Kubernetes in Action, Second Edition MEAP V15 정리중
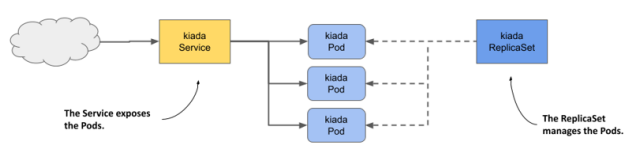
Service object
Kubernetes에서는 Service object를 사용하여 pod을 여러개 복제하고, 유저가 여러 pod들을 하나의 IP로 연결하도록 통합시킨다. 또한 여러 pod들이 Flat network이라는 공간에서 서로 통신한다.
apiVersion: v1
kind: Service
metadata:
  name: my-service
spec:
  selector:
    app.kubernetes.io/name: MyApp
  ports:
    - protocol: TCP
      port: 80
      targetPort: 9376
Workload Management API
Replicaset
Pod의 복제본 수를 지정해놓고, pod가 종료되면 그만큼의 pod을 새로 할당해주고 pod이 너무 많아지면 pod을 죽여서 개수를 유지한다.
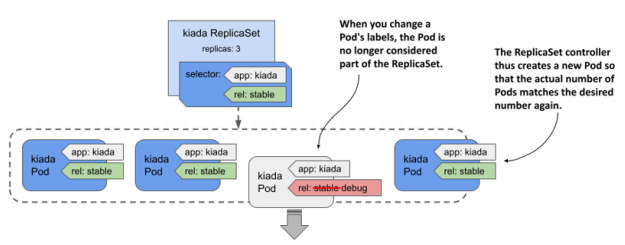
각 pod마다 label을 두고 replicaset object에는 label selector를 두어 자기 관할인 pod만 지정할 수 있다. 또한 pod은 해당 replicaset이 소유한 것으로 취급된다.
다음과 같이 선언한다.
// rs.kiada.yaml

apiVersion: apps/v1
kind: ReplicaSet
metadata:
  name: frontend
  labels:
    app: guestbook
    tier: frontend
spec:
  # 케이스에 따라 레플리카를 수정한다.
  replicas: 3
  selector:
    matchLabels:
      tier: frontend
  template:
    metadata:
      labels:
        tier: frontend
    spec:
      containers:
      - name: php-redis
        image: gcr.io/google_samples/gb-frontend:v3
replicaset controller
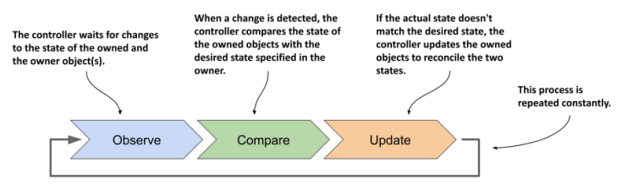
replicaset과 그 아래 있는 pod을 관리하며, 관리 객체들의 state의 변경시 알맞게 조절해준다.
예를 들어 pod이 종료되어 명세된 개수보다 적어지면 pod을 다시 생성한다.
다음과 같이 replica의 수를 늘리거나 줄일 수 있다.
$ kubectl scale rs kiada --replicas 6
replicaset.apps/kiada scaled
replica의 수를 줄일 경우 가장 지워도 되는 pod부터 선택해서 제거한다.
pod의 label을 바꾸면 해당 replicaset controller의 통제를 벗어날 수 있다.
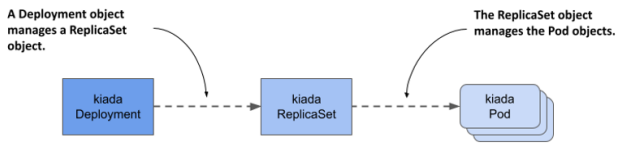
Deployment
application의 desired state를 정의하여 상태를 조절한다. 선언시에 replicaSet을 이용하여 pod의 개수를 정의할 수 있다.
다음과 같이 선언할 수 있다.
// deploy.kiada.yaml

apiVersion: apps/v1
kind: Deployment
metadata:
  name: nginx-deployment
  labels:
    app: nginx
spec:
  replicas: 3
  selector:
    matchLabels:
      app: nginx
  template:
    metadata:
      labels:
        app: nginx
    spec:
      containers:
      - name: nginx
        image: nginx:1.14.2
        ports:
        - containerPort: 80
 ...
pod updating in deployment
pod을 update할 때, deployment object에서는 rolling update라는 것을 지원한다.
pod을 모두 한번에 멈춰버리면 서버가 다운되므로, pod을 천천히 하나씩 종료하고 업데이트한다.

다음과 같이 선언할 수 있다.
apiVersion: apps/v1
kind: Deployment
metadata:
name: nginx
spec:
strategy:
type: RollingUpdate
rollingUpdate:
maxSurge: 0
maxUnavailable: 1
minReadySeconds: 10
replicas: 3
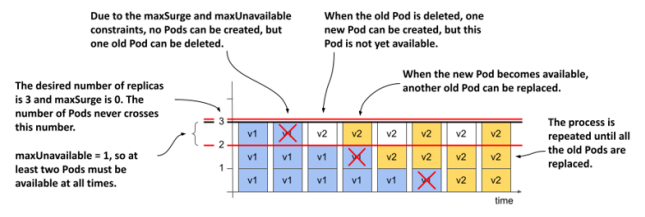
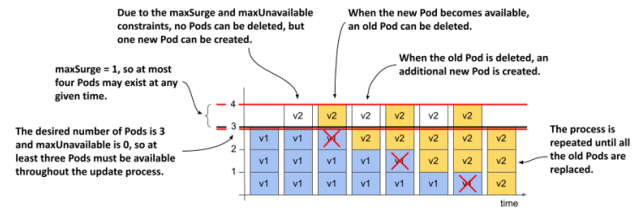
selector:maxSurge, maxUnavailable 두 필드가 중요하다.
maxSurge: update중 원래 size를 초과하여 pod를 생성할 수 있는 최대 개수
maxUnavailable: update중 실행 가능하지 않은 pod의 최대 개수
maxSurge: 0, maxUnavailable: 1
maxSurge: 1, maxUnavailable: 0
그 외에도 여러 update strategy도 있는데 간단한 설명은 다음과 같다. 더 궁금하면 나중에 찾아보자.
Recreate: service의 일시적인 중단을 무시하고 pod을 모두 동시에 업데이트한다.
Canary: 적은 수의 canary pod만 남겨두고 모두 동시에 업데이트한다.
A/B testing: 두 종류의 deployment를 만들고, Ingress object를 만들어 유저 특징별로 어떤 deployment에 들어갈 것인지 결정하고 redirect한다.
Blue/Green: 기존에 pod들(blue label)로 서비스하면서 새로운 pod들(green label)을 만든다. 다 완성되면 선택하는 label을 바꿔서 새로운 pod들로 연결한다.
Shadowing: 새 버전이 정상적으로 작동할지 확신이 없을 때, 새 버전을 먼저 만들어 놓고 Ingress object를 만들어 traffic을 기존 버전과 새 버전에게 모두 전달한다. 새 버전의 결과는 test용도로만 쓰고 버린다.
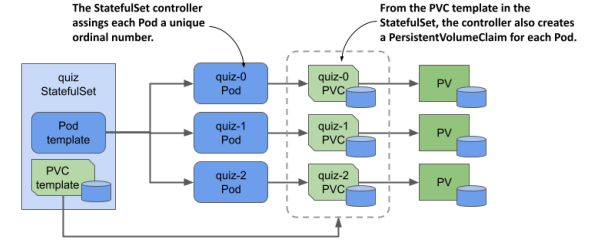
StatefulSet
상태를 저장해야 하는 application(ex. DB)를 배포하기 위해 존재한다.
Statefulset은 각 pod마다 지정된 ID와 Persistent Volume, 그리고 안정적인 IP address를 가진다.
즉 pod의 순서와 고유성을 보장한다.
다음과 같이 선언할 수 있다.
apiVersion: apps/v1
kind: StatefulSet
metadata:
  name: web
spec:
  selector:
    matchLabels:
      app: nginx # .spec.template.metadata.labels 와 일치해야 한다
  serviceName: "nginx"
  replicas: 3 # 기본값은 1
  minReadySeconds: 10 # 기본값은 0
  template:
    metadata:
      labels:
        app: nginx # .spec.selector.matchLabels 와 일치해야 한다
    spec:
      terminationGracePeriodSeconds: 10
      containers:
      - name: nginx
        image: registry.k8s.io/nginx-slim:0.8
        ports:
        - containerPort: 80
          name: web
        volumeMounts:
        - name: www
          mountPath: /usr/share/nginx/html
  volumeClaimTemplates:
  - metadata:
      name: www
    spec:
      accessModes: [ "ReadWriteOnce" ]
      storageClassName: "my-storage-class"
      resources:
        requests:
          storage: 1Gi
StatefulSet의 세부기능은 나중에 추가로 봐야겠다...
DaemonSet
K8s의 모든 worker node에서 단 하나의 해당 pod을 실행하도록 한다.
system 레벨의 서비스를 제공하는 application(ex. 로그, device plugin)에 주로 사용한다. 예를 들어서 Kube proxy component는 kube-system namespace를 가지고 DaemonSet으로 배포된다.
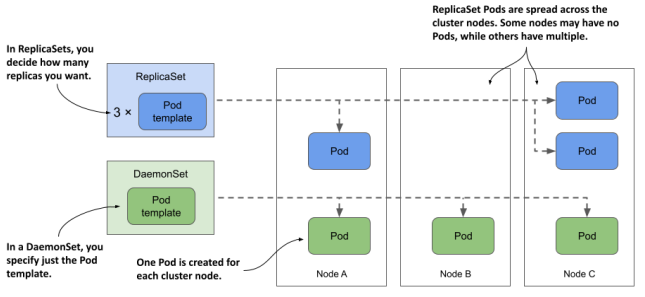
또는 node selecter를 통해 꼭 모든 node가 아니라 특정 조건을 만족하는 node에만 pod을 scheduling할 수 있다.
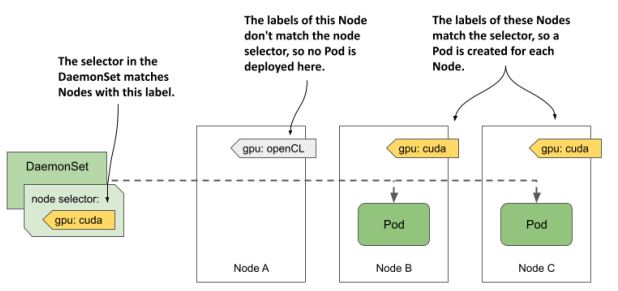
node selecter는 이렇게 정의할 수 있다.
apiVersion: apps/v1
kind: DaemonSet
metadata:
   name: demo
   labels:
     app: demo
spec:
   selector:
     matchLabels:
       app: demo
   template:
     metadata:
       labels:
         app: demo
     spec:
       nodeSelector:
         gpu: cuda
       containers:
       - name: demo
         image: busybox
         command:
         - sleep
         - infinity
해당하는 node에는 다음과 같이 선언한다.
$ kubectl label node kind-worker2 gpu=cudaDaemonSet 또한 label selector를 가지고 label에 맞는 pod만 관리한다.
DaemonSet의 선언은 다음과 같다.
apiVersion: apps/v1
kind: DaemonSet
metadata:
 	name: demo
spec:
   selector:
     matchLabels:
     	app: demo
   template:
     metadata:
       labels:
       	 app: demo
     spec:
       containers:
       - name: demo
       	 image: busybox
       	 command:
       	 - sleep
       	 - infinity
DaemonSet은 status를 가지고 있는데, 확인하려면 다음과 같다. 각 status가 의미하는 것은 너무 자명하므로 생략한다.
$ kubectl get ds demo -o yaml
...
status:
 currentNumberScheduled: 2
 desiredNumberScheduled: 2
 numberAvailable: 2
 numberMisscheduled: 0
 numberReady: 2
 updatedNumberScheduled: 2
DaemonSet만의 기능
container에게 system상의(OS kernel) 접근 권한이나 node의 filesystem이나 network등의 접근 권한을 받을 수 있다.
DaemonSet pod과의 통신
apiVersion: apps/v1
kind: DaemonSet
metadata:
 name: node-agent
 ...
spec:
 template:
   spec:
     containers:
     - name: node-agent
       image: luksa/node-agent:0.1
       args:
       - --listen-address
       - :80
       ...
       ports:
       - name: http
         containerPort: 80
         hostPort: 11559
이렇게 하면 각 node의 pod에서는 port 11559로 접근시 port 80에서 듣고 있는 DaemonSet pod으로 전해진다.
이것도 자세한건 나중에...
Job, CronJob
Job은 특수한 작업을 진행하는 동안만 pod을 유지시키고 이후에 pod을 종료하는 리소스이다.
CronJob은 주기적으로 Job을 실행시키는 리소스로, 주로 n분 단위 시스템 감시 & 자동 업데이트 등에 사용된다.
