Kubernetes에는 taint, tolerence, affinity 등으로 구성된 기본적인 스케줄러가 존재한다. 여기
이 기본 스케줄러 대신 추가적인 기능들을 구현한 Custom scheduler를 만들어 볼 수 있다.
기본 Scheduler의 작동방식
Scheduler가 pod을 배치하는 것은 크게 Scheduling cycle, Binding cycle로 나뉜다. cycle 안의 각각의 단계들은 plugin에 의해 동작한다.
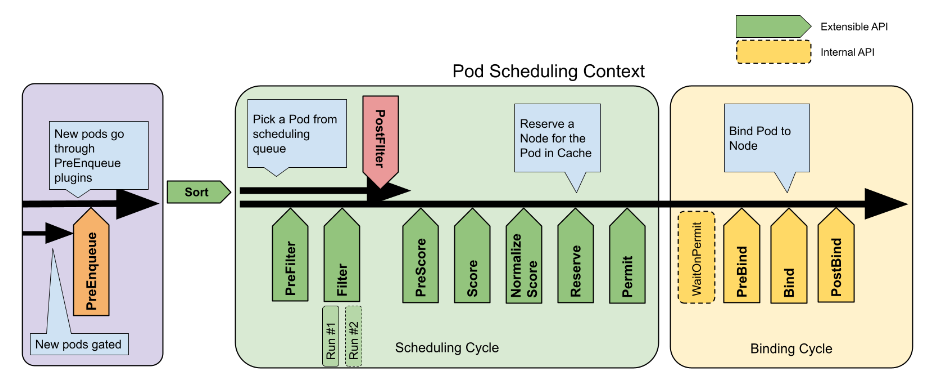
PreEnqueue
scheduling되려는 pod이 가장 처음 들어오는 queue이다. 안에 있는 모든 PreEnqueue Plugin이 Success를 return하면 pod들이 active queue로 들어가기 시작한다.
Scheduling cycle
pod에 적합한 node를 선택하는 과정이다. 기본적으로 아래의 순서대로 진행된다.
PreFilter
pod에 대한 정보를 전처리하거나, pod이 만족해야 하는 필수사항을 체크한다. 만족하지 못하면 pod을 unscheduled로 만든다.
Filter
여러 개의 filter를 통해 pod에 적합하지 않은 node를 제거한다. Taint와 Tolerence가 여기서 적용된다. node가 모두 filter를 통과하지 않으면 postFilter 단계로 넘어간다.
PostFilter
pod이 실행 가능한 node가 모두 filtering되었을 때 pod pre-emption등의 작업을 거쳐 node가 조건을 만족하도록 바꿔준다. 이래도 해결되지 않을 경우 pod을 unscheduled로 만든다.
Score
filtering되지 않은 node들에 대해 적합도를 매긴다. NodeAffinity가 여기서 적용된다. 적합도는 여러 기준을 사용할 수 있다. 그 후 적합도가 가장 높은 node를 선택한다.
Reserve
race condition등을 방지하기 위해 pod에서 필요한 resource들을 예약해 둔다.
Permit
Binding cycle에 들어가기 전에 대기할 수 있다.
Binding cycle
pod를 실제로 node에 바인딩하는 단계이다.
Custom scheduler
기본 scheduler에서 기본적으로 제공하는 plugin들은 여기. 여기서 몇 가지의 plugin제거하거나 custom plugin을 추가해서 custom scheduler를 만들 수 있다.
예를 들어 Scoring 단계에서 custom plugin을 적용해 custom resource에 대한 가중치를 추가할 수 있다.
적용하는 법
다음과 같이 Custom Plugin을 만들 수 있다.
type Plugin interface {
    Name() string
}

type QueueSortPlugin interface {
    Plugin
    Less(*v1.pod, *v1.pod) bool
}

type PreFilterPlugin interface {
    Plugin
    PreFilter(context.Context, *framework.CycleState, *v1.pod) error
}
Custom Plugin 또는 Kubernetes에서 배포하는 확장 플러그인을 적용하려면 다음의 yaml 파일을 작성하면 된다.
예시에서는 score 단계에서 사용할 plugin중 PodTopologySpread plugin을 비활성화하고 custom plugin A, B를 추가하였다.
apiVersion: kubescheduler.config.k8s.io/v1
kind: KubeSchedulerConfiguration
profiles:
  - plugins:
      score:
        disabled:
        - name: PodTopologySpread
        enabled:
        - name: MyCustomPluginA
          weight: 2
        - name: MyCustomPluginB
          weight: 1
또는 다음과 같이 하면 MyPlugin이 적용 가능한 익스텐션 포인트들에 한번에 적용된다.
apiVersion: kubescheduler.config.k8s.io/v1
kind: KubeSchedulerConfiguration
profiles:
  - schedulerName: non-multipoint-scheduler
    plugins:
      multiPoint:
        enabled:
        - name: 'MyPlugin'
      preScore:
        disabled:
        - name: '*'
      score:
        disabled:
        - name: '*'
이렇게 만들어진 custom scheduler와 기본 scheduler를 같이 사용하고 싶다면 다음과 같이 한다.
apiVersion: kubescheduler.config.k8s.io/v1
kind: KubeSchedulerConfiguration
profiles:
  - schedulerName: default-scheduler
  - schedulerName: no-scoring-scheduler
    plugins:
      preScore:
        disabled:
        - name: '*'
      score:
        disabled:
        - name: '*'
출처
https://kubernetes.io/docs/concepts/scheduling-eviction/scheduling-framework/
