Executor란?
airflow가 일을 처리하는 방식은 여러가지이다.
그러한 작업방식을 결정짓는 것이 바로 executor이다.
구체적으로 아래와 같은 dag가 있다고 가정해보자.
task1 >> [task2, task3] >> task4
위의 작업을 수행하기 위해서는 여러가지 방법론이 있을 것이다.
제일 먼저 떠오르는 것은 그냥 일들을 task1 > task2 > task3 > task 4 이렇게 진행할 수 있을 것 같다.
두번째로 떠오르는 것은 task2, task3가 서로 의존관계에 있지 않다면 병렬적으로 동작될 수 있지 않을까? 라는 생각이 떠오를 수 있다.
구체적으로 task1이 수행되고, task2 or task3가 병렬적으로 수행이 되고, 위의 task들이 마무리 되면 task4가 수행이 되는 것이다.
처음의 방법에 비해서 리소스는 많이 사용하지만 시간적인 측면에서 이득이 발생할 것이다.
이처럼 airflow에게 어떻게 작업을 수행할지 방법론을 지정해주는 것이 executor라고 볼 수 있다.
sequential executor
airflow 에서 defalut로 지정해준 executor이다. 해당 작업 방식은 제목 그대로 순차적으로 dag를 실행시키는 방식으로 동작시킨다.병렬적으로 수행 가능한 것들도 순차적으로 진행이 되기때문에 느리다. 따라서 test 단계에서만 사용이 권장이 된다.
참고할 사항!!
sqlite sequential 때만 사용이 가능하다!!! 병렬 프로세스 적용 불가.
airflow config get-value core sql_alchemy_conn를 통해 어떤 db와 연동이 되어 있는지 확인해보자.

airflow.db와 연동이 되어 있으며, sqlite로 적용이 되어 있다.
airflow config get-value core executor 입력해보면 지정된 executor를 확인할 수 있다.

default인 sequential executor로 설정되어 있다.
sequential executor 의 순서를 확인하려면 shell 의 sleep을 이용하면 눈으로 확인하면서 진행할 수 있다.
아래와 같이 dag를 작성한 후 web ui에서 각 노드별로 초록불이 순차적으로 들어오는 것을 확인이 가능하다.
from airflow import DAG
from datetime import datetime
from airflow.operators.bash import BashOperator

default_args = {
    'start_date': datetime(2022, 1, 1)
}

with DAG('parallel_dag',
    default_args=default_args,
    schedule_interval="@daily",
    catchup=False) as dag:

    task1 = BashOperator(
        task_id='task_1',
        bash_command='sleep 3'
    )

    task2 = BashOperator(
        task_id='task_2',
        bash_command='sleep 3'
    )

    task3 = BashOperator(
        task_id='task_3',
        bash_command='sleep 3'
    )

    task4 = BashOperator(
        task_id='task_4',
        bash_command='sleep 3'
    )


    task1 >> [task2, task3] >> task4
간트차트로 확인하면 아래와 같다.

parallel 하게 task들을 수행하게 만들기!!
우리는 순차적으로 진행하는 것이 아니라, 동시에 수행할 수 있는 것은 동시다발적으로 수행하기를 원한다. 따라서 우리는 2가지를 바꿔줘야 한다.
database change
데이터 베이스를 sqlite가 아닌 postgreSQL로 바꿔줘야 한다.executor change
sequential executor 가 아닌 local celery kubernetes executor등으로 바꿔줘야 한다.
먼저 postgresql을 설치하자.
sudo apt update > sudo apt install postgresql > sudo -u postgres psql

postgresql에 접속후 DB user의 password를 바꿔주자.
ALTER USER postgres PASSWORD 'postgres' 정상적으로 바뀌었으면 \q를 입력해 빠져나오자.

pip install 'apache-airflow[postgres]' 을 통해 postgresql 라이브러리를 하나 설치해주자.
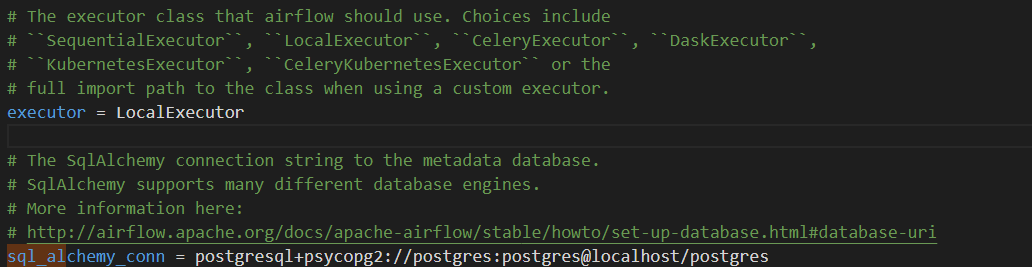
airflow.cfg 파일에서 sql_alchemy_conn 에 할당된 값을 postgresql+psycopg2://postgres:postgres@localhost/postgres 로 바꿔주자.
executor도 SquencialExecutor에서 LocalExecutor 로 바꿔주자.
airflow db check 를 하면 정상적으로 postgresql를 기반으로 한 airflow.db를 만들 수 있게되었다.

airflow db init 을 통해 db를 만들어주자.
그리고 user를 아래와 같이 생성해주자.
airflow users create -u admin -p admin -r Admin -f hyunwoo -l Oh -e admin@gmail.com
이제 웹서버와 스케듈러를 실행시키면 된다.
우리가 이제 뭘 했는지 확인을 좀 해보자!!!

위의 사진을 보면 이제 뭐가 다른지 감이 확 올 것이다. 
참고