추가할 gradle 코드
    // https://mvnrepository.com/artifact/javax.servlet.jsp/javax.servlet.jsp-api
    compileOnly 'javax.servlet.jsp:javax.servlet.jsp-api:2.3.3'


    // https://mvnrepository.com/artifact/javax.servlet/jstl
    implementation 'javax.servlet:jstl:1.2'
jspChap11
쿠키
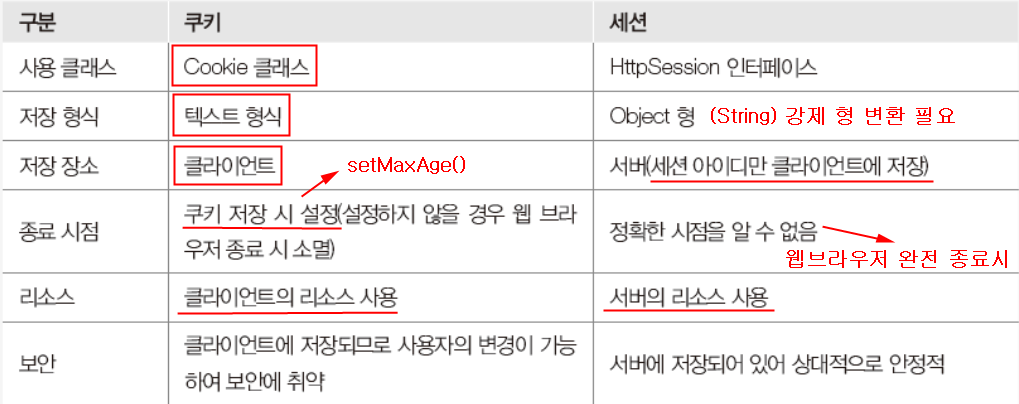
세션은 서버에 저장되고, 쿠키는 내 컴퓨터(클라이언트)에 저장됨
쿠키의 동작 과정
-
쿠키 생성 단계 : 주로 웹 서버 측에서 생성. 생성된 쿠키는 응답 데이터에 함
께 저장되어 웹 브라우저에 전송됨 -
쿠키 저장 단계 : 웹 브라우저는 응답 데이터에 포함된 쿠키를 쿠키 저장소에
보관. 쿠키는 종류에 따라 메모리나 파일로 저장됨 -
쿠키 전송 단계 : 웹 브라우저는 한 번 저장된 쿠키를 요청이 있을 때마다 웹
서버에 전송. 웹 서버는 웹 브라우저가 전송한 쿠키를 사용하여 필요한 작업
을 수행할 수 있음.
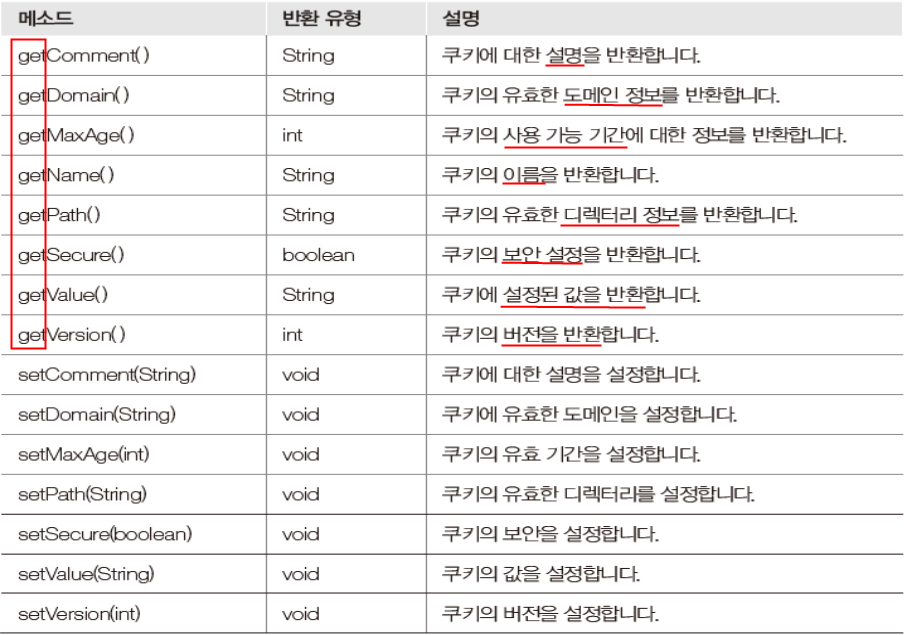
Cookie 클래스의 메소드 종류
주의! 쿠키는 remove가 없음. setmaxAge()를 0으로 만들면 삭제가 됨
쿠키와 세션의 차이
쿠키 생성
-
Cookie( )메소드를 사용
Cookie cookie = new Cookie(String name, String value)
첫 번째 매개변수 name은 쿠키를 식별하기 위한 이름
두 번째 매개변수 value는 쿠키 값 -
쿠키를 생성한 후에는 반드시 response 내장 객체의
addCookie( )메소드로 쿠키를 설정해야 함 -
사용 예
Cookie cookie = new Cookie("userId", "admin");
response.addCookie(cookie);
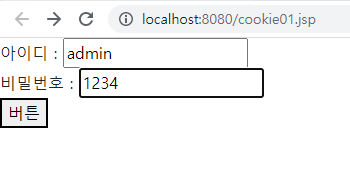
쿠키 생성 예제 1
- cookie01.jsp
<%@ page contentType="text/html;charset=UTF-8" language="java" pageEncoding="UTF-8" %>
<!DOCTYPE html>
<html>
<head>
<title>쿠키 사용하기</title>
</head>
<body>
<form action="cookie01_process.jsp" method="post">
<label for="user-id">아이디 : </label>
<input type="text" id="user-id" name="userId" placeholder="아이디를 입력해주세요"><br>
<label for="user-pw">비밀번호 : </label>
<input type="text" id="user-pw" name="userPw" placeholder="비밀번호를 입력해주세요"><br>
<button type="submit">버튼</button>
</form>
</body>
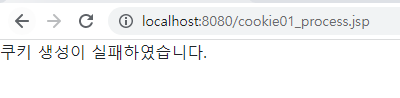
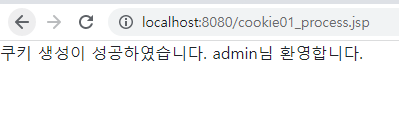
</html>- cookie01_process.jsp
<%@ page contentType="text/html;charset=UTF-8" language="java" pageEncoding="UTF-8" %>
<!DOCTYPE html>
<html>
<head>
    <title>쿠키 사용하기</title>
</head>
<body>
<%
  String userId = request.getParameter("userId");
  String userPw = request.getParameter("userPw");

  if (userId.equals("admin") && userPw.equals("1234")) {
    Cookie cookieId = new Cookie("userId", userId);
    Cookie cookiePw = new Cookie("userPw", userPw);

//쿠키를 생성한 후에는 반드시 response 내장 객체의 `addCookie( )` 메소드로 쿠키를 설정해야 함
    response.addCookie(cookieId);
    response.addCookie(cookiePw);

    out.println("쿠키 생성이 성공하였습니다.");
    out.println(userId + "님 환영합니다.");
  }
  else {
      out.println("쿠키 생성이 실패하였습니다.");
  }
%>
</body>
</html>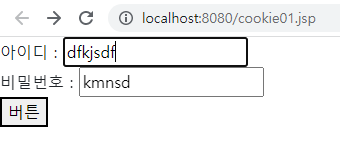
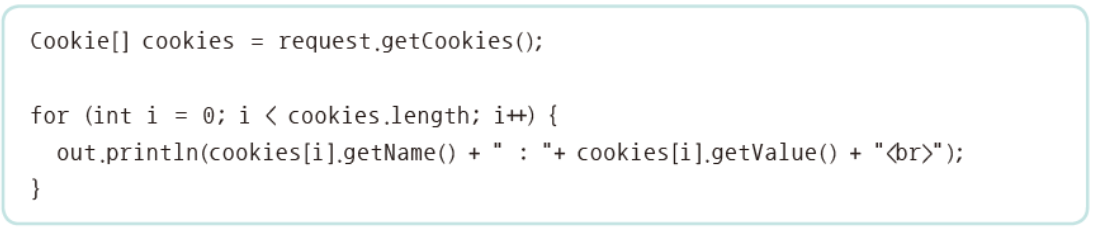
쿠키 객체 얻기
- 클라이언트에 저장된 모든 쿠키 객체를 가져오려면 request 내장 객체의
getCookies( )메소드를 사용
Cookie[] requset.getCookies() - 쿠키 객체가 여러 개일 때는 배열 형태로 가져옴
- 사용 예 :

쿠키 객체의 정보 얻기
- 쿠키 객체를 얻어왔다면 이 쿠키 객체에 저장된 쿠키 이름과 값을 가져오기 위해
getName( ),getValue( )메소드를 사용
String getName( )/String getValue( ) - 사용 예
쿠키 사용 예제 2
cookie02.jsp
<%@ page contentType="text/html;charset=UTF-8" language="java" pageEncoding="UTF-8" %>
<!DOCTYPE html>
<html>
<head>
    <title>쿠키 사용하기</title>
</head>
<body>
<%
    Cookie[] cookies = request.getCookies();
    out.println("현재 설정된 쿠키의 개수 => " + cookies.length + "<br>");
    out.println("==================================================<br>");

    for (int i = 0; i < cookies.length; i++) {
        out.println("설정된 쿠키의 속성 이름 [" + i + "] : " + cookies[i].getName() + "<br>");
        out.println("설정된 쿠키의 속성 값 [" + i + "] : " + cookies[i].getValue() + "<br>");
        out.println("==================================================<br>");
    }
%>
</body>
</html>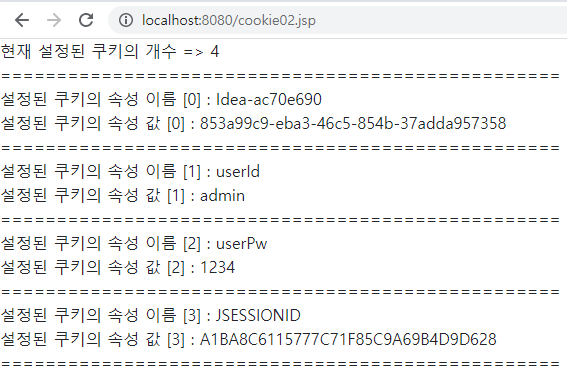
쿠키 삭제
- 쿠키의 유효 기간을 결정하는 setMaxAge( ) 메소드에 유효 기간을 0으로 설정하여 쿠키를 삭제할 수 있음
setMaxAge( )메소드의 형식
void setMaxAge(int age)- 사용 예

쿠키 삭제 예제 1
cookie01.jsp
<%@ page contentType="text/html;charset=UTF-8" language="java" pageEncoding="UTF-8" %>
<!DOCTYPE html>
<html>
<head>
    <title>쿠키 사용하기</title>
</head>
<body>
<form action="cookie01_process.jsp" method="post">
    <label for="user-id">아이디 : </label>
    <input type="text" id="user-id" name="userId" placeholder="아이디를 입력해주세요"><br>
    <label for="user-pw">비밀번호 : </label>
    <input type="text" id="user-pw" name="userPw" placeholder="비밀번호를 입력해주세요"><br>
    <button type="submit">버튼</button>
</form>

<a href="cookie01.jsp">쿠키 생성</a>
<a href="cookie02.jsp">쿠키 확인</a>
<a href="cookie03.jsp">쿠키 삭제</a>
</body>
</html>
cookie01_process.jsp
<%@ page contentType="text/html;charset=UTF-8" language="java" pageEncoding="UTF-8" %>
<!DOCTYPE html>
<html>
<head>
    <title>쿠키 사용하기</title>
</head>
<body>
<%
  String userId = request.getParameter("userId");
  String userPw = request.getParameter("userPw");

  if (userId.equals("admin") && userPw.equals("1234")) {
    Cookie cookieId = new Cookie("userId", userId);
    Cookie cookiePw = new Cookie("userPw", userPw);

//쿠키를 생성한 후에는 반드시 response 내장 객체의 `addCookie( )` 메소드로 쿠키를 설정해야 함
    response.addCookie(cookieId);
    response.addCookie(cookiePw);

    out.println("쿠키 생성이 성공하였습니다.");
    out.println(userId + "님 환영합니다.");
  }
  else {
      out.println("쿠키 생성이 실패하였습니다.");
  }
%>

<a href="cookie01.jsp">쿠키 생성</a>
<a href="cookie02.jsp">쿠키 확인</a>
<a href="cookie03.jsp">쿠키 삭제</a>
</body>
</html>
cookie02.jsp
<%@ page contentType="text/html;charset=UTF-8" language="java" pageEncoding="UTF-8" %>
<!DOCTYPE html>
<html>
<head>
    <title>쿠키 사용하기</title>
</head>
<body>
<%
    Cookie[] cookies = request.getCookies();
    out.println("현재 설정된 쿠키의 개수 => " + cookies.length + "<br>");
    out.println("==================================================<br>");

    for (int i = 0; i < cookies.length; i++) {
        out.println("설정된 쿠키의 속성 이름 [" + i + "] : " + cookies[i].getName() + "<br>");
        out.println("설정된 쿠키의 속성 값 [" + i + "] : " + cookies[i].getValue() + "<br>");
        out.println("==================================================<br>");
    }
%>
<a href="cookie01.jsp">쿠키 생성</a>
<a href="cookie02.jsp">쿠키 확인</a>
<a href="cookie03.jsp">쿠키 삭제</a>
</body>
</html>
cookie03.jsp
<%@ page contentType="text/html;charset=UTF-8" language="java" pageEncoding="UTF-8" %>
<!DOCTYPE html>
<html>
<head>
    <title>쿠키 사용하기</title>
</head>
<body>
<%
  Cookie[] cookies = request.getCookies();

    // JSESSIONID 빼고 다 삭제해라
  for (int i = 0; i < cookies.length; i++) {
      if (!cookies[i].getName().equals("JSESSIONID")) {
          cookies[i].setMaxAge(0);
          response.addCookie(cookies[i]);
      }
  }
  response.sendRedirect("cookie02.jsp");
%>
<a href="cookie01.jsp">쿠키 생성</a>
<a href="cookie02.jsp">쿠키 확인</a>
<a href="cookie03.jsp">쿠키 삭제</a>

</body>
</html>
jspChap12.project
웹 프로그래밍 라이브러리
https://commons.apache.org/
빌드 시스템을 사용하지 않을때는 다운로드 받아서 프로젝트 폴더 내에 넣어야 하지만
빌드시스템 사용시에는 메이븐 레파지토리에서 해당 파일 찾아서 링크 -> build.gradle에 복붙
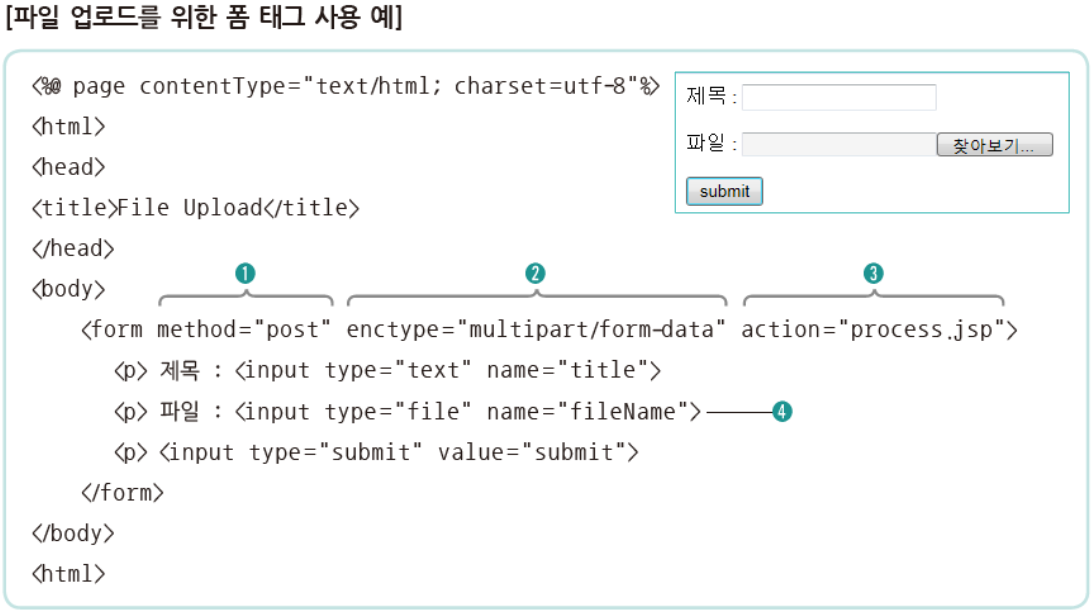
파일 업로드
웹 브라우저에서 서버로 파일을 전송하기 위해서는 JSP페이지에 폼 태그 사용
웹 브라우저에서 서버로 파일을 전송하여 서버에 저장하는 것이며, 전송되는 파일을 서버에 저장하기 위해 오픈 라이브러리 사용해야함
파일 업로드를 위한 JSP 페이지 만들기
웹 브라우저에서 서버로 파일을 전송하기 위해 JSP 페이지에 폼 태그를 작성할 때 몇 가지 중요한 규칙
-

-
form 태그의 method 속성은 반드시 POST 방식으로 설정
-
form 태그의 enctype 속성은 반드시 multipart/form-data로 설정
-
form 태그의 action 속성은 파일 업로드를 처리할 JSP 파일로 설정
-
파일 업로드를 위해 input 태그의 type 속성을 file로 설정
-
만약 여러 파일을 업로드하려면 2개 이상의 input 태그를 사용하고 name 속성에 서로 다른 값을 설정
파일 업로드 처리
- 단순한 자바 코드로 작성하여 처리할 수 없어 오픈 라이브러리인 cos.jar나 commonsfileupload.jar를 사용해야 함
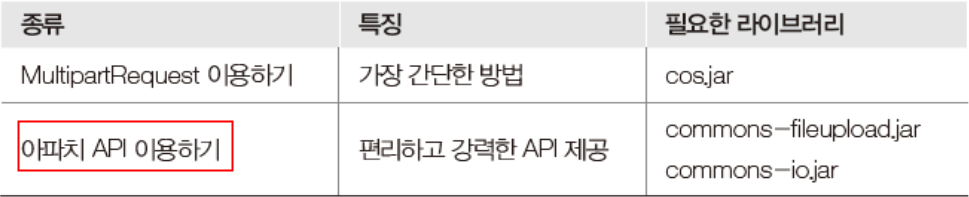
Commons-FileUpload를 이용한 파일 업로드
Commons-FileUpload
- 파일 업로드 패키지
- 서버의 메모리상에서 파일 처리가 가능하도록 지원
- 오픈 라이브러리 commons-fileupload.jar, commons-io.jar 파일을 배포 사이트에서 직접 다운로드해서 사용
- 배포 사이트: http://commons.apache.org/downloads/
- 다운로드 파일: commons-fileupload-1.3.3-bin.zip, commons-io-2.6-bin.zip
- JSP 페이지에 page 디렉티브 태그의 import 속성을 사용하여 패키지 org.apache.commons.fileupload.*를 설정
- 메이븐레파지토리에서 다운받아 build.gradle 에 복붙해줘도 됨
    // Apache Common IO
    // https://mvnrepository.com/artifact/commons-io/commons-io
    implementation 'commons-io:commons-io:2.11.0'

    // Apache Commons FileUpload
    // https://mvnrepository.com/artifact/commons-fileupload/commons-fileupload
implementation 'commons-fileupload:commons-fileupload:1.4'-
DiskFileUpload 클래스의 메소드

-
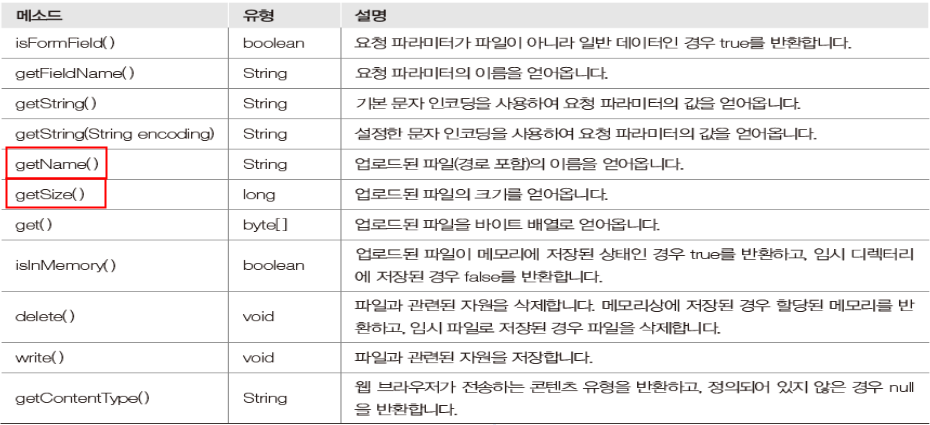
FileItem 클래스의 메소드
파일 업로드 예제
fileUpload01.jsp
<%@ page contentType="text/html;charset=UTF-8" language="java" pageEncoding="UTF-8" %>
<!DOCTYPE html>
<html>
<head>
    <title>파일 사용하기</title>
</head>
<body>
<form action="fileUpload01_process.jsp" method="post" enctype="multipart/form-data">
  <label for="file">파일 : </label>
  <input type="file" id="file" name="fileName">
  <button type="submit">파일 업로드</button>
</form>
</body>
</html>
fileUpload01_process.jsp
<%--<%@ page import="org.apache.commons.fileupload.DiskFileUpload" %>--%>
<%--<%@ page import="java.util.List" %>--%>
<%@ page contentType="text/html;charset=UTF-8" language="java" pageEncoding="UTF-8" %>
<%-- 고정 추가 하기 --%>
<%@ page import="org.apache.commons.fileupload.*" %>
<%@ page import="java.util.*" %>
<%@ page import="java.io.*" %>
<%-- 3개 추가 끝 --%>
<!DOCTYPE html>
<html>
<head>
    <title>파일 사용하기</title>
</head>
<body>
<%
    request.setCharacterEncoding("UTF-8");
    String fileUploadPath = "C:\\java505git\\upload";

    DiskFileUpload upload = new DiskFileUpload();
//    alt + Enter => 클래스 가져오기 (java.util)
    List items = upload.parseRequest(request);
//    반복 가능한 객체로 생성
    Iterator params = items.iterator();

//    hasNext() : 다음 데이터가 존재하는지 확인
    while (params.hasNext()) {
//        next() : 다음 데이터를 가져옴
        FileItem fileItem = (FileItem) params.next();

//        FormField가 맞는지 확인
        if (!fileItem.isFormField()) {
//            FormField가 아니라면 file 객체가 가지고있는 이름 가져옴
            String fileName = fileItem.getName();
//            lastIndexOf : 가장 마지막에 나온 \\ 의 인덱스번호 추출
            fileName = fileName.substring(fileName.lastIndexOf("\\") + 1);
//            저장할경로 + / + 파일이름
            File file = new File(fileUploadPath + "/" + fileName);
//            실제 파일 저장
            fileItem.write(file);
        }
    }
%>
</body>
</html>
파일 업로드 예제 2
fileUpload02.jsp
<%@ page contentType="text/html;charset=UTF-8" language="java" pageEncoding="UTF-8" %>
<!DOCTYPE html>
<html>
<head>
    <title>파일업로드</title>
</head>
<body>
<form action="fileUpload02_process.jsp" method="post" enctype="multipart/form-data">
  <label for="user-name">이름 : </label>
  <input type="text" id="user-name" name="userName"><br>
  <label for="subject">제목 : </label>
  <input type="text" id="subject" name="subject"><br>
  <label for="file">파일 : </label>
  <input type="file" id="file" name="file"><br>
  <button type="submit">파일 업로드</button>
</form>
</body>
</html>
fileUpload02_process.jsp
<%--<%@ page import="org.apache.commons.fileupload.FileItem" %>--%>
<%@ page contentType="text/html;charset=UTF-8" language="java" pageEncoding="UTF-8" %>
<%@ page import="org.apache.commons.fileupload.*" %>
<%@ page import="java.util.*" %>
<%@ page import="java.io.*" %>
<!DOCTYPE html>
<html>
<head>
    <title>파일 업로드 process</title>
</head>
<body>
<%
  String path = "C:\\java505git\\upload";

  DiskFileUpload upload = new DiskFileUpload();

  upload.setFileSizeMax(1000000);
  upload.setSizeThreshold(4096);
  upload.setRepositoryPath(path);

  List items = upload.parseRequest(request);
  Iterator params = items.iterator();

  while (params.hasNext()) {
    FileItem item = (FileItem) params.next();

//    사용자 입력을 받는 input 타입인지 파일인지 확인
    if (item.isFormField()) {
//      input 태그일 경우 사용자 입력 정보 가져오기
      String name = item.getFieldName();
      String value = item.getString("utf-8");
      out.println(name + "=" + value + "<br>");
    }
    else {
//      파일일 경우 파일 정보 가져오기
      String fileFieldName = item.getFieldName();
//      파일명 가져오기
      String fileName = item.getName();
//      파일 타입 가져오기
      String contentType = item.getContentType();

      fileName = fileName.substring(fileName.lastIndexOf("\\") + 1);
//      파일 크기 가져오기
      long fileSize = item.getSize();

      File file = new File(path + "/" + fileName);
      item.write(file);

      out.println("-----------------------------------------<br>");
      out.println("요청 파라미터 이름 : " + fileFieldName + "<br>");
      out.println("저장 파일 이름 : " + fileName + "<br>");
      out.println("파일 콘텐츠 유형 : " + contentType + "<br>");
      out.println("파일 크기 : " + fileSize);

    }
  }
%>
</body>
</html>
JDBC로 데이터베이스와 JSP 연동
MySQL WorkBench 사용
콘솔창으로 접속하기
mysql 서버로 접속(동작중인지 확인)
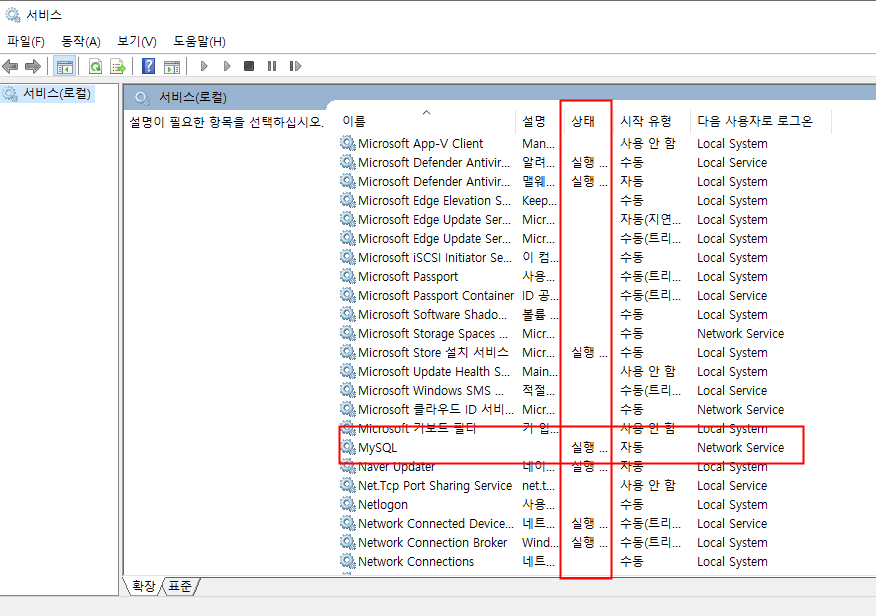
동작중인것 확인 완료
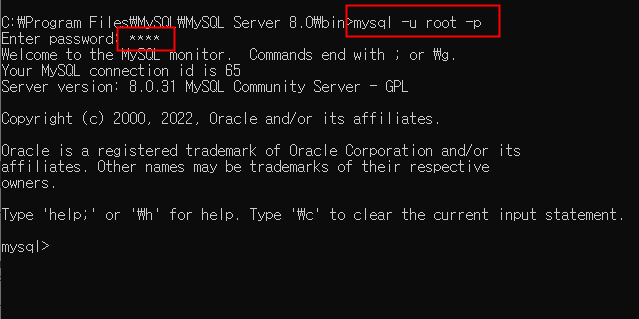
cmd -> cd C:\Program Files\MySQL\MySQL Server 8.0\bin (mysql 경로)


mysql -u root -p 엔터 -> 패스워드 1234 입력
show databases;
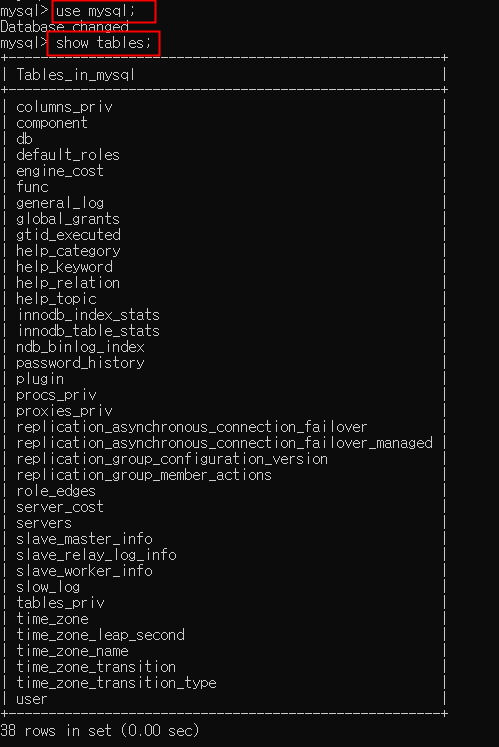
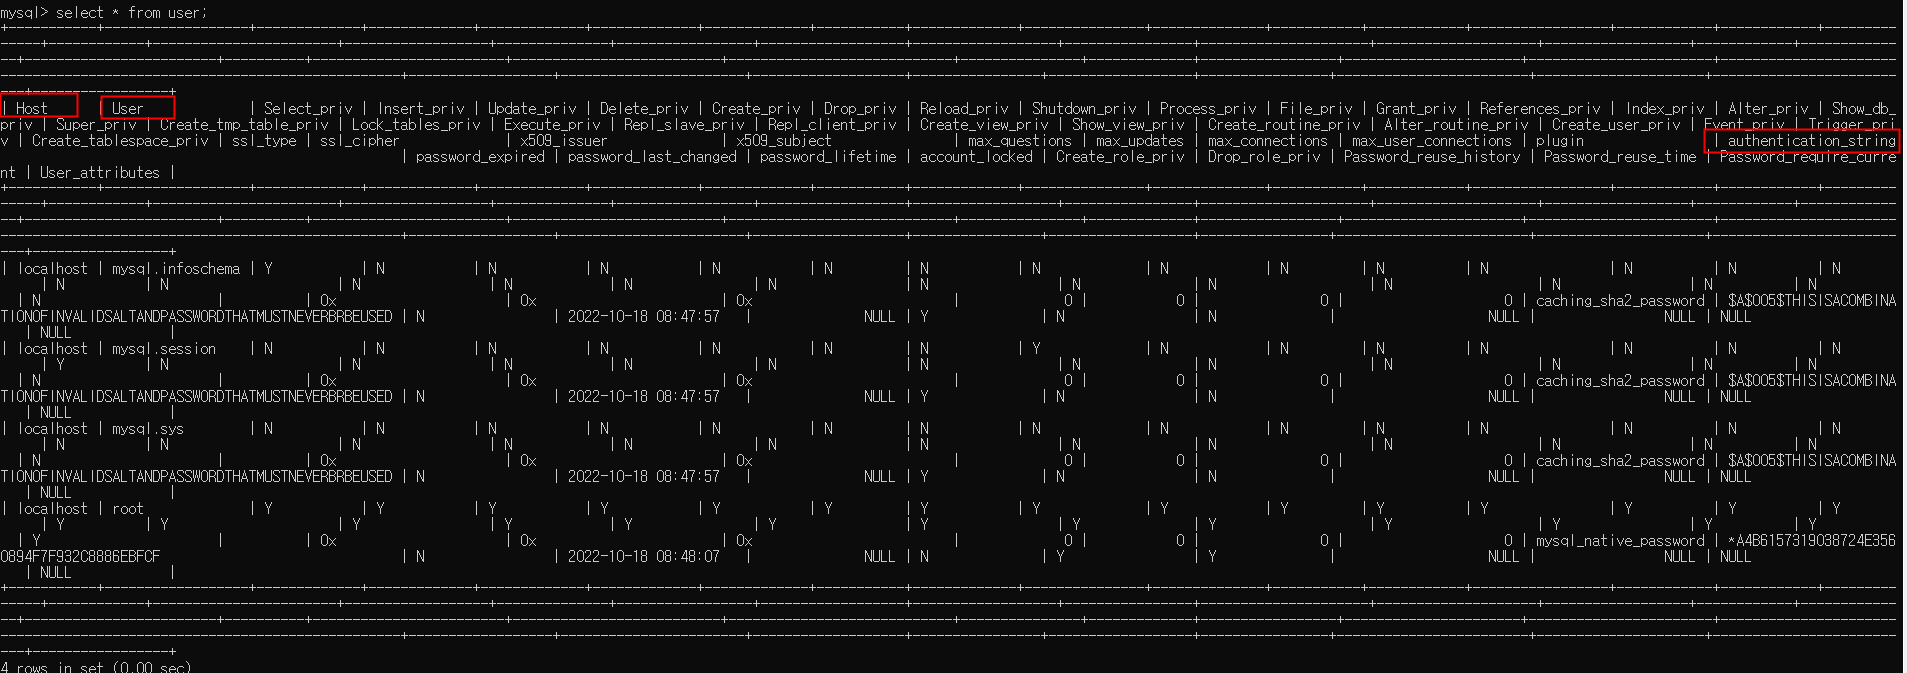
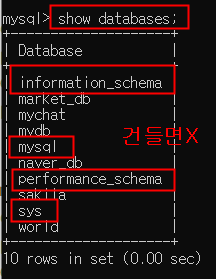 mysql의 user 테이블만 사용 가능, 나머지 3개의 테이블은 건들면 절대 안됨
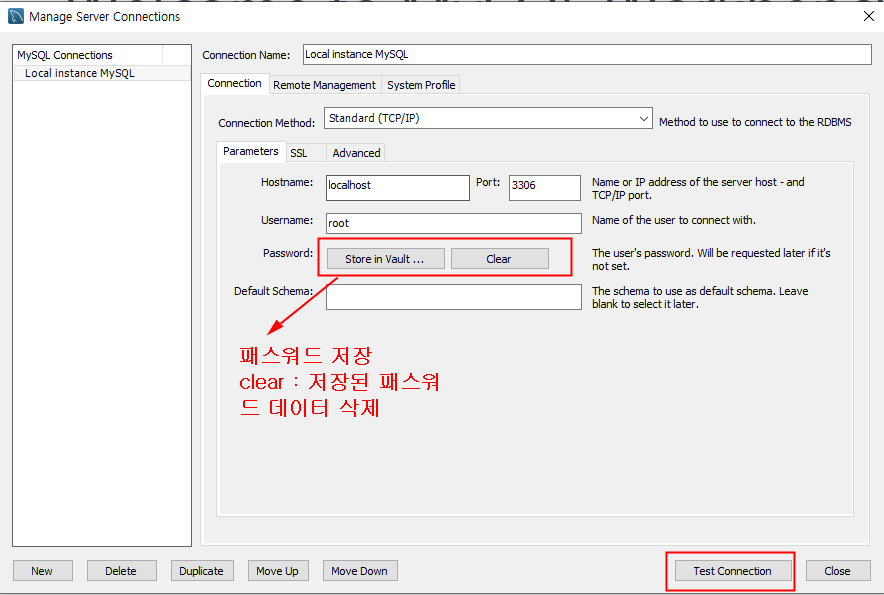
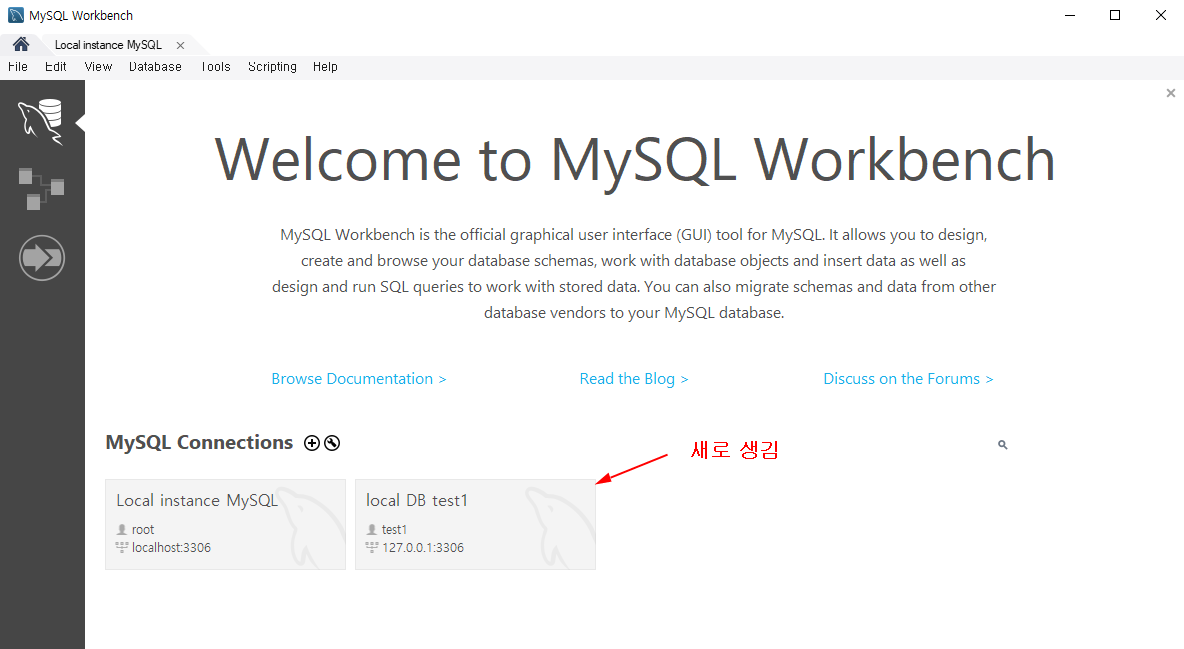
WorkBench로 접속하기
워크벤치 실행
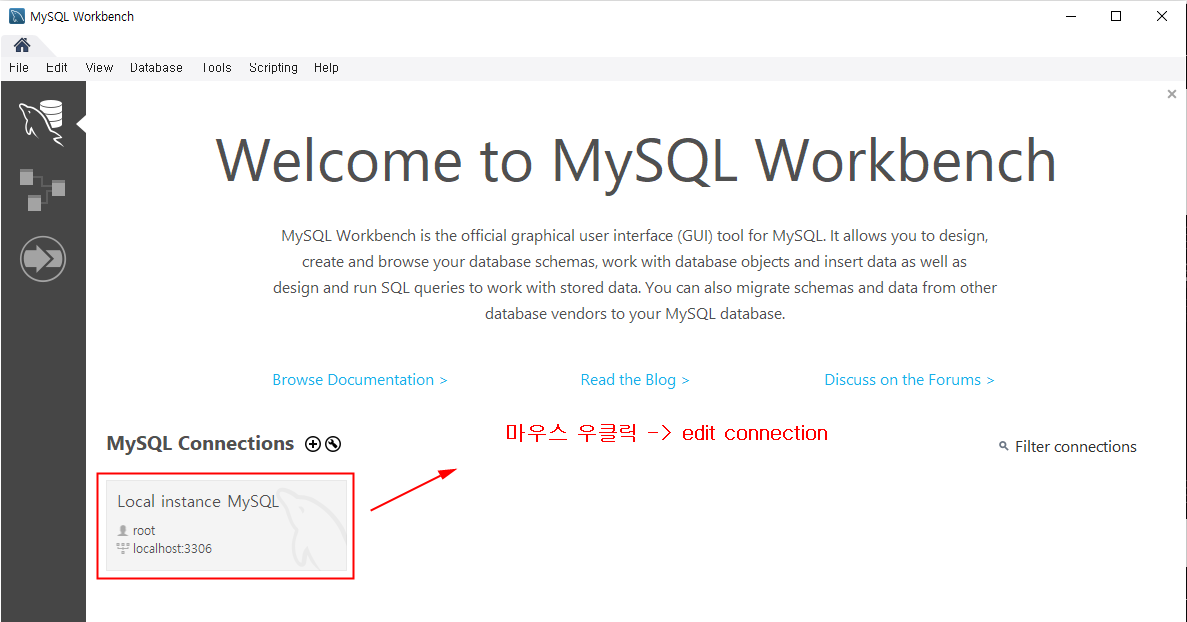
접속 테스트 실행
build.gradle 추가할 것
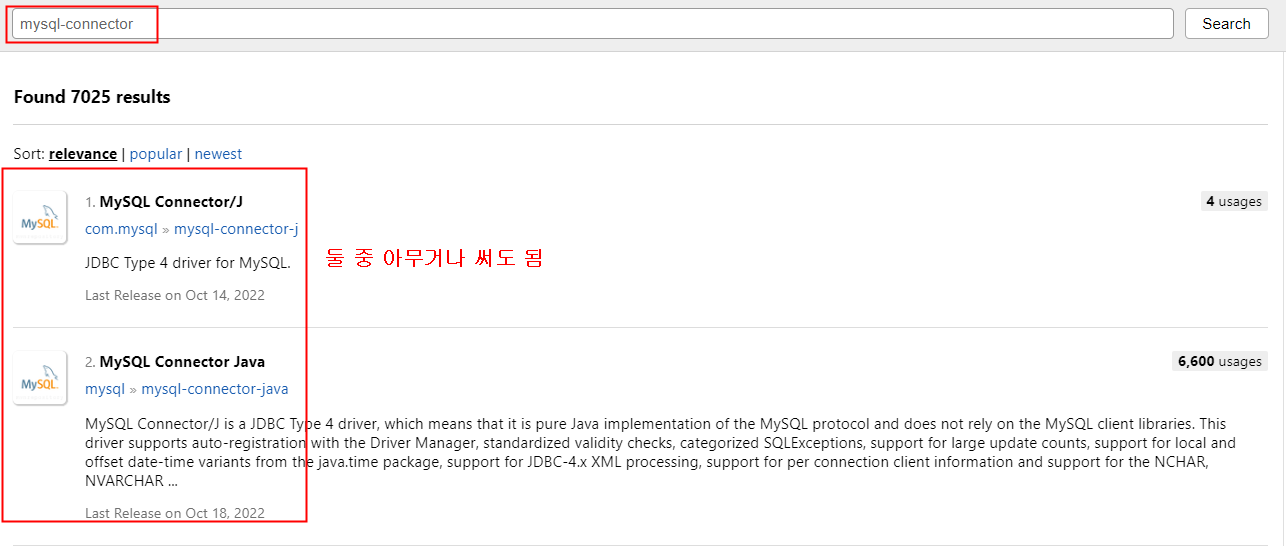
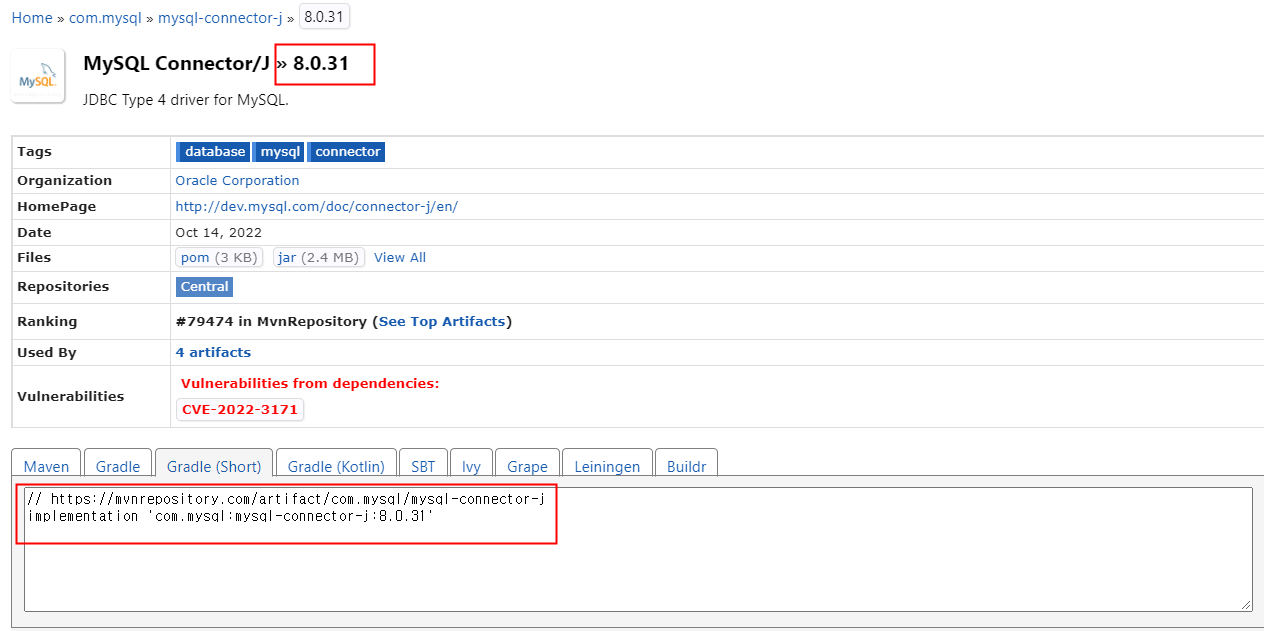
추가할 MySQL Connector/J 코드
// https://mvnrepository.com/artifact/commons-fileupload/commons-fileupload
    implementation 'commons-fileupload:commons-fileupload:1.4'
JDBC(Java DataBase Connectivity)
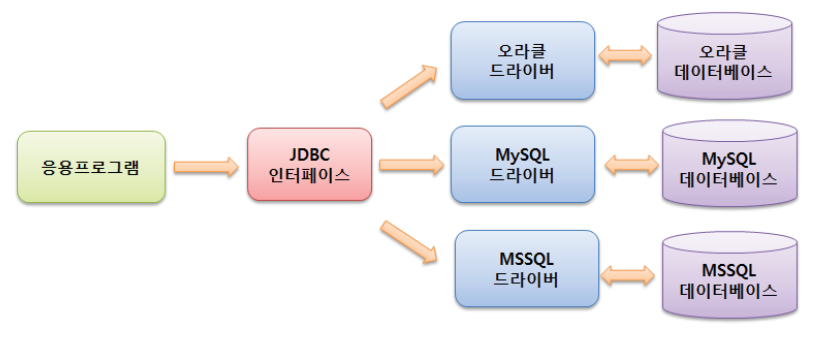
- 자바/JSP 프로그램 내에서 데이터베이스와 관련된 작업을 처리할 수 있도록 도와주는 자바 표준 인터페이스
- 관계형 데이터베이스 시스템에 접근하여 SQL 문을 실행하기 위한 자바 API 또는 자바 라이브러리
- JDBC API를 사용하면 DBMS의 종류에 상관없이 데이터베이스 작업을 처리할 수 있음
JDBC를 사용한 JSP와 데이터베이스의 연동
java.sql.*패키지 임포트
<%@ page import:java.sql.*%>- JDBC 드라이버 로딩
- 데이터베이스 접속을 위한 Connection 객체 생성
- 쿼리문을 실행하기 위한 Statement/PreparedStatement/CallableStatement
객체 생성 - 쿼리 실행
- 쿼리 실행의 결과 값(int, ResultSet) 사용
- 사용된 객체(ResultSet, Statement/PreparedStatement/CallableStatement,
Connection) 종료
JDBC 드라이버 로딩하기
- JDBC 드라이버 로딩 단계에서는 드라이버 인터페이스를 구현하는 작업
- Class.forName( ) 메소드를 이용하여 JDBC 드라이버를 로딩
Class.forName(String ClassName); - JDBC 드라이버가 로딩되면 자동으로 객체가 생성되고 DriverManager 클래스에 등록
예시 :
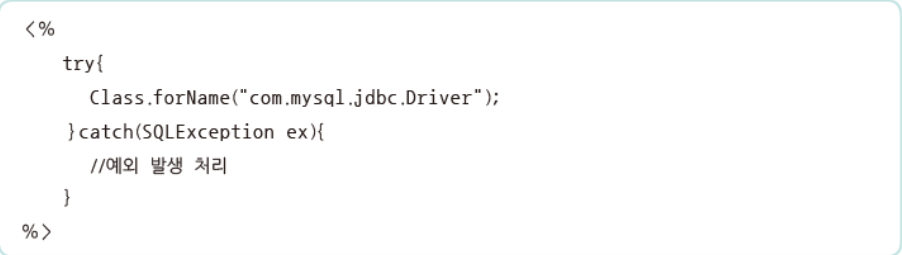
- JDBC 드라이버 로딩은 프로그램 수행 시 한 번만 필요
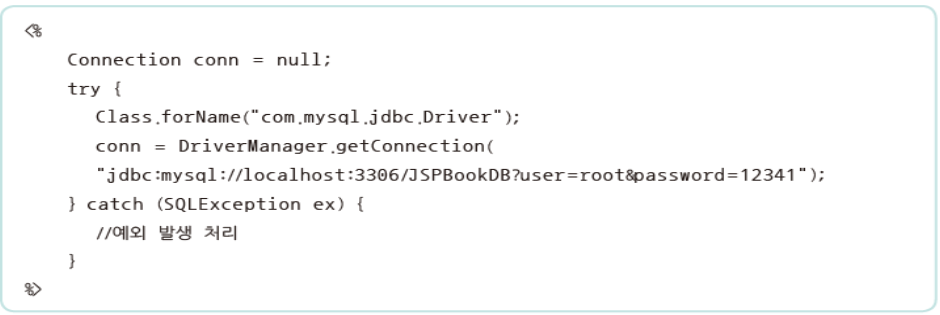
Connection 객체 생성하기
- JDBC 드라이버에서 데이터베이스와 연결된 커넥션을 가져오기 위해 DriverManager 클래스의 getConnection( ) 메소드를 사용
- DriverManager 클래스로 Connection 객체를 생성할 때 JDBC 드라이버를 검색하고, 검색된 드라이버를 이용하여 Connection 객체를 생성한 후 이를 반환

- Connection 객체 생성 예 :
getConnection(String url)메소드 사용
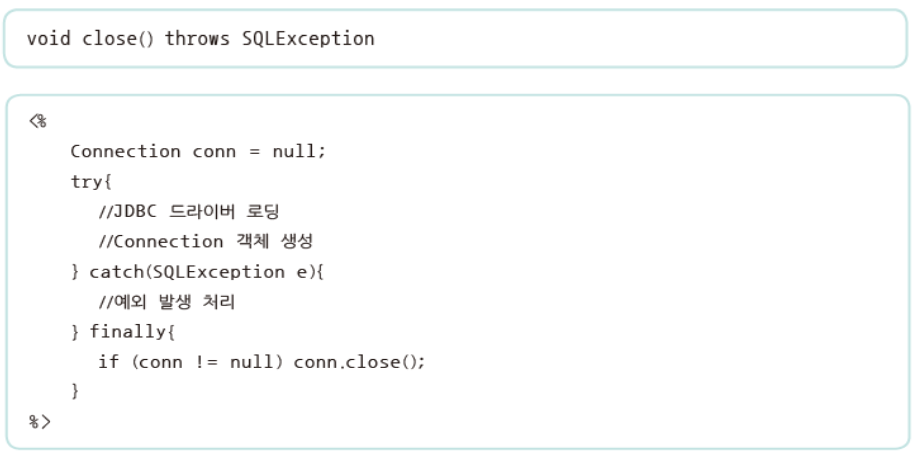
데이터베이스 연결 닫기
- 무조건 try-catch 문 사용해야 함
- connection - statement - resultset 순서로 닫아야 함
- 데이터베이스 연결이 더 이상 필요하지 않으면 데이터베이스와 JDBC 리소스가 자동으로 닫힐 때까지 대기하는 것이 아니라 close( ) 메소드로 생성한 Connection 객체를 해제
- 일반적으로 데이터베이스 리소스를 사용하지 않기 위해 사용을 끝내자마자 리소스를 해제하는 것이 좋음
데이터베이스 접속 예제
jspChap13.project
connection.jsp
<%@ page contentType="text/html;charset=UTF-8" language="java" pageEncoding="UTF-8" %>
<%@ page import="java.sql.*" %>
<!DOCTYPE html>
<html>
<head>
    <title>Title</title>
</head>
<body>
<%
  Connection conn = null;

  try {
//    접속할 주소, id, pw 설정
    String url = "jdbc:mysql://localhost:3306/javadb";
    String userId = "test1";
    String userPw = "java505";

//    드라이버 사용
    Class.forName("com.mysql.cj.jdbc.Driver");
//    DriverManager에 getConnection()을 통해 접속 -> 정상 : conn에 객체를 넘겨주고 실패 : 연결실패 출력 후 conn이 닫힘
    conn = DriverManager.getConnection(url, userId, userPw);
    out.println("데이터 베이스 연결이 성공하였습니다.");
  }
  catch (SQLException e) {
    out.println("데이터 베이스 연결이 실패했습니다.");
    out.println("SQLException : " + e.getMessage());
  }
  finally {
//    접속 해제 부분 : if 없이 그냥 conn.close(); 하면 안됨.
    if (conn != null) {
      conn.close();
    }
  }
%>
</body>
</html>
데이터베이스 쿼리 실행
Statement 객체로 데이터 접근하기
- Statement 객체
- 정적인 쿼리에 사용
- 하나의 쿼리를 사용하고 나면 더는 사용할 수 없음
- 하나의 쿼리를 끝내면 close( )를 사용하여 객체를 즉시 해제해야 함
- close( )를 사용하여 객체를 즉시 해제하지 않으면 무시할 수 없는 공간이 필요하며 페이지가 다른 작업을 수행하는 동안 멈추지 않기 때문
- 복잡하지 않은 간단한 쿼리문을 사용하는 경우에 좋음

- statement 객체의 메소드 종류

Statement 객체로 데이터 접근하기
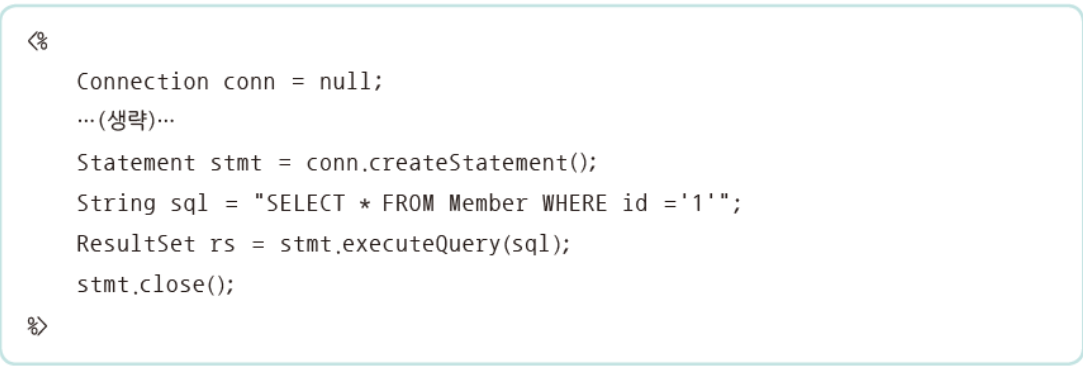
executeQuery() 메소드
- executeQuery() 메소드로 데이터 조회하기

- executeQuery() 메소드 사용 예 : SELECT 쿼리문
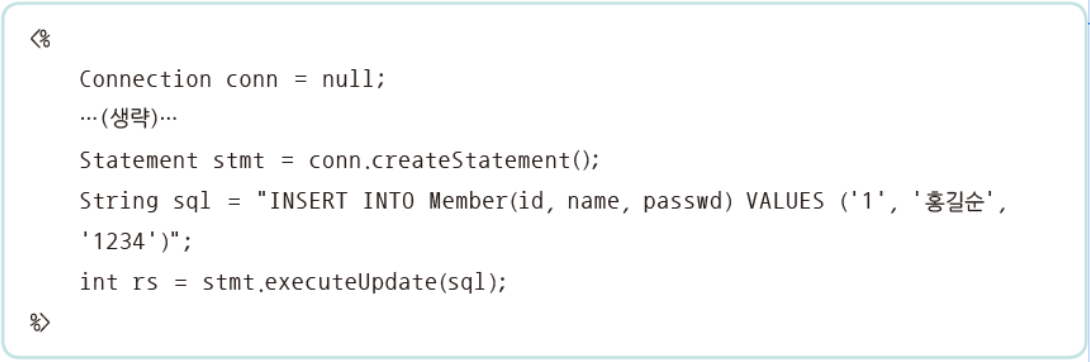
executeUpdate() 메소드
- executeUpdate() 메소드로 데이터 삽입, 수정, 삭제하기
- executeUpdate( ) 메소드는 INSERT, UPDATE, DELETE 쿼리문을 통해 데이터를 삽입, 수정, 삭제하는 데 사용

- executeUpdate( ) 메소드는 INSERT, UPDATE, DELETE 쿼리문을 통해 데이터를 삽입, 수정, 삭제하는 데 사용
- executeUpdate() 메소드 사용 예 : INSERT 쿼리문
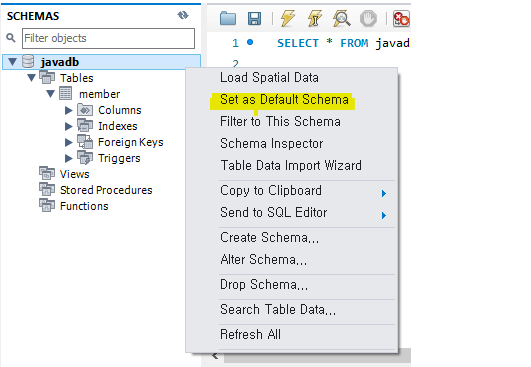
MySQL 새 Connection 만들기
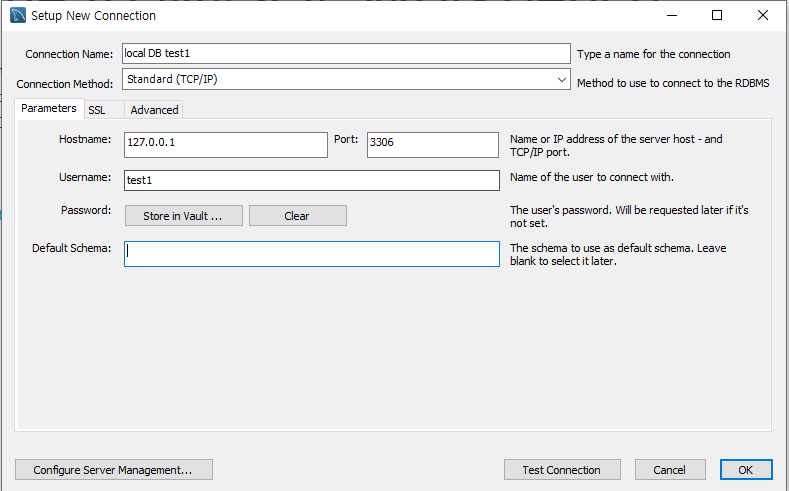
- 기본 스키마로 설정 하는방법 (javadb 더블클릭해도됨)
MySQL 데이터베이스 명령어
mysql쿼리.sql
use mysql;
show tables;
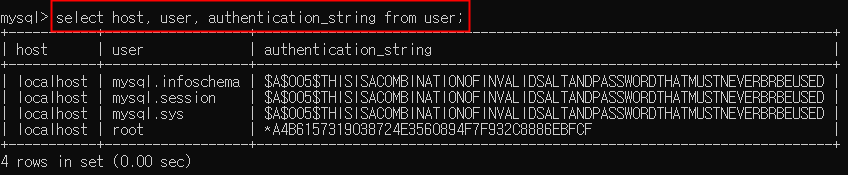
SELECT host, user, authentication_string FROM user;
-- mysql 명령어
-- <사용자 추가 명령>
-- 사용자만 추가
-- create user '계정명';
-- 사용자 및 비밀번호를 추가하면서 접속할 수 있는 주소를 함께 설정
-- create user '계정명'@'접속주소' identified by '비밀번호';
-- <사용자 삭제 명령>
-- drop user '계정명'@'접속주소';
-- <사용자 비밀번호 변경
-- alter user '사용자계정'@'접속주소' identified with mysql_native_password by '변경할 비밀번호'
-- <DB 생성 명령어>
-- 단순 DB 생성
-- create database DB이름;
-- <DB 생성 및 사용 문자셋 설정>
-- create database DB이름 default character set utf8;
-- <DB 삭제 명령어>
-- drop database DB명 ;
-- <DB 사용 권한 확인>
-- show grants for '사용자계정'@'접속주소';
-- <DB 사용 권한 설정>
-- grant all privileges on DB명.테이블명 to '사용자계정'@'접속주소';
-- <DB 사용 권한 제거>
-- revoke all on DB명.* from '사용자계정'@'접속주소';
-- <변경 내용 즉시 적용>
-- flush privilleges ;mysql쿼리2.sql
use mysql;

select host, user, authentication_string from user;

create user 'testuser1'@'localhost' identified by 'java505git';

drop user 'testuser1'@'localhost';

-- id : test1, pw : java505git
create user 'test1'@'localhost' identified by 'java505git';

-- DB 사용 권한 확인
show grants for 'test1'@'localhost';

-- DB 사용 권한 주기
grant all privileges on javadb.* to 'test1'@'localhost';

revoke all on javadb.* from 'test1'@'localhost';

alter user 'test1'@'localhost' identified with mysql_native_password by '505java';
alter user 'test1'@'localhost' identified with mysql_native_password by 'java505';
DB 사용하기 예제 1
insert01.jsp
<%@ page contentType="text/html;charset=UTF-8" language="java" pageEncoding="UTF-8" %>

<!DOCTYPE html>
<html>
<head>
    <title>DB 사용하기</title>
</head>
<body>
<form action="insert01_process.jsp" method="post">
  <label for="user-id">아이디 : </label>
  <input type="text" id="user-id" name="userId"><br>
  <label for="user-pw">비밀번호 : </label>
  <input type="text" id="user-pw" name="userPw"><br>
  <label for="user-name">이름 : </label>
  <input type="text" id="user-name" name="userName"><br>
  <button type="submit">전송</button>
</form>
</body>
</html>
insert01_process.jsp
<%@ page contentType="text/html;charset=UTF-8" language="java" pageEncoding="UTF-8" %>
<%@ page import="java.sql.*" %>
<!DOCTYPE html>
<html>
<head>
    <title>DB 사용하기</title>
</head>
<body>
<%
  Connection conn = null;
  Statement stmt = null;

  try {
    String url = "jdbc:mysql://localhost:3306/javadb";
    String user = "test1";
    String passwd = "java505";

    Class.forName("com.mysql.cj.jdbc.Driver");
    conn = DriverManager.getConnection(url, user, passwd);

    request.setCharacterEncoding("utf-8");

    String userId = request.getParameter("userId");
    String userPw = request.getParameter("userPw");
    String userName = request.getParameter("userName");

    String sql = "INSERT INTO member (id, passwd, name) ";
    sql += "VALUES ('" + userId + "', '" + userPw + "', '" + userName + "') ";

    stmt = conn.createStatement();
    stmt.executeUpdate(sql);
    out.println("Member 테이블에 데이터 추가가 성공했습니다.");

  }
  catch (SQLException e) {
    out.println("Member 테이블에 데이터 추가가 실패했습니다.");
    out.println("SQLException : " + e.getMessage());
  }
  finally {
    if (stmt != null) {
      stmt.close();
    }
    if (conn != null) {
      conn.close();
    }
  }
%>
</body>
</html>