url 파라미터
- restful 방식의 주소 형태로 구성되는 파라미터
- 기존 url 뒤에 / 와 : 파라미터명을 사용하여 데이터를 전달하는 방식
- rest 방식에서 많이 사용함
- 연결된 컴포넌트에서 useParams 훅을 사용해야 함
- 사용법 :
기존 url/:파라미터1/:파라미터2
<Route path={url/:test1/:test2} element={<url/>} />쿼리스트링
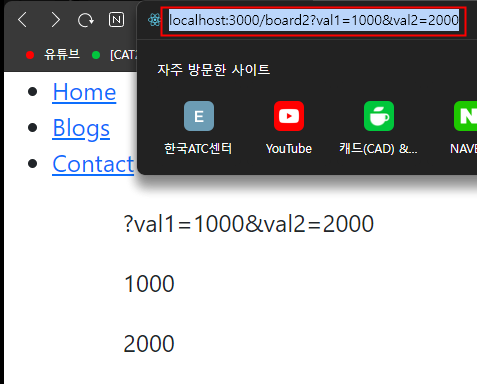
- 기존의 get 방식으로 웹 브라우저의 주소에 파라미터를 함께 전달하는 방식
<Route />컴포넌트의 path에 변경이 없음. - 지정된 컴포넌트에서 몇가지 옵션 사항을 사용할 수 있음
- 옵션 :
- pathname : 쿼리 스트링을 제외한 현재 주소의 경로
- search : 맨앞의 ? 문자를 포함한 쿼리 스트링 값
- hash : 주소의 # 문자열 뒤의 값 (구형 브라우저에서만 사용-익스플로러)
- state : 페이지 이동 시 임의로 추가할 상태 값
- key : location 객체의 고유 값
- useLocation(), useSearchParams() 훅을 사용하여 데이터를 가져올 수 있음
- useLocation() 훅을 사용하여 데이터를 가져오면 원하는 파라미터 값을 가져오기 위해 직접 파싱을 진행해야 함
- useSearchParams() 훅을 사용하여 데이터를 가져오면 파라미터 데이터만 따로 가져올 수 있음
- 사용법 :
기존 url?파라미터1=값1&파라미터2=값2
- useNavigate() : Link 컴포넌트를 사용하지 않고 다른 페이지로 이동하는 훅
- 사용법 :
const navigate = useNavigate(); - navigate(-1) : History 를 사용하여 앞 페이지로 이동, 숫자를 음수로 입력 시 해당 뒤로 이동이고, 양수로 입력 시 앞으로 이동
- navigate('/url') : 지정한 url 로 이동
- 사용법 :
예시
App7.jsx
<Route path={"board/:boardIdx"} element={<Board />}/>
<Route path={"board2"} element={<Board2/>} />
Board1.jsx
//Board.jsx
import React from "react";
import {useParams} from "react-router-dom";

function Board(props){
    const boardSelect = useParams();
    return(
        <div>
            <h2>글번호 : {boardSelect.boardIdx}</h2>
        </div>
    )
}

export default Board;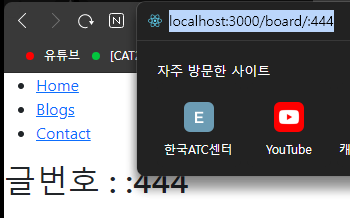
Board2.jsx
// Board2.jsx

import React from "react";
import {useLocation, useNavigate, useSearchParams} from "react-router-dom";

function Board2(props) {
    const param1 = useLocation();
    const [param2, setParam2] = useSearchParams();
    const navi = useNavigate();

    const goBack = () => {
        navi(-1);
    }

    const goBoard = () => {
        navi('/Board/100')
    }

    return (
        <div className={"container"}>

            <p>{param1.search}</p>
            <p>{param2.get("val1")}</p>
            <p>{param2.get("val2")}</p>
            <button onClick={goBack} className={"btn btn-secondary"}>뒤로 이동</button>
            <button onClick={goBoard} className={"btn btn-primary"}>Board 페이지로 이동</button>
        </div>
    );
}

export default Board2;
액시오스
비동기 통신을 쉽게 해줌
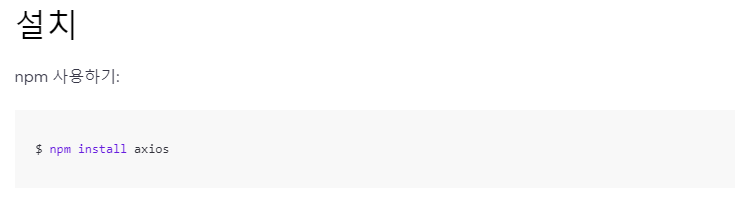
설치법 : https://axios-http.com/kr/docs/intro

파일 생성
App8.jsx
folder6
folder6/AxiosTest.jsx
영화진흥원 openAPI
https://www.kobis.or.kr/kobisopenapi/homepg/main/main.do
http://kobis.or.kr/kobisopenapi/webservice/rest/boxoffice/searchDailyBoxOfficeList.json?key=f5eef3421c602c6cb7ea224104795888&targetDt=20120101

기본 Axios 사용법(JSON)
axios
node.js 에서 비동기 통신을 하기 위한 라이브러리, promise 를 사용함
axios 는 rest 방식을 지원함
- GET 방식으로 서버에 데이터를 요청함
get(url, config)- POST 방식으로 서버에 데이터를 전달
post(url, data[, config])- PUT 방식으로 서버에 데이터 전달
put(url, data[, config])- DELETE 방식으로 데이터 전달
delete(url, data[, config]- axios 객체 생성 시 설정 정보를 변경할 수 있음
options(url, config)then() : 정상적으로 통신이 성공했을 경우 실행
catch() : 통신이 실패했을 경우 실행
async/await 와 함께 사용 시 then(), catch() 는 필요할 경우 나중에 호출할 수 있음
async/await 와 함께 사용 시 예외처리를 try/catch 로 처리함
응답 객체 : 요청에 대한 응답 객체가 json 방식으로 전달됨
data{} : 서버에서 제공한 데이터 json 타입
status : 서버와의 통신 응답 신호, 200 : ok, 300 : redirect, 400 : 리소스 없음, 500 : 서버 내부 오류
statusText : 서버와의 응답 메시지
headers{} : 서버에서 응답한 헤더 정보
config{} : 서버에 요청 시 axios 의 설정 정보
request{} : 응답을 생성한 요청
-
적용법 :
npm install axios: 사용할 프로젝트 axios 설치
import axios from 'axios';: 사용할 컴포넌트에서 axios import -
axios 사용법 1
    axios.get(url)
    .then(function(req) {
        성공 시 실행할 소스;
    })
    .catch(function(err) {
        실패 시 실행할 소스;
})- axios 사용법 2
    axios({
        method: 'get|post|put|delete',
        url: 'url',
        data: {
            param1: 'data',
            param2: 'data'
        },
});- axios 사용법 3
    axios.post(url, {
        param1: 'data1',
        param2: 'data2'
    })
    .then(function(req) {
        성공 시 실행할 소스;
    })
    .catch(function(err) {
        실패 시 실행할 소스;
    });
AxiosTest.jsx
// AxiosTest.jsx

import React, {useEffect} from "react";
import axios from "axios";

function AxiosTest(props) {
    const value = 11;
    useEffect(() => {
        axios.get('http://kobis.or.kr/kobisopenapi/webservice/rest/boxoffice/searchDailyBoxOfficeList.json?key=f5eef3421c602c6cb7ea224104795888&targetDt=20230109')
            .then((req) => {
                alert("통신성공");
                console.log(req);
                console.log(req.data);
                const list = req.data.boxOfficeResult.dailyBoxOfficeList;

                for (let i = 0; i < list.length; i++) {
                    let str = `순번 : ${list[i].rnum}
                    순위 : ${list[i].rank}
                    제목 : ${list[i].movieNm}
                    개봉일 : ${list[i].openDt}
                    관람객 : ${list[i].audiCnt}`
                    console.log(str + '\n');
                }
            })
            .catch((err) => {
                alert("통신실패");
            });
    });
    return (
        <div>

        </div>
    );
}

export default AxiosTest;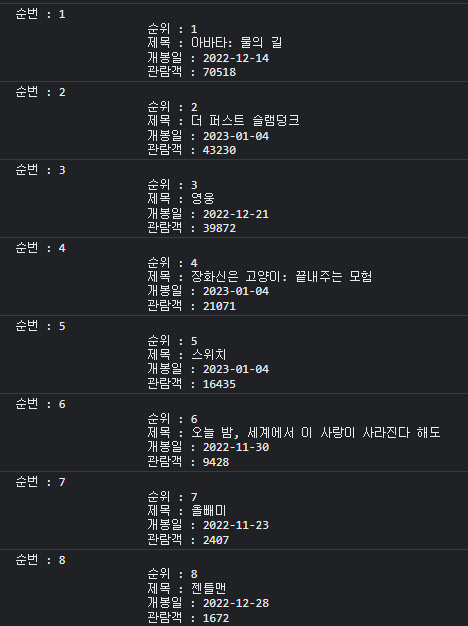
axios 문제 1
버튼 클릭 시 axios 통신을 통해서 데이터를 가져와서 화면의 table 에 출력하는 컴포넌트를 작성하세요
state 사용.( 화면이 업데이트 되니까), 배열로 들어오니까 map() 사용.
DailyBoxOffice.jsx
// DailyBoxOffice.jsx

import React from "react";
import axios from "axios";

// 문제 1. 버튼 클릭 시 axios 통신을 통해서 데이터를 가져와서 화면의 table 에 출력하는 컴포넌트를 작성하세요
// state 사용.( 화면이 업데이트 되니까), 배열로 들어오니까 map() 사용.
function DailyBoxOffice(props) {

  const loadBoxOffice = () => {
    axios.get('http://kobis.or.kr/kobisopenapi/webservice/rest/boxoffice/searchDailyBoxOfficeList.json?key=f5eef3421c602c6cb7ea224104795888&targetDt=20230109')
      .then((req) => {
        const boxOffice = req.data.boxOfficeResult.dailyBoxOfficeList;
        console.log(boxOffice);
      })
      .catch((err) => {
        console.log('통신 시 오류가 발생하였습니다.');
      });
  }


  return (
    <div className={"container"}>
      <div className={"row"}>
        <div className={"col-sm-8 mx-auto"}>
          <table className={"table table-striped table-hover"}>
            <thead>
            <tr>
              <th>순위</th>
              <th>제목</th>
              <th>개봉일</th>
              <th>당일 관람객</th>
              <th>누적 관람객</th>
            </tr>
            </thead>
            <tbody>

            </tbody>
          </table>
          <hr/>
          <div className={'my-3 d-flex justify-content-end'}>
            <button className={'btn btn-outline-primary btn-sm'} onClick={loadBoxOffice}>영화 순위 조회</button>
          </div>
        </div>
      </div>
    </div>
  );
}

export default DailyBoxOffice;
해답
DailyBoxOffice.jsx
// DailyBoxOffice.jsx

import React, {useState} from "react";
import axios from "axios";
import BoardItem from "../folder1/BoardItem";

// 문제 1. 버튼 클릭 시 axios 통신을 통해서 데이터를 가져와서 화면의 table 에 출력하는 컴포넌트를 작성하세요
// state 사용.( 화면이 업데이트 되니까), 배열로 들어오니까 map() 사용.
function DailyBoxOffice(props) {
  // boxOffice 를 state 로 설정. 주의: 초기값을 빈 배열로 넣어줘야함
  const [boxOffice, setBoxOffice] = useState([]);

  const loadBoxOffice = () => {
    axios.get('http://kobis.or.kr/kobisopenapi/webservice/rest/boxoffice/searchDailyBoxOfficeList.json?key=f5eef3421c602c6cb7ea224104795888&targetDt=20230109')
      .then((req) => {
        const DailyBoxOffice = req.data.boxOfficeResult.dailyBoxOfficeList;

        setBoxOffice(DailyBoxOffice);
        console.log(DailyBoxOffice);
      })
      .catch((err) => {
        console.log('통신 시 오류가 발생하였습니다.');
      });
  }


  return (
    <div className={"container"}>
      <div className={"row"}>
        <div className={"col-sm-8 mx-auto"}>
          <table className={"table table-striped table-hover"}>
            <thead>
            <tr>
              <th>순위</th>
              <th>제목</th>
              <th>개봉일</th>
              <th>당일 관람객</th>
              <th>누적 관람객</th>
            </tr>
            </thead>
            <tbody>
            {
              boxOffice.map((item) => {
                console.log(item);
                return (
                  <tr key={item.rnum}>
                    <td>{item.rank}</td>
                    <td>{item.movieNm}</td>
                    <td>{item.openDt}</td>
                    <td>{item.audiCnt}</td>
                    <td>{item.audiAcc}</td>
                  </tr>
                );
              })
            }
            </tbody>
          </table>
          <hr/>
          <div className={'my-3 d-flex justify-content-end'}>
            <button className={'btn btn-outline-primary btn-sm'} onClick={loadBoxOffice}>영화 순위 조회</button>
          </div>
        </div>
      </div>
    </div>
  );
}

export default DailyBoxOffice;
Async, Await
기본 사용 방법
async / await : 비동기 처리를 조금 더 쉽게 하기 위해서 개발됨
기본적으로 promise 를 사용함
사용법 :
async function 함수명(매개변수) {
        const 변수명 = await_promise_를_사용하는 함수();
        console.log(변수명);
    }
AsyncAwait.jsx 생성
// AsyncAwait.jsx

import React from "react";
import axios from "axios";

function AsyncAwait(props) {
    const fetchItems = () => {
        return new Promise((resolve, reject) => {
            const items = [1, 2, 3];
            resolve(items);
        });
    }

    // 프로미스 사용 시 비동기 처리 방법
    const logItem1 = () => {
        fetchItems()
            .then((item) => {
                console.log(item);
            })
            .catch((err) => {
                console.log(err);
            });
    }

    // async / await 사용 시 비동기 처리 방법
    const logItem2 = async () => {
        const resultItems = await fetchItems();
        // ↓ 필요없으면 안써도됨
        // resultItems.then(() => {
        //
        // })
        //     .catch(() => {
        //
        //     });
        console.log(resultItems);
    }


    const getData = async () => {
        const {data} = await axios.get('http://kobis.or.kr/kobisopenapi/webservice/rest/boxoffice/searchDailyBoxOfficeList.json?key=f5eef3421c602c6cb7ea224104795888&targetDt=20230109');
        console.log(data.boxOfficeResult.dailyBoxOfficeList);
    }

    return (
        <div>
            <button className={'btn btn-primary'} onClick={logItem1}>프로미스 사용</button>
            <button className={'btn btn-success'} onClick={logItem2}>async/await 사용</button>
            <button className={'btn btn-success'} onClick={getData}>axios와 함께 사용</button>
        </div>
    );
}

export default AsyncAwait;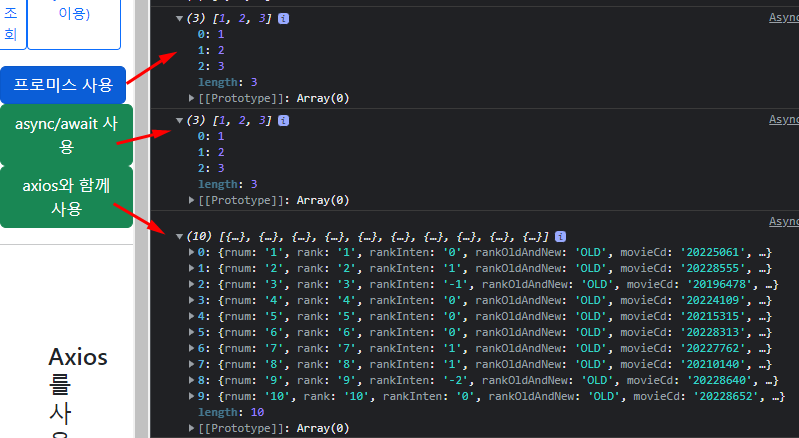
async, await 써주면 then, catch 안써도 됨
코드가 훨씬 간결해진다. 사용하기도 편함!
응용 1
영화 순위 데이터 가져오는 버튼도 async, await 방식으로 만들어보자
DailyBoxOffice.jsx => asyncBoxOffice 함수
// DailyBoxOffice.jsx
import React, {useState} from "react";
import axios from "axios";
function DailyBoxOffice(props) {
// boxOffice 를 state 로 설정. 주의: 초기값을 빈 배열로 넣어줘야함. 만약 '' (빈 문자열)형태로 넣으면 아래에서 map 함수가 동작하지 않음
const [boxOffice, setBoxOffice] = useState([]);
const loadBoxOffice = () => {
axios.get('http://kobis.or.kr/kobisopenapi/webservice/rest/boxoffice/searchDailyBoxOfficeList.json?key=f5eef3421c602c6cb7ea224104795888&targetDt=20230109')
.then((req) => {
const DailyBoxOffice = req.data.boxOfficeResult.dailyBoxOfficeList;
setBoxOffice(DailyBoxOffice);
console.log(DailyBoxOffice);
})
.catch((err) => {
console.log('통신 시 오류가 발생하였습니다.');
});
}
const asyncBoxOffice = async () => {
const {data} = await axios.get('http://kobis.or.kr/kobisopenapi/webservice/rest/boxoffice/searchDailyBoxOfficeList.json?key=f5eef3421c602c6cb7ea224104795888&targetDt=20230109');
const DailyBoxOffice = data.boxOfficeResult.dailyBoxOfficeList;
setBoxOffice(DailyBoxOffice);
}
return (
<div className={"container"}>
<div className={"row"}>
<div className={"col-sm-8 mx-auto"}>
<table className={"table table-striped table-hover"}>
<thead>
<tr>
<th>순위</th>
<th>제목</th>
<th>개봉일</th>
<th>당일 관람객</th>
<th>누적 관람객</th>
</tr>
</thead>
<tbody>
{
boxOffice.map((item) => {
console.log(item);
return (
<tr key={item.rnum}>
<td>{item.rank}</td>
<td>{item.movieNm}</td>
<td>{item.openDt}</td>
<td>{item.audiCnt}</td>
<td>{item.audiAcc}</td>
</tr>
);
})
}
</tbody>
</table>
<hr/>
<div className={'my-3 d-flex justify-content-end'}>
<button className={'btn btn-outline-primary btn-sm'} onClick={loadBoxOffice}>영화 순위 조회</button>
<button className={'btn btn-outline-primary btn-sm'} onClick={asyncBoxOffice}>영화 순위 조회(async/await 이용)</button>
</div>
</div>
</div>
</div>
);
}
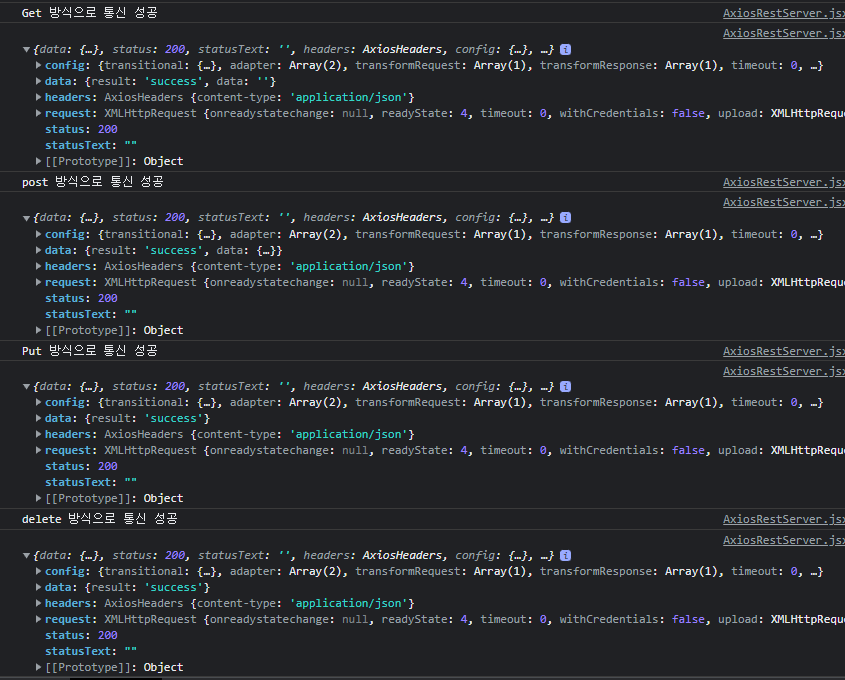
export default DailyBoxOffice;AxiosRestServer.jsx 파일 생성
//AxiosRestServer.jsx
// spring과 데이터 주고받기
import React from "react";
import axios from "axios";
// 버튼을 매개로 요청 서버(get, post, put, delete)
function AxiosRestServer(props){

  const sendDataGet = () => {
    axios.get("http://localhost:8080/async/sendDataGet", {params: {idx: 300}})
      .then((req) => {
        console.log('Get 방식으로 통신 성공');
        console.log(req); //데이터 넘어오는지 확인
      })
      .catch((err) => {
        console.log('Get 방식 통신 오류');
      });
  }
  const sendDataPost = () => {
    axios.post("http://localhost:8080/async/sendDataPost", null, {params: {id: "id", pw: "pw"}})
      .then((req) => {
        console.log('post 방식으로 통신 성공');
        console.log(req);
      })
      .catch((err) => {
        console.log('post 방식 통신 오류');
      });
  }
  const sendDataPut = () => {
    axios.put("http://localhost:8080/async/sendDataPut", null, {params: {idx: 100}})
      .then((req) => {
        console.log('Put 방식으로 통신 성공');
        console.log(req);
      })
      .catch((err) => {
        console.log('Put 방식 통신 오류');
      });
  }

  const sendDataDelete = () => {
    axios.delete("http://localhost:8080/async/sendDataDelete", {params: {idx: 200}})
      .then((req) => {
        console.log('delete 방식으로 통신 성공');
        console.log(req);
      })
      .catch((err) => {
        console.log('delete 방식 통신 오류');
      });
  }


  return(
    <div className={"container mt-5 p-5"}>
      <h1>Axios를 사용한 비동기 통신</h1>
      <div className={"row"}>
        <div className={"col-sm-8 mx-auto"}>
          <div>

          </div>
          <div className={"my-3 d-flex justify-content-center"}>
            <button className = {"btn btn-primary me-3"} onClick={sendDataGet}>get 방식</button>
            <button className={"btn btn-success me-3"} onClick={sendDataPost}>post 방식</button>
            <button className={"btn btn-info me-3"} onClick={sendDataPut}>put 방식</button>
            <button className={"btn btn-danger"} onClick={sendDataDelete}>delete 방식</button>
          </div>
        </div>
      </div>
    </div>
  )
}
export default AxiosRestServer;
스프링 파일 참고

AsyncController.java
package com.bitc.asynctestserveer.controller;
import org.springframework.web.bind.annotation.*;
import java.util.HashMap;
import java.util.Map;

@CrossOrigin(origins = {"http://localhost:3000", "http://localhost:4000"})
@RestController
public class AsyncController {

  @RequestMapping()
  public String index() {return "index 페이지";}

//    @CrossOrigin(origins = "http://localhost:3000")
  @RequestMapping(value = "/async/data1", method = RequestMethod.POST)
  public Object data1() {
    return "success";
  }

  @RequestMapping(value = "/async/sendDataGet", method = RequestMethod.GET)
  public Object sendDataGet() throws Exception {
  Map<String, String> result = new HashMap<>();
  result.put("result", "success");
  result.put("data", "");

  return result;
}

@RequestMapping(value = "/async/sendDataPost", method = RequestMethod.POST)
public Object sendDataPost(@RequestParam("id") String id, @RequestParam("pw") String pw) throws Exception {
  Map<String, Object> user = new HashMap<>();
  user.put("id", "test1");
  user.put("pw", "pw1234");

  Map<String, Object> result = new HashMap<>();
  result.put("result", "success");
  result.put("data", user);

  return result;
}

@RequestMapping(value = "/async/sendDataPut", method = RequestMethod.PUT)
public Object sendDataPut(@RequestParam("idx") int idx) throws Exception {
  Map<String, Object> result = new HashMap<>();
  result.put("result", "success");

  return result;
}

@RequestMapping(value = "/async/sendDataDelete", method = RequestMethod.DELETE)
public Object sendDataDelete(@RequestParam("idx") int idx) throws Exception {
  Map<String, Object> result = new HashMap<>();
  result.put("result", "success");

  return result;
}
}
CORS 오류
CORS 오류 : Cross Origin resource sharing 의 줄임말, 동일한 주소 내에서만 리소스를 공유할 수 있음.
스프링에서는 CORS 허용을 위해서 @CrossOrigin 어노테이션을 사용하여 처리함
@CrossOrigin 어노테이션을 사용하면 지정한 도메인에 대해서 접근을 허용함
@CrossOrigin 어노테이션은 메소드, 클래스, configuration 에 설정할 수 있음
메소드에 사용 시 지정한 메소드만 접근을 허용
클래스에 사용 시 지정한 컨트롤러에 대해서만 접근을 허용
configurer 에 사용 시 모든 곳에 접근을 허용함
옵션으로 origins 에 접근할 서버의 주소를 입력함
이를 해결하기 위해서는 세 가지 방법이 있다.
- 메인 컨트롤러에 @CrossOrigin 어노테이션으로 접근허용 url을 추가해주면 하위의 소스들에 추가 조치 없이 접근이 가능.
@CrossOrigin(origins = {"http://localhost:3000", "http://localhost:4000"})
@RestController
public class AsyncController {
	실행내용
}- 메인 컨트롤러 하위의 소스에 개별적으로 @CrossOrigin 어노테이션을 추가해주면 좀 더 디테일하게 접근을 제한해줄수 있다.
아래의 코드대로라면"/async/data1"에만http://localhost:3000에서 접근이 가능하다.
@RestController
public class AsyncController {

  @CrossOrigin(origins = "http://localhost:3000")
  @RequestMapping(value = "/async/data1", method = RequestMethod.POST)
  public Object data1() {
    return "success";
  }

  @RequestMapping(value = "/async/sendDataPut", method = RequestMethod.PUT)
  public Object sendDataPut(@RequestParam("idx") int idx) throws Exception {
    Map<String, Object> result = new HashMap<>();
    result.put("result", "success");

    return result;
  }
}- configuration 으로 설정해주는 방법

3-1. @Configuration 어노테이션 추가
3-2. WebMvcConfigurer 상속
implements WebMvcConfigurer
3-3. @Override : CorsRegistry
3-4.@Override public void addCorsMappings(CorsRegistry registry) { }addMapping()을 이용해 접근 권한 확인(경로) 추가후
allowedOrigins(url)을 이용해 접근 허용할 외부 url 지정(여러개 가능)
두개는.으로 연결시키기
결과registry.addMapping("/**") .allowedOrigins("http://localhost:3000", "http://localhost:4000");
package com.bitc.asynctestserveer.configuration;
import org.springframework.context.annotation.Configuration;
import org.springframework.web.servlet.config.annotation.CorsRegistry;
import org.springframework.web.servlet.config.annotation.WebMvcConfigurer;
@Configuration
public class WebMvcConfiguration implements WebMvcConfigurer {
@Override
public void addCorsMappings(CorsRegistry registry) {
// addMapping() : 지정한 패턴에 맞는 페이지에 대해서 접근 권한 확인
// allowedOrigins(url) : 접근 허용할 외부 url
registry.addMapping("/**")
         .allowedOrigins("http://localhost:3000", "http://localhost:4000");
}
}