POD
핵심 명령어
alias k=kubectlk get podsk get pods -A -o widekubectl run nginx --image=nginxk describe pod newpods-t6vj2k delete pod webappk edit pod redis
REPLICA SET
apiVersion 정의 부분을 잘 확인해봐야 한다
- Wrong
apiVersion: v1
kind: ReplicaSet
metadata:
  name: replicaset-2
spec:
  replicas: 2
  selector:
    matchLabels:
      tier: nginx
  template:
    metadata:
      labels:
        tier: nginx
    spec:
      containers:
      - name: nginx
image: nginx- Correct
apiVersion: apps/v1
kind: ReplicaSet
metadata:
  name: replicaset-2
spec:
  replicas: 2
  selector:
    matchLabels:
      tier: nginx
  template:
    metadata:
      labels:
        tier: nginx
    spec:
      containers:
      - name: nginx
        image: nginx
matchLabels과 container의 label과 일치해야 한다
- wrong
apiVersion: apps/v1
kind: ReplicaSet
metadata:
  name: replicaset-2
spec:
  replicas: 2
  selector:
    matchLabels:
      tier: busybox
  template:
    metadata:
      labels:
        tier: nginx
    spec:
      containers:
      - name: nginx
image: nginx- correct
apiVersion: apps/v1
kind: ReplicaSet
metadata:
  name: replicaset-2
spec:
  replicas: 2
  selector:
    matchLabels:
      tier: nginx
  template:
    metadata:
      labels:
        tier: nginx
    spec:
      containers:
      - name: nginx
        image: nginx
Label Selector로 어떤 Pod가 ReplicaSet의 일부분인지 확인한다
apiVersion: apps/v1
kind: ReplicaSet
metadata:
  name: replicaset-2
spec:
  replicas: 2
  selector:
    matchLabels:
      tier: nginx			# service의 selector
  template:
    metadata:
      labels:
        tier: nginx			# pod의 label
    spec:
      containers:
      - name: nginx
        image: nginx
Replica의 설정이 변경되어도 적용되지 않는다
Replica 설정을 변경해도 그 변경 사항이 관련된 pod에 적용되지 않음
적용하는 방법으로는 1️⃣Replica를 삭제하고 다시 생성하는 방법과 2️⃣관련된 모든 Pod를 삭제시키는 것이다 (삭제하면 자동적으로 Pod가 다시 생성됨)
핵심 명령어
alias k=kubectlk get replicasetsk get rsk describe rs new-replica-setk create -f /root/replicaset-definition-1.yamlk get rs new-replica-set -o yamlk delete rs new-replica-setk get rs --watchk scale rs --replicas=5 new-replica-set
DEPLOYMENT
Kind에 위치하는 Resource의 이름은 대문자여야 한다
- wrong
apiVersion: apps/v1
kind: deployment
metadata:
  name: deployment-1
spec:
  replicas: 2
  selector:
    matchLabels:
      name: busybox-pod
  template:
    metadata:
      labels:
        name: busybox-pod
    spec:
      containers:
      - name: busybox-container
        image: busybox888
        command:
        - sh
        - "-c"
- echo Hello Kubernetes! && sleep 3600- correct
apiVersion: apps/v1
kind: Deployment
metadata:
  name: deployment-1
spec:
  replicas: 2
  selector:
    matchLabels:
      name: busybox-pod
  template:
    metadata:
      labels:
        name: busybox-pod
    spec:
      containers:
      - name: busybox-container
        image: busybox888
        command:
        - sh
        - "-c"
        - echo Hello Kubernetes! && sleep 3600
핵심 명령어
alias k=kubectlk get deployk get deploymentsk describe deploy frontend-deploymentk create -f deployment-definition-1.yamlkubectl create deployment httpd-frontend --image=httpd:2.4-alpine --replicas=3k get deploy --watch
NAMESPACE
동일한 Namespace의 Resource 접근 방법
-
Pod

-
Service
-
Pod에서 Service에 접근하는 경우
db-service:6379상이한 Namespace의 Resource 접근 방법
-
Pod
-
Service
-
Pod에서 Service에 접근하는 경우
db-service.dev
db-service.dev.svc
db-service.dev.svc.cluster.local
핵심 명령어
kubectl get namespacesk get nsk get pods -n=researchk get pods -Ak get pods --all-namespace
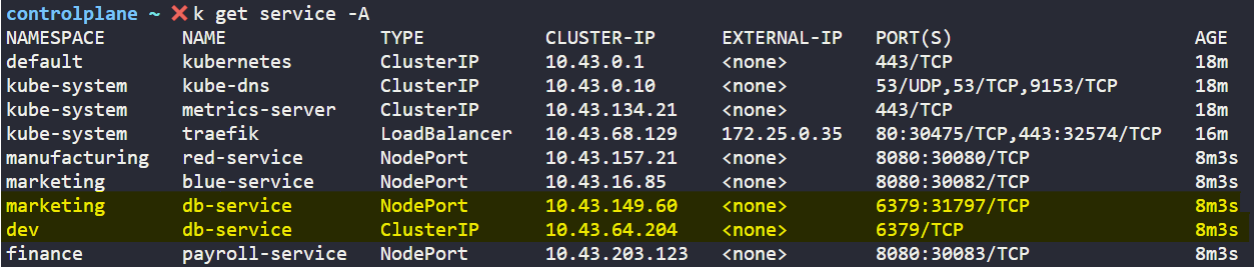
SERVICE
port VS targetPort vs nodePort
apiVersion: v1
kind: Service
metadata:
  name: webapp-service
spec:
  type: NodePort
  ports:
    - targetPort: 8080
      port: 8080
      nodePort: 30080
  selector:
name: simple-webappport: Service가 사용할 Port
targetPort: Service가 forwarding할 Pod의 Port
nodePort: 각 Cluster Node의 Port 30080으로 Service에 접근 가능
Endpoint
endpoint: Service로 노출되는 Pod의 IP Address와 Port 목록
핵심 명령어
alias k=kubectlk get srvk get servicesk get services -Ak create -f service-definition-1.yaml
IMPERATIVE COMMAND
Resource 수정하는 방법
1. kubectl edit
기본 편집기로 오브젝트의 manifest를 연다
변경 후 파일을 저장하고 편집기를 종료하면, 오브젝트가 업데이트 된다
ex) kubectl edit deployment kubia
2. kubectl patch
오브젝트의 개별 속성을 수정한다
ex) kubectl patch deployment kubia -p '~~~'
3. kubectl apply
전체 YAML/JSON 파일의 속성 값을 적용해 오브젝트를 수정한다
YAML/JSON에 지정된 오브젝트가 아직 없으면 생성된다
파일에는 리소스의 전체 정의가 포함돼야 한다
ex) kubectl apply -f kubia-deployment-v2.yaml
4. kubectl replace
YAML/JSON 파일로 오브젝트를 새 것으로 교체한다
apply 명령어와 달리 이 명령어는 오브젝트가 있어야 한다
그렇지 않으면 오류를 출력한다
ex) kubectl replace -f kubia-deployment-v2.yaml
5. kubectl set image
Pod, Replica Controller의 Template, Deployment, Deamon Set, Job 또는 Replica Set에 정의된 Container Image를 변경한다
ex) kubectl set image deployment kubia nodejs=luksa/kubia:v2
핵심 명령어
alias k=kubectlk run nginx-pod --image=nginx:alpinek run redis --image=redis:alpine --labels="tier=db"k create service clusterip redis-service --tcp=6379k create deployment webapp --image=kodekloud/webapp-color --replicas=3k run custom-nginx --image=nginx --port=8080k expose pod custom-nginx --port=8080 --name=pod-nginxk create deploy redis-deploy -n=dev-ns --image=redis --replicas=2k run httpd --image=httpd:alpine --port=80 --expose=truek create svc clusterip httpd --tcp=80 labels="app=httpd"k run httpd --image=httpd:alpine --port=80 --labels="app=httpd"
Document
https://kubernetes.io/docs/tasks/manage-kubernetes-objects/imperative-command/ -> Service