#0 사용한 라이브러리 : pubspec.yaml
firebase_messaging: ^11.1.0
firebase_core: ^1.10.0#1 파이어베이스 프로젝트 생성
- 파이어베이스에서 파이어베이스 > 프로젝트 개요 > 프로젝트 설정에서 앱 프로젝트(안드로이드, iOS 둘다 하나씩)를 생성한다.
- 안드로이드 : google-sevices.json 파일을 /android/app 폴더에 복사넣기
- iOS : GoogleService-Info.plist 파일을 /ios/Runner 폴더에 넣을 때 중요한 것은 xcode 실행하고 거기서 드래그앤드랍으로 넣어야만 인식함. (매우 중요)
#2 APNs 인증키 등록 for iOS
- iOS 인 경우는 중간에 메시지를 APNs에 거쳐서 오기 때문에 APNs의 인증서나 인증키를 등록해야 한다. (둘 중 하나만 있어도 됨)
- 인증서 보다는 인증키가 편함. (인증키는 빌드팀을 인증하기 때문에 하나의 인증키로 여러번 사용가능)
- 인증키나 인증서 등록은 파이어베이스 > 프로젝트 개요 > 프로젝트 설정 > 클라우드 메시징에서 등록하면 된다
- 참고할 유튜브 영상 :: https://www.youtube.com/watch?v=ytT65m_CjXU&t=111s
#3 iOS xcode에서 설정
- Project Runner > Deployment Target > Info > iOS Deployment Target 을 10.0으로 설정
- iOS버전 때문에 "Ignoring ffi-1.15.4 because its extensions are not built. Try: gem pristine ffi --version 1.15.4" 에러 메시지가 나오면 아래 #9 번처럼 디버깅 처리 하면 됨.
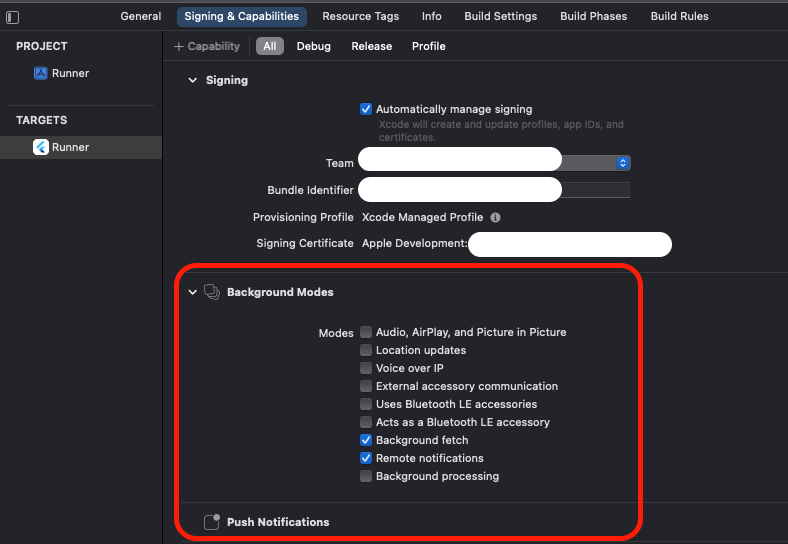
- Target Runner > Signing & Capabilities > All 에서 Team을 선택하고
- Target Runner > Signing & Capabilities > Capability에서 Push Notification 추가, Background Modes추가
- 선택된 Background Modes에서 Background fetch, Remote notifications 선택
#4 안드로이드 셋팅
- android/app/src/main/AndroidManifest.xml
<uses-permission android:name="android.permission.INTERNET"/>

<intent-filter>
                <action android:name="FLUTTER_NOTIFICATION_CLICK" />
                <category android:name="android.intent.category.DEFAULT" />
</intent-filter>- andrioid/app/build.gradle
apply plugin: 'com.google.gms.google-services'

dependencies {
    implementation platform('com.google.firebase:firebase-bom:29.0.0')
    implementation 'com.google.firebase:firebase-analytics'
}- android/build.gradle
dependencies {
        classpath 'com.android.tools.build:gradle:4.1.0'
        classpath 'com.google.gms:google-services:4.3.10'
    }
#5 FCM V2에서 추가되는 부분 (소스)
- 아래와 같이 backgroudnHandler를 추가해 줘야 함.
// Receive message when app is in background
Future<void> backgroundHandler(RemoteMessage message) async{
  print("Handling a background message: ${message.messageId}");
}

Future main() async{
  WidgetsFlutterBinding.ensureInitialized();
  if (Platform.isAndroid) {
    await AndroidInAppWebViewController.setWebContentsDebuggingEnabled(true);
  }
  await Firebase.initializeApp();
  FirebaseMessaging.onBackgroundMessage(backgroundHandler);
  runApp(MyApp());
#6 FCM V2에서 iOS 권한 처리 (소스)
if (Platform.isIOS) {
      Future.microtask(() async {
        await FirebaseMessaging.instance
            .requestPermission(
          alert: true,
          announcement: false,
          badge: true,
          carPlay: false,
          criticalAlert: false,
          provisional: false,
          sound: true,
        ).then((settings) {
          print('User granted permission: ${settings.authorizationStatus}');
        });

        await FirebaseMessaging.instance
            .setForegroundNotificationPresentationOptions(
          alert: true,
          badge: true,
          sound: true,
        );
      });
    }
#7 FCM V2에서 메시징 처리 (소스)
- inistState()나 onInit() 메서드 안에 메시지 처리를 담아 준다
// gives you the message on which user taps and it opened the app from teminated state
    FirebaseMessaging.instance.getInitialMessage().then((message){
      print(message);
    });

    // forground
    FirebaseMessaging.onMessage.listen((message) {
      String title = '';
      String body = '';
      print(message);
      if(message.notification != null) {
        title = message.notification!.title!;
        body = message.notification!.body!;
      }
      Get.snackbar(title, body,
          snackPosition: SnackPosition.TOP,
          backgroundColor: Colors.white,
          duration: Duration(seconds: 3));
    });

    // When the app is in background but opened and user taps
    FirebaseMessaging.onMessageOpenedApp.listen((message) {
      print(message);
    });
#8 FCM 테스팅
- 파이어베이스 > 클라우드 메시징 > 알림 작성 하면 테스트 메시지 보낼 수 있음.
- 토큰 값을 알면 '테스트 메시지 전송'도 사용할 수 있다
- 토큰 값을 아는 방법 (토큰을 출력하게 하면 메시지 보내지 않아도 토큰 값을 알 수 있음)
String? token = await FirebaseMessaging.instance.getToken();
print("token : ${token ?? 'token NULL!'}");- iOS인 경우 V2가 되면서 에뮬에서는 foreground도 background도 메시지를 받지 못한다. 실제 디바이스로 테스트를 해야 함 (매우 중요)
#9 디버깅
- Ignoring ffi-1.15.4 because its extensions are not built. Try: gem pristine ffi --version 1.15.4 에러 메시지
자세히 보면 그 위부터 에러 메시지가 있음
[!] CocoaPods could not find compatible versions for pod "firebase_messaging":
      In Podfile:
        firebase_messaging (from `.symlinks/plugins/firebase_messaging/ios`)
참조 :: https://github.com/FirebaseExtended/flutterfire/issues/4709
As mentioned in the changelog the minimum deployment target is now iOS 10.
Go to your Podfile and uncomment
# platform :ios, '9.0'
Then change the version to 10
platform :ios, '10.0'

>> 2가지를 고침 xcode 에서 deployment target을 iOS 10으로 고치고 아래와 같이 실행
1. flutter clean
2. pod update (flutter pub get을 하라는 메시지가 나오면 그것 하고 pod update하면 됨)
앱&웹개발(flutter, vuejs, typescript, react), 인공지능(nlp, asr, rl), 백엔드(nodejs, flask, golang, grpc, webrtc, aws, msa, nft, spring cloud, nest.js), 함수형 프로그래밍(scala, erlang)을 공부하며 정리합니다.