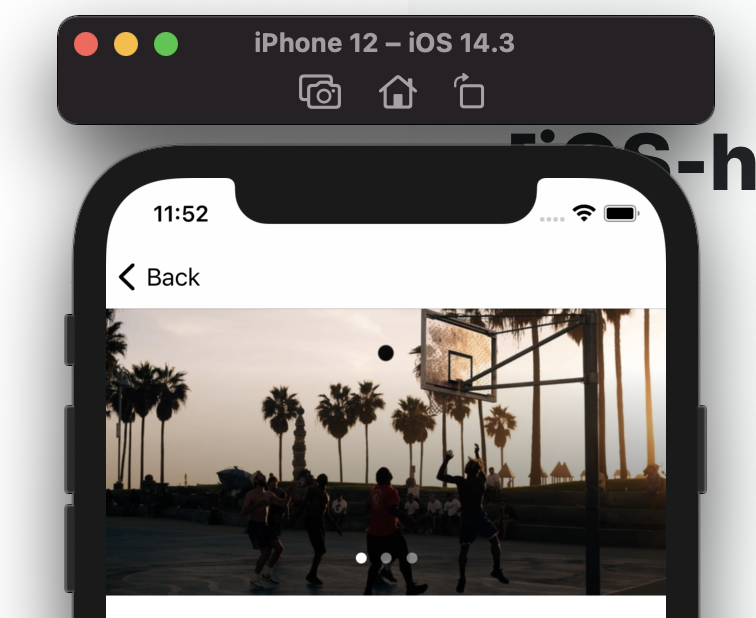
상단 이미지 배너
앱을 보다보면, 위의 이미지와 같이 이미지들이 슬라이드 되는 뷰를 많이 보게된다.
구현할 수 있는 방법에는 여러가지가 있을 수 있지만, 나는 나의 최애인 콜렉션뷰로 구해보도록 하겠다.
콜렉션뷰를 선택한 이유는 이미지라는 셀이 반복적으로 사용되기 때문이다. 즉, 셀을 정의해 놓으면 쉽게 구현을 할 수 있다고 생각을 했다. 또한 셀을 재활용할수 있기 때문이다.
우선 기본적으로 콜렉션뷰를 이용한 이미지 슬라이드 기능을 설명하고, 그다음 page control 을 이용해 슬라이드 할때 마다 page(원)가 변하는 기능을 설명하도록 하겠다.
How to make
1. 콜렉션뷰 setting
우선, 콜렉션뷰의 사이즈와 constraint를 정해준다.
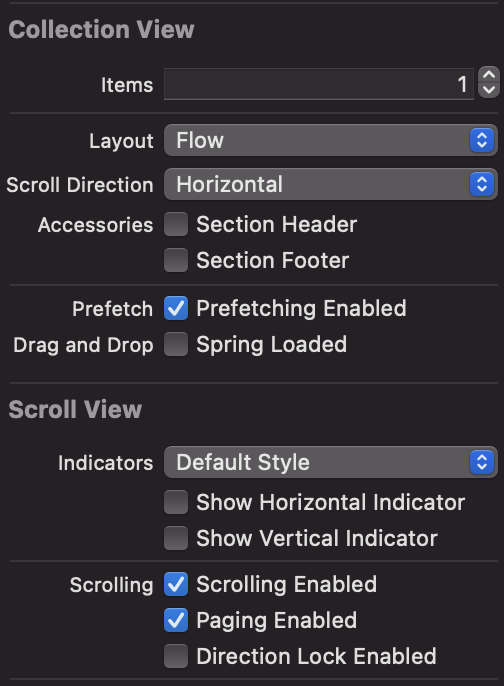
이때, attributes instpector 영역에서 scroll direction 과 paging enabled 를 잘 선택해줘야한다. 특히 paging enabled 의 경우 선택을 해주게되면, 스크롤(슬라이드)을 했을 때, 한 셀씩 차-악 넘어간다. (이부분은 마지막 실행 영상에서 확인이 가능하다)
2. cell setting
위에서 말했다시피 콜렉션뷰의 장점은 셀을 재활용할 수 있다는 점이라고 생각한다. 그래서 나는 주로 자주 쓰이는 셀은 xib 파일로 따로 만들어 관리를 해준다.
collectionview cell 을 따로 만들어주고, IBOutlet으로 연결을 해준다.
3. cell 등록
placeDetailImgCV.register(UINib(nibName: "PlaceDetailCollectionViewCell", bundle: .main), forCellWithReuseIdentifier: "PlaceDetailCollectionViewCell")

// placeDetailImgCV : CollectionView
위의 코드와 같이 셀을 등록할 수 있다.
4. collection view delegate, datasource
extension PlaceDetailViewController : UICollectionViewDataSource, UICollectionViewDelegate {

    // 반환할 데이터의 개수
    func collectionView(_ collectionView: UICollectionView, numberOfItemsInSection section: Int) -> Int {
        return imageArr.count
    }

    // 셀에 뭐가 들어갈지
    func collectionView(_ collectionView: UICollectionView, cellForItemAt indexPath: IndexPath) -> UICollectionViewCell {

        var cell = UICollectionViewCell()
        if collectionView.tag == 0 {
            guard let Imgcell = collectionView.dequeueReusableCell(withReuseIdentifier: "PlaceDetailCollectionViewCell", for: indexPath) as? PlaceDetailCollectionViewCell else {
                return PlaceDetailCollectionViewCell()
            }

            Imgcell.placeDetailImgView.image = UIImage(named:imageArr[indexPath.row])
            Imgcell.clipsToBounds = true
            cell = Imgcell
        }
        return cell

    }
}
다음과 같이 extension을 통해 collection view의 delegate를 구현해줄 수 있다.
그리고, delegate 내가 할꺼임!! 을 알려주는 아래 코드를 잊지 말자.
참고로 tag는 콜렉션뷰를 구분하기 위해 넣은 코드이다.(필수적이지는 않으나, 현재 진행중인 프로젝트 일부를 발췌한거라, tag를 넣었을 뿐이다.)
placeDetailImgCV.delegate = self
placeDetailImgCV.dataSource = self
placeDetailImgCV.tag = 0