
✅ 비동기 자바스크립트
시간이 걸리는 작업을 기다리지 않고 먼저 실행한 뒤, 나중에 결과를 처리하는 방식.
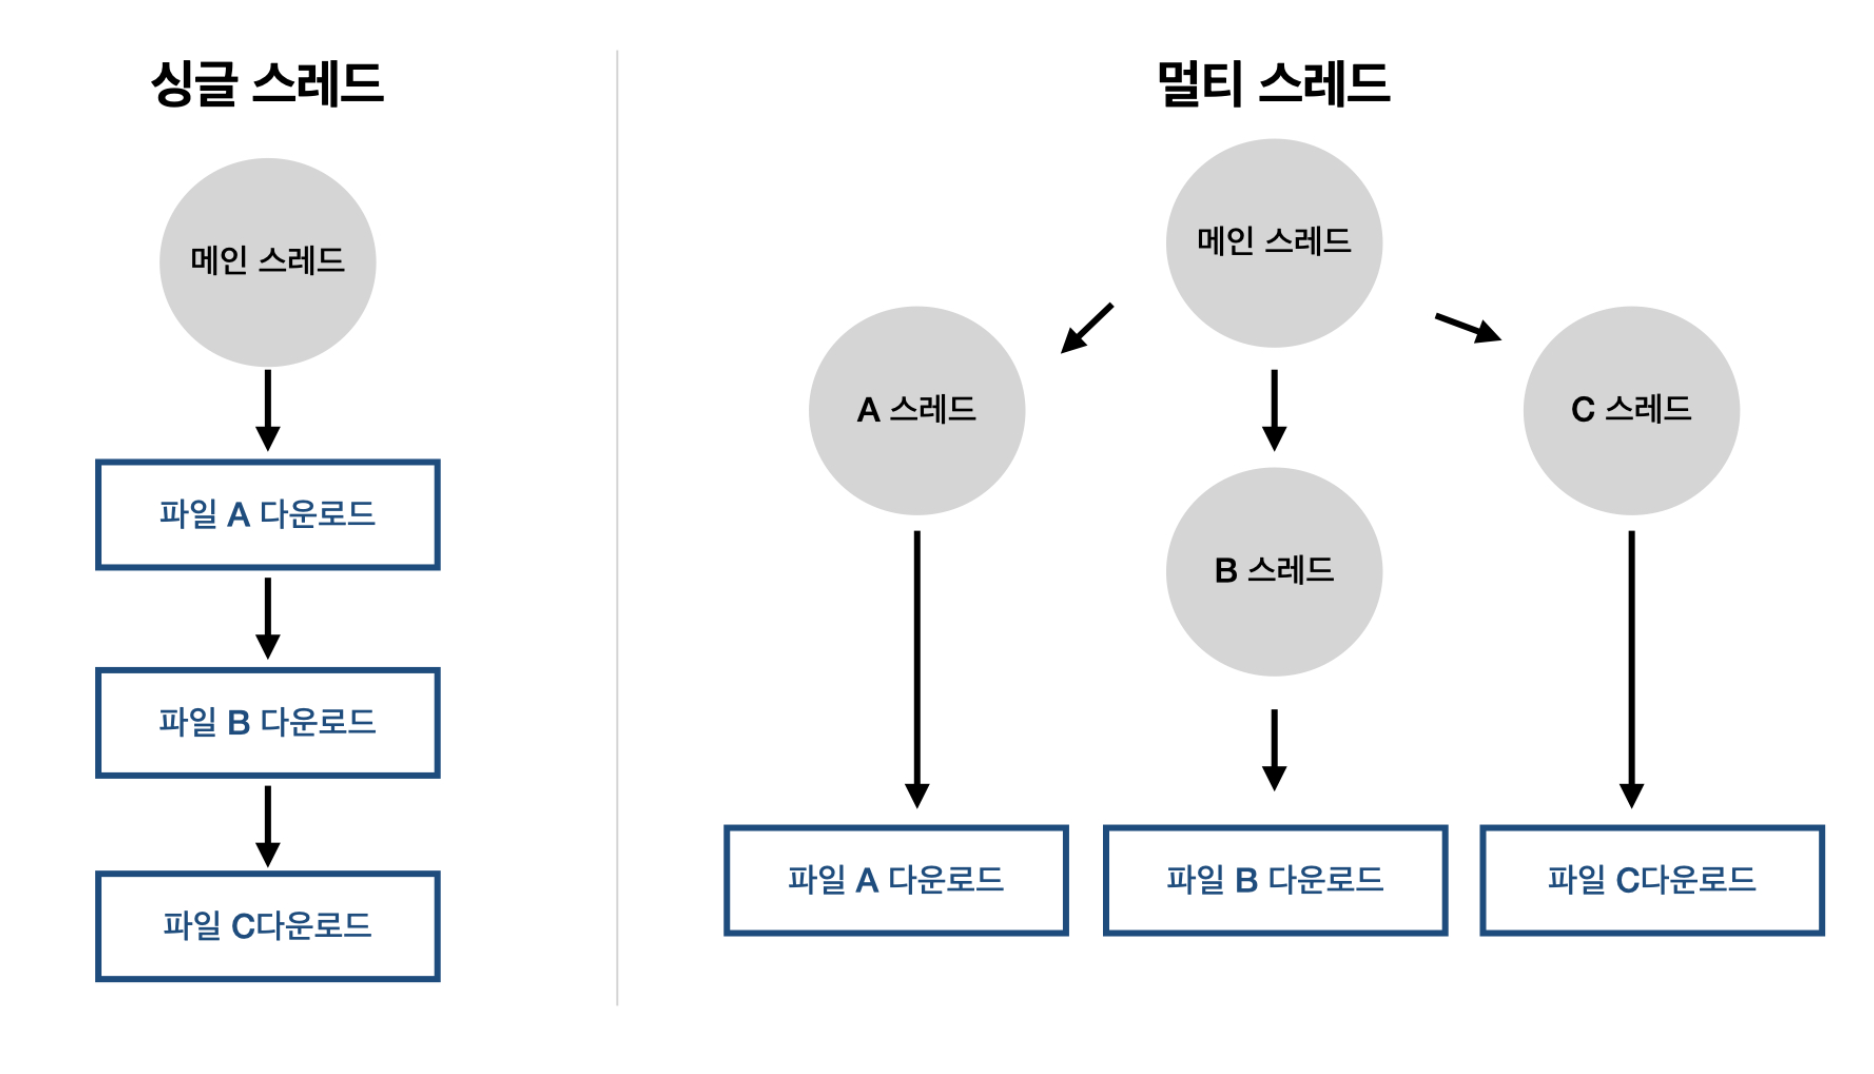
✔️ 자바스크립트는 기본적으로 싱글 스레드 언어
✔️ 비동기 방식을 통해 UI 멈춤 없이 빠르게 처리 가능.
🌠 싱글 스레드(Single-Thread)란?
프로세스가 단일 스레드로 동작하는 방식
처리를 단일 스레드만으로 직렬 처리하는 프로그래밍 방법
동기 vs 비동기
동기(Synchronous)
작업을 순차적으로 처리. 하나 끝나야 다음 실행.
비동기(Asynchronous)
기다리지 않고 다음 작업 실행, 결과는 나중에 받아 처리.
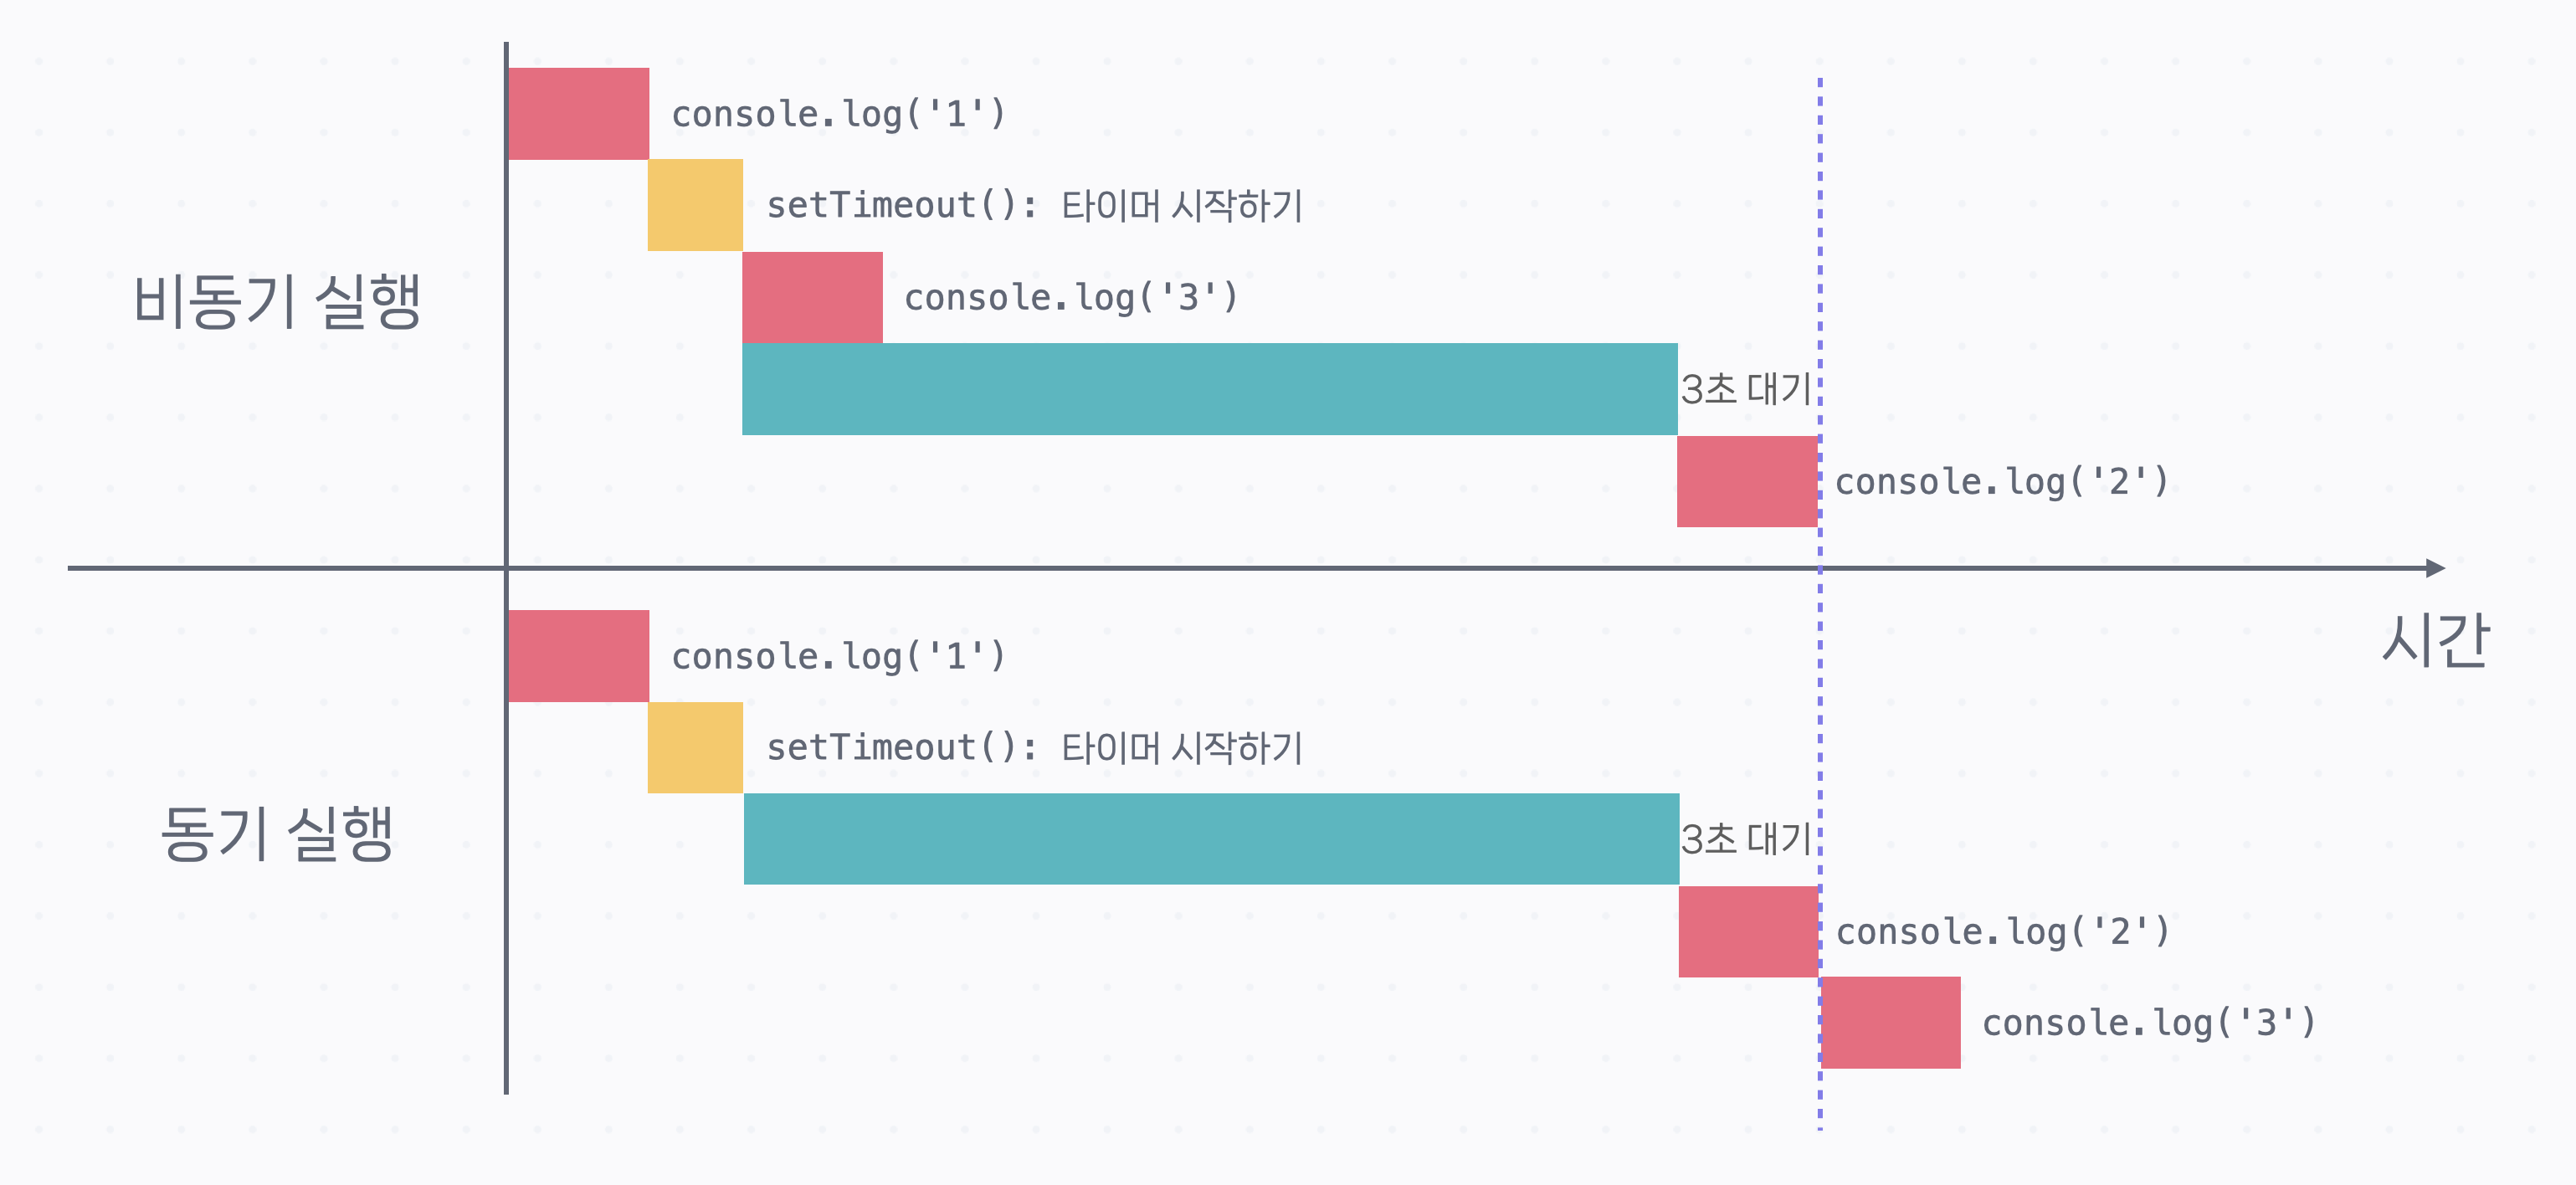
console.log('1');
setTimeout(() => console.log('2'), 3000);
console.log('3');


------
1
3
2
비동기의 필요성
✔️ 서버 요청, 파일 읽기 등 시간이 걸리는 작업을 할 때
✔️ 사용자 경험(UX) 개선 (화면 멈춤 방지)
✔️ 빠르고 효율적인 프로세스 관리
비동기 처리방식에는 콜백(Callback), Promise 방식이 있다.
🌠 AJAX란?
AJAX는 Asynchronous JavaScript and XML의 약자.
쉽게 말하면, 웹 페이지를 새로 고침하지 않고도 서버와 데이터를 주고받을 수 있는 기술이다. 이를 통해 사용자 경험을 더 부드럽고 빠르게 만들어줄 수 있다.
주요 특징
✔️ 비동기적 처리: 서버에 요청을 보내고 응답을 받을 때 페이지를 새로 고침하지 않음.
✔️ 배경에서 데이터 요청: 사용자 인터페이스를 방해하지 않고 데이터를 받아와서 화면을 갱신.
✔️ 빠른 반응: 필요한 부분만 갱신되므로 전체 페이지가 다시 로딩될 필요 없음.
✅ 비동기 함수
다양한 종류의 비동기 함수 예시
setTimeout() 함수
일정 시간(delay) 후에 지정한 함수를 한 번 실행
setTimeout(callback, delay);

// 함수의 동작
// setTimeout() 이전에 있는 코드 실행
// setTimeout() 함수 실행: delay 만큼 기다리는 타이머를 시작
// setTimeout() 이후에 있는 코드 실행
// delay가 지나면 callback 실행
setInterval() 함수
시간 간격을 두고 콜백을 반복적으로 실행
setTimeout()과 비슷한 setInterval() 함수
console.log('Start');

// setInterval(callback, interval): interval 단위는 밀리초입니다.
setInterval(() => console.log('2초가 지났습니다'), 2000);

console.log('End');


------
Start
End
2초가 지났습니다
2초가 지났습니다
2초가 지났습니다
2초가 지났습니다
...
(callback은 interval이 지난 후 처음으로 실행된다.)
콜백이 호출되는 것을 멈추고 싶다면 setInterval() 함수의 리턴값을 저장해 놨다가 clearInterval()을 실행한다.
console.log('Start');

const intervalID = setInterval(() => console.log('2초가 지났습니다'), 2000);

// 7초 후에 setInterval() 해제
setTimeout(() => clearInterval(intervalID), 7000);

console.log('End');


------
Start
End
2초가 지났습니다
2초가 지났습니다
2초가 지났습니다

//2초가 지났습니다를 2초마다 출력하지만
// 7초 후에 clearInterval() 함수가 setInterval() 함수를
// 해제하기 때문에 2초 지났습니다는 세 번만 출력
DOM의 addEventListener() 함수
웹 페이지 요소에 상호 작용이 있을 경우 실행할 함수를 등록한다.
const btn = document.querySelector('.my-btn');

btn.addEventListener('click', () => console.log('button clicked!'));

// ...
React의 useEffect() 함수
컴포넌트가 모두 화면에 그려지는 시점에 콜백을 실행
function PostList() {
  // ...

  useEffect(() => console.log('render finished!'), []);

  return (
    <div className="post-list">
      <div className="post-item">...</div>
      <div className="post-item">...</div>
      <div className="post-item">...</div>
      ...
    </div>
  );
}
Express의 get() 함수
Express는 서버를 만들 때 사용
app.get() 함수는 /hello 주소로 GET 리퀘스트가 들어오면 두 번째 아규먼트인 콜백을 실행하는데, 콜백은 ‘Success’라는 내용을 담고 있는 리스폰스를 보내준다.
app.get('/hello', (req, res) => {
  res.send('Success!');
});

// ...
✅ 콜백
함수의 아규먼트로 전달되는 함수를 콜백 또는 콜백 함수라고 부른다.
나중에 필요할 때 호출되는 함수를 뜻한다.
영어 의미 그대로, 나중에 다시 불러주는 함수.
🖥️ (일단 이 함수를 넘겨줄 테니, 네가 적절한 때에 실행해줘)
- 비동기 함수는 이후에 있는 코드를 모두 실행하고 콜백을 실행한다.
console.log('1');

setTimeout(() => console.log('2'), 0);

console.log('3');
console.log('4');
console.log('5');


------
1
3
4
5
2- 실행할 콜백이 여러 개일 경우, 동기적으로 실행된다.
console.log('1');

setTimeout(() => console.log('2'), 1001);

setTimeout(() => console.log('3'), 1000);

console.log('4');


------
1
4
3
2
📄 function 키워드로 선언한 함수를 콜백으로 사용(콜백 파라미터 없음)
function printMessage(func) {
  console.log('Printing message...');
  func();
}

function sayHello() {
  console.log('Hello World!');
}

printMessage(sayHello);


------------
Printing message...
Hello World!
📄 Arrow Function을 콜백으로 사용(콜백 파라미터 없음)
라미터 없음)
function printMessage(func) {
  console.log('Printing message...');
  func();
}

printMessage(() => console.log('Hello World!'));


------------
Printing message...
Hello World!
📄 function 키워드로 선언한 함수를 콜백으로 사용(콜백 파라미터 있음)
function printMessageWithParams(func, name) {
  console.log('Printing message...');
  func(name);
}

function sayHello(name) {
  console.log(`Hello ${name}!`);
}

printMessageWithParams(sayHello, 'Bob');


------------
Printing message...
Hello Bob!
📄 Arrow Function을 콜백으로 사용(콜백 파라미터 있음)
function printMessageWithParams(func, name) {
  console.log('Printing message...');
  func(name);
}

printMessageWithParams((name) => console.log(`Hello ${name}!`), 'Bob');


------------
Printing message...
Hello Bob!
콜백의 한계점
콜백 헬(Callback Hell)
콜백 기반 코드는 모든 작업을 함수 안에서 처리하기 때문에 작업을 이어서 하려면 콜백 안에 콜백을 등록해야 한다. 그렇기 때문에 콜백을 중첩해서 사용해야 하고, 이런 현상을 콜백 헬(Callback Hell)이라고 부른다.
✔️ 코드를 이해하기도 힘들고
✔️ 디버깅이나 테스팅 같은 걸 하기도 어렵다.
// 직원 데이터를 가져온 후 리스폰스를 파싱하고 데이터를 프로세싱 하는 예시
getEmployees((response) => {
  json(response, (data) => {
    groupEmployees(data, (result) => {
      console.log(result);
    });
  });
});
🌠 참고로 모든 상황에 Promise 기반 코드가 더 좋고, 모든 비동기 작업은 Promise로 처리하는 것은 아니다. Promise는 비동기 코드의 결괏값을 활용해야 할 때 특히 유용하고 이런 경우가 아니라면 여전히 콜백을 사용한다.
✅ Promise
Promise는 비동기 작업이 완료되면 값을 알려 주는 객체
🖥️ (비동기 작업이 끝나면 알려줄게)라고 약속하는 객체
✔️ ES6(ES2015)에서 도입
✔️ 콜백 지옥(callback hell)을 해결하기 위해 만들어진 표준 비동기 처리 방법.
Promise의 동작 원리
Promise는 3가지 상태(state)를 가진다.
| 상태 | 설명 |
|---|---|
| pending (대기) | 작업이 아직 끝나지 않음 비동기 작업이 끝나기를 기다릴 때 |
| fulfilled (이행) | 작업이 성공적으로 끝남 (resolve) 비동기 작업의 성공 결과를 결괏값으로 갖게 됨. |
| rejected (거부) | 작업이 실패함 (reject) 비동기 작업에서 발생한 오류를 결괏값으로 갖게 됨. |
Promise 객체를 통해 비동기 작업의 결과를 가져오거나 오류를 적절히 처리할 수 있다.
Promise 객체를 다루는 방법은 두 가지가 있다.
await, async 문법
await
🌠 Promise 객체의 값을 가져오려면 항상 앞에 await을 붙어야 한다.
fetch함수는 비동기 작업이 완료되면 promise가 결과값을 알려준다.
그 결과 값을 받아 오려면 await 문법을 쓰면 된다.
const result = await Promise;

// 예시
const response = await fetch('https://learn.codeit.kr/api/employees');
Promise 객체 앞에 await 키워드를 쓰면 Promise의 상태가 fulfilled 또는 rejected가 될 때까지 기다린다.
✔️ Fulfilled가 되면 Promise 객체의 결괏값을 리턴
✔️ Rejected가 되면 Promise 객체의 결괏값(오류)을 throw
await은 보통 async 함수 안에서 사용한다.
ES 모듈의 최상위 레벨에서 사용할 수 있다.(함수 바깥)
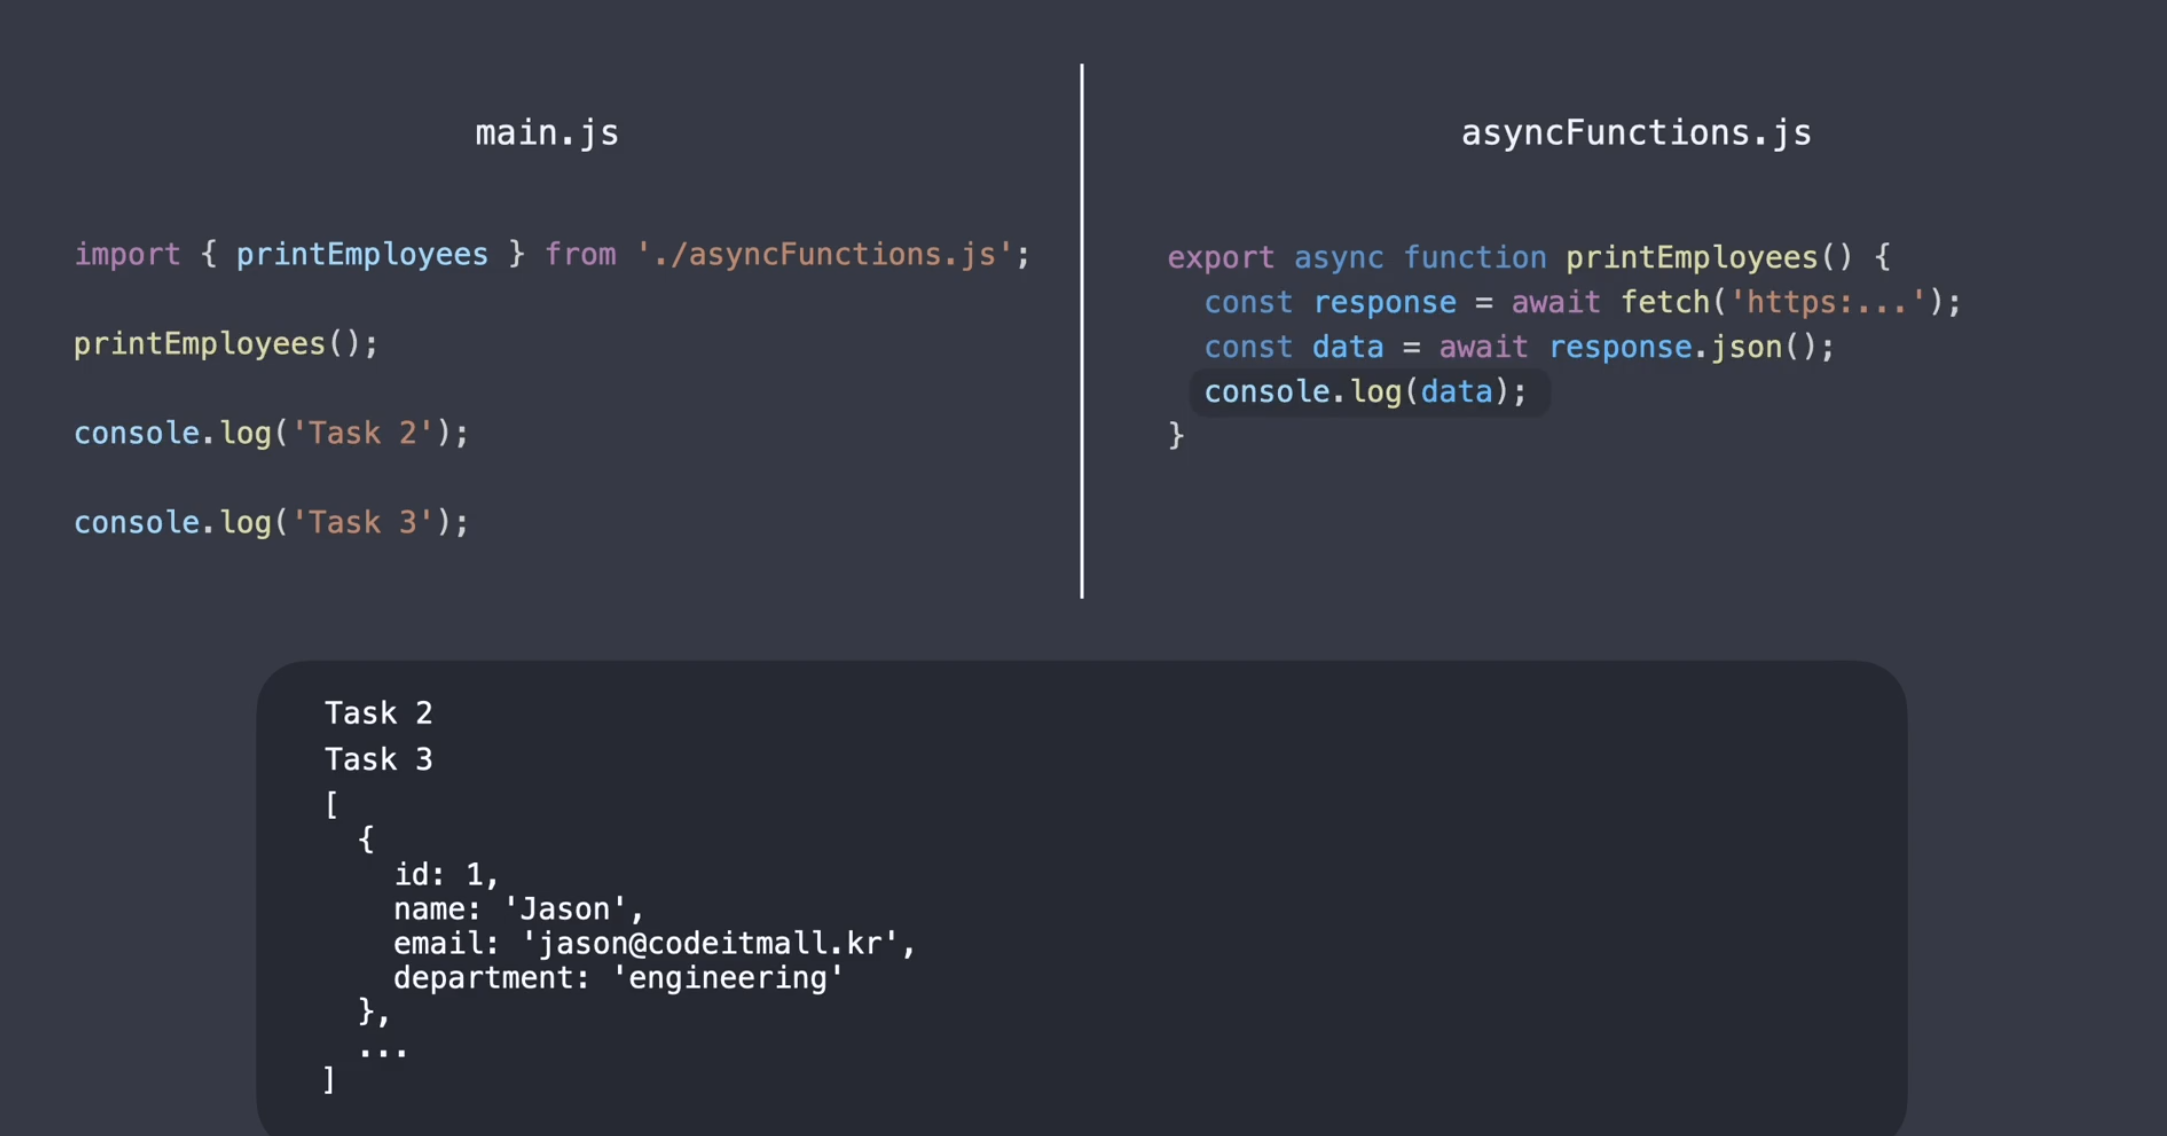
// 일반 function
async function printEmployees() {
  const response = await fetch('https://learn.codeit.kr/api/employees');
  const data = await response.json();
  console.log(data);
}

// Arrow function
const printEmployees = async () => {
  const response = await fetch('https://learn.codeit.kr/api/employees');
  const data = await response.json();
  console.log(data);
}
async 함수
promise와 await으로 비동기 처리를 제대로 하려면 함수를 이용해야한다.
✔️async 함수는 항상 Promise를 리턴한다.
- 함수 안에서 Promise를 리턴하면 그 Promise를 그대로 리턴한다.
- 함수 안에서 평범한 값을 리턴하면 그 값을 결괏값으로 갖는 Promise를 리턴한다.
따라서 async 함수에서 리턴하는 값을 가져오려면 await을 활용해야 한다.
async 함수를 만들려면 function 앞에 async키워드를 붙여준다.
export function printEmployess(){}


async function printEmployess(){} // 일반 function

const printEmployessArrow = async () => {} // Arrow function 문법으로 정의

// --------------------------------------------------------

// 일반 function
async function printEmployees() {
  const response = await fetch('https://learn.codeit.kr/api/employees');
  const data = await response.json();
  console.log(data);
}

// Arrow function
const printEmployees = async () => {
  const response = await fetch('https://learn.codeit.kr/api/employees');
  const data = await response.json();
  console.log(data);
}
❌ 오류처리
try, catch를 이용해서 오류를 처리할 수 있다.
✔️ 오류가 발생할 만한 코드를 try로 감싸 주고,
✔️ catch 안에서 오류를 처리
async function printEmployees() {
  try {
    const response = await fetch('https://learn.codeit.krrrrr/api/employees');
    const data = await response.json();
    console.log(data);
  } catch (error) {
    console.log('error!');
  }
}
발생한 오류는 catch문의 error 변수에 전달되기 때문에 이걸 활용할 수도 있다.
try, catch문의 결과와 상관없이 끝에 항상 실행해야 하는 코드가 있다면 finally문을 사용한다.
// 오류가 발생해서 catch문에서 return을 해도
async function printEmployees() {
  try {
    const response = await fetch('https://learn.codeit.krrrrr/api/employees');
    const data = await response.json();
    console.log(data);
  } catch (error) {
    console.log('error!');
    return;
  } finally {
	// console.log('finished')는 실행
    console.log('finished');
  }
}
.then(), .catch(), .finally() 메소드
.then() 메소드
Promise 객체의 메소드
앞선 Promise 객체가 fulfilled 상태가 될 때까지 기다렸다가 fulfilled 상태가 되면 안에 있는 콜백을 실행한다.
✔️ 이때 앞선 Promise의 결괏값을 콜백의 아규먼트로 전달하고,
✔️ 앞선 Promise를 기다리는 동안에는 이후에 있는 코드를 실행
✔️ .then()도 항상 Promise를 리턴한다.
- .then()안의 콜백이 Promise를 리턴할 경우 Promise를 그대로 리턴
- .then()안의 콜백이 평범한 값을 리턴할 경우 이 값을 결괏값으로 가지는 Promise를 리턴
-> 따라서 .then()을 연결해서 쓸 수 있고, 이걸 Promise 체인이라고 부른다.
fetch('https://learn.codeit.kr/api/employees')
  .then((response) => response.json())
  .then((data) => console.log(data));

console.log('Task 2');
console.log('Task 3');


-------------------------------------------
Task 2
Task 3
[
  {
    id: 1,
    name: 'Jason',
    email: 'jason@codeitmall.kr',
    department: 'engineering'
  },
  ...
]
❌ 오류처리
Promise 체인에서는 .catch(), .finally() 메소드를 이용해서 오류 처리를 할 수 있다.
fetch('https://learn.codeit.krrrr/api/employees')
  .then((response) => response.json())
  .then((data) => console.log(data))
  .catch((error) => console.log('error!'))
  .finally(() => console.log('finished'));
📄 정리하자면,
.then()은 앞선 Promise가 fulfilled 상태가 되면 안에 있는 콜백을 실행한다.
(이때 앞선 Promise의 결괏값을 콜백의 아규먼트로 전달).catch()는 앞선 Promise가 rejected 상태가 되면 안에 있는 콜백을 실행한다.
(이때 앞선 Promise의 결괏값(오류)을 콜백의 아규먼트로 전달).finally()는 앞선 Promise가 fulfilled 또는 rejected 상태가 되면 안에 있는 콜백을 실행한다.
.then()의 경우 앞선 Promise가 rejected 상태가 되면 콜백을 실행하지 않고, 앞선 Promise를 그대로 리턴한다.
따라서 rejected된 Promise는 .catch() 전까지 전파되고, 대부분의 경우 .catch()와 .finally()를 Promise 체인 마지막 부분에 쓴다.
Promise.all()
Promise.all([p1, p2, p3, ...])은 여러 Promise를 동시에 기다릴 때 사용한다.
여러 비동기 작업을 한꺼번에 처리할 때 유용하다.
✔️ Promise.all() 자체도 Promise를 리턴한다.
- 아규먼트로 전달된 Promise들이 모두 fulfilled 상태가 되면 Promise.all()이 리턴하는 Promise도 fulfilled 상태가 된다.
(그리고 아규먼트로 전달되는 Promise의 성공 결괏값들로 이루어진 배열을 결괏값으로 갖게 된다.) - 아규먼트로 전달된 Promise 중 하나라도 rejected 상태가 되면 Promise.all()이 리턴하는 Promise는 rejected 상태가 된다.
(그리고 rejected된 Promise의 결괏값(오류)을 결괏값으로 갖게 된다.)
async function getEmployee(id) {
  const response = await fetch(`https://learn.codeit.kr/api/employees/${id}`);
  const data = await response.json();
  return data;
}

const promises = [];

for (let i = 1; i < 11; i++) {
  promises.push(getEmployee(i));
}

let employees;

try {
  employees = await Promise.all(promises);
} catch (error) {
  console.log(error);
}

console.log(employees);


-------------------------------------
  [
  {
    id: 1,
    name: 'Jason',
    email: 'jason@codeitmall.kr',
    department: 'engineering'
  },
  {
    id: 2,
    name: 'Alice',
    email: 'alice@codeitmall.kr',
    department: 'engineering'
  },
  ...
]
참고자료
코드잇 | 비동기 자바스크립트 토픽