- SDN, SDDC, SDWAN
- SDN(Software-Defined Networking): 네트워크 제어 부분을 소프트웨어로 분리하여 중앙 집중식으로 관리하고 프로그래밍할 수 있도록 하는 기술
- SDDC(Software-Defined Data Center): 전통적인 데이터 센터를 가상화하고, 네트워크, 스토리지, 컴퓨팅 등의 리소스를 소프트웨어로 추상화해 제공하는 개념
- SDWAN(Software-Defined Wide Area Network): 소프트웨어를 사용해 광역 네트워크(WAN)를 관리하는 기술
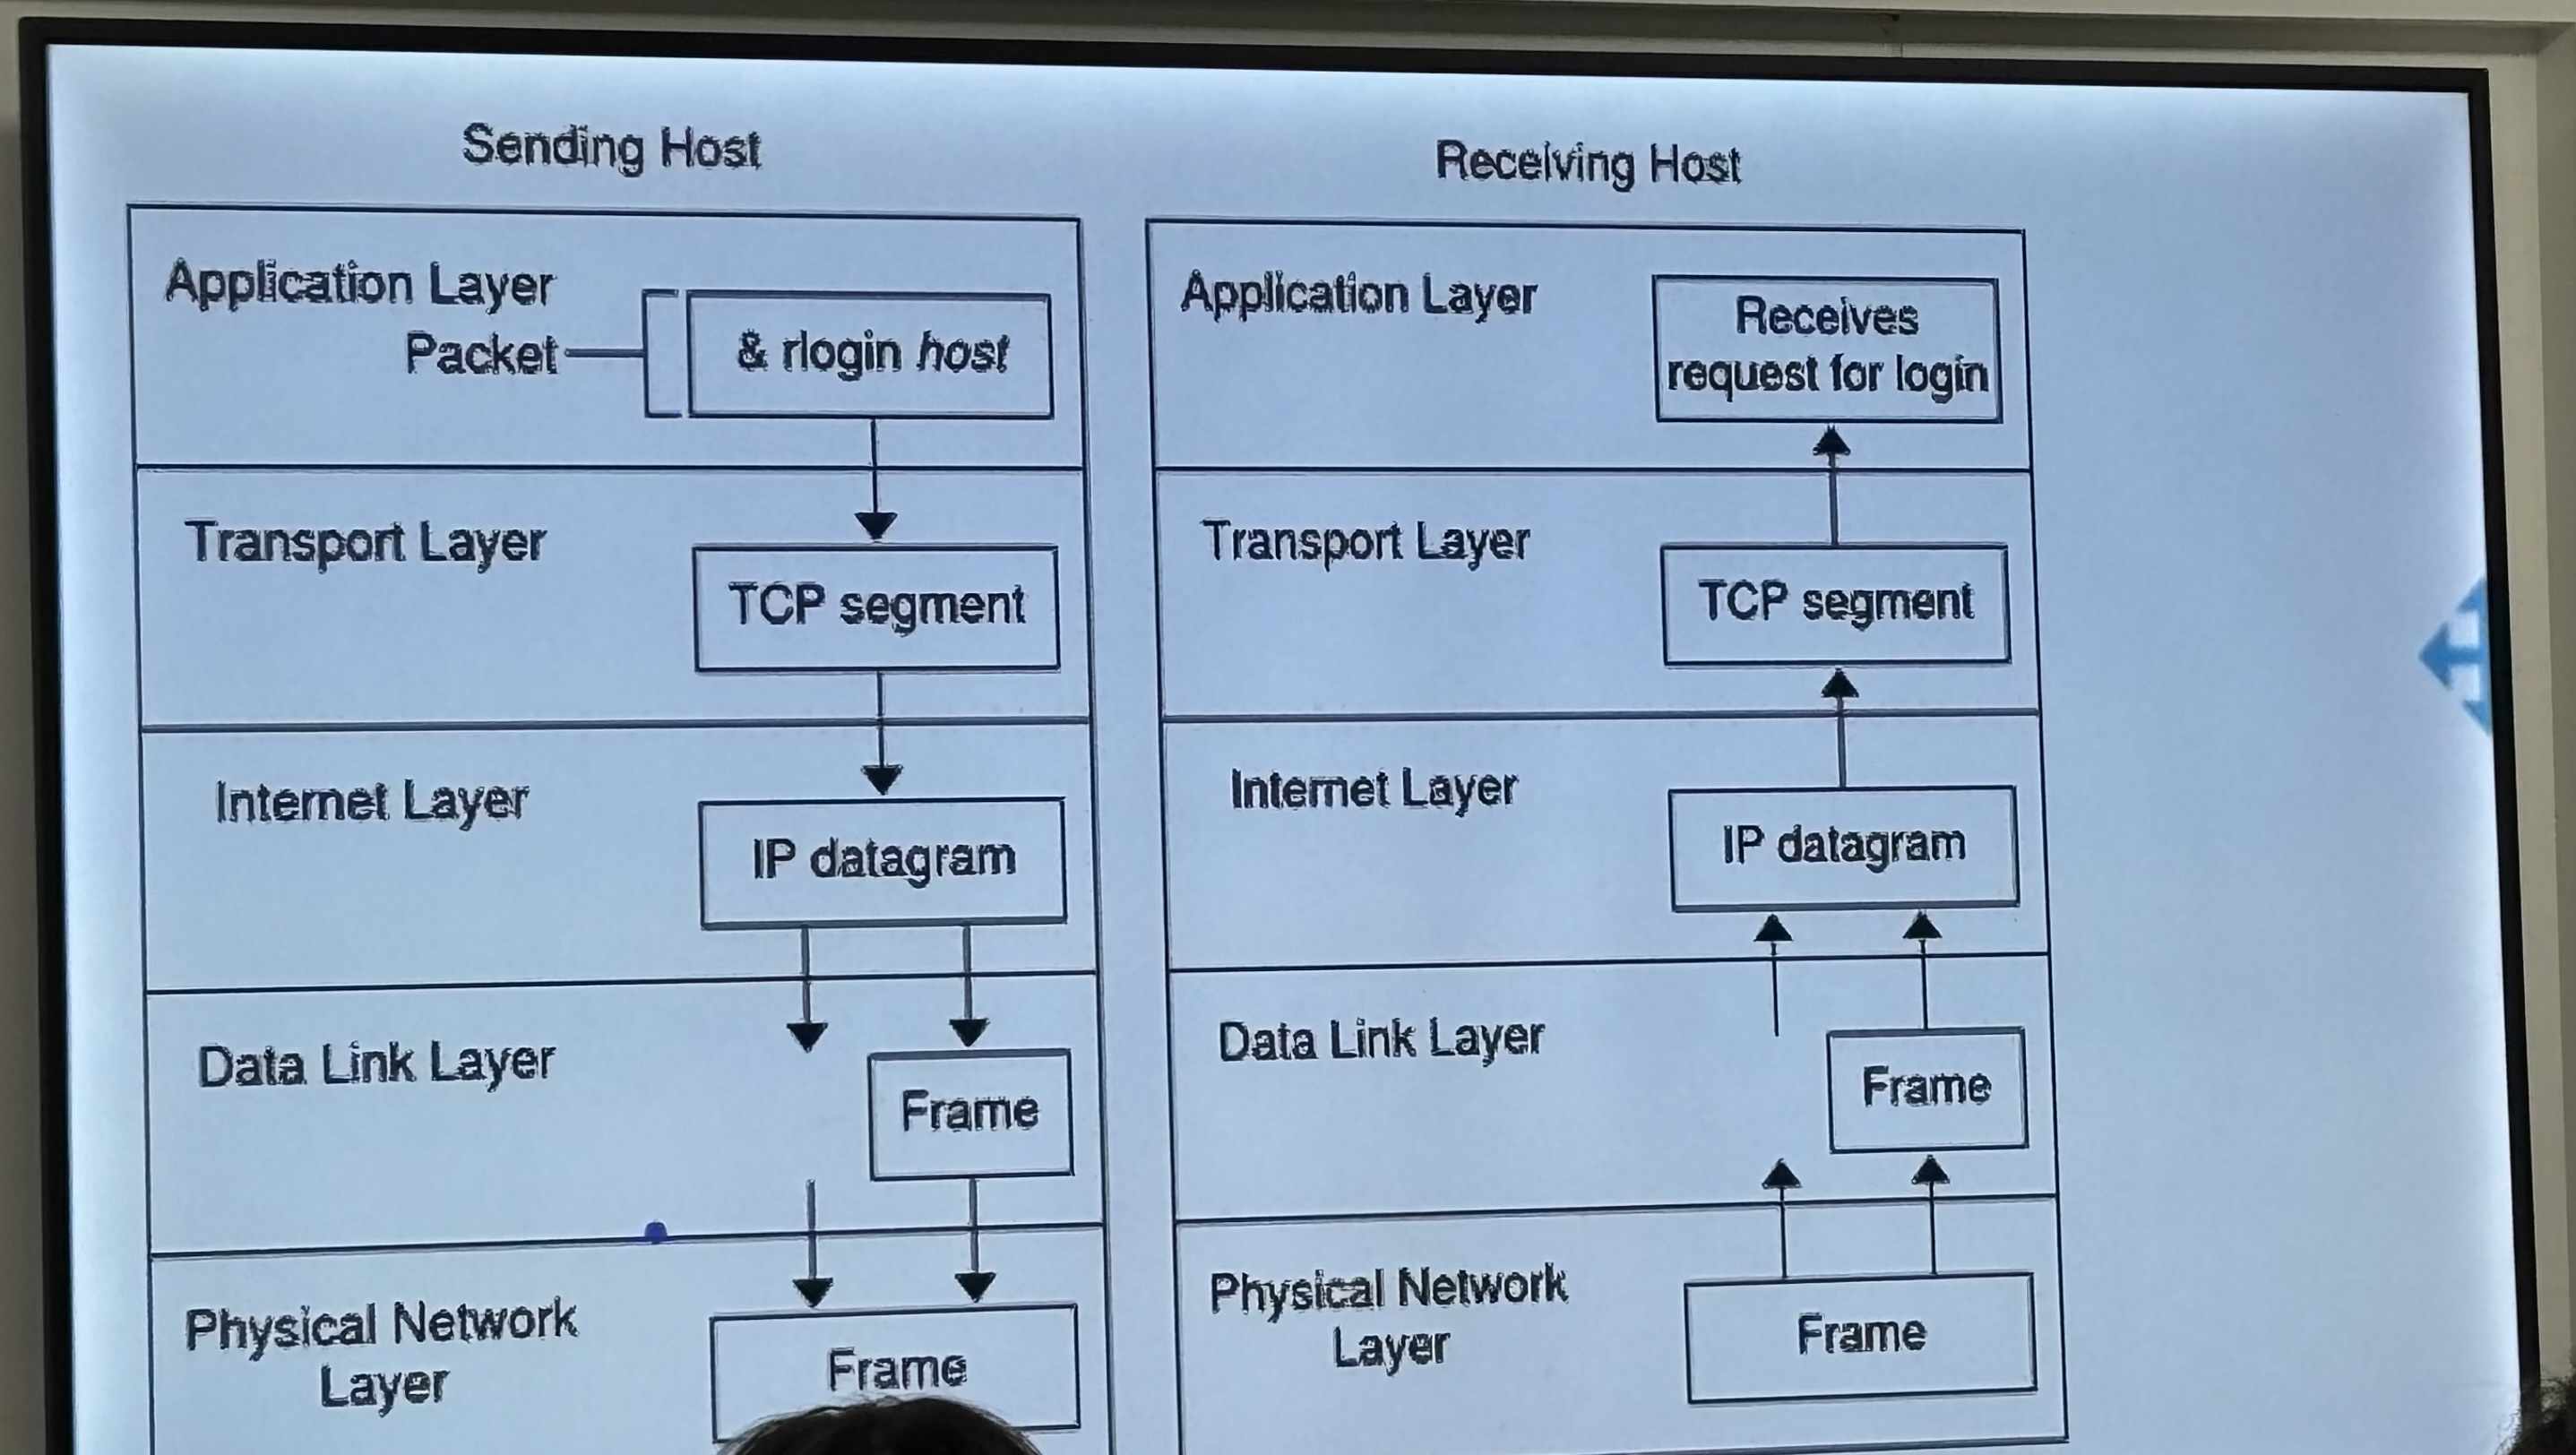
- proxyCommand
- ProxyCommand: SSH 클라이언트가 중간 서버(예: Bastion Host)를 거쳐 최종 목적지 서버에 연결할 수 있도록 설정하는 옵션
어제 task review
[SSH 부분]
-
먼저 rocky1에서 key-pair을 만든다.
ssh-keygen -q -N "" -f lab.pem -
public key는 .ssh/authorized_key에 저장
cat lab.pem.pub > .ssh/authorized_keys만약 .ssh 가 없다면 직접 만들어야 한다.
mkdir ~/.ssh ; chmod 700 ~/.ssh ; touch ~/.ssh/authorized_keys && chmod 600 ~/.ssh/authorized_keys -
cat .ssh/authorized_keys로 키가 잘 들어갔는지 확인 -
lab.pem, lab.pem.pub을 지워야 함.
ls로 파일 확인 후rm -rf lab.pem* -
SSH 버튼 211.183.3.101 user1 으로 접속, Use private key에서 key 파일 가져와서
-
local) ls, cat .ssh/config
-
vi .ssh/config
-
211.183.3.101 → 192.168.1.131 (본인 ip (ipconfig)) 변경
따라하다가 놓친 ver.
-
rocky2:/shared←→ rocky1:/test 마운트를 해제 한다. 이를 rocky1 의 /var/www/html 과 마운트 시킨다. 사전에 rocky1 에 httpd 를 설치해 두어야 한다!!!!
rocky1:/var/www/html ←→ rocky2:/shared
이후 rocky1 에서 /var/www/html/index.html 파일을 작성하면 rocky2:/shared 에서 해당 파일을 확인할 수 있어야 하며 외부 사용자들은 주소 창에 http://192.168.X.Y ← rocky1 의 공인IP 로 접속시 index.html 파일의 내용을 확인할 수 있어야 한다!!!
[user1@rocky1 ~]$ sudo dnf -y install httpd

[user1@rocky1 ~]$ sudo mount -t nfs 211.183.3.102:/shared /var/www/html

[user1@rocky1 ~]$ sudo echo "hello all" > /var/www/html/index.html
-bash: /var/www/html/index.html: Permission denied
[user1@rocky1 ~]$
[user1@rocky1 ~]$ echo "hello all" | sudo tee /var/www/html/index.html
hello all
[user1@rocky1 ~]$
[user1@rocky1 ~]$ sudo cat /var/www/html/index.html
hello all
[user1@rocky1 ~]$
[user1@rocky1 ~]$ sudo systemctl start httpd   # 지금 시작
[user1@rocky1 ~]$ sudo systemctl enable httpd # 재부팅 이후 자동 시작
# 포트 수정하기
[user1@rocky1 ~]$ sudo vi /etc/httpd/conf/httpd.conf

[user1@rocky1 ~]$ sudo getenforce
Enforcing
[user1@rocky1 ~]$ sudo setenforce 0  # 지금 당장 중지
[user1@rocky1 ~]$
[user1@rocky1 ~]$ sudo sed -i 's/SELINUX=enforcing/SELINUX=disabled/' /etc/selinux/config
[user1@rocky1 ~]$ sudo cat /etc/selinux/config | grep ^SELINUX=
SELINUX=disabled
[user1@rocky1 ~]$ sudo systemctl restart httpd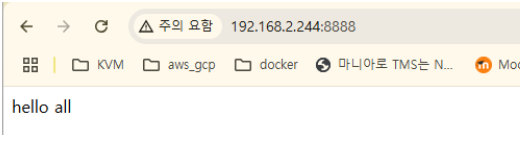
성공 ver.
-
키페어 만들고 공개키 복붙
rocky1)
-
ssh-keygen -q -N “” -f testkey.pem
-
cat testkey.pem.pub 복사
-
rm -rf .ssh
-
mkdir ~/.ssh ; chmod 700 ~/.ssh, touch ~/.ssh/authorized_keys && chmod 600 ~/.ssh/authorized_keys
-
vi ~/.ssh/authorized_keys 붙여넣기
rocky2)
-
rm -rf .ssh
-
mkdir ~/.ssh ; chmod 700 ~/.ssh, touch ~/.ssh/authorized_keys && chmod 600 ~/.ssh/authorized_keys
-
vi ~/.ssh/authorized_keys 붙여넣기
-
-
rocky1, 2 연결되어있는지 확인
rocky1)
-
ping 211.183.3.102 -c 3
rocky2)
-
ping 211.183.3.101 -c 3
-
-
로컬에 testkey.pem 파일 생성
rocky1)
-
cat testkey.pem 복사
local)
-
vi testkey.pem 붙여넣기
-
바탕화면에 메모장에 testkey.pem 파일 만들기
-
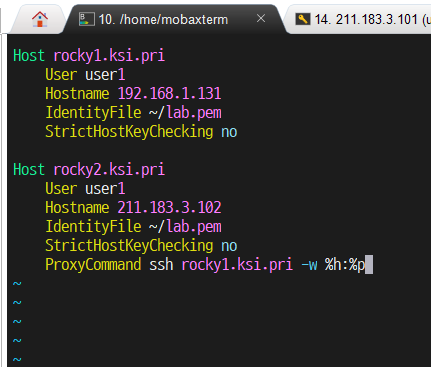
vi .ssh/config
-
- ssh 연결 ✅
-
ssh rocky1.ksi.pri -l user1 -i testkey.pem
Activate the web console with: systemctl enable --now cockpit.socket

Last login: Wed Mar  5 08:56:37 2025 from 211.183.3.1
-
-
rocky2 는 /shared 라는 디렉토리가 생성되어있을 것이다. 이를 외부에 노출시켜 서버들이 이용사용할 수 있도록 할 계획이다.
/shared 는 211.183.3.0/24 의 모든 서버들이 공유할 수 있어야 하며 파일 작성,수정,삭제 가 모두 가능해야 한다.
-
/shared 디렉토리가 없어서 생성
rocky2)
- sudo mkdir -p /shared
- sudo chmod 777 /shared
- sudo vi /etc/exports
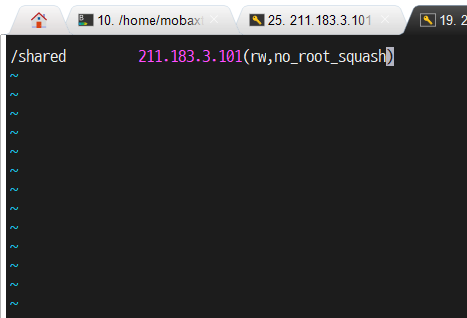
- sudo systemctl restart nfs-server
rocky1 은 로컬 환경에 /test 디렉토리를 생성하고 rocky2 의 /shared 와 마운트 시켜 파일을 작성해 본다.
rocky1)
- sudo systemctl status nfs-server
- sudo systemctl start nfs-server
- sudo systemctl enable nfs-server
- showmount -e 211.183.3.102
- sudo mkdir -p /test
- sudo mount -t nfs 211.183.3.102:/shared /test
- df -h | grep 211.183.3.102
- echo “Hello from rocky1” | sudo tee /test/index.html
rocky2 의 /shared 에서 이를 확인할 수 있어야 한다.
rocky2)
- ls -l /shared
- cat /shared/index.html →Hello from rocky1
-
-
rocky2:/shared←→ rocky1:/test 마운트를 해제 한다. 이를 rocky1 의 /var/www/html 과 마운트 시킨다. 사전에 rocky1 에 httpd 를 설치해 두어야 한다!!!!
- sudo umount /test
- sudo dnf install -y httpd
rocky1:/var/www/html ←→ rocky2:/shared
이후 rocky1 에서 /var/www/html/index.html 파일을 작성하면 rocky2:/shared 에서 해당 파일을 확인할 수 있어야 하며
-
sudo systemctl enable --now httpd
-
sudo mount -t nfs 211.183.3.102:/shared /var/www/html
-
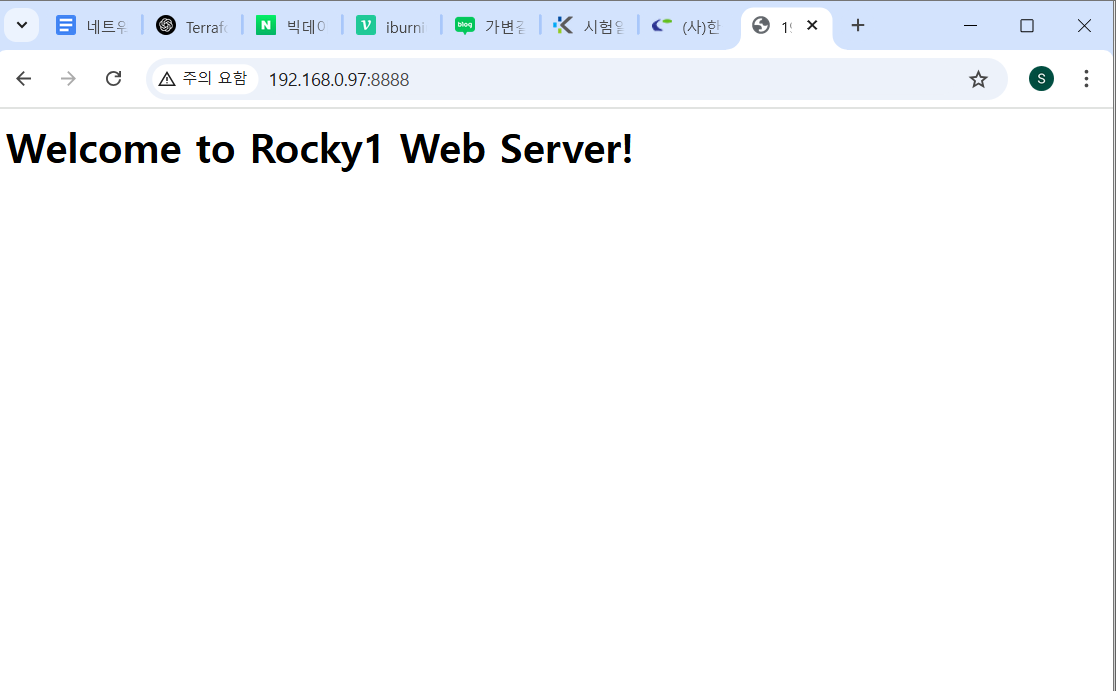
echo "<h1>Welcome to Rocky1 Web Server! </h1>” | sudo tee /var/www/html/index.html -
ip addr
-
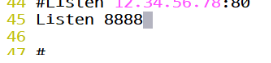
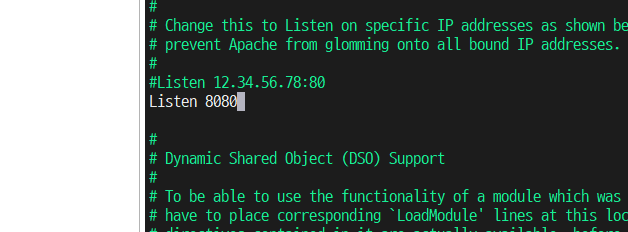
sudo vi /etc/httpd/conf/httpd.conf
-
포트 8888로 바꿈
-
sudo systemctl restart httpd → 안되면
- sudo systemctl status httpd → 이거 확인
- sudo vi /etc/selinux/config에서 → 안되면 SELINUX = disable을 enforcing으로 바꿈
-
setenforce 0
외부 사용자들은 주소 창에 http://192.168.X.Y ← rocky1 의 공인IP 로 접속시 index.html 파일의 내용을 확인할 수 있어야 한다!!!
-
크롬창에 http://192.168.0.97:8888 해서 확인
HAproxy 실습
- haproxy: 기존의 하드웨어 스위치를 대체하는 소프트웨어 로드밸런서로, 네트워크 스위치에서 제공하는 L4, L7 기능 및 로드 밸런서 기능을 제공한다.
- 준비
# httpd 중지 및 삭제
[user1@rocky1 ~]$ sudo systemctl stop httpd
[user1@rocky1 ~]$ sudo systemctl disable httpd
[user1@rocky1 ~]$ sudo dnf -y remove httpd
# nfs 중지
[user1@rocky2 ~]$ sudo systemctl stop nfs-server
[user1@rocky2 ~]$ sudo systemctl disable nfs-serverrocky1,2 종료 → rocky2 오른쪽버튼 → manage → clone → 다음 → 다음 → clone method를 create a full clone 로 바꾸고 다음 → virtual machine name: rocky3 마침
- rocky3을 실행하고 hostname 변경하기(rocky3), ip 변경하기(211.183.3.103), 인터넷 가능 여부 확인
# hostname 변경하기
[root@rocky2 ~]# hostnamectl set-hostname rocky3.ksi.pri
[root@rocky2 ~]# hostname
[root@rocky2 ~]# reboot
# ip 변경하기 [root@rocky3 ~]# ip a ... inet 211.183.3.102/24 brd 211.183.3.255 scope global noprefixroute ens160 valid_lft forever preferred_lft forever ... [root@rocky3 ~]# vi /etc/sysconfig/network-scripts/ifcfg-ens160 [root@rocky3 ~]# systemctl restart NetworkManager [root@rocky3 ~]# ip a ... inet 211.183.3.103/24 brd 211.183.3.255 scope global secondary noprefixroute ens160 valid_lft forever preferred_lft forever ...# 인터넷 연결 확인 [root@rocky3 ~]# ping www.google.com -c 3 PING www.google.com (142.250.206.196) 56(84) bytes of data. 64 bytes from kix07s07-in-f4.1e100.net (142.250.206.196): icmp_seq=1 ttl=128 time=37.2 ms 64 bytes from kix07s07-in-f4.1e100.net (142.250.206.196): icmp_seq=2 ttl=128 time=41.9 ms 64 bytes from kix07s07-in-f4.1e100.net (142.250.206.196): icmp_seq=3 ttl=128 time=36.2 ms --- www.google.com ping statistics --- 3 packets transmitted, 3 received, 0% packet loss, time 2003ms rtt min/avg/max/mdev = 36.245/38.462/41.937/2.488 ms
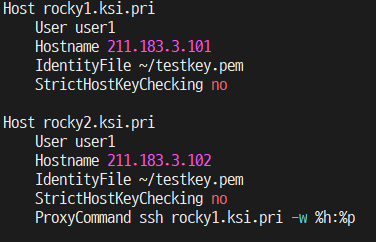
rocky1.ksi.priHost rocky1.kbt.pri User user1 Hostname 192.168.2.244 IdentityFile ~/lab.pem StrictHostKeyChecking no Host rocky2.kbt.pri User user1 Hostname 211.183.3.102 IdentityFile ~/lab.pem StrictHostKeyChecking no ProxyCommand ssh rocky1.kbt.pri -W %h:%p Host rocky3.kbt.pri User user1 Hostname 211.183.3.103 IdentityFile ~/lab.pem StrictHostKeyChecking no ProxyCommand ssh rocky1.kbt.pri -W %h:%p
Task.
rocky2, rocky3에서 httpd를 설치하고 index.html 파일을 /var/www/html 하위에 위치시키세요.
페이지는 각각 “WEB1”, “WEB2”가 되도록 해주세요
rocky1에서 http://211.183.3.102, 103으로 접속해보세요!!!!
💡- httpd 설치 및 index.html 생성
rocky2)
sudo dnf install -y httpd
sudo systemctl enable —now httpd
echo "<h1>WEB1</h1>" | sudo tee /var/www/html/index.html
rocky3)
sudo dnf install -y httpd
sudo systemctl enable —now httpd
echo "<h1>WEB2</h1>" | sudo tee /var/www/html/index.html- haproxy 설정
rocky1)
[user1@rocky1 ~]$ sudo vi /etc/haproxy/haproxy.cfg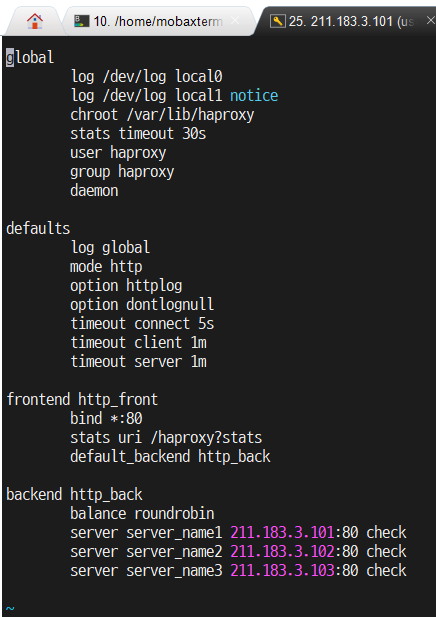
- 접속 확인
[user1@rocky1 ~]$ curl http://211.183.3.102
<h1>WEB1</h1>
[user1@rocky1 ~]$ curl http://211.183.3.103
<h1>WEB2</h1>
haproxy 구성
- 설치
- 구성파일
[user1@rocky1 ~]$ sudo dnf -y install haproxy- 설정파일
[user1@rocky1 ~]$ vi /etc/haproxy/haproxy.cfg안에 내용 다 지우기
global  # HAProxy 시스템에 대한 설정값
	log /dev/log local0
	log /dev/log local1 notice
	chroot /var/lib/haproxy
	stats timeout 30s
	user haproxy
	group haproxy
	daemon

defaults
	log global  # 로그정보는 global 을 따른다
	mode http              # tcp 를 사용하는 로드밸런싱 모드
	option httplog        # 기본 로그는 SIP, DIP
	option dontlognull    # 스캔등에 대한 정보는 로그화하지 않음
	timeout connect 5s  # 백엔드 서버로 연결 시도 시 최대 5초 대기
	timeout client 1m  # 클라이언트가 1분 동안 아무런 데이터도 보내지 않으면 연결 종료
	timeout server 1m  # 서버가 1분 동안 응답하지 않으면 연결 종료

frontend http_front
	bind *:80
	stats uri /haproxy?stats  #http://lb주소/haproxy?stats 에서 확인
	default_backend http_bac

backend http_back
	balance roundrobin
	server server_name1 192.168.1.101:80 check
	server server_name2 192.168.1.102:80 check
server server_name3 192.168.1.103:80 check-
timeout 옵션
HAProxy에서 설정한 timeout 관련 옵션들은 연결 및 요청과 관련된 시간 제한을 정의합니다. 각각의 의미는 다음과 같습니다.
- timeout connect 5s
- 백엔드 서버(혹은 upstream 서버)로 연결을 시도할 때, 최대 5초 동안 연결을 기다립니다.
- 5초 내에 연결이 되지 않으면 해당 요청은 실패하며, HAProxy는 해당 요청을 중단하고 클라이언트에게 오류를 반환합니다.
- 주로 서버가 응답하지 않거나 과부하로 인해 연결이 지연될 경우 영향을 줍니다.
- timeout client 1m
- 클라이언트가 데이터를 전송하는 동안 아무런 데이터도 보내지 않는다면, 1분 후에 연결이 끊어집니다.
- 즉, 클라이언트가 1분 동안 요청을 보내지 않으면 HAProxy가 해당 연결을 닫습니다.
- HTTP 요청의 경우, 클라이언트가 요청을 보내는 중 너무 오래 걸릴 경우 적용됩니다.
- timeout server 1m
- HAProxy가 백엔드 서버로 요청을 보낸 후, 서버가 응답을 하지 않으면 1분 후에 연결을 끊습니다.
- 즉, 서버가 요청을 받은 후 1분 내에 응답하지 않으면 해당 요청은 실패로 간주됩니다.
- 이는 서버가 과부하 상태이거나, 지연이 너무 길어지는 경우를 방지하는 데 사용됩니다.
- timeout connect 5s
-
연결확인
backend webservers
	option httpchk
	http-check send meth GET  uri /health
	server server1 192.168.50.2:80 check
	server server2 192.168.50.3:80 check
	server server3 192.168.50.4:80 check
backend be_myapp
option httpchk GET /
server srv1 10.0.0.1:80 check
server srv2 10.0.0.2:80 check
[user1@rocky1 ~]$ sudo systemctl restart haproxy
[user1@rocky1 ~]$ sudo systemctl status haproxy
● haproxy.service - HAProxy Load Balancer
   Loaded: loaded (/usr/lib/systemd/system/haproxy.service; disabled; vendor preset: disabled)
   Active: active (running) since Wed 2025-03-05 16:28:48 KST; 11s ago
  Process: 4913 ExecStartPre=/usr/sbin/haproxy -f $CONFIG -f $CFGDIR -c -q $OPTIONS (code=exited, stat>
 Main PID: 4916 (haproxy)
    Tasks: 2 (limit: 22872)
   Memory: 2.1M
   CGroup: /system.slice/haproxy.service
           ├─4916 /usr/sbin/haproxy -Ws -f /etc/haproxy/haproxy.cfg -f /etc/haproxy/conf.d -p /run/hap>
           └─4918 /usr/sbin/haproxy -Ws -f /etc/haproxy/haproxy.cfg -f /etc/haproxy/conf.d -p /run/hap>

Mar 05 16:28:48 rocky1.ksi.pri systemd[1]: Starting HAProxy Load Balancer...
Mar 05 16:28:48 rocky1.ksi.pri haproxy[4916]: Proxy http_front started.
Mar 05 16:28:48 rocky1.ksi.pri haproxy[4916]: Proxy http_front started.
Mar 05 16:28:48 rocky1.ksi.pri haproxy[4916]: Proxy http_back started.
Mar 05 16:28:48 rocky1.ksi.pri haproxy[4916]: Proxy http_back started.
Mar 05 16:28:48 rocky1.ksi.pri systemd[1]: Started HAProxy Load Balancer.-
curl http://211.168.3.102, 103 해서
web1, web2 나오는지 확인
[user1@rocky1 ~]$ curl http://211.183.3.102
<h1>WEB1</h1>
[user1@rocky1 ~]$ curl http://211.183.3.103
<h1>WEB2</h1>[user1@rocky1 ~]$ curl http://211.183.3.101
<h1>WEB2</h1>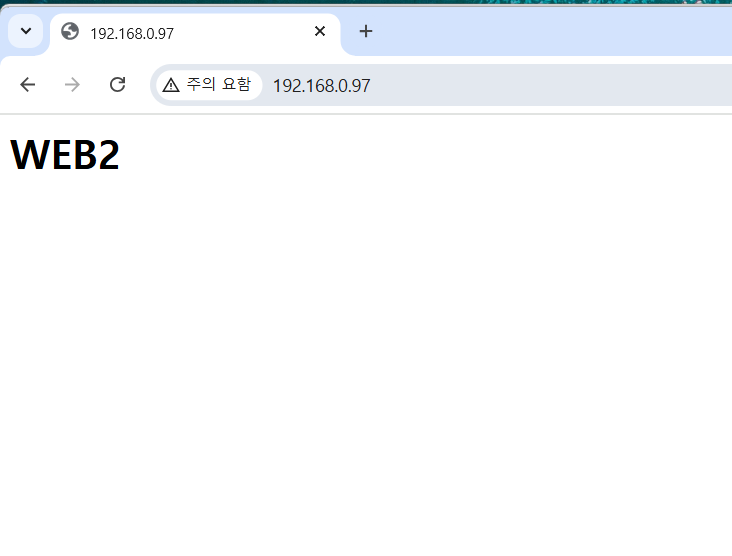
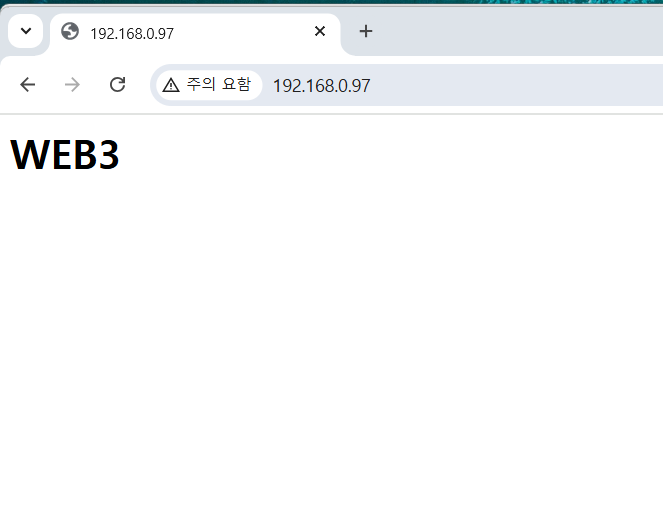
- 101을 조회하는데 계속 WEB2만 떠서 보니까 102 ip가 두 개 설정되어 있었음
- ip 다시 바꾸고 설정 변경하니까 101에서 WEB2, WEB3 번갈아서 잘 뜸
- 헷갈려서 211.183.3.102 → “WEB2”, 211.183.3.103 → “WEB3” 로 변경함
로드밸런서
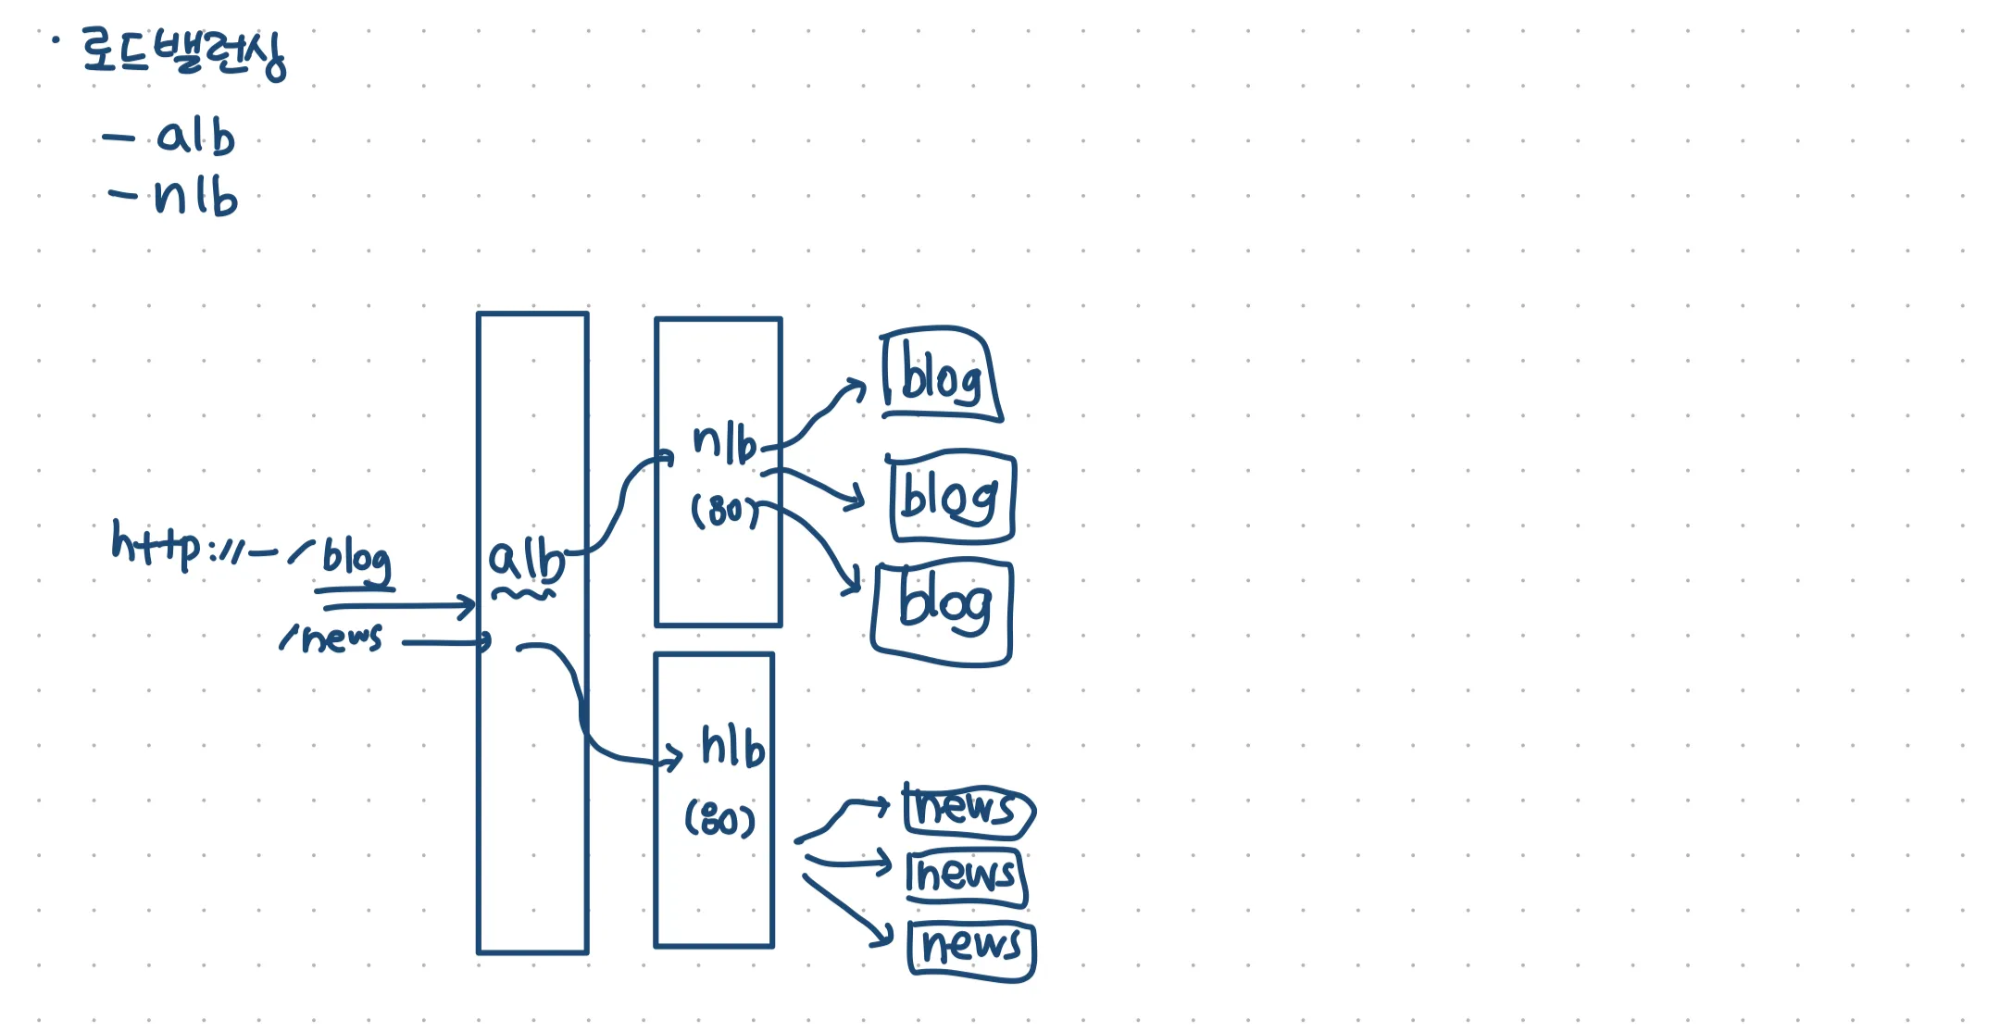
- ALB(Application Load Balancer)
- NLB(Network Load Balancer)
ALB (Application Load Balancer) vs. NLB (Network Load Balancer) 차이점
| 구분 | ALB (Application Load Balancer) | NLB (Network Load Balancer) |
|---|---|---|
| OSI 계층 | 7계층 (Application Layer) | 4계층 (Transport Layer) |
| 트래픽 처리 방식 | HTTP(S) 요청을 기반으로 라우팅 (URL, Host, Path 등) | TCP/UDP 트래픽을 기반으로 라우팅 (IP, Port 기반) |
| 로드 밸런싱 알고리즘 | 콘텐츠 기반 라우팅 (예: /api는 서버 A, /img는 서버 B) | 연결 기반 라우팅 (클라이언트의 IP/포트 기반) |
| 성능 | 복잡한 규칙을 적용할 수 있지만 상대적으로 느림 | 낮은 지연시간(Latency)과 높은 처리량(Throughput) 제공 |
| 사용 사례 | 웹 애플리케이션, 마이크로서비스, API Gateway 등 | 고성능 애플리케이션, TCP/UDP 기반 서비스 (VPN, 게임 서버 등) |
| TLS 종료 | 지원 (SSL/TLS 오프로딩 가능) | 지원 (고성능 TLS 처리 가능) |
한줄 요약
- ALB는 HTTP(S) 트래픽을 지능적으로 라우팅하는 데 적합함.
- NLB는 TCP/UDP 트래픽을 빠르고 효율적으로 분산하는 데 최적화됨.