3. 레일즈 프로젝트 생성하기
3-1. 레일즈 설치하기
- 우분투에서 루비 설치하기
sudo apt install ruby-full이 방식으로 루비를 설치하면 이후 프로젝트 생성 때 오류가 발생한다. 번들러가 설치가 안되기 때문에 다른 방법으로 루비를 설치해야 한다.
여기에서 Rbenv를 사용하여 Ruby를 설치를 참고해서 설치하면 된다.
추가적으로 참고하면 좋은 링크
- 루비 버전 확인
ruby --version- squlite3 설치하기
sduo apt sqlite3- squlite3 버전 확인
squlite3 --version3-2. 블로그 앱 생성하기
프로젝트 생성
rails new blogsudo apt install ruby-full로 루비를 설치하면 이 단계에서 오류가 발생한다. 주의하기!
4. Hello, Rails!
4-1. 서버 켜기
bin/rails server간단쓰!
근데 왜 계속 bin 아래에서 하는거지?
4.2 Say "Hello", Rails
MVC 관련 내용
번역하자!
To get Rails saying "Hello", you need to create at minimum a controller and a view.
Rails에서 "Hello"를 출력하기 위해 최소한 컨트롤러와 뷰를 생성해야 합니다.
A controller's purpose is to receive specific requests for the application. Routing decides which controller receives which requests. Often, there is more than one route to each controller, and different routes can be served by different actions. Each action's purpose is to collect information to provide it to a view.
컨트롤러의 목적은 어플리케이션으로부터 특정 요청을 받는 것입니다.
라우팅은 어떤 컨트롤러가 어떤 요청을 받아야 하는지 결정합니다.
종종(often), 각각의 컨트롤러에 하나 이상의 루트가 있고, 다른 루트는 다른 액션에 의해 처리될(served) 수 있습니다.
각각의 액션의 목적은 정보를 수집해서 뷰에 공하는 것입니다.
A view's purpose is to display this information in a human readable format. An important distinction to make is that it is the controller, not the view, where information is collected. The view should just display that information. By default, view templates are written in a language called eRuby (Embedded Ruby) which is processed by the request cycle in Rails before being sent to the user.
뷰의 목적은 이 정보를 사람이 읽을 수 있는 형식으로 표시하는 것입니다.
중요한 차이점(distinction)은 정보를 수집하는 곳은 뷰가 아니라 컨트롤러라는 점입니다.
뷰는 단지 정보를 표시할 뿐입니다.
기본적으로, 뷰 템플릿은 eRuby라는 언어로 작성되며, 이는 레일즈 요청 주기에서 처리되고 (사이클에 의해서 진행되는) 사용자에게 전송되기 전에 처리됩니다.
- 컨트롤러 생성
bin/rails generate controller Welcom indexWelocome 이라는 컨트롤러
index 라는 액션(action)
- 화면에 Hello, Rails! 띄우기
VScode 열고 app/views/welcome/index.html.erb에 아래 코드 작성하기
<h1>Hello, Rails!</h1>놀라지말기! 이렇게 해도 이 단계에서는 아직 Hello, Rails!가 화면에 보이지 않는다.
5. Getting Up and Running
.erb파일은 레일즈에서 View단에 해당한다..rb루비로 만들어진 파일의 확장자명이다.
5-1. form 생성
app/views/articles/new.html.erb 에 아래 코드 작성하기
<%= form_with scope: :article, local: true do |form| %>
  <p>
    <%= form.label :title %><br>
    <%= form.text_field :title %>
  </p>

  <p>
    <%= form.label :text %><br>
    <%= form.text_area :text %>
  </p>

  <p>
    <%= form.submit %>
  </p>
<% end %>
When you call form_with, you pass it an identifying scope for this form. In this case, it's the symbol :article. This tells the form_with helper what this form is for. Inside the block for this method, the FormBuilder object - represented by form - is used to build two labels and two text fields, one each for the title and text of an article. Finally, a call to submit on the form object will create a submit button for the form.
form_with 메서드를 호출(call)할 때는, 이 폼에 대한 식별범위(Identifying scope)를 전달합니다. 이 경우에는 :article 심볼을 사용합니다. 이는 form_with 도우미에게 이 폼이 어떤 용도로 사용되는지 알려줍니다. 이 메서드의 블록 내에서, 폼으로 표시되는 FormBuilder 객체를 사용하여 두 개의 라벨과 두 개의 텍스트 영역을 생성(build)합니다. 각각은 아티클의 제목과 내용에 대한 것입니다. 마지막으로, 폼 객체를 제출하는 요청은 폼 제출 버튼을 생성한다.
There's one problem with this form though. If you inspect the HTML that is generated, by viewing the source of the page, you will see that the action attribute for the form is pointing at /articles/new. This is a problem because this route goes to the very page that you're on right at the moment, and that route should only be used to display the form for a new article.
하지만 이 폼에는 한 가지 문제가 있습니다. 페이지의 소스를 확인해서 생성된 HTML 파일을 검사해보면, 폼의 action 속성이 /articles/new을 가리키는 것을 알 수 있습니다. 이 경로는 현재 보고 있는 페이지 자체를 가리키기 때문에, 이 루트는 오직 새로운 아티클을 위한 폼을 보여주기 위해 사용되어야 합니다.
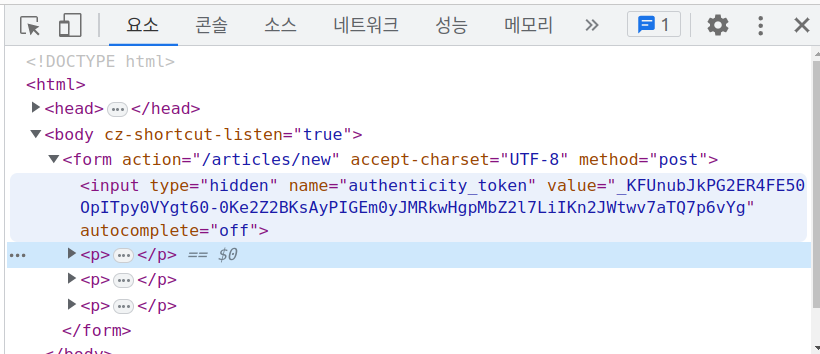
여기까지 하고 검사해보면 action 속성이 /articles/new을 가리킨다.
The form needs to use a different URL in order to go somewhere else. This can be done quite simply with the :url option of form_with. Typically in Rails, the action that is used for new form submissions like this is called "create", and so the form should be pointed to that action.
폼이 다른 곳으로 이동하려면 다른 URL을 사용해야 합니다. 이는 form_with의 :url 옵션을 사용하여 간단하게 처리할 수 있습니다. 일반적으로 Rails에서 이와 같은 새로운 폼 제출에 사용되는 동작은 "create"라고 불립니다. 따라서 폼은 해당 동작을 가리키도록 설정되어야 합니다.
app/views/articles/new.html.erb 아래처럼 수정하기
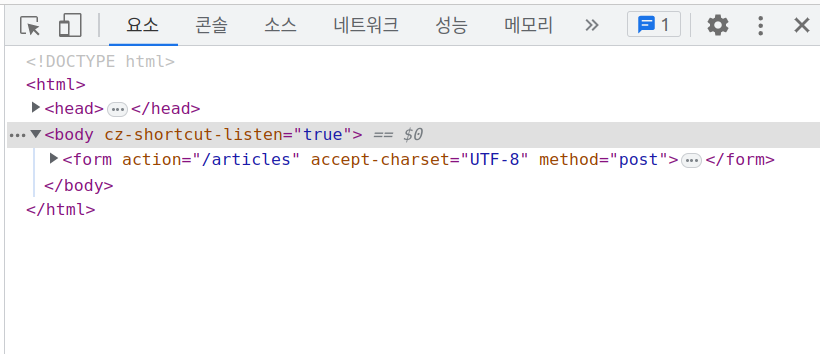
<%= form_with scope: :article, url: articles_path, local: true do |form| %> 이렇게 하면 action 속성이 /articles을 가리킨다.
이렇게 하면 에러가 뜬다는데 난 에러가 발생하지 않는다...뭘까...
일단 CRUD는 다음 편에 정리하자