https://www.youtube.com/watch?v=3ChtEuiQ2Yg&list=PLApuRlvrZKohaBHvXAOhUD-RxD0uQ3z0c&index=5
참고 유튜브
kubectl이란?
- 쿠버네티스에게 요청할 때 쓰는 명령어
kubectl 구조
kubectl [command] [TYPE] [NAME] [flags]- command: 자원(object)에 실행할 명령, create 등이 있음
- TYPE: 자원의 타입, node나 pod 등이 있음
- NAME: 자원의 이름, 사용자가 지정 가능(소문자, 대쉬, 숫자로 구성)
- flags: 부가적으로 설정할 옵션, --help 등이 있음
kubectl, kubeadm 명령어 자동완성 설정
source <(kubectl completion bash)
source <(kubeadm completion bash)

echo "source <(kubectl completion bash)" >> ~/.bashrc
echo "source <(kubeadm completion bash)" >> ~/.bashrc
kubectl 명령어들
kubectl --help
kubectl command --help

kubectl run <자원이름> <옵션>
kubectl create -f obj.yaml
kubectl apply -f obj.yaml

kubectl get <자원이름> <객체이름>
kubectl edit <자원이름> <객체이름>
kubectl describe <자원이름> <객체이름>

kubectl delete pod main
kubectl 명령어 사용해보기
kubectl api-resources- 약어 정보를 확인할 수 있음
kubectl --help- 도움말 확인
kubectl <명령어> --help: 명령어 도움말 확인
node 확인하기
- 현재 만들어둔 node는 2개(마스터 1개 워커 2개) 확인 가능
kubectl get nodeskubectl get nodes -o wide: 더 자세한 정보kubectl describe node <node NAME>: 노드에 대한 아주 자세한 정보-o wide와describe를 잘 기억하자
상세 확인 명령어
kubectl get pods
kubectl get pods <pod NAME>

kubectl get pods -o wide
kubectl describe pod <pod NAME> - 상세 목록 확인 가능
홈페이지 확인 명령어
curl <pod IP>:port- 마스터 노드에서 IP로 서비스 접속이 가능함
- ubuntu에서
apt-get update후apt-get install elinks다운로드 해주면 cli에서 웹 탐색이 가능함 - rocky에서 다운로드하려니까 찾을 수가 없다고 떠서 잠시 보류
kubectl run
kubectl run: 컨테이너를 1개 실행 시 사용하는 명령어
kubectl run <name> --image= --portkubectl run webserver --image=nginx:1.14 --port 80- 이미지 뒤에
:버전을 작성하지 않으면 latest 즉 최근 버전이 깔림 - system V(시스템 파이브): 대시 필수,
-a와 같은 옵션 씀 - BSD(Barkeley Software Distribution): 유닉스 기반, 대시 없이 쓰는 경우가 많다는데 강의에서는 대시 2개 쓰는 경우가 많다고 함
- kube는 다 지원
- 띄어쓰기를 기준으로 많은 옵션 사용 가능
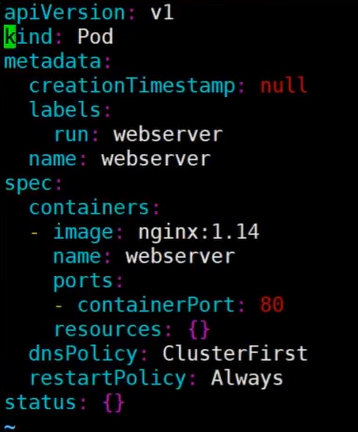
yaml/json 파일로 확인하기
kubectl get pods <pod name> -o yamlkubectl get pods <pod name> -o jsonkubectl create deployment
kubectl create deployment: 컨테이너를 여러개 실행 가능한 명령어
kubectl create deployment <name> --image=<image> --replicas=<number>--replicas=: 원하는 수만큼 생성 가능kubectl get deployments.apps: 생성 중인 deployment 확인 가능kubectl describe deployments.apps: 상세한 확인 가능
kube exec: 컨테이너 내부에서 수정하기
- pod에서만 사용 가능하므로 따로 pod 라고 적지 않아도 됨
kubectl exec <pod NAME> -it -- /bin/사용하려는 쉘
- 안으로 들어온 모습
/usr/share/nginx/html: 안에 웹 문서 저장됨, nginx 기준index.html: 맨 처음 나오게 되는 페이지, 수정하여 master node에서 확인하기
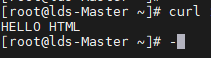
- 잘 변경된 모습
kubectl logs
- 들어간 기록들 확인 가능
kubectl logs <pod NAME>kubectl port-forward
kubectl port-forward <pod NAME> 00:00- 만약 8080:80 으로 설정하게 될 경우 master node IP:8080으로 들어오게 되면 자동으로 pod NAME:80으로 들어가게 됨
- 근데 이건 명령어를 켜놓고 있을 때(지속적으로)만 적용 되는 듯, 백그라운드로 실행시켜놔야하나?
kubectl edit
- 동작 중인 컨테이너 수정
kubectl edit deployments.apps mainui- replicas 수 변경 시 파드 늘리고 줄이고 가능
--dry-run
- 실행 과정에서 문제가 없는지 확인
kubectl run samplepod --image=nginx:1.14 port:80 --dry-run- 문제 여부 확인 가능
kubectl run samplepod --image=nginx:1.14 port:80 --dry-run -o yaml- yaml 파일 형태로 확인 가능
kubectl run samplepod --image=nginx:1.14 port:80 --dry-run -o yaml > samplepod.pod.yaml- yaml 파일로 저장 가능
yaml 파일 수정

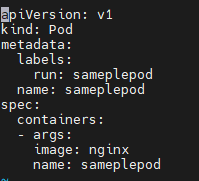
- 강의와는 스크립트가 좀 달라서 임의로 수정함
kubectl delete pod
- pod 삭제 명령어
kubectl delete pod <pod NAME>kubectl delete deployments.app <NAME>- create로 생성한 애들은 이렇게 삭제해야하나보다..?
파일로 pod 생성하기
kubectl create -f <file명>kubectl create -f samplepod.pod.yaml
많은 경험을 해보고자 하는