NAVER 검색(쇼핑) API 이용하기
- NAVER 검색(쇼핑)오픈 API 신청
- 사용 API: 검색
- 비로그인 오픈 API 서비스 환경: WEB 설정(URL: http://localhost)
NAVER 검색(쇼핑) API 사용하기
public class NaverShopSearch {
    public String search() {
        RestTemplate rest = new RestTemplate();
        HttpHeaders headers = new HttpHeaders();
        headers.add("X-Naver-Client-Id", {클라이언트 아이디});
        headers.add("X-Naver-Client-Secret", {클라이언트 시크릿});
        String body = "";

        HttpEntity<String> requestEntity = new HttpEntity<String>(body, headers);
        ResponseEntity<String> responseEntity = rest.exchange("https://openapi.naver.com/v1/search/shop.json?query=iphone", HttpMethod.GET, requestEntity, String.class);
        HttpStatus httpStatus = responseEntity.getStatusCode();
        int status = httpStatus.value();
        String response = responseEntity.getBody();
        System.out.println("Response status: " + status);
        System.out.println(response);

        return response;
    }

    public static void main(String[] args) {
        NaverShopSearch naverShopSearch = new NaverShopSearch();
        naverShopSearch.search();
    }
}- ARC에서 제공해주는 코드를 copy해서 search 메소드 안에 붙여넣기.
Spring 프로젝트 시작 전 확인해야 할 주의사항
- auto import(복사/붙여넣기를 할 때 필요한 것을 자동으로 import)
- Insert imports on paste: Always
- Add unambiguous imports on the fly: 체크
- annotation processors(annotation 썼을 때 자동으로 잡아주는 기능)
- Enable annotation processing: 체크
API 설계하기
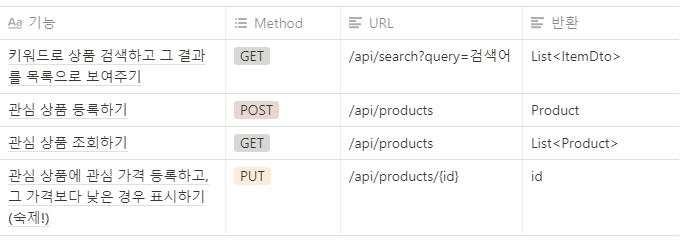
-
3계층 설계하기
- Controller
- ProductRestController: 관심 상품 관련 컨트롤러
- SearchRequestController: 검색 관련 컨트롤러
- Service
- ProductService: 관심 상품 가격 변경
- Repository
- Product: 관심 상품 테이블(DB에 저장되는 클래스)
- ProductRepository: 관심 상품 조회, 저장
- ProductRequestDto: 관심 상품 등록하기
- ProductMypriceRequestDto: 관심 가격 변경하기
- ItemDto: 검색 결과 주고받기
- Controller
관심 상품 조회하기
Timestamped
@Getter // get 함수를 자동 생성합니다.
@MappedSuperclass // 멤버 변수가 컬럼이 되도록 합니다.
@EntityListeners(AuditingEntityListener.class) // 변경되었을 때 자동으로 기록합니다.
public abstract class Timestamped {
    @CreatedDate // 최초 생성 시점
    private LocalDateTime createdAt;
    @LastModifiedDate // 마지막 변경 시점
    private LocalDateTime modifiedAt;
}
- Week04Application에 @EnableJpaAuditing을 추가해준다. 이로써 시간 자동 변경이 가능하도록 한다.
Product
@Getter // get 함수를 일괄적으로 만들어줍니다.
@NoArgsConstructor // 기본 생성자를 만들어줍니다.
@Entity // DB 테이블 역할을 합니다.
public class Product extends Timestamped{
    @GeneratedValue(strategy = GenerationType.AUTO) // ID가 자동으로 생성 및 증가합니다.
    @Id
    private Long id;
    @Column(nullable = false) // 반드시 값을 가지도록 합니다.
    private String title;
    @Column(nullable = false)
    private String image;
    @Column(nullable = false)
    private String link;
    @Column(nullable = false)
    private int lprice;
    @Column(nullable = false)
    private int myprice;
}
ProductRepository(interface)
public interface ProductRepository extends JpaRepository<Product, Long> {
}
ProductRestController
@RequiredArgsConstructor // final로 선언된 멤버 변수를 자동으로 생성합니다.
@RestController // JSON으로 데이터를 주고받음을 선언합니다.
public class ProductRestController {
    private final ProductRepository productRepository;
    // 등록된 전체 상품 목록 조회
    @GetMapping("/api/products")
    public List<Product> getProducts() {
        return productRepository.findAll();
    }
}
관심 상품 등록하기
ProductRequestDto
@Getter
public class ProductRequestDto {
    private String title;
    private String link;
    private String image;
    private int lprice;
}
ProductMypriceRequestDto
@Getter
public class ProductMypriceRequestDto {
    private int myprice;
}
ProductService
@RequiredArgsConstructor // final로 선언된 멤버 변수를 자동으로 생성합니다.
@Service // 서비스임을 선언합니다.
public class ProductService {
    private final ProductRepository productRepository;
    @Transactional // 메소드 동작이 SQL 쿼리문임을 선언합니다.
    public Long update(Long id, ProductMypriceRequestDto requestDto) {
        Product product = productRepository.findById(id).orElseThrow(
                () -> new NullPointerException("해당 아이디가 존재하지 않습니다.")
        );
        product.update(requestDto);
        return id;
    }
}
키워드로 상품 검색하기
-
org.json 패키지 설치하기(외부 라이브러리)
cf) org.json: JSON을 자바에서 다루기 위해, JSONObject/JSONArray 클래스가 필요하다. 이를 사용하기 위한 라이브러리이다.- 구글에 maven central 검색
- 검색창에 json 입력 후 엔터
- JSON in java 클릭
- 숫자 가장 높은 버전 클릭
- Gradle 탭 클릭
- build.gradle에서 dependencies 안에 붙여넣기 -> run dependencies
- grable 탭 새로고침하기
-
NaverShopSearch 컴포넌트 등록: 스프링이 자동으로 필요한 클래스를 필요한 곳에 생성하기 위해, 자동으로 생성할 클래스 목록에 등록하는 간단한 방법이 컴포넌트 등록이다.
-
이와 같이 컴포넌트 등록을 해야 나중에 private final을 사용하기 위한 @RequiredArgsConstructor에서 NaverShopSearch를 찾을 수 있다.
스케줄러 만들기
- 스케줄러: 매일 특정 시각에 관심 상품 목록 제목으로 검색해서, 최저가 정보를 업데이트
Scheduler
@RequiredArgsConstructor // final 멤버 변수를 자동으로 생성합니다.
@Component // 스프링이 필요 시 자동으로 생성하는 클래스 목록에 추가합니다.
public class Scheduler {
    private final ProductRepository productRepository;
    private final ProductService productService;
    private final NaverShopSearch naverShopSearch;
    // 초, 분, 시, 일, 월, 주 순서
    @Scheduled(cron = "0 0 1 * * *")
    public void updatePrice() throws InterruptedException {
        System.out.println("가격 업데이트 실행");
        // 저장된 모든 관심상품을 조회합니다.
        List<Product> productList = productRepository.findAll();
        for (int i=0; i<productList.size(); i++) {
            // 1초에 한 상품 씩 조회합니다 (Naver 제한)
            TimeUnit.SECONDS.sleep(1);
            // i 번째 관심 상품을 꺼냅니다.
            Product p = productList.get(i);
            // i 번째 관심 상품의 제목으로 검색을 실행합니다.
            String title = p.getTitle();
            String resultString = naverShopSearch.search(title);
            // i 번째 관심 상품의 검색 결과 목록 중에서 첫 번째 결과를 꺼냅니다.
            List<ItemDto> itemDtoList = naverShopSearch.fromJSONtoItems(resultString);
            ItemDto itemDto = itemDtoList.get(0);
            // i 번째 관심 상품 정보를 업데이트합니다.
            Long id = p.getId();
            productService.updateBySearch(id, itemDto);
        }
    }
}
- 추가적으로 Week04Application에 @EnableScheduling을 붙여야 정상적으로 동작하다.
