[Spring Boot] Server-Sent Event를 통한 실시간 웹 알림 구현
1. Server-Sent Event 학습 계기
현재 개발하고 있는 교환일기 웹 서비스에서 알림 기능을 구현하게 되었습니다.
처음에는 단순하게 발생한 알림을 DB에 저장하고,
사용자가 알림 목록에 들어가면 DB에서 알림 데이터를 불러와서
그동안 발생한 알림들을 조회할 수 있도록 하려 했습니다.
그러나 기존에 몇 번 진행해보았던 익숙한 방식에서 벗어나서
조금 더 프로젝트의 완성도를 높이고자 실시간 알림을 구현할 수 있는 방법을 조사했습니다.
프로젝트에 들어갈 알림 기능 요구사항은 다음과 같습니다.
- 양방향 통신이 필요없고, 서버 -> 클라이언트로만 통신하면 된다.
- 알림의 양이 많지 않다.
("일기장 생성 / 일기장 비활성화 / 상대방의 답장" 3가지 case에 대한 알림 발생)- 사용자가 실시간으로 알림을 확인할 수 있어야 한다.
조사 과정에서 Server-Sent Event 방식을 통해 알림을 구현하는 것이 요구사항에 가장 적합하다는 생각이 들어, 해당 방식을 학습하고 도입하게 되었습니다.
2. 웹서비스 알림 기능 구현 방법 3가지
실시간 알림을 구현할 수 있는 방법에는 대표적으로 3가지가 있습니다.
바로 Polling, Web Socket, Server-Sent Events입니다.
각 방식을 간단하게 살펴보겠습니다.
(1) Polling 방식

- 작동 원리: 클라이언트가 정해진 간격으로 서버에 데이터를 요청합니다.
- 장점: 구현이 간단하고 특별한 서버 설정이 필요 없습니다.
- 단점: 서버에 불필요한 요청이 많아지고, 실시간성에서 약간 뒤처질 수 있습니다.
(2) Web Socket 방식
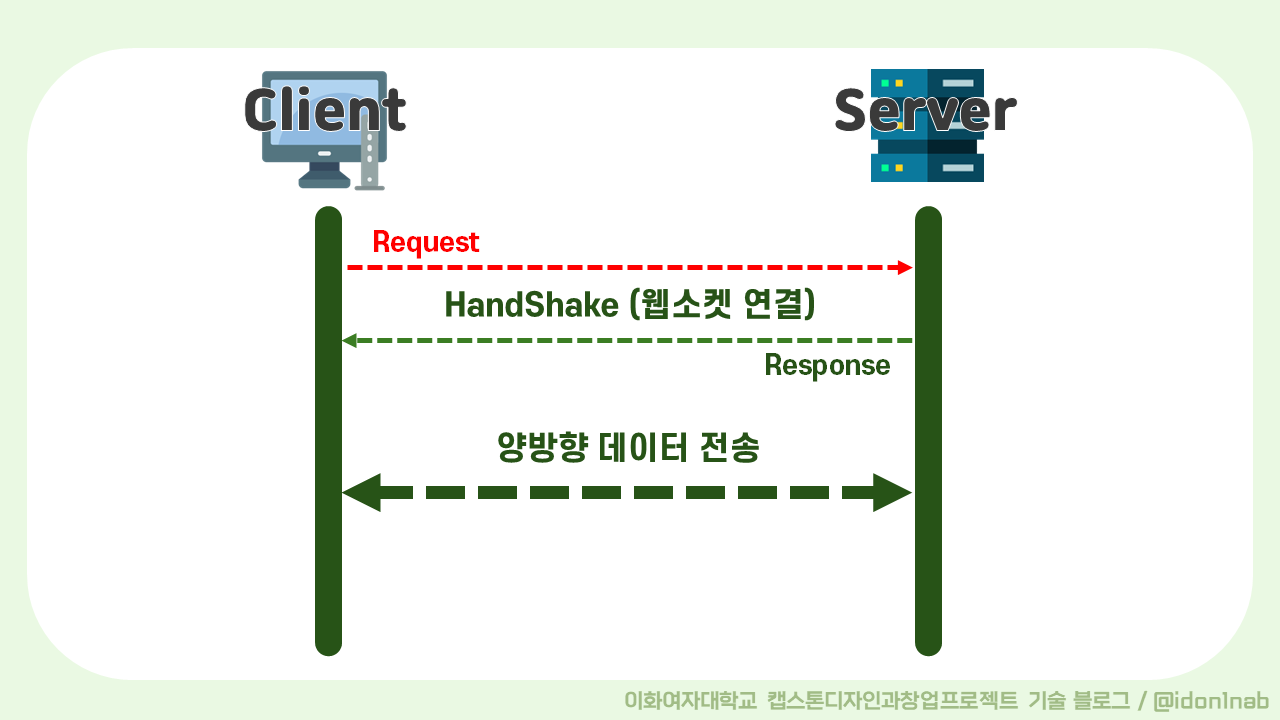
- 작동 원리: 클라이언트와 서버 간의 지속적인 연결을 유지하여, 서버가 클라이언트로 데이터를 푸시할 수 있습니다.
- 장점: 실시간 양방향 통신이 가능하여 매우 빠른 데이터 전송합니다.
- 단점: 설정과 구현이 복잡할 수 있고, 서버 리소스를 더 많이 사용합니다.
(3) Server-Sent Events 방식
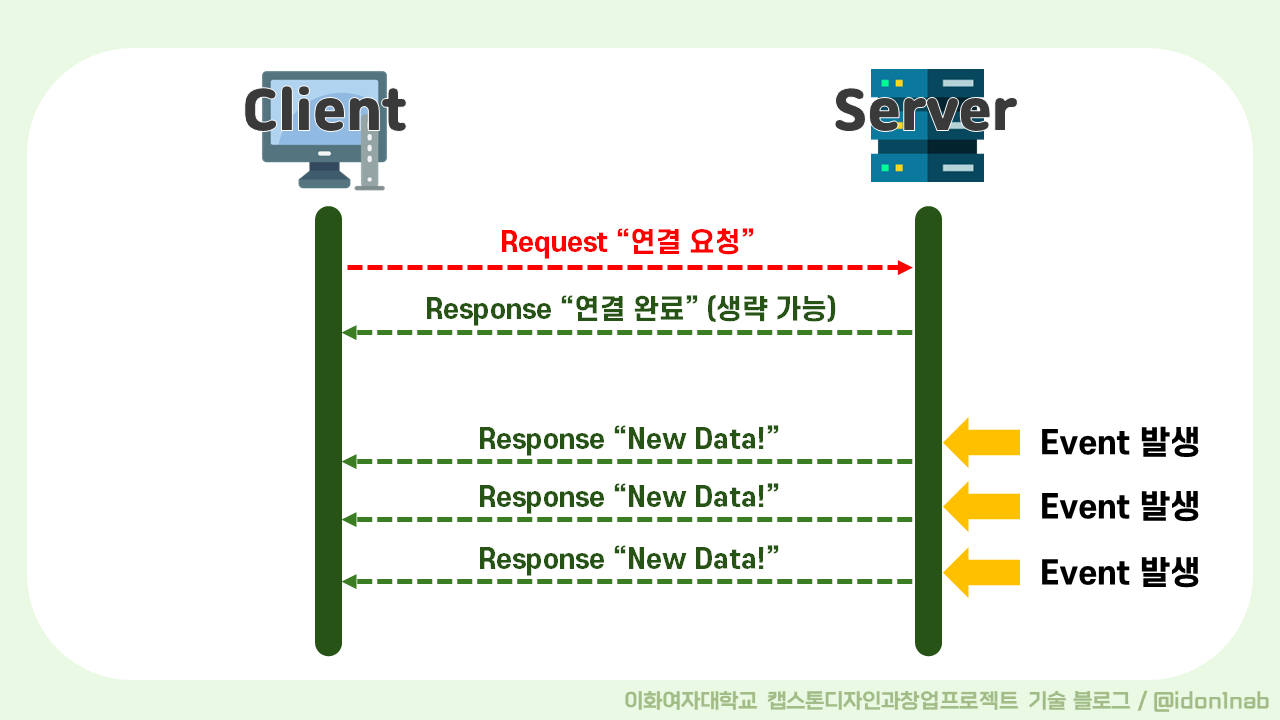
- 작동 원리: 서버가 클라이언트로 일방적으로 데이터를 푸시하는 방식입니다.
- 장점: 설정이 비교적 간단하고, 클라이언트 리소스를 덜 사용하며, HTTP를 기반으로 하여 방화벽 및 프록시와의 호환성이 좋습니다.
- 단점: 단방향 통신만 가능합니다.
이러한 특징들과 더불어, SSE는 다음과 같은 장점을 가지고 있습니다.
- HTTP 기반이므로 기존의 웹 서버와 쉽게 통합
- 별도의 라이브러리나 프로토콜 설정이 필요 없음
- 여러 클라이언트와 동시에 통신이 가능
- 문제가 있어 연결이 끊어질 경우, 자동으로 재연결 시도
따라서 웹 기반의 프로젝트에서 클라이언트가 수신만 하면 되는 알림 기능을 구현할 때
SSE 방식이 가장 적합하다는 결론을 내리게 되었습니다.
3. Spring Boot SSE 실습
(1) IntelliJ를 통한 프로젝트 기본 설정
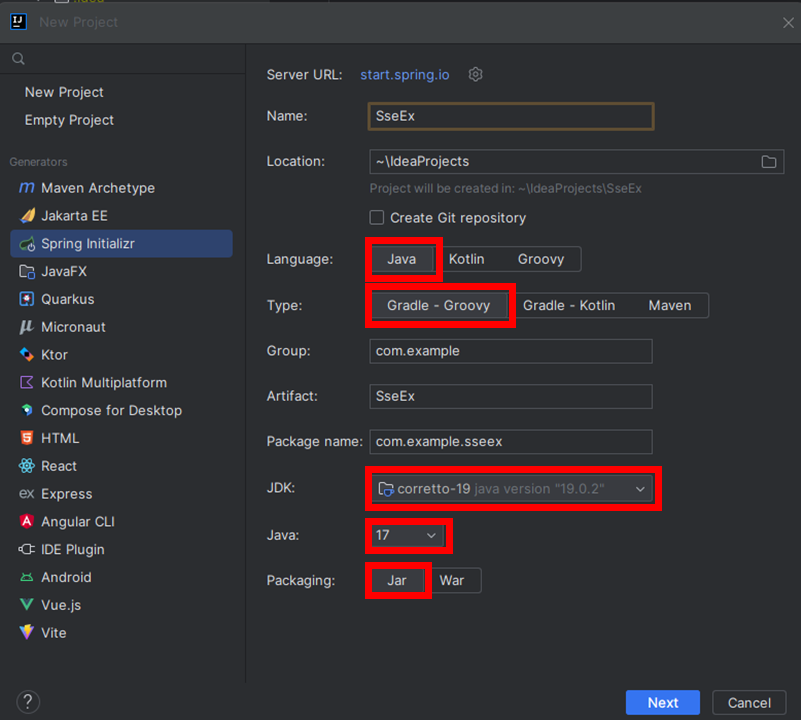
Spring Initializr 프로젝트 생성 후, 다음을 선택합니다.
JavaGradleJDK corretto-19Java 17 버전Packaging Jar

Dependencies는 다음 5가지를 선택합니다.
LombokSpring WebThymeleafSpring Data JPASpring Boot DevTools
※ 실제 프로젝트는 프론트엔드 React - 백엔드 Spring Boot로 나누어서 개발을 하고 있지만,
보다 간단한 실습을 위하여 웹 view 템플릿 엔진 Thymeleaf를 사용합니다.
(2) 프로젝트 구조

SSE를 실습할 프로젝트의 구조입니다.
이 중 SseController, SseService, SseExApplication, index.html의 코드를 알아보겠습니다.
(3) 예제 1번: 문자열 데이터 전송
🚩index.html
<!DOCTYPE html>
<html lang="en">
<head>
    <meta charset="UTF-8">
    <title>Spring Boot SSE Example</title>
</head>
<body>
    <h1>Server-Sent Events</h1>
    <div id = "events"></div>

    <script>

        const eventSource = new EventSource("/emitter"); //controller 경로

        eventSource.onmessage = (event) => {
            const div = document.createElement("div");
            div.textContent = `Event received: ${event.data}`;
            document.getElementById("events").appendChild(div);
        };

        eventSource.onerror = (error) => {
            console.log("Error occurred", error);
            eventSource.close();
        };
    </script>
</body>
</html>
index.html에서 가장 중요한 것은
eventSource 객체를 선언함으로써, 서버와 클라이언트 간의 emitter을 연결하는 것입니다.
한번 객체를 선언한 후로 계속해서 eventSource를 통해 서버가 보내는 message를 받아올 수 있습니다.
🚩SseService.java
package com.example.sseex.service;

import org.springframework.http.MediaType;
import org.springframework.scheduling.annotation.Scheduled;
import org.springframework.stereotype.Service;
import org.springframework.web.servlet.mvc.method.annotation.SseEmitter;

import java.io.IOException;
import java.util.HashMap;
import java.util.List;
import java.util.Map;
import java.util.concurrent.CopyOnWriteArrayList;

@Service
public class SseService {

    private final List<SseEmitter> emitters = new CopyOnWriteArrayList<>();

    public void addEmitter(SseEmitter emitter) {
        emitters.add(emitter);
        emitter.onCompletion(()-> emitters.remove(emitter));
        emitter.onTimeout(()-> emitters.remove(emitter));
    }

    @Scheduled(fixedRate = 1000)
    public void sendEvents(){
        for(SseEmitter emitter : emitters) {
            try {
                // 문자열 형태의 데이터 생성
                emitter.send("Hello, world!");
            } catch (IOException e) {
                emitter.complete();
                emitters.remove(emitter);
            }
        }
    }
}SseEmitter는 Server-Sent Events를 생성하여 클라이언트에게 전송하는데 사용되는 객체입니다. (터널과 유사)
이 코드에서는 List<SseEmitter> emitters에 만들어진 emitter들을 저장합니다.
저장해둔 emitter들은 저장해두었다가 필요하면 꺼내서 사용합니다.
❓ 왜
emitter들을 저장해둘까?
실제 프로그램의 경우, 여러 클라이언트들로부터 각각의 emitter가 생성되고,
클라이언트마다 events를 발생시켜줘야 하는 시점이 모두 다릅니다.
따라서 이 emitter들을 저장해두고, 필요 시에 원하는 클라이언트의 emitter를 찾아서 해당 emitter에 event를 발생시켜야 합니다.
❓ 실제로도
List<SseEmitter> emitters를 사용하나?
실제로는List보다ConcurrentHashMap을 사용합니다.
이는 멀티스레딩 및 동시성 처리를 위해 일반적으로 사용되는 자료형으로, 멀티스레드 환경에서 안전하게 데이터를 처리할 수 있도록 동기화된 메서드를 제공하여 동시성 문제를 방지합니다.
예제는 간소화된 코드로 이해를 돕기 위해List를 사용하였습니다.
addEmitter() : 생성된 emitter를 emitters에 저장합니다.
sendEvents() : emitters 리스트에 있는 모든 emitter들에게 1초마다 문자열 데이터 "Hello, world!"를 전송합니다.
🚩SseController.java
package com.example.sseex.controller;

import com.example.sseex.service.SseService;
import org.springframework.beans.factory.annotation.Autowired;
import org.springframework.http.MediaType;
import org.springframework.web.bind.annotation.GetMapping;
import org.springframework.web.bind.annotation.RestController;
import org.springframework.web.servlet.mvc.method.annotation.SseEmitter;

@RestController
public class SseController {

    @Autowired
    private SseService sseService;

    @GetMapping(path = "/emitter", produces = MediaType.TEXT_EVENT_STREAM_VALUE)
    public SseEmitter subscribe(){
        SseEmitter emitter = new SseEmitter(Long.MAX_VALUE);
        sseService.addEmitter(emitter);
        sseService.sendEvents();
        return emitter;
    }
}
클라이언트가 "/emitter" url로 접근하면, subscribe() 메소드가 실행됩니다.
그 때부터 해당 클라이언트와 서버 간의 emitter 객체가 생성되고,
클라이언트는 events을 보내는 함수를 실행하여 본인이 그 events를 받아볼 수 있게 됩니다.
여기에서 주의할 점은 SSE를 구현하기 위해
produces = MediaType.TEXT_EVENT_STREAM_VALUE를 꼭 선언해주는 것입니다.
🚩SseExApplication.java
package com.example.sseex;

import org.springframework.boot.SpringApplication;
import org.springframework.boot.autoconfigure.SpringBootApplication;
import org.springframework.scheduling.annotation.EnableScheduling;

@SpringBootApplication
@EnableScheduling
public class SseExApplication {

    public static void main(String[] args) {
        SpringApplication.run(SseExApplication.class, args);
    }

}
1초마다 한번씩 이벤트를 주기적으로 발생시키기 위해
@EnableScheduling 어노테이션의 추가가 필요합니다.
🚩실행 결과
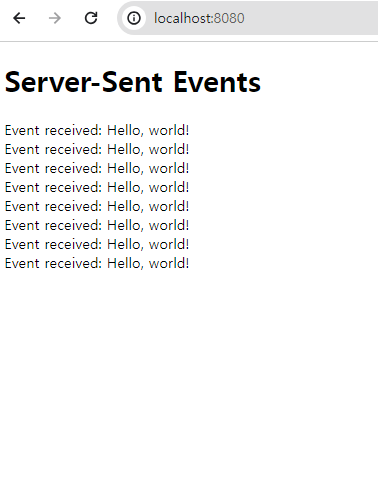
IntelliJ에서 톰캣 웹 서버를 실행시킨 후, localhost:8080에 접속하면
1초마다 한번씩 event가 발생하고, 그 이벤트를 화면에 출력하는 SSE의 작동을 확인할 수 있습니다.
(4) 예제 2번: JSON 타입 데이터 전송
위 예제에서 문자열을 전송하는 방법을 알아보았습니다.
그러나 실제로 SSE를 활용할 때, 하나의 문자열만을 전송하기 보다는 메세지의 타입, 메세지 내용, 발생 시간 등을 함께 담아서 보내는 경우가 많습니다.
따라서 emitter를 통해 JSON 타입의 데이터를 전송하는 방법을 추가로 알아보겠습니다.
예제 1과 동일한 SseExApplication.java, SseController.java 파일을 사용합니다.
🚩index.html
<!DOCTYPE html>
<html lang="en">
<head>
    <meta charset="UTF-8">
    <title>Spring Boot SSE Example</title>
</head>
<body>
    <h1>Server-Sent Events</h1>
    <div id = "events"></div>

    <script>

        const eventSource = new EventSource("/emitter"); //controller 경로

        eventSource.onmessage = (event) => {

            const div = document.createElement("div");

            // JSON으로 받아올 경우
            const eventData = JSON.parse(event.data);
            div.textContent = `Message: ${eventData.message}, TimeStamp:${new Date(eventData.timestamp)}`;

            document.getElementById("events").appendChild(div);

        };

        eventSource.onerror = (error) => {
            console.log("Error occurred", error);
            eventSource.close();
        };
    </script>
</body>
</html>eventSource를 통해 받아온 데이터를 event에 우선 저장합니다.
그리고 JSON.parse(event.data)를 통해 데이터를 JSON 타입으로 변환시키는 과정을 거치고 있습니다.
🚩SseService.java
package com.example.sseex.service;

import com.fasterxml.jackson.databind.ObjectMapper;
import org.springframework.http.MediaType;
import org.springframework.scheduling.annotation.Scheduled;
import org.springframework.stereotype.Service;
import org.springframework.web.servlet.mvc.method.annotation.SseEmitter;

import java.io.IOException;
import java.util.HashMap;
import java.util.List;
import java.util.Map;
import java.util.concurrent.CopyOnWriteArrayList;

@Service
public class SseService {

    private final List<SseEmitter> emitters = new CopyOnWriteArrayList<>();
    private final ObjectMapper objectMapper;

    public SseService(ObjectMapper objectMapper) {
        this.objectMapper = objectMapper;
    }


    public void addEmitter(SseEmitter emitter) {
        emitters.add(emitter);
        emitter.onCompletion(()-> emitters.remove(emitter));
        emitter.onTimeout(()-> emitters.remove(emitter));
    }

    @Scheduled(fixedRate = 1000)
    public void sendEvents(){
        for(SseEmitter emitter : emitters) {

            try {
                // JSON 형태의 데이터 생성
                Map<String, Object> eventData = new HashMap<>();
                eventData.put("message", "Hello, world!");
                eventData.put("timestamp", System.currentTimeMillis());
                String json = objectMapper.writeValueAsString(eventData); //json으로 변환
                emitter.send(json, MediaType.APPLICATION_JSON); //JSON 데이터를 emitter로 보냄
            } catch (IOException e) {
                emitter.complete();
                emitters.remove(emitter);
            }
        }
    }
}
SseService.java에서 예제 1번과 달라진 부분은 다음과 같습니다.
import com.fasterxml.jackson.databind.ObjectMapper;MediaType.APPLICATION_JSON
JSON 형태의 데이터를 만들기 위한 초기 구조는 Map으로 작성하였고,
이 Map을 JSON 타입으로 변환하기 위해 ObjectMapper 객체를 활용하고 있습니다.
또한 emitter로 데이터를 전송할 때 JSON 데이터를 보내기 때문에
send() 메소드에 JSON 타입을 명시하고 있습니다.
🚩실행 결과
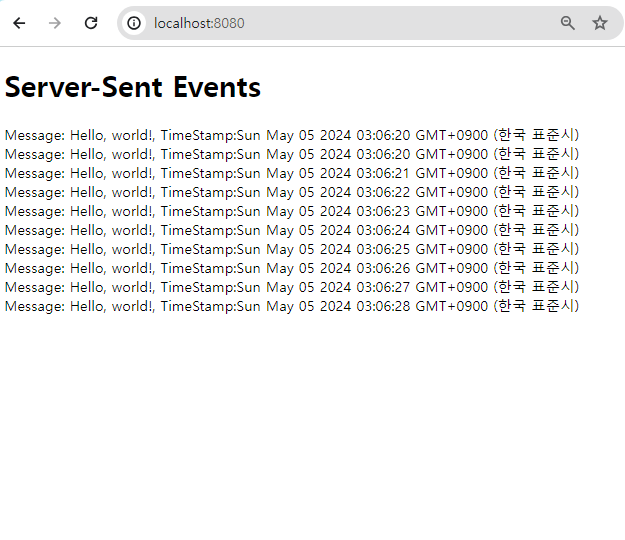
예제 1번과 동일하게 IntelliJ 톰캣 웹 서버를 실행하고 localhost:8080에 접속하면
1초마다 한 번씩 메세지와 현재 시간을 담은 데이터를 emitter를 통해 전송하는 event가 발생하고, 그 결과물이 화면에 출력되는 것을 확인할 수 있습니다.
실시간으로 데이터를 생성하고 전달하기 때문에, 화면에서 출력된 Timestamp에 1초 간격으로 데이터의 생성 시각이 작성됩니다.
