Spring Boot Mybatis
본 피드는 모든 소스코드를 제공하지 않습니다.
Mybatis를 쉽게
Mybatis를 연동하고자 하면 EgovFramework에서 설정하려고 하면 복잡하다. 그걸 위해서 나온 것은 Spring boot인데 복잡한 설정을 생략하고 Mybatis를 보다 쉽게 설정할 수 있게 해준다. 단 Spring vs Spring-boot 의 차이점을 명확히 알고있어야 한다.
Spring boot
EgovFramework(전자정부표준 프레임워크)에서는 지원하지 않아 쉽게 다룰 수 없다. 그래도 사용하고 싶다면 spring-boot의 초기설정을 해주어야 한다고 들었다.
필자는 Eclipse를 재다운 받아서 활용하였다.
1> 세팅
- EclipseIDE for Java Dev (2020-12)(4.18.0.RELEASE)
- plugin : spring Tools 4 (4.9.0.RELEASE)
- JDK 1.8
- MyBatis x MariaDB
Eclipse Marketplace
plugin 설치를 위한 마켓을 클릭
Spring Tools 4
Spring boot를 사용하기 위함
Java Developer Tools 3.20
JSP 사용을 위함

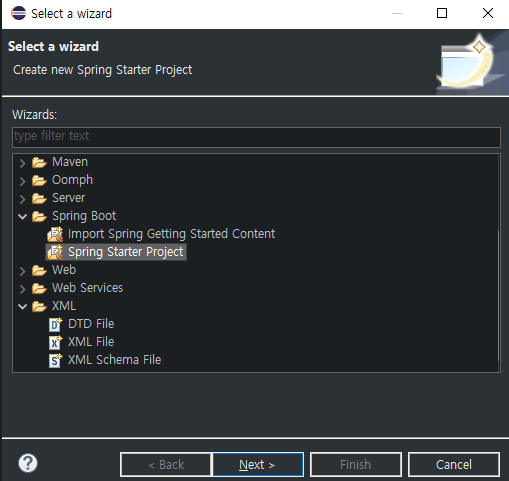
2> 프로젝트 생성
New - Other - Spring Boot - Spring Stater Project
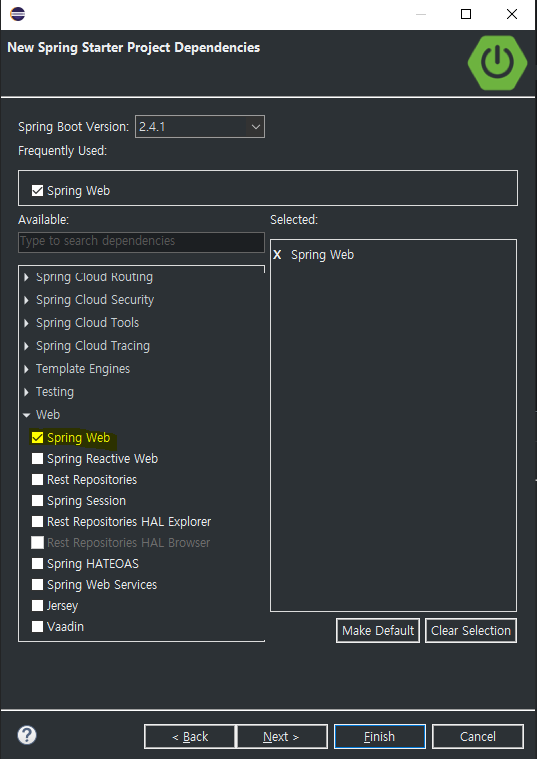
Spring Web 클릭 후 Finish
! 2-1> 실행 이슈
프로젝트를 진행하면서 에러가 발생하였고 run as-Spring Boot App을 해도 실행되지 않았다.
에러문구
Error occurred during initialization of boot layer java.lang.module.FindException: Module jdk.management.agent not found
원인 및 해결
해결을 하기 위해선 2가지 방법을 실행하면 될 것이라 추측된다.
1. JRE 👉 JDK 변경 👍해결참고링크
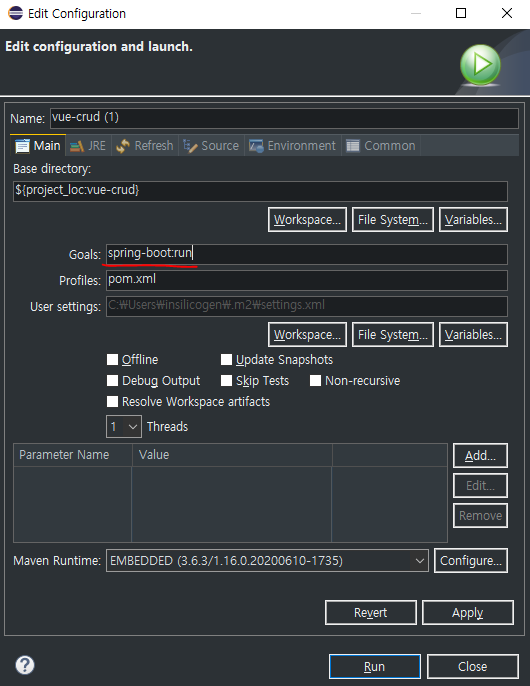
2. 4 Maven build... 👉 goal부분에 spring-boot:run 작성 👉 apply
2번 같은 경우에는 맨 처음 실행에만 해주고 다음부터는 9 Spring Boot App으로 실행이 가능하다.
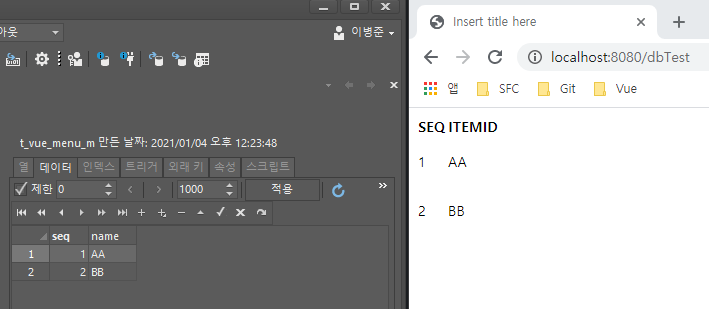
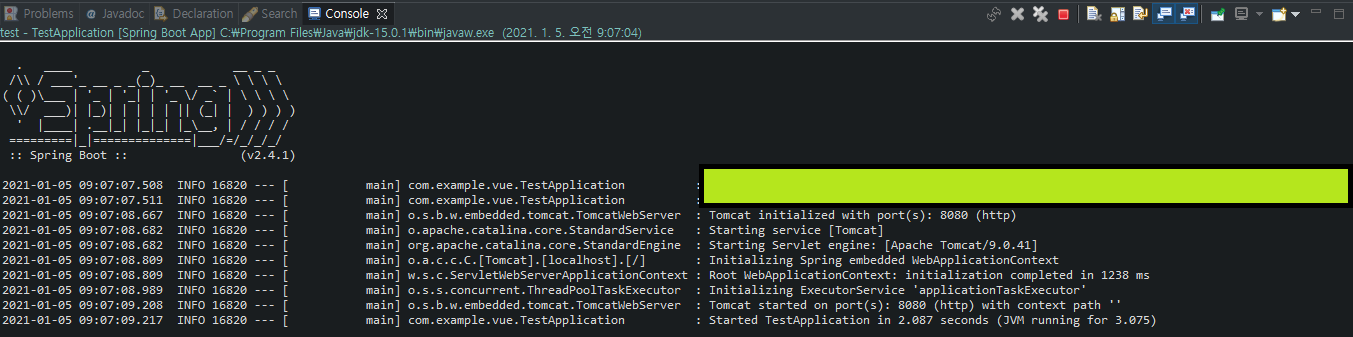
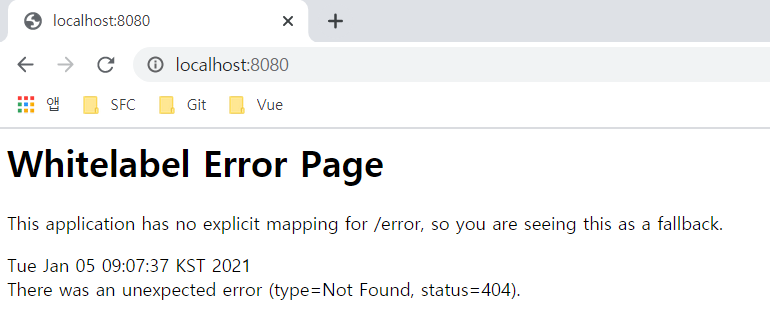
성공
localhost:8080으로 접속하여 성공여부를 확인한다.CMD
WEB
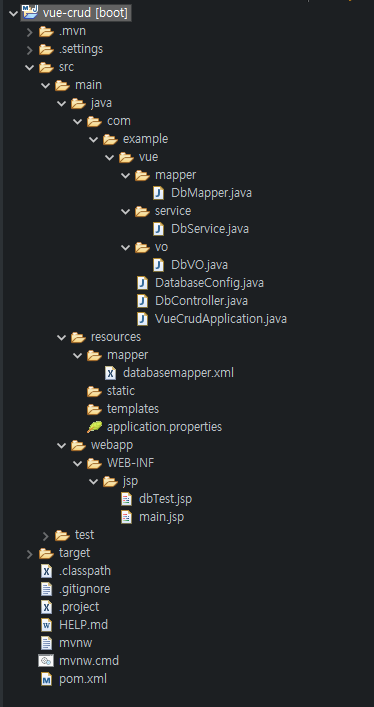
3> Mybatis 전체 DOM 구조
4> 선언한 pom.xml
<!-- This is a web application -->
        <dependency>
            <groupId>org.springframework.boot</groupId>
            <artifactId>spring-boot-starter-web</artifactId>
        </dependency>

        <!-- Tomcat embedded container-->
        <dependency>
            <groupId>org.springframework.boot</groupId>
            <artifactId>spring-boot-starter-tomcat</artifactId>
            <scope>provided</scope>
        </dependency>

        <dependency>
            <groupId>org.springframework.boot</groupId>
            <artifactId>spring-boot-starter-test</artifactId>
            <scope>test</scope>
        </dependency>

        <!-- This is for JDBC -->
        <dependency>
	    <groupId>org.springframework.boot</groupId>
            <artifactId>spring-boot-starter-jdbc</artifactId>
        </dependency>

        <!-- JSTL for JSP -->
        <dependency>
            <groupId>javax.servlet</groupId>
            <artifactId>jstl</artifactId>
        </dependency>

        <!-- Need this to compile JSP -->
        <dependency>
            <groupId>org.apache.tomcat.embed</groupId>
            <artifactId>tomcat-embed-jasper</artifactId>
            <scope>provided</scope>
        </dependency>

        <!-- Need this to compile JSP,
            tomcat-embed-jasper version is not working, no idea why -->
        <dependency>
            <groupId>org.eclipse.jdt.core.compiler</groupId>
            <artifactId>ecj</artifactId>
            <version>4.6.1</version>
            <scope>provided</scope>
        </dependency>

        <!-- Optional, test for static content, bootstrap CSS-->
        <dependency>
            <groupId>org.webjars</groupId>
            <artifactId>bootstrap</artifactId>
            <version>3.3.7</version>
        </dependency>

        <!-- for mariaDB -->
        <dependency>
            <groupId>org.mariadb.jdbc</groupId>
            <artifactId>mariadb-java-client</artifactId>
            <version>1.3.2</version>
        </dependency>

        <!-- for mybatis -->
        <dependency>
            <groupId>org.mybatis</groupId>
            <artifactId>mybatis</artifactId>
            <version>3.3.0</version>
        </dependency>

        <dependency>
            <groupId>org.mybatis</groupId>
            <artifactId>mybatis-spring</artifactId>
            <version>1.2.3</version>
        </dependency>
선언 후에는 저장 및 Maven update를 꼭 해주세요.
5> application.properties
resources > application.properties
#mariaDB
spring.datasource.driverClassName=org.mariadb.jdbc.Driver
spring.datasource.url=jdbc:mariadb://호스트명/DB명
spring.datasource.username=
spring.datasource.password=

spring.mvc.view.prefix=/WEB-INF/jsp/
spring.mvc.view.suffix=.jsp
6> application.java
초기 생성된 java파일
package com.example.vue;

import org.mybatis.spring.annotation.MapperScan;
import org.springframework.boot.SpringApplication;
import org.springframework.boot.autoconfigure.SpringBootApplication;

@SpringBootApplication
@MapperScan(basePackages = "com.example.vue") // 이 부분을 추가해야한다. (Application의 경로로 작성하면 무방할 것 같다.)
public class VueCrudApplication {

	public static void main(String[] args) {
	SpringApplication.run(VueCrudApplication.class, args);
	}

}
7> DatabaseConfig.java
package com.example.vue;

import javax.sql.DataSource;
import org.apache.ibatis.session.SqlSessionFactory;
import org.mybatis.spring.SqlSessionFactoryBean;
import org.mybatis.spring.SqlSessionTemplate;
import org.mybatis.spring.annotation.MapperScan;
import org.springframework.context.annotation.Bean;
import org.springframework.context.annotation.Configuration;
import org.springframework.core.io.support.PathMatchingResourcePatternResolver;
import org.springframework.transaction.annotation.EnableTransactionManagement;

@Configuration
@MapperScan(basePackages="com.insilicogen.vue.mapper")
@EnableTransactionManagement
public class DatabaseConfig {

    @Bean
    public  SqlSessionFactory sqlSessionFactory(DataSource dataSource) throws Exception {
        final SqlSessionFactoryBean sessionFactory = new SqlSessionFactoryBean();
        sessionFactory.setDataSource(dataSource);
        PathMatchingResourcePatternResolver resolver = new PathMatchingResourcePatternResolver();
        sessionFactory.setMapperLocations(resolver.getResources("classpath:mapper/*.xml"));
        return sessionFactory.getObject();
    }

    @Bean
    public SqlSessionTemplate sqlSessionTemplate(SqlSessionFactory sqlSessionFactory) throws Exception {
      final SqlSessionTemplate sqlSessionTemplate = new SqlSessionTemplate(sqlSessionFactory);
      return sqlSessionTemplate;
    }
}
8> 마치며
MyBatis에 대한 설정은 전부 마쳤다.
테스트를 하는 경우에는 Controller, Serive, VO, Mapper를 일반적으로 사용했던 방식대로 적용하면 된다.