<LinkedList?>
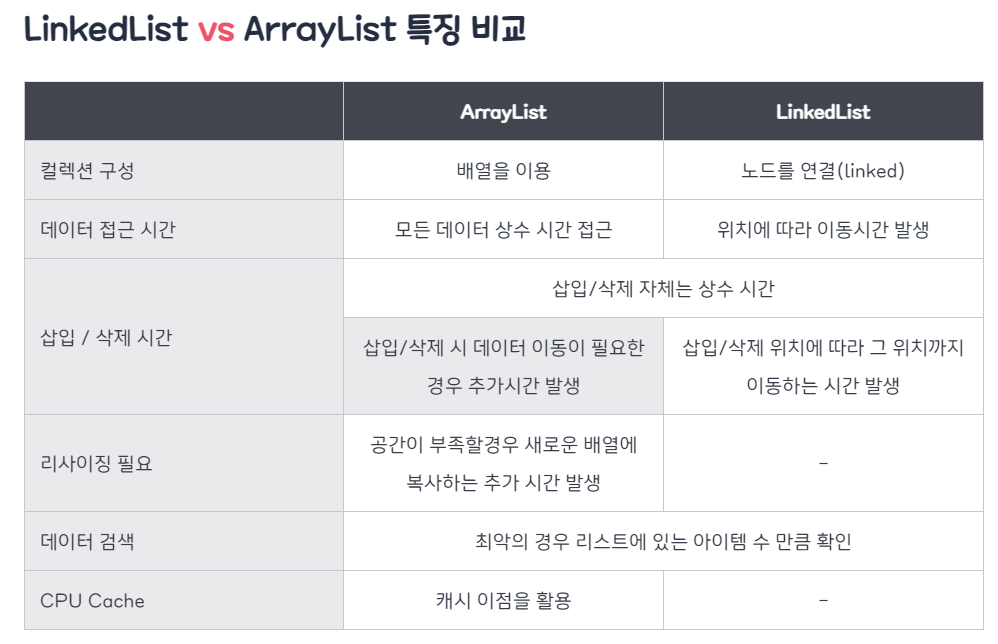
LinkedList는 ArrayList와 같이 index로 접근하여 조회, 삽입이 가능
but 내부 구조는 완전히 다르다.
ArrayList는 내부적으로 배열을 이용하여 메서드로 조작이 가능
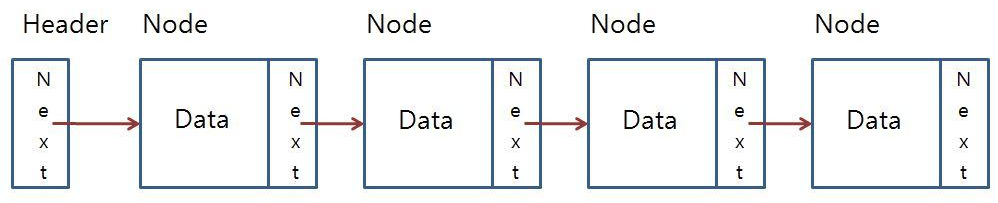
하지만 LinkedList는 노드(객체) 끼리 주소 포인터를 서로 가르키며 서로 연결 (참조) 하여 이어지는 구조
=> LinkedList는 각 노드마다 화살표로 연결 되어 있는 것을 볼 수 있는데, 노드는 하나의 객체로 보면 된다. 객체를 만들면 객체의 주소가 생기는데, 노드마다 객체의 주소를 서로 참조함으로서, 연결을 구성
class Node {
    Node next; // 다음 노드 주소를 저장하는 필드
    int data; // 데이터를 저장하는 필드
};
<LinkedList의 종류>
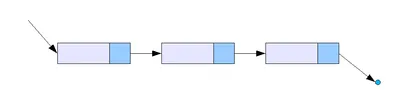
1. 단방향 연결 리스트

노드를 가르키기 위한 포인터 필드 = next 만을 갖고 있는 LinkedList를
단방향 연결 리스트 라고 함.
하지만 단일 연결 리스트는 현재 요소에서 이전 요소로 접근해야 할때 매우 부적합 -> 이를 해결 하기 위해서 생긴 것이 양뱡향 연결 리스트
- 단방향 연결 리스트 코드-
class MyArray {

    int[] arr;

    //  배열의 초기 사이즈 설정
    MyArray(int size) {
        this.arr = new int[size];
    }   // 잡혀 있는 arr 변수에 size를 잡아서 fix한 배열을 생성

    //  배열에 데이터 삽입
    public void insertData(int index, int data) { // 특정 위치에 어떤 값을 추가하는 함수 생성
        if (index < 0 || this.arr.length < index) {
            //this.arr.length < index -> 배열 초과 or 0보다 작은 index 값
            System.out.println("[index Error]");
            return;
        }

        int[] arrDup = this.arr.clone(); // 기존 데이터들을 여기에 복사를 해놓은 것
        this.arr = new int[this.arr.length + 1]; // 데이터가 하나 더 추가 될 것이기 때문에 이 배열보다 하나 더 큰 size을 형성

        for (int i = 0; i < index; i++) {
            this.arr[i] = arrDup[i];
            // i는 0부터 데이터를 추가하려는 index 까지는 기존에 갖고 있던 데이터를 할당
        }

        for (int i = index + 1; i < this.arr.length; i++) {
            this.arr[i] = arrDup[i - 1];
            // 데이터를 추가하려는 위치 그 다음부터 끝자리 까지 기존에 배열을 갖고 할당
        }

        this.arr[index] = data;
    }

    //  배열에서 특정 데이터 삭제
    public void removeData(int data) { // 데이터를 삭제 할때 여기에 들어온 데이터를 찾아서 해당 데이터 삭제
        int targetIndex = -1;

        for (int i = 0; i < this.arr.length; i++) {
            if (this.arr[i] == data) {
                targetIndex = i;
                break;

                /*
                배열을 순회 하면서 각각에 배열에 위치한 데이터가 삭제하려고 한 데이터와 같은지 비교
                if 같은 데이터 있으면 targetIndex 위치를 처음에는 아무것도 찾은게 없단 의미로 -1
                찾으면 찾은 위치에 index 넣어주고, 만약에 해당 data 있으면 break
                 */
            }
        }

        if (targetIndex == -1) {
            System.out.println("[해당 데이터가 없습니다.]");
        } else {
            int[] arrDup = this.arr.clone(); //backUp
            this.arr = new int[this.arr.length - 1];

            for (int i = 0; i < targetIndex; i++) {
                this.arr[i] = arrDup[i];
                //targetIndex에 지우려는 데이터 빼고, 나머지 데이터만 새로 만들어준 배열에 들어간다.
            }

            for (int i = 0; i < this.arr.length; i++) {
                this.arr[i] = arrDup[i + 1];
            }
        }

    }

}- 양방향 연결 리스트
class Node {
    Node next; // 다음 노드 주소를 저장하는 필드
    Node prev; // 이전 노드 주소를 저장하는 필드
    int data; // 데이터를 저장하는 필드
};
단일 연결 노드 객체에서 이전 노드의 주소를 담고 있는 prev가 추가 된 것이 양뱡향 연결 리스트 라고 한다.
이는 역순으로도 검색이 가능 하다. 이로 인해 각 요소에 대한 접근과 이동이 쉬움.
class NodeBi {
        int data;
        NodeBi next;
        NodeBi prev;

    public NodeBi(int data, NodeBi next, NodeBi prev) {
        this.data = data;
        this.next = next;
        this.prev = prev;
    }
}

class DoublyLinkedList extends LinkedList{
    NodeBi head;
    NodeBi tail;

    DoublyLinkedList(NodeBi node) {
        this.head = node;
        this.tail = node;
    }

    public boolean isEmpty(){
        if (this.head == null){
            return true;
        }

        return false;
    }

    //양방향 data
    public void addData(int data, Integer beforeData){
        if (this.head == null){
            this.head = new NodeBi(data, null, null);
            this.tail = this.head; //tail도 같은 노드를 가르킬 수 있도록 할당
        } else if(beforeData == null){ //가장 끝에 추가 (tail을 관리 하기 때문에 tail를 이용해서 바로 추가 가능)
            this.tail.next = new NodeBi(data, null, this.tail);
            //기존에 가장 끝 노드에 다음에 새롭게 만든 노드를 가르킬 수 있도록 만듦
            //새롭게 만든 노드도 next는 없지만 기존에 tail을 가르키게 끔 만듦
            this.tail = this.tail.next;
        } else {

            NodeBi cur = this.head;
            NodeBi pre = cur;
            while (cur != null){
                if (cur.data == beforeData){ //해당 노드를 찾았을때 앞에다가 추가
                    if (cur == this.head){
                        this.head =  new NodeBi(data, this.head, null);
                        //기존 head를 새롭게 만든 node를 가르키도록 만들면 되고, next가 기존 head를 가르키도록 만든다.
                        this.head.next.prev = this.head;
                    } else {
                        //head가 아닐때
                        pre.next = new NodeBi(data, cur, pre);
                        cur.prev = pre.next;
                    }
                    break;
                }

                pre = cur;
                cur = cur.next;
            }
        }
    }

    //remove
    public void removeData(int data){
        if (this.isEmpty()){
            System.out.println("List is empty");
            return;
        }

        NodeBi cur = this.head;
        NodeBi pre = cur;

        //지우고자 하는 node를 찾았는데 cur = head랑 같고, tail이랑 같을때 -> node가 하나 인 경우
        //해당 node가 삭제 되면 아무것도 남지 않기 때문에 head랑 tail을 null로 변경
        while (cur != null){
            if (cur.data == data){
                if (cur == this.head && cur == this.tail) {
                    this.head = null;
                    this.tail = null;

                    //head 인경우, node는 하나가 아닌 상황
                } else if (cur == this.head) {
                    this.head = cur.next; //-> head를 다음으로 가르키도록 하고,
                    this.head.prev = null; // 이전은 null = 기존 head 사라진다.
                } else if (cur == this.tail) {
                    this.tail = this.tail.prev; // 가장 끝을 가르켰던 tail을 기존 tail의 이전이 되도록
                    this.tail.next = null; //기존의 가장 끝 node = null 처리
                }else { //중간 노드 삭제
                    pre.next = cur.next; //cur.next를 pre.next가 되도록
                    cur.next.prev= pre; //cur.next로 가서 걔의 이전은 -> 원래는 삭제 대상인데 pre를 가르키도록 만들어 주면 중간 노드는 자동으로 삭제
                }

                break;
            }
            pre = cur;
            cur = cur.next;
        }
    }

    public void showData(int data){
        if (this.isEmpty()){
            System.out.println("List is empty");
            return;
        }

        NodeBi cur = this.head;
       while (cur!=null){
           System.out.println(cur.data + " ");
           cur = cur.next;
       }
        System.out.println();
       /*
       순회를 하면서 기본 출력 데이터 메소드가 하나 만들어 졌고
        */
    }

    public void showDataFromTail(){
        if (this.isEmpty()){
            System.out.println("List is empty");
            return;
        }

        NodeBi cur = this.tail;
        while (cur != null){
            System.out.println(cur.data + " ");
            cur = cur.prev;
        }

    }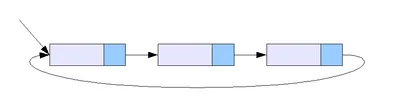
}- 양방향 원형 연결 리스트
첫 노드와 마지막 노드를 각각 연결하여, 마치 원형 리스트 처럼 만듬.
class CircularLinkedList {
    NodeBi head;
    NodeBi tail;

    CircularLinkedList(NodeBi node){
        this.head = node;
        this.tail = node;

        //다시 자기 방향으로 올 수 있게끔
        node.next = this.head;
        node.prev = this.tail;
    }

    public boolean isEmpty(){
        if (this.head == null){
            return true;
        }
        return false;
    }


    // 연결 리스트에 데이터 추가
    // before_data 가 null 인 경우, 가장 뒤에 추가
    // before_data 에 값이 있는 경우, 해당 값을 가진 노드 앞에 추가
    public void addData(int data, Integer beforeData){
        //처음에는 node가 하나이기 때문에 자기 자신을 가르킬 수 있도록
        if (this.head ==null){
            NodeBi newNodeBi = new NodeBi(data, null, null);
            this.head = newNodeBi;
            this.tail = newNodeBi;
            newNodeBi.next = newNodeBi;
            newNodeBi.prev = newNodeBi;
        } else if (beforeData == null){
            //가장 끝 노드로 찾아가서, 해당 부분에 노드 추가
            NodeBi newNodeBi = new NodeBi(data, this.head, this.tail); //data를 넣어주고 이 노드에 next는 head, 이 노드에 이전은 tail (원형이기 때문에 끝에서 첨을 가르키도록)
            this.tail.next = newNodeBi; //기존에 가장 끝 다음에 노드를 넣어주고
            this.head.prev = newNodeBi;//기존 head 이전은 다시 처음으로 가르키도록 만들어줌
            this.tail = newNodeBi; //tail 뒤에 하나 추가 되었으니까 tail이 newNodeBi가 될 수 있도록 만들어준 것
        } else {
            //새롭게 head에 만들때
            NodeBi cur = this.head;
            NodeBi pre = cur;
            do {
                if (cur.data == beforeData){
                    if (cur == this.head){ //가장 head 앞에 데이터 추가
                        NodeBi newNodeBi = new NodeBi(data, this.head, this.tail);
                        //node는 새롭게 만들때 next는 head에 앞이니까, next는 head, prev = tail
                        this.tail.next = newNodeBi; // 방금 들어온 노드가 될 수 있도록
                        this.head.prev = newNodeBi; // head의 이전은 newNodeBi가 될 수 있도록
                        this.head = newNodeBi; // head를 방금 들어온 애로 변경
                    } else {
                        //중간에 들어오는 경우
                        NodeBi newNodeBi = new NodeBi(data, cur, pre);
                        //data의 다음은 cur, cur 이전은 pre
                        pre.next = newNodeBi; //중간에 들어올 애
                        cur.prev = newNodeBi;//beforedata이전에 해당 했던 애 이전은 들어온 애가 될 수 있도록
                    }
                    break;
                }
                pre= cur;
                cur = cur.next;
            } while (cur != this.head);
        }
    }


    //  연결 리스트에서 특정 값을 가진 노드 삭제
    public void removeData(int data){
        if (this.isEmpty()){
            System.out.println("List is Empty");
            return;
        }

        //삭제를 위한 기본 구조
        NodeBi cur = this.head;
        NodeBi pre = cur;
        while (cur != null){
            //삭제하려는 노드를 찾았을때
            if (cur.data == data) {
                if (cur == this.head && cur == this.tail) {
                    this.head = null;
                    this.tail =null;

                    //처음과 끝을 지울때는 원형링크드리스트를 유지 해야 하기 때문에 주의
                } else if (cur == this.head) {
                    cur.next.prev = this.tail;
                    //현재 삭제 하려고 하는 노드에 그 다음노드에 이전 링크를 head에 이전으로 가르키도록
                    //기존에 head를 지우기 때문에 다음에 이전은 다시 이전으로 돌아가 tail을 가르킴
                    this.head = cur.next;
                    this.tail.next = this.head;
                    //기존 tail의 다음은 원래 지우려고 했던 대상에서 head로 변경

                    //가장 끝 노드 지우기
                } else if (cur == this.tail) {
                    /*
                    가장 끝 노드인 경우에는 이전 노드에 next를 이 끝 노드에 다음으로 링크를 변경
                     */
                    pre.next = this.tail.next;
                    this.head = pre; //tail을 가장 끝을 지울 꺼니까 가장 끝 이전인 pre로 변경
                    this.head.prev = this.tail; //head에 이전 노드는 변경된 tail로 변경
                } else {
                    pre.next = cur.next;
                    cur.next.prev = pre;
                }
                break;
            }

            pre = cur;
            cur = cur.next;
        }
    }

    public void showData(){
        if (this.isEmpty()){
            System.out.println("List is Empty");
            return;
        }

        NodeBi cur = this.head;
        while (cur.next != this.head){ // 원형이기 때문에 head로 끝나게끔
            System.out.println(cur.data + " ");
            cur = cur.next;
        }

        System.out.println(cur.data); //가장 끝 노드 데이터가 출력이 되지 않기 때문에 여기까지 실행
    }
}
<정리>
링크텍스트
여기서 많이 참고하고 공부가 되었다.
<공부하면서 느낀점>
LinkedList를 공부할때 가장 단순하게 배열을 차례대로 정리해준다 라고만 알고 있었다. 근데 이건 하면 할수록 머리속에 ? 만 많이 남겼던 것 같다.
아직 공부중이지만 code를 치면서 이걸 내가 구현 할 수 있을까? 라는 의문이 많이 남았다. 하지만 이제 개발이라는 공부를 제대로 시작한지는 한 2주 되어가는 것 같은데, 차근차근 다시 해봐야 겠다.