어제 작성한 Spring-Security-도입-login 에 이은 내용이므로 이전 내용을 참고 하세요.
Spring Security를 사용하고 적용하였고 로그인을 완성 했으므로, 실질적으로 스프링 시큐리티를 사용하여 인가를 적용하는 방법에 대해 포스팅 하고자 한다.
먼저 Spring Security 필터를 지나면서 accessToken이 존재한다면, SpringSecurityContextHolder에 Authentication 객체를 저장해주는 필터를 작성해야 한다.
@RequiredArgsConstructor
public class TokenCheckFilter extends OncePerRequestFilter {
    private final JwtService jwtService;
    private final CustomUserDetailsService customUserDetailsService;

    @Override
    protected void doFilterInternal(HttpServletRequest request, HttpServletResponse response, FilterChain filterChain) throws ServletException, IOException {

        String token = request.getHeader("Authorization");
        if (token == null) {
            filterChain.doFilter(request, response);
            return;
        }
        try {
            Map<String, Object> jwtValueMap = jwtService.parseToken(token);
            String email = (String) jwtValueMap.get("email");
            UserDetails userDetails = customUserDetailsService.loadUserByUsername(email);
            UsernamePasswordAuthenticationToken authenticationToken = new UsernamePasswordAuthenticationToken(userDetails, null, userDetails.getAuthorities());
            SecurityContextHolder.getContext().setAuthentication(authenticationToken);
            filterChain.doFilter(request, response);
        } catch (Exception e) {
            filterChain.doFilter(request, response);
        }
    }
}
TokenCheckFilter에서는 요청의 헤더 부분에 “Authorization” 헤더가 존재한다면 Authentication 객체를 저장하고 존재하지 않는다면 필터를 그냥 진행한다.
TokenCheckFilter를 지나서도 Authentication 객체가 존재하지 않는다면 기본 제공되는 AnonymousAuthenticationFilter 에 의해 익명 사용자 롤을 갖게된다.
public SecurityFilterChain securityFilterChain(HttpSecurity http) throws Exception{

            http.cors(cors-> cors.disable());
            http.csrf(csrf ->csrf.disable());
            http.formLogin(formLogin -> formLogin.disable());

            http.authenticationManager(buildCustomAuthenticationManager(http));
            http.addFilterBefore(loginFilter(buildCustomAuthenticationManager(http)), UsernamePasswordAuthenticationFilter.class);
            http.addFilterBefore(tokenCheckFilter(), UsernamePasswordAuthenticationFilter.class);

            http.authorizeRequests(authorizeRequests ->
                    authorizeRequests.requestMatchers("/account/my-info").authenticated()
            );
            return http.build();
    }
@Bean
    public TokenCheckFilter tokenCheckFilter() {
        return new TokenCheckFilter(jwtService, customUserDetailsService);
    }
다음으로는 SecurityConfig에서 filterChain에 작성한 TokenChainFilter를 끼워넣어줘야 한다,
그리고 맨 처음 작성했던 get메서드인 /account/my-info url에 대해 인증된 요청에 대해 인가할 수 있게 바꿔준다.
그렇게 작성한 이후 /account/my-info 에서 사용되는 서비스 메서드는 다음과 같이 수정할 수 있다.
@Override
public ResponseEntity<AccountDTO> getMyInfo() {
    Account account = ((CustomUserDetails) SecurityContextHolder.getContext().getAuthentication().getPrincipal()).getAccount();
    return ResponseEntity.ok(AccountDTO.builder()
            .id(account.getId())
            .email(account.getEmail())
            .nickname(account.getNickname())
            .build());
}
불필요한 부분이 제거되고, 실질적으로 필요한 로직인 account 객체를 적절한 DTO 형태로 변환해서 반환하는 로직밖에 보이지 않기 때문에 가독성이 좋아진 것을 확인 할 수있다.
혹시 이전 코드가 어땠냐면은
    @Override
    public ResponseEntity<AccountDTO> getMyInfo(String token) {
        //access token을 파싱해서 jwt에 들어 있는 정보를 가져온다.
        Map<String, Object> values = jwtService.parseToken(token);
        if (values == null) {
            return ResponseEntity.badRequest().build();
        }
        //jwt에 들어있는 accountId를 사용해서 해당 id-accessToken이 redis에 저장되어 있는지 확인한다.
        Long accountId = ((Integer) values.get("accountId")).longValue();

        Optional<AccessToken> validToken = tokenService.findAccessTokenById(accountId);
        if (validToken.isEmpty() || !validToken.get().getJwt().equals(token.substring(7))) {
            return ResponseEntity.badRequest().build();
        }
		//accountId를 사용해서 DB에 저장되어 있는 엔티티를 가져온다.
        Optional<Account> maybeAccount = accountRepository.findById(accountId);
        if (maybeAccount.isEmpty()) {
            return ResponseEntity.badRequest().build();
        }
        //실질적으로 사용하고자하는 로직
        Account account = maybeAccount.get();
        return ResponseEntity.ok(AccountDTO.builder()
                .id(account.getId())
                .email(account.getEmail())
                .nickname(account.getNickname())
                .build());
    }
위와 같다.
이렇게 spring security filter의 사용은 불필요하고 반복적인 코드를 제거해 주므로서 인증, 인가에 대한 작업을 줄여주게 된다.
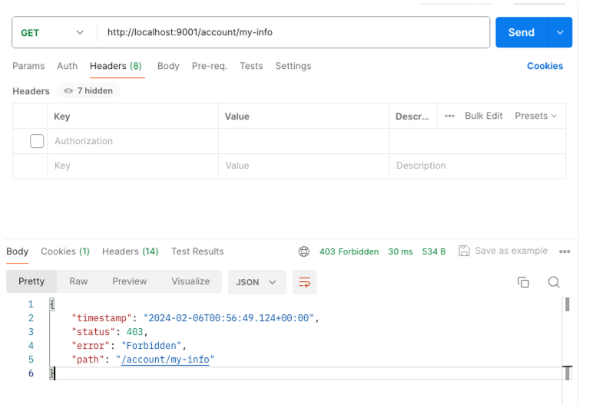
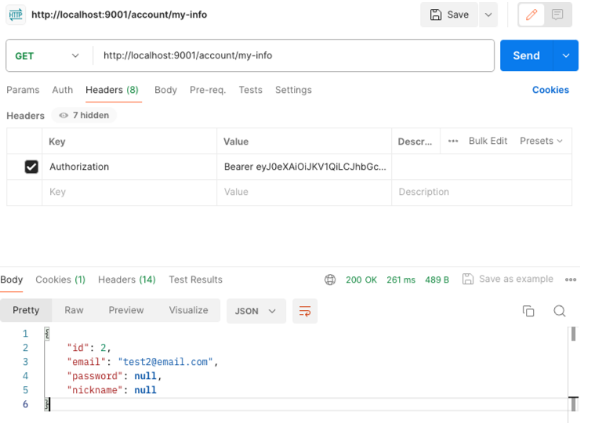
결과
또한 Postman으로 정상적으로 요청한 경우 정상적으로 AccountDTO를 잘 받아 오는 것을 확인 할 수 있다.
예외 사항으로 헤더에 Authorization 이 존재하지 않는 경우 인가 되지 않은 요청의 경우 403 Forbidden에 의해 진행되지 않은 것을 확인 할 수 있다.