
1. inflate
inflate는 과정은 마크업 코드로 작성되어 있는 XML이 화면을 통해서 보여지게 되는데, 이 때 사전적으로 팽창해서 새롭게 생기는 것을 의미하게 됩니다.
(그림으로 나타내는 inflate 흐름)
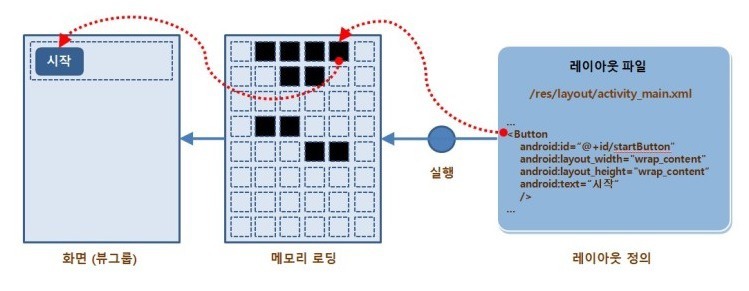
즉, 안드로이드에서 inflate는 xml 작성된 View의 코드를 View 객체로 만드는(메모리에 올리는 것) 용도로 쓰는 단어로 알 수 있습니다.
2. LayoutInflater 생성 방법.
LayoutInflater 는 위의 inflate의 설명에서 보듯이, 레이아웃 XML 마크업 코드를, View 객체로 만드는 역할을 합니다.
1. getSystemService()
LayoutInflater 객체는 System Service 객체로 제공되기 때문에, getSystemService 메서드를 통해 갖고올 수 있습니다. context에서 LayoutInflater를 가져오는 방법입니다.
val inflater: LayoutInflater = context.getSystemService(Context.LAYOUT_INFLATER_SERVICE)2. getLayoutInflater()
Activity에서는 LayoutInflater를 getLayoutInflater() 메서드를 통해 얻어옵니다. Activity는 자신 window의 LayoutInflater를 사용합니다.
val inflater: LayoutInflater = getLayoutInflater()3. LayoutInflater.from()
LayoutInflater에 static으로 정의되어있는 LayoutInflater.from을 통해 LayoutInflater를 만드는 방법입니다. 내부적으로 getSystemService를 호출 하고 있으며, 같은 context에서는 같은 객체를 리턴하기 때문에 굳이 멤버 변수로 선언해 놓지 않고 필요할 때마다 호출해서 사용할 수 있습니다.
val inflater: LayoutInflater = LayoutInflater.from(context) 3. setContentView()
class MainActivity : AppCompatActivity() {
    override fun onCreate(savedInstanceState: Bundle?) {
        super.onCreate(savedInstanceState)
        setContentView(R.layout.activity_main)
    }
}
setContentView()에게 레이아웃의 리소스 ID 를 넘겨주게 되면, inflate() 를 수행하여 XML 마크업 코드를 View 객체로 만드는 동작을 수행하게 됩니다. 그래서 Activity의 코드를 작성할때, 일반적으로 setContentView() 를 가장 먼저 호출 하게 됩니다.
자세한 세부 내용에대한 설명은 setContentView() 편을 따로 작성해서 다루겠습니다.