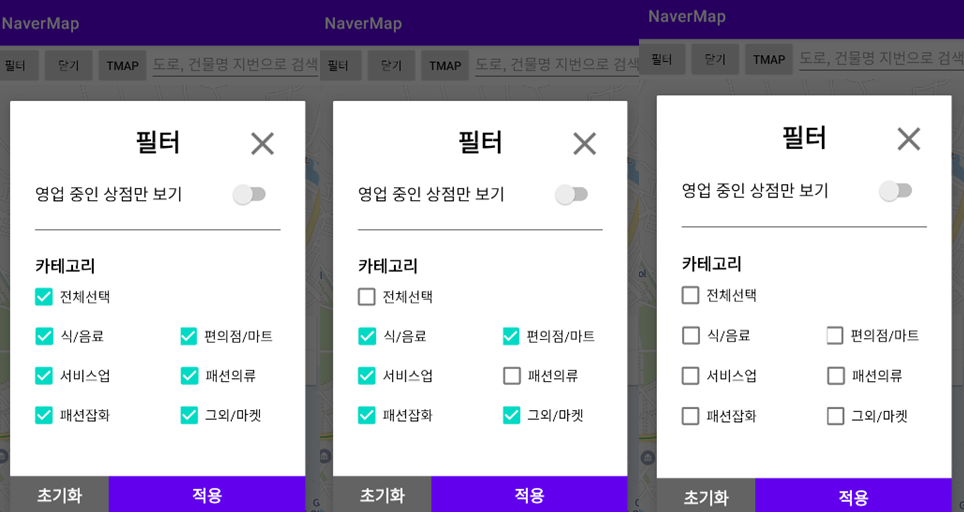
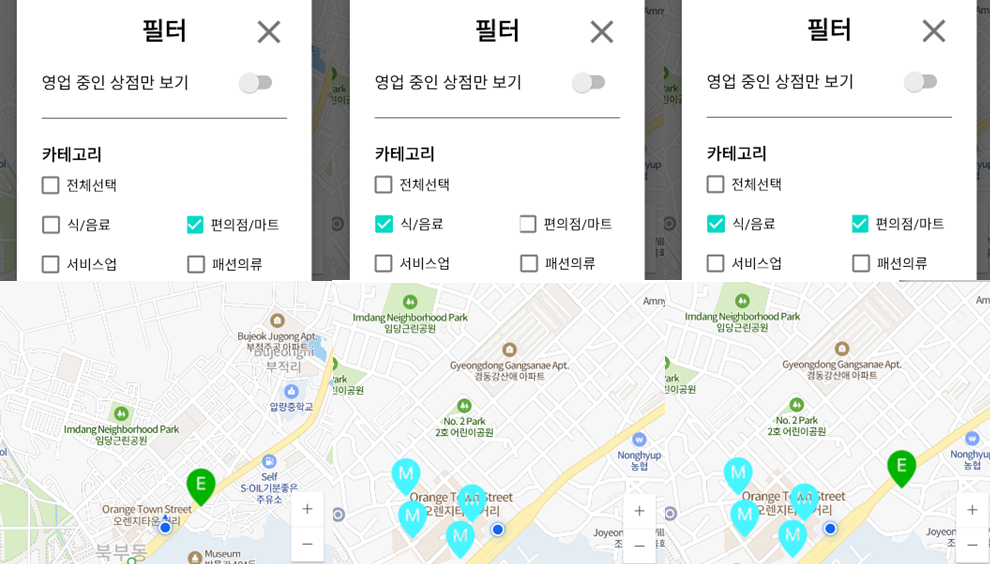
1. 마커 필터 기능 만들기

위 그림과 같은 필터를 만들고 필터에 따라서 지도에 출력되는 마커가 달라지는 기능을 추가할 것 입니다. 차근히 알아보겠습니다.
private fun initDialog() {

        builder = AlertDialog.Builder(this)
        builder.setCancelable(false)

        chkAll = dialogBinding.all

        with(dialogBinding) {
            filterCategoryOptions.addAll(arrayOf(
                foodBeverage, service, fashionAccessories,
                supermarket, fashionClothes, etc)
            )
        }

        chkAll.setOnClickListener {
            filterCategoryOptions.forEach { checkBox ->
                checkBox.isChecked = chkAll.isChecked
            }
        }

        filterCategoryOptions.forEach { checkBox ->
            filterCategoryChecked.add(true)
            checkBox.setOnClickListener {
                for (_checkBox in filterCategoryOptions) {
                    if (!_checkBox.isChecked) {
                        chkAll.isChecked = false
                        return@setOnClickListener
                    }
                }
                chkAll.isChecked = true
            }
        }

		dialogBinding.btnFilterApply.setOnClickListener {

            var noChk = true
            for (item in filterCategoryOptions) {
                if (item.isChecked) {
                    noChk = false
                    break
                }
            }

            if (noChk) {
                Toast.makeText(this, "적어도 하나 이상 카테고리를 선택해야 합니다.", Toast.LENGTH_SHORT).show()
                return@setOnClickListener
            }

            for (i in 0 until filterCategoryOptions.size)
                filterCategoryChecked[i] = filterCategoryOptions[i].isChecked

            updateMarker()

            dialog.dismiss()
            (dialogBinding.root.parent as ViewGroup).removeView(dialogBinding.root)
        }

        dialogBinding.btnCloseFilter.setOnClickListener {

            var check = true
            for (i in 0 until filterCategoryOptions.size) {
                filterCategoryOptions[i].isChecked = filterCategoryChecked[i]
                if (!filterCategoryOptions[i].isChecked)
                    check = false
            }
            chkAll.isChecked = check

            dialog.dismiss()
            (dialogBinding.root.parent as ViewGroup).removeView(dialogBinding.root)
        }

        dialogBinding.btnFilterReset.setOnClickListener {

            filterCategoryOptions.forEach { it.isChecked = true }

            var check = true
            for (item in filterCategoryOptions)
                if (!item.isChecked) {
                    check = false
                }

            if (check) chkAll.isChecked = true
        }

        builder.setView(dialogBinding.root)
        builder.create()
    }
위 코드가 필터기능의 핵심 코드가 됩니다. 코드 길이가 길기 때문에 주요 코드 부분을 나눠서 알아보겠습니다.
class MainActivity : AppCompatActivity(), OnMapReadyCallback {

    private val dialogBinding by lazy {
        val displayRectangle = Rect()
        this.window.decorView.getWindowVisibleDisplayFrame(displayRectangle)
        DialogFilterBinding.inflate(layoutInflater).apply {
            root.minimumHeight = (displayRectangle.width() * 0.9f).toInt()
            root.minimumHeight = (displayRectangle.height() * 0.9f).toInt()
        }
    }
    ....
}

private fun initDialog() {

        builder = AlertDialog.Builder(this)
        builder.setCancelable(false)

        chkAll = dialogBinding.all

        with(dialogBinding) {
            filterCategoryOptions.addAll(arrayOf(
                foodBeverage, service, fashionAccessories,
                supermarket, fashionClothes, etc)
            )
        }
        ....
}
AlertDialog.Builder 객체를 생성하여 AlertDialog의 다양한 디자인을 구축할 수 있습니다. builder.setCancelable(false)로 뒤로가기 버튼 & dialog 뒷배경 터치시 dialog가 종료되는 것 막아줍니다.
만들어진 다이알로그에 대해서 구성 목록의 체크 박스 xml 아이디를 매칭해줍니다. 이로인해서 체크 박스 아이디에 맞게 우리는 코드로 이벤트를 설정 할 수 있게 됩니다.
private lateinit var chkAll: CheckBox
private var filterCategoryOptions = mutableListOf<CheckBox>()
private var filterCategoryChecked = mutableListOf<Boolean>()

private fun initDialog() {

		....

        chkAll.setOnClickListener {
            filterCategoryOptions.forEach { checkBox ->
                checkBox.isChecked = chkAll.isChecked
            }
        }

        filterCategoryOptions.forEach { checkBox ->
            filterCategoryChecked.add(true)
            checkBox.setOnClickListener {
                for (_checkBox in filterCategoryOptions) {
                    if (!_checkBox.isChecked) {
                        chkAll.isChecked = false
                        return@setOnClickListener
                    }
                }
                chkAll.isChecked = true
            }
        }

        ....
}
chkAll.setOnClickListener 를 통해서 전체 선택을 활성화하면 모두가 선택이 됩니다. 전체 선택을 비활성화 활시 모두가 false로 바뀌게 됩니다. filterCategoryChecked.add(true) 하는 이유는 필터 적용을 안하고 x로 종료하고 난 뒤 다시 필터를 키게되면 모든 필터가 true로 초기화 되게 만들기 위해서 입니다.
checkBox.setOnClickListener 같은 경우는 filterCategoryOptions.forEach를 통해 각각 다른 checkBox를 반환해서 리스너를 각각 만들어 줍니다. 그리고 리스너 안의 for (_checkBox in filterCategoryOptions) 로 반복문을 통해서 만약 !_checkBox.isChecked와 같이 체크박스가 하나라도 체크 되어있지 않다면 전체선택 체크 박스가 해제 되게 됩니다.
함수 블록 안 에서 return을 사용하면 해당 함수의 반환값으로 됩니다. 그래서 함수를 반환해서 종료시킬 때 return을 해주게 됩니다. return 이 클릭리스너에 대한 것인지 내부에 또 다른 함수에 대한 것인지 구분이 안될 때 명시적으로 알려주기 위해서 @(at) 을 붙힙니다. return@(클릭리스너) 입니다.
private fun initDialog() {

		....

       dialogBinding.btnFilterApply.setOnClickListener {

            var noChk = true
            for (item in filterCategoryOptions) {
                if (item.isChecked) {
                    noChk = false
                    break
                }
            }

            if (noChk) {
                Toast.makeText(this, "적어도 하나 이상 카테고리를 선택해야 합니다.", Toast.LENGTH_SHORT).show()
                return@setOnClickListener
            }

            for (i in 0 until filterCategoryOptions.size)
                filterCategoryChecked[i] = filterCategoryOptions[i].isChecked

            updateMarker()

            dialog.dismiss()
            (dialogBinding.root.parent as ViewGroup).removeView(dialogBinding.root)
        }

        ....
}
for (i in 0 until filterCategoryOptions.size)
filterCategoryChecked[i] = filterCategoryOptions[i].isChecked 로 체크된 옵션에 대해서 따로 배열에 저장해줍니다. 그리고 필터를 적용을 합니다. 이후에 적용하기를 하지 않고 X로 닫고 난 뒤에 다시 필터를 열게되면 이전에 필터를 적용해서 배열에 저장된 체크 박스의 값으로 열리게 됩니다.
private fun initDialog() {

		....

        dialogBinding.btnCloseFilter.setOnClickListener {

            var check = true
            for (i in 0 until filterCategoryOptions.size) {
                filterCategoryOptions[i].isChecked = filterCategoryChecked[i]
                if (!filterCategoryOptions[i].isChecked)
                    check = false
            }
            chkAll.isChecked = check

            dialog.dismiss()
            (dialogBinding.root.parent as ViewGroup).removeView(dialogBinding.root)
        }

        dialogBinding.btnFilterReset.setOnClickListener {

            filterCategoryOptions.forEach { it.isChecked = true }

            var check = true
            for (item in filterCategoryOptions)
                if (!item.isChecked) {
                    check = false
                }

            if (check) chkAll.isChecked = true
        }

        ....
}
Caused by: java.lang.IllegalStateException: The specified child already has a parent. You must call removeView() on the child's parent first.
dialog.dismiss()를 한 이후에는 (dialogBinding.root.parent as ViewGroup).removeView(dialogBinding.root)를 해줘야 위와같은 앱크래쉬가 발생하지 않습니다.
2. 뷰페이저를 활용한 상점 판매 물건 출력
준비중.
3. reference
https://developer.android.com/guide/topics/ui/dialogs?hl=ko
https://developer.android.com/reference/android/app/AlertDialog.Builder