catalogs service 추가
지금까지 user service를 작성하였는데 하나의 micro service를 더 추가하여 사용해보려고 한다. 상품의 기본 정보를 가지고 있는 카탈로그 서비스를 만들건데. 순서대로 해보자
프로젝트 생성
먼저 프로젝트를 생성하고
- Spring-web
- lombok
- jpa
- h2
- eureka-client
를 추가하여 프로젝트를 생성한다.
pom.xml 작성
<dependency>
    <groupId>com.h2database</groupId>
    <artifactId>h2</artifactId>
    <version>1.3.176</version>
    <scope>runtime</scope>
</dependency>

<dependency>
    <groupId>org.modelmapper</groupId>
    <artifactId>modelmapper</artifactId>
    <version>2.3.8</version>
</dependency>
강의 내용대로 maven을 사용하며 자신이 정한 db가 없다면 위와 같이 pom을 작성해주고
application.yml
yml파일에 h2 설정과 eureka 설정을 해주자
server:
  port: 0

spring:
  application:
    name: catalog-service
  h2:
    console:
      enabled: true
      settings:
        web-allow-others: true  #외부 접속 허용
      path: /h2-console
  datasource:
    driver-class-name: org.h2.Driver
    url: jdbc:h2:mem:testdb
    username: sa
  jpa:
    database-platform: org.hibernate.dialect.H2Dialect
    hibernate:
      ddl-auto: create-drop
    show-sql: true


eureka:
  instance:
    #instance-id: ${spring.cloud.client.hostname} 으로 작성시 ip 번호로 들어옴
    instance-id: ${spring.application.name}:${spring.application.instance_id:${random.value}}
  client: #eureka에 등록할지에 대한 설정
    register-with-eureka: true
    fetch-registry: true
    service-url:
      defaultZone: http://127.0.0.1:8761/eureka #eureka 서버 정보
기본 데이터 생성
꼭 하지 않아도 되는 작업이지만 없으면 디비가 생성될때 마다 정보를 넣어줘야하기 때문에 기본 데이터를 먼저 생성하는 sql을 작성하려고 한다.
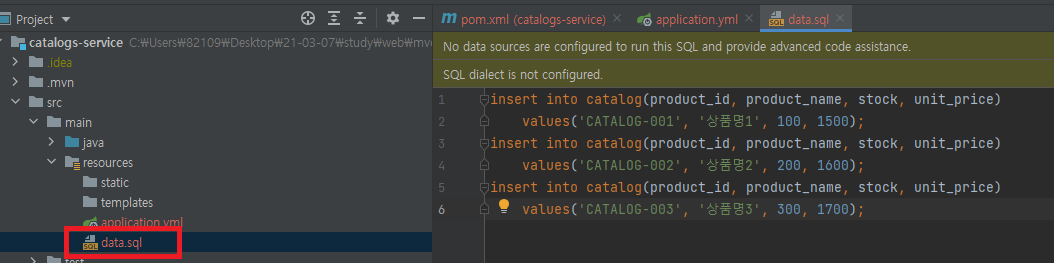
위치는 다음과 같이 resources 패키지 아래에 넣어주고 sql은
insert into catalog(product_id, product_name, stock, unit_price)
    values('CATALOG-001', '상품명1', 100, 1500);
insert into catalog(product_id, product_name, stock, unit_price)
    values('CATALOG-002', '상품명2', 200, 1600);
insert into catalog(product_id, product_name, stock, unit_price)
    values('CATALOG-003', '상품명3', 300, 1700);
다음과 같다. 사용자가 다르게 작성하고 싶다면 다르게 작성해도 된다.
Entity와 Repository 생성
우선 프로젝트의 파일들을 생성할건데 패키지와 파일 이름부터 보여주겠다.
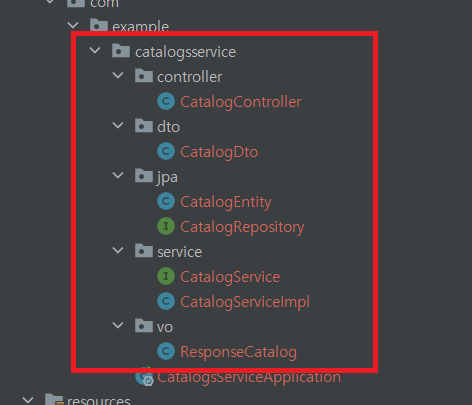
패키지명과 파일 이름은 자신의 스타일로 변경해서 사용해도 된다!
다시 Entity 부터 생성해보자 패키지 jpa아래에 파일들을 생성할거다.
@Data
@Entity
@Table(name = "catalog")
public class CatalogEntity implements Serializable {

    @Id
    @GeneratedValue(strategy = GenerationType.IDENTITY)
    private Long id;

    @Column(nullable = false, length = 120, unique = true)
    private String productId;
    @Column(nullable = false)
    private String productName;
    @Column(nullable = false)
    private Integer stock;
    @Column(nullable = false)
    private Integer unitPrice;

    @Column(nullable = false, updatable = false, insertable = false)
    @ColumnDefault(value = "CURRENT_TIMESTAMP") //now()
    private Date createAt;
}
Entity파일은 jpa에 대한 지식이 있어야한다. 설정값은 위와 같이 해준다.
public interface CatalogRepository extends CrudRepository<CatalogEntity, Long> {
    CatalogEntity findByProductId(String productId);
}
Repository 파일은 interface로 생성하며 CrudRepository를 상속받아 사용한다.
Dto, vo, service 생성
@Data
public class CatalogDto implements Serializable {
    private String productId;
    private Integer qty;
    private Integer unitPrice;
    private Integer totalPrice;

    private String orderId;
    private String userId;
}
dto
@Data
@JsonInclude(JsonInclude.Include.NON_NULL)
public class ResponseCatalog {
    private String productId;
    private String productName;
    private Integer unitPrice;
    private Integer stock;
    private Date createdAt;
}
vo
public interface CatalogService {
    Iterable<CatalogEntity> getAllCatalogs();
}
service
@Data
@Slf4j
@Service
public class CatalogServiceImpl implements CatalogService{

    CatalogRepository catalogRepository;

    @Autowired
    public CatalogServiceImpl(CatalogRepository catalogRepository) {
        this.catalogRepository = catalogRepository;
    }

    @Override
    public Iterable<CatalogEntity> getAllCatalogs() {
        return catalogRepository.findAll();
    }
}
serviceImpl
마지막 컨트롤러
@RestController
@RequestMapping("/catalog-service")
public class CatalogController {
    CatalogService catalogService;

    @Autowired
    public CatalogController(CatalogService catalogService) {
        this.catalogService = catalogService;
    }

    @RequestMapping("/health_check")
    public String status(HttpServletRequest request){
        return String.format("port = %s", request.getServerPort());
    }

    @GetMapping("/catalogs")
    public ResponseEntity<List<ResponseCatalog>> getCatalogs(){
        Iterable<CatalogEntity> catalogList = catalogService.getAllCatalogs();

        List<ResponseCatalog> result = new ArrayList<>();
        catalogList.forEach(v ->{
            result.add(new ModelMapper().map(v, ResponseCatalog.class));
        });

        return ResponseEntity.status(HttpStatus.OK).body(result);
    }
}
health_check는 이전 user-service와 같이 테스트용도로 체크하기 위한 코드로 굳이 추가하지 않아도 된다. 하지만 저번에 설명했던 request를 통해 서버 포트 번호를 가져오는 예시 코드를 작성하고 싶어서 추가해놨다. 이제 catalog service의 작업이 모두 끝났다.
정말 마지막으로 apigateway에 추가해주자!
apigateway 추가
server:
  port: 8000

eureka:
  client:
    register-with-eureka: true
    fetch-registry: true
    service-url:
      defaultZone: http://localhost:8761/eureka

spring:
  application:
    name: apigateway-service
  cloud:
    gateway:
      default-filters:
        - name: GlobalFilter  #Global filter class 파일 명
          args:               #파라미터로 전달될 값 정의
            message: hi global gateway
            preLogger: true
            postLogger: true
      routes:
        - id: user-service
          uri: lb://USER-SERVICE
          predicates: #조건절
            - Path=/user-service/**
원래 코드에서 아래의 코드로 수정해주자!
server:
  port: 8000

eureka:
  client:
    register-with-eureka: true
    fetch-registry: true
    service-url:
      defaultZone: http://localhost:8761/eureka

spring:
  application:
    name: apigateway-service
  cloud:
    gateway:
      default-filters:
        - name: GlobalFilter  #Global filter class 파일 명
          args:               #파라미터로 전달될 값 정의
            message: hi global gateway
            preLogger: true
            postLogger: true
      routes:
        - id: user-service
          uri: lb://USER-SERVICE
          predicates: #조건절
            - Path=/user-service/**
        - id: catalogs-service
          uri: lb://CATALOGS-SERVICE
          predicates: #조건절
            - Path=/catalogs-service/**
아래의 서비스가 하나 더 추가되었다. 이렇게 Eureka - apigateway - service를 모두 실행시켜서 포스트 맨으로 확인도 해보자!
결과 확인
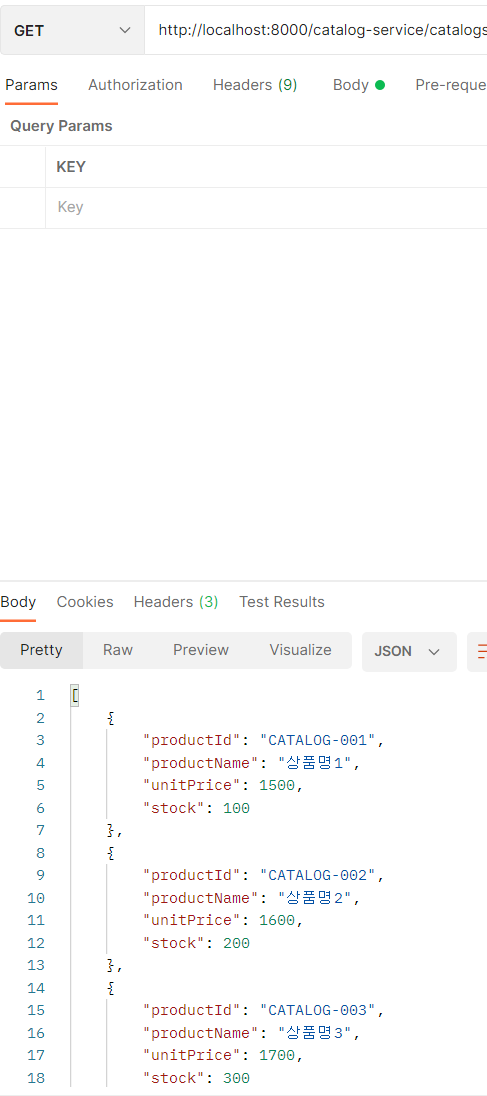
다음과 같이 결과를 확인할 수 있다!!
마지막 팁
db에 저 값들이 정말로 잘 들어가 있는건지 궁금할 수도 있다. 내장 h2 데이터베이스에 접근하는 방법은

유레카에서 실행한 서비스를 클릭하여 서비스의 포트번호로 접근한 뒤
http://192.168.0.1:포트번호/h2-console
로 접근하여 connect를 누른후
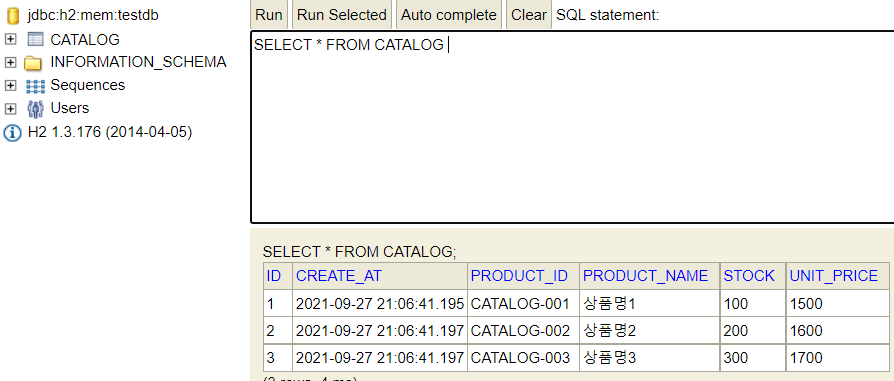
확인이 가능하다.
이 글을 작성하면서 "진짜 쉽지 않나? 여기까지 작성하면서 와 이렇게 서비스를 쪼개어 프로젝트를 작성하게 되면 아무리 큰 프로젝트라도 여러명의 개발자가 각 팀에 맞게 프로젝트를 배분받아 작성할 수 있겠다." 라는 생각을 하게 되었다. 하지만 또 다른 방면으로 생각해보면 이 모든 프로젝트를 방대하게 관리해야하므로 총 괄리 해주시는 분이 꼭 필요할거 같다... 서비스가 커지면 어떤 서비스가 어떤 역할인지 헷갈릴수도 ㅜㅜ 그래도 이렇게 새로운 프로젝트의 구성은 재미있는거 같다.
