🔨User Service 프로젝트 생성
@SpringBootApplication
@EnableDiscoveryClient
public class UserServiceApplication {

    public static void main(String[] args) {
        SpringApplication.run(UserServiceApplication.class, args);
    }

}
프로젝트 생성 후 @EnableDiscoveryClient를 통해 Eureka Client로 등록시켜준다.
server:
  port: 0 #랜덤으로 포트 설정

spring:
  application:
    name: user-service  #Eureka에 등록되는 서비스 이름
eureka:
  instance:
    instance-id: ${spring.application.name}:${spring.application.instance_id:${random.value}}  #포트가 중복으로 설정되어 구분하기 위한 인스턴스 아이디 값 설정
  client:
    register-with-eureka: true
    fetch-registry: true
    service-url:
      defaultZone: http://127.0.0.1:8761/eureka
yml에 설정도 해준다.
🔨Health Check Controller 생성
@RestController
@RequestMapping("/")
public class UserController {

    @GetMapping("/health_check")
    public String status(){
        return "It's Working in User Service";
    }
}
서비스 상태 체크를 위한 health check url을 만들자.

서비스를 실행하여 Eureka에서 서비스를 확인할 수 있다.

실제 health check도 확인할 수 있다.
🔨yml 설정 데이터를 가져오기
server:
  port: 0 #랜덤으로 포트 설정

spring:
  application:
    name: user-service  #Eureka에 등록되는 서비스 이름
eureka:
  instance:
    instance-id: ${spring.application.name}:${spring.application.instance_id:${random.value}}  #포트가 중복으로 설정되어 구분하기 위한 인스턴스 아이디 값 설정
  client:
    register-with-eureka: true
    fetch-registry: true
    service-url:
      defaultZone: http://127.0.0.1:8761/eureka

greeting:
  message: Welcome to the MSA
yml의 설정에 greeting이란 문구를 추가해준다.
@RestController
@RequestMapping("/")
@RequiredArgsConstructor
public class UserController {

    private final Environment env;

    ...

    @GetMapping("/welcome")
    public String welcome(){
        return env.getProperty("greeting.message");
    }
}
yml에 지정된 값을 env로 가져오는 방법이다.

@Value()로 가져오는 방법
@Component
@Data
public class Greeting {
    @Value("${greeting.message}")
    private String message;
}
yml에 설정된 내용을 Greeting class를 만들어 @Component를 통해 bean에 등록해주고 @Value를 통해 값을 넣어서 사용해보자.
@RestController
@RequestMapping("/")
@RequiredArgsConstructor
public class UserController {

    private final Environment env;
    private final Greeting greeting;

    ...

    @GetMapping("/welcome")
    public String welcome(){
        //return env.getProperty("greeting.message");
        return greeting.getMessage();
    }
}
이전의 env 대신 객체 자체에 message를 그대로 불러와서 사용할 수 있다.

동일하게 작동되는 것을 확인할 수 있다.
h2 연동
<!-- https://mvnrepository.com/artifact/com.h2database/h2 -->
<dependency>
    <groupId>com.h2database</groupId>
    <artifactId>h2</artifactId>
    <version>1.3.176</version>
    <scope>runtime</scope>
</dependency>
h2를 추가해주고
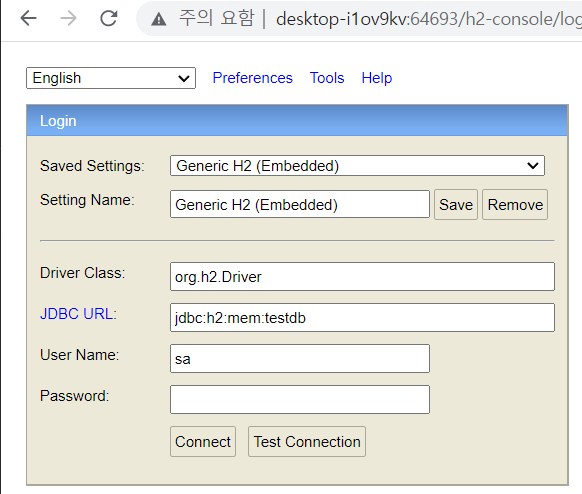
h2의 정책 변경으로 1.3.176으로 진행하면 빠르게 진행할 수 있다.
server:
  port: 0 #랜덤으로 포트 설정

spring:
  application:
    name: user-service  #Eureka에 등록되는 서비스 이름
  h2:
    console:
      enabled: true
      settings:
        web-allow-others: true
      path: /h2-console
...
yml파일에 h2 설정을 추가해준다.
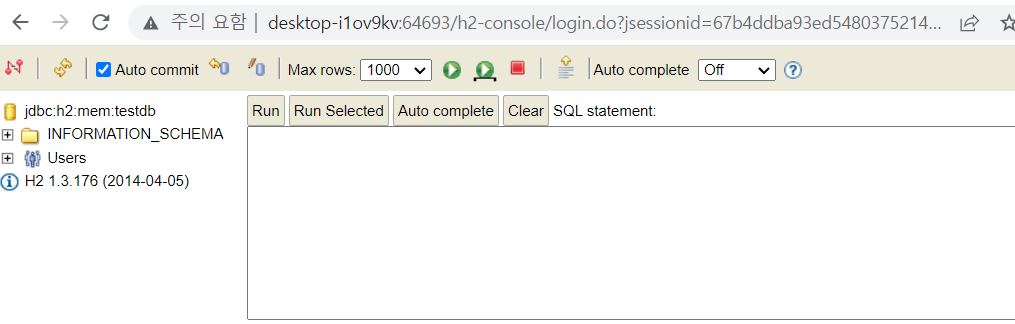
정상적으로 실행된것을 확인할 수 있다.
