🔨Login 데이터 모델 생성
@Data
public class RequestLogin {

    @Email
    @NotNull(message = "Email cannot be null")
    @Size(min = 2, message = "Email not be less than 2 characters")
    private String email;

    @NotNull(message = "Password cannot be null")
    @Size(min = 8, message = "Password not be less than 8 characters")
    private String pwd;
}
UsernamePasswordAuthenticationFilter 상속 class 생성
public class AuthenticationFilter extends UsernamePasswordAuthenticationFilter {

    //로그인 요청을 보냈을 때 로직
    @Override
    public Authentication attemptAuthentication(HttpServletRequest request,
                                                HttpServletResponse response) throws AuthenticationException {
        try {
            RequestLogin creds = new ObjectMapper().readValue(request.getInputStream(), RequestLogin.class);

            //인증정보 생성
            return getAuthenticationManager()
                    .authenticate(
                            new UsernamePasswordAuthenticationToken(
                                    creds.getEmail(),       //id
                                    creds.getPassword(),    //pw
                                    new ArrayList<>()       //권한 정보
                            )
                    );
        } catch (IOException e) {
            throw new RuntimeException(e);
        }

    }

    //로그인 성공했을 때 로직
    @Override
    protected void successfulAuthentication(HttpServletRequest request, HttpServletResponse response, FilterChain chain,
                                            Authentication authResult) throws IOException, ServletException {

    }
}
security의 UsernamePasswordAuthenticationFilter를 구현하여 로그인 요청을 보냈을 때와 로그인을 성공 했을 때 로직을 정의한다.
Security 설정 변경
@Configuration  //다른 bean들 보다 우선순위를 앞으로
@EnableWebSecurity  //security 어노테이션
@RequiredArgsConstructor
public class WebSecurity extends WebSecurityConfigurerAdapter {

    private final UserService userService;
    private final BCryptPasswordEncoder passwordEncoder;
    private final Environment env;

    //권한
    @Override
    protected void configure(HttpSecurity http) throws Exception {
        http.csrf().disable();
        //http.authorizeRequests().antMatchers("/users/**").permitAll();    //기존 모두 ok
        http.authorizeRequests().antMatchers("/**")
            .permitAll()
            .and()
            .addFilter(getAuthenticationFilter());

        http.headers().frameOptions().disable();    //h2 console error 해결을 위해
    }

    private AuthenticationFilter getAuthenticationFilter() throws Exception {
        AuthenticationFilter authenticationFilter = new AuthenticationFilter();
        authenticationFilter.setAuthenticationManager(authenticationManager()); //spring security에서 제공하는 manager 객체

        return authenticationFilter;
    }

    //인증
    @Override
    protected void configure(AuthenticationManagerBuilder auth) throws Exception {
        auth.userDetailsService(userService).passwordEncoder(passwordEncoder);   //사용자가 전달한 id와 pw를 통해 로그인 처리를 security가 해줌
    }
}
기존의 모두 permit()해주던 코드에서 filter를 통해 거르도록 설정을 변경해 주었다. 여기서 중요한 것은 마지막 인증 코드인데. UserDetailsService를 상속받은 userSerivce가 필요하다.
public interface UserService extends UserDetailsService {
    ResponseUser createUser(UserDto userDto);
    UserDto getUserByUserId(String userId);
    Iterable<UserEntity> getUserByAll();
}
interface로 정의된 UserService에 UserDetailsService를 상속시켜주고
@Service
@RequiredArgsConstructor
public class UserServiceImpl implements UserService{
    ...

    @Override
    public UserDetails loadUserByUsername(String username) throws UsernameNotFoundException {
        UserEntity userEntity = userRepository.findByEmail(username);

        if(userEntity == null) throw new UsernameNotFoundException("user가 존재하지 않습니다.");

        return new User(userEntity.getEmail(), userEntity.getEncryptedPwd(), true, true, true, true, new ArrayList<>());
    }
}
우리가 지정한 email 로그인 방식에 따라 email로 회원을 검색 후 User 객체를 반환하도록 코드를 작성했다.
Gateway 설정 변경
...

#        - id: user-service
#          uri: lb://USER-SERVICE
#          predicates:
#            - Path=/user-service/**
        - id: user-service
          uri: lb://USER-SERVICE
          predicates:
           - Path=/user-service/login
           - Method=POST
          filters:
            - RemoveRequestHeader=Cookie
            - RewritePath=/user-service(?<segment>.*), /$\{segment}
        - id: user-service
          uri: lb://USER-SERVICE
          predicates:
            - Path=/user-service/users
            - Method=POST
          filters:
            - RemoveRequestHeader=Cookie
            - RewritePath=/user-service(?<segment>.*), /$\{segment}
        - id: user-service
          uri: lb://USER-SERVICE
          predicates:
            - Path=/user-service/**
            - Method=GET
          filters:
            - RemoveRequestHeader=Cookie
            - RewritePath=/user-service(?<segment>.*), /$\{segment}
...
기존의 설정을 주석처리하고 user-service를 다음과 같이 세분화 하여 설정해준다. 그리고 User Controller도 수정해주어야 하는데
@RequestMapping("/")해당 부분만 이렇게 수정해주자.
요청해보기
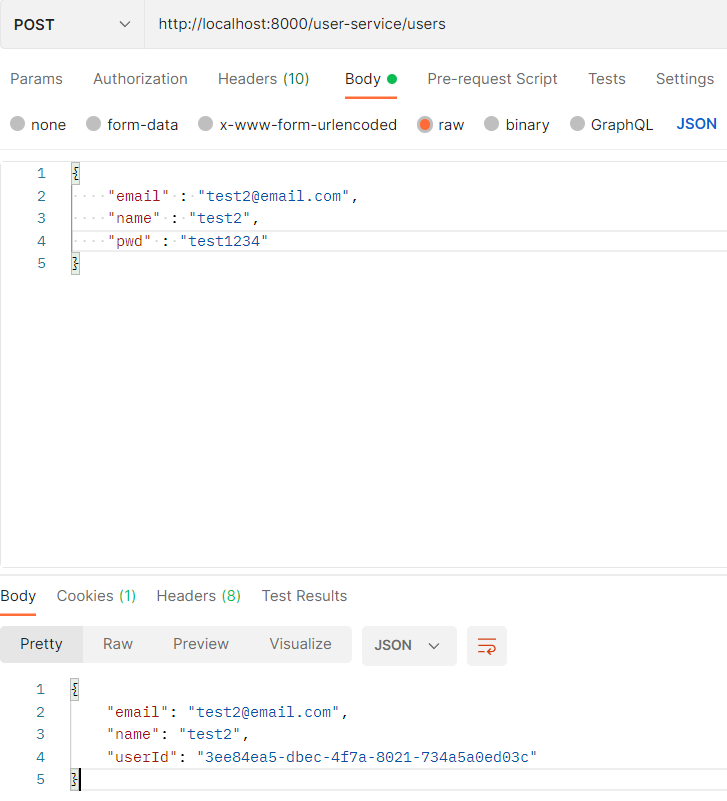
다음과 같이 정상적으로 요청된 결과를 반환받을 수 있고
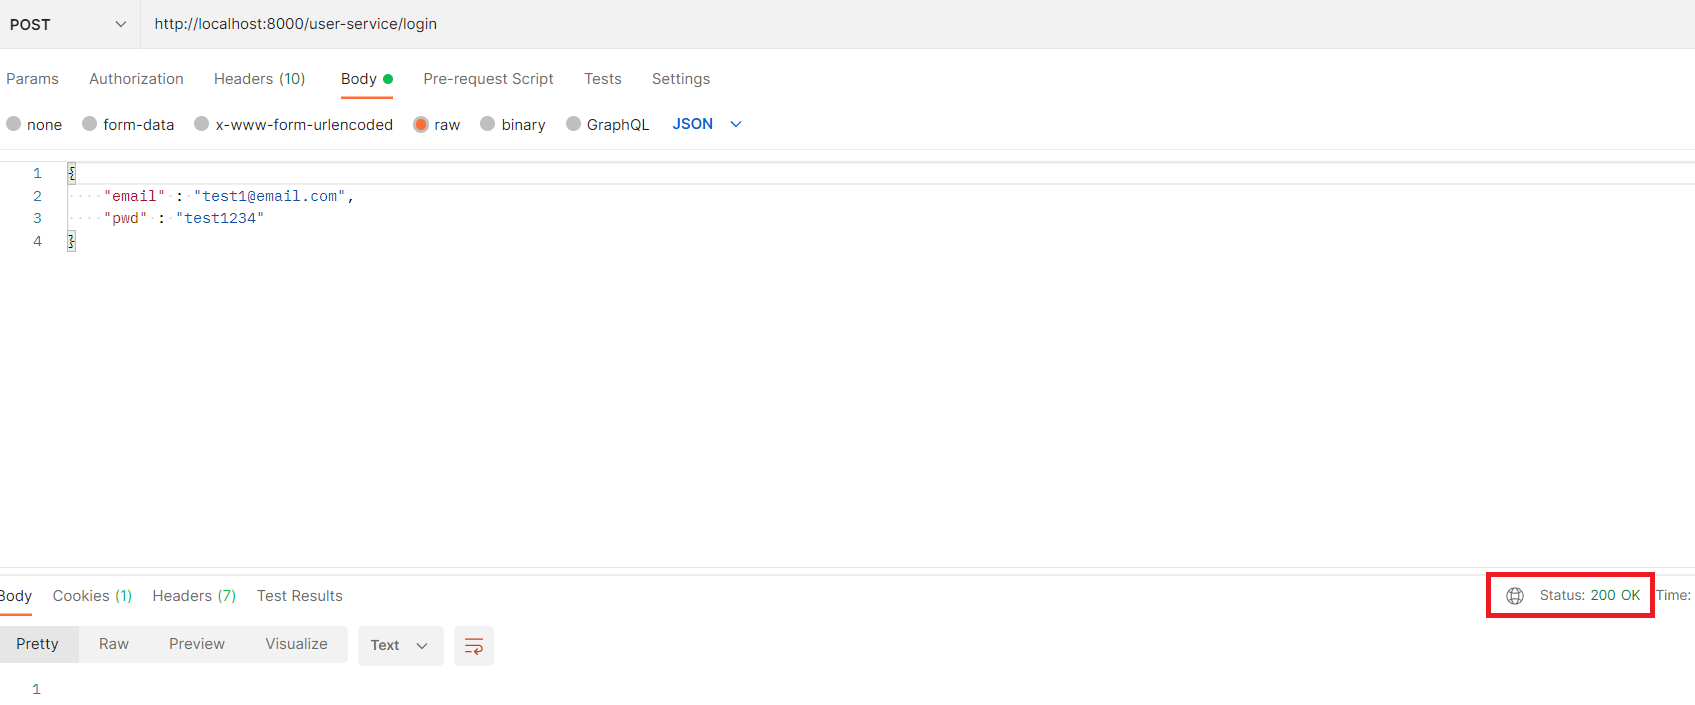
security에서 기본 제공되는 login을 통해 post로 요청했을 때 정상 반환되는 것을 확인할 수 있다.
