[Flutter 트랙] 앱개발 종합반 5주차
4주차까지 배운 내용을 기반으로 메모장 어플을 출시까지 진행을 하는 강의다.
인트로
📚 기능 명세
- 메모는 월별로 그룹화된다.
- 메모에는 제목과 내용으로 나뉘어 저장된다.
- 메모 상세 페이지에는 바로 편집이 된다.
- 구글 광고는 홈 화면에서만 노출이 된다.
- 검색은 입력에 따라 제목에 포함된 내용이 필터링 되어 노출이 된다.
- 제목은 한 줄로 표시되고 한 줄이 넘어가는 긴 제목의 경우는 … 처리한다.
- 모든 메모는 휘발되지 않는다.
- 삭제는 메모 상세 화면 하단에 삭제 버튼을 배치하여 삭제할 수 있다.
📚 할일 정리
- 홈 화면 구성
- 등록/상세 화면 구성
- 파이어베이스 연동
- 메모 등록 기능 개발
- 메모 리스트 개발
- 메모를 눌러 메모 수정 개발
- 메모를 눌러 삭제 개발
- 검색기능을 통해 메모 리스트 필터 개발
- 구글 애드몹 연동
- 앱 배포
화면
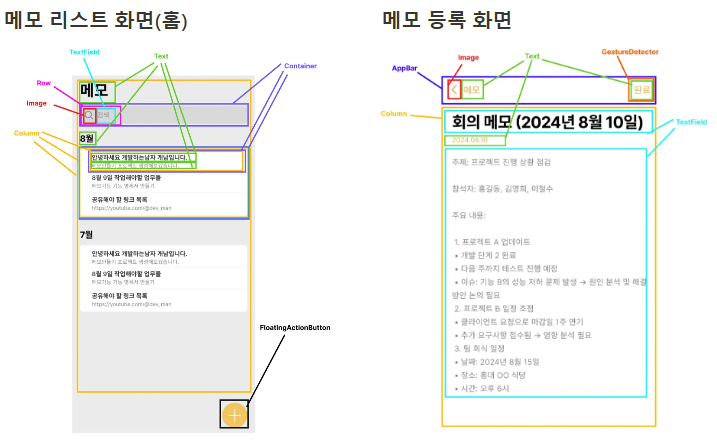
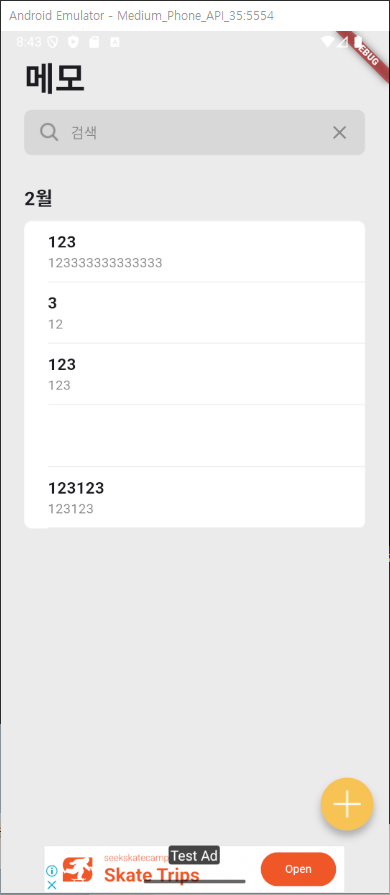
메모 상단
최상단의 메모 텍스트 부분은 텍스트와 검색바가 위치해 있다
검색바는 _searchBar로 위젯을 분리하고 home화면을 구성한다.
import 'package:flutter/material.dart';
class Home extends StatelessWidget {
const Home({super.key});
Widget build(BuildContext context) {
return Scaffold(
backgroundColor: Color(0xffEBEBEB),
body: SafeArea(
child: SingleChildScrollView(
padding: const EdgeInsets.symmetric(horizontal: 25),
child: Column(
crossAxisAlignment: CrossAxisAlignment.stretch,
children: [
Text(
'메모',
style: TextStyle(
fontSize: 35,
fontWeight: FontWeight.bold,
),
),
_searchBar(),
],
),
),
),
);
}
Widget _searchBar() {
return Container(
margin: const EdgeInsets.only(top: 10),
padding: const EdgeInsets.symmetric(horizontal: 15),
decoration: BoxDecoration(
color: Color(0xffD8D8D8),
borderRadius: BorderRadius.circular(8),
),
child: Row(
children: [
Image.asset('assets/images/search.png'),
SizedBox(width: 10),
Expanded(
child: TextField(
decoration: InputDecoration(
border: InputBorder.none,
hintText: '검색',
hintStyle: TextStyle(
color: Color(0xff888888),
fontSize: 15,
),
),
),
),
],
),
);
}
}
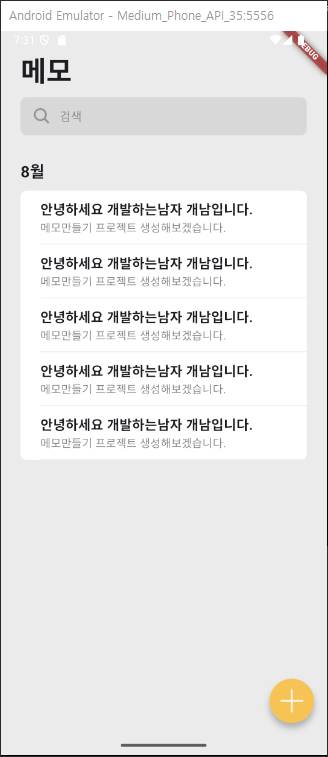
월별 메모 그룹
  Widget _monthlyMemoGroup() {
    return Column(
      crossAxisAlignment: CrossAxisAlignment.stretch,
      children: [
        SizedBox(height: 30),
        Text(
          '8월',
          style: TextStyle(fontWeight: FontWeight.bold, fontSize: 20),
        ),
        SizedBox(height: 10),
        Container(
          decoration: BoxDecoration(
            borderRadius: BorderRadius.circular(8),
            color: Colors.white,
          ),
          padding: const EdgeInsets.only(left: 25),
          child: Column(
            crossAxisAlignment: CrossAxisAlignment.stretch,
            children: List.generate(
              5,
              (i) {
                return Container(
                  padding: const EdgeInsets.symmetric(vertical: 10),
                  decoration: BoxDecoration(
                    border: Border(
                      bottom: BorderSide(
                        color: Color(0xffECECEC),
                      ),
                    ),
                  ),
                  child: Column(
                    crossAxisAlignment: CrossAxisAlignment.stretch,
                    children: [
                      Text(
                        '안녕하세요 개발하는남자 개남입니다.',
                        style: TextStyle(
                          fontWeight: FontWeight.bold,
                          fontSize: 17,
                        ),
                      ),
                      Text(
                        '메모만들기 프로젝트 생성해보겠습니다.',
                        style:
                            TextStyle(fontSize: 14, color: Color(0xff848484)),
                      ),
                    ],
                  ),
                );
              },
            ),
          ),
        )
      ],
    );
  }
임시로 레이아웃을 볼 월별 메모를 넣엇고 후에 추가 화면으로 넘어갈 플러팅 버튼까지 추가
플러팅버튼
floatingActionButton: FloatingActionButton(
    onPressed: () {},
    backgroundColor: Color(0xffF7C354),
    shape: RoundedRectangleBorder(
      borderRadius: BorderRadius.circular(50),
    ),
    child: Image.asset('assets/images/plus.png'),
),
라우팅
 return GetMaterialApp(
      title: 'Flutter Demo',
      theme: ThemeData(
        colorScheme: ColorScheme.fromSeed(seedColor: Colors.deepPurple),
        useMaterial3: true,
      ),
      home: Home(),
    );
메인에서 get으로 라우팅을 연결하고 플러팅 버튼에 페이지 이동 코드 작성
 floatingActionButton: FloatingActionButton(
        onPressed: () {
          Get.to(MemoWritePage());
        },
        backgroundColor: Color(0xffF7C354),
        shape: RoundedRectangleBorder(
          borderRadius: BorderRadius.circular(50),
        ),
        child: Image.asset('assets/images/plus.png'),
      ),
appbar
appBar: AppBar(
  leading: GestureDetector(
    onTap: Get.back,
    child: Image.asset('assets/images/back.png'),
  ),
  centerTitle: false,
  titleSpacing: 0,
  title: Text(
    '메모',
    style: TextStyle(fontSize: 17, color: Color(0xffE3AC34)),
  ),
  actions: [
    GestureDetector(
      onTap: () {},
      child: Padding(
        padding: const EdgeInsets.symmetric(horizontal: 25.0),
        child: Text(
          '완료',
          style: TextStyle(fontSize: 17, color: Color(0xffE3AC34)),
        ),
      ),
    ),
  ],
),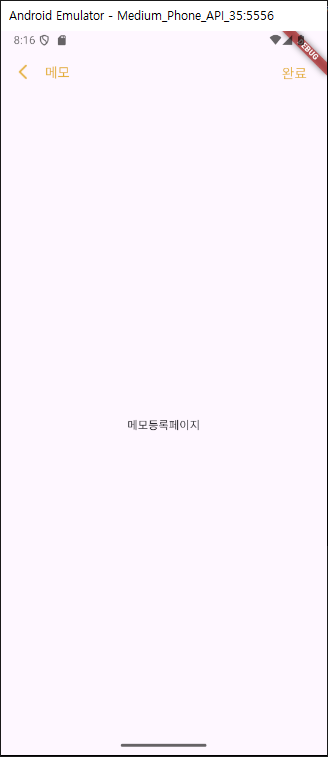
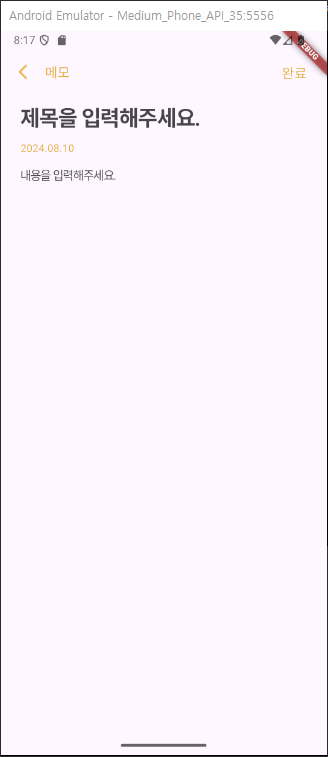
메모 작성
body: Padding(
  padding: const EdgeInsets.symmetric(horizontal: 25),
  child: Column(
    crossAxisAlignment: CrossAxisAlignment.stretch,
    children: [
      TextField(
        decoration: InputDecoration(
          border: InputBorder.none,
          hintText: '제목을 입력해주세요.',
        ),
        style: TextStyle(
          fontSize: 27,
          height: 1.5,
          fontWeight: FontWeight.bold,
          letterSpacing: -1,
        ),
        maxLines: null, // 여러 줄 입력 가능
      ),
      Text(
        '2024.08.10',
        style: TextStyle(fontSize: 13, color: Color(0xffE3AC34)),
      ),
      Expanded(
        child: TextField(
          decoration: InputDecoration(
            border: InputBorder.none,
            hintText: '내용을 입력해주세요.',
          ),
          style: TextStyle(
            fontSize: 15,
            height: 1.5,
            color: Color(0xff848484),
            letterSpacing: -1,
          ),
          maxLines: null, // 여러 줄 입력 가능
        ),
      ),
    ],
  ),
),
파이어베이스 연결
프로젝트와 연결 및 초기 셋팅은 생략.
메모 등록 기능 개발
작성 컨트롤러 생성
import 'package:cloud_firestore/cloud_firestore.dart';
import 'package:get/get.dart';
class MemoWriteController extends GetxController {
late CollectionReference memoCollectionRef;
String title = '';
String memo = '';
DateTime? memoDate;
void onInit() {
super.onInit();
memoCollectionRef = FirebaseFirestore.instance.collection('memo');
memoDate = DateTime.now();
}
void setTitle(String title) {
this.title = title;
update();
}
void setMemo(String memo) {
this.memo = memo;
update();
}
}
플러팅 버튼 클릭시 화면 라우팅 및 의존성 주입
floatingActionButton: FloatingActionButton(
  onPressed: () {
    Get.to(MemoWritePage(), binding: BindingsBuilder(() {
      Get.put(MemoWriteController());
    }));
  },
  backgroundColor: Color(0xffF7C354),
  shape: RoundedRectangleBorder(
    borderRadius: BorderRadius.circular(50),
  ),
  child: Image.asset('assets/images/plus.png'),
),
메모 작성페이지에 상태관리와 이벤트 연결
body: Padding(
  padding: const EdgeInsets.symmetric(horizontal: 25),
  child: Column(
    crossAxisAlignment: CrossAxisAlignment.stretch,
    children: [
      TextField(
        decoration: InputDecoration(
          border: InputBorder.none,
          hintText: '제목을 입력해주세요.',
        ),
        style: TextStyle(
          fontSize: 27,
          height: 1.5,
          fontWeight: FontWeight.bold,
          letterSpacing: -1,
        ),
        maxLines: null,
        onChanged: (value) {
          Get.find<MemoWriteController>().setTitle(value);
        }, // 여러 줄 입력 가능
      ),
      Text(
        Get.find<MemoWriteController>().memoDate!.toString(),
        style: TextStyle(fontSize: 13, color: Color(0xffE3AC34)),
      ),
      Expanded(
        child: TextField(
          decoration: InputDecoration(
            border: InputBorder.none,
            hintText: '내용을 입력해주세요.',
          ),
          style: TextStyle(
            fontSize: 15,
            height: 1.5,
            color: Color(0xff848484),
            letterSpacing: -1,
          ),
          maxLines: null, // 여러 줄 입력 가능
          onChanged: (value) {
            Get.find<MemoWriteController>().setMemo(value);
          },
        ),
      ),
    ],
  ),
),
날짜 포맷에 맞추기위해 라이브러리 사용
https://pub.dev/packages/intl
포맷 함수 구현후 메모 작성 페이지에 적용
class MemoDataUtils {
  static String formatDate(String format, DateTime date) {
    return DateFormat(format).format(date);
  }
}
...

Text(
  MemoDataUtils.formatDate(
      'yyyy-MM-dd', Get.find<MemoWriteController>().memoDate!),
  style: TextStyle(fontSize: 13, color: Color(0xffE3AC34)),
),
저장을 위해 메모 모델 작성
uuid 라이브러리 사용
https://pub.dev/packages/uuid
import 'package:uuid/uuid.dart';
class MemoModel {
final String id;
final String title;
final String memo;
final DateTime createdAt;
MemoModel({
String? id,
required this.title,
required this.memo,
DateTime? createdAt,
}) : id = Uuid().v4(),
createdAt = DateTime.now();
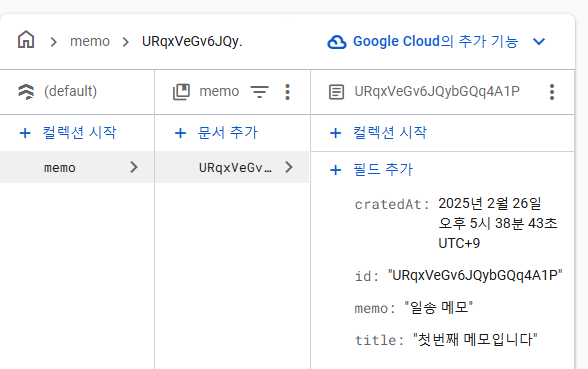
factory MemoModel.fromJson(Map<String, dynamic> json) {
return MemoModel(
id: json['id'],
title: json['title'],
memo: json['memo'],
createdAt: DateTime.parse(json['createdAt']),
);
}
Map<String, dynamic> toMap() {
return {
'id': id,
'title': title,
'memo': memo,
'createdAt': createdAt.toIso8601String(),
};
}
}저장 관련 코드 작성하고
void save() {
  var memoModel = MemoModel(title: title, memo: memo);
  memoCollectionRef.add(memoModel.toMap());
  Get.back(result: memoModel);
}
저장 버튼에 함수실행
GestureDetector(
  onTap: () {
    Get.find<MemoWriteController>().save();
  },
  child: Padding(
    padding: const EdgeInsets.symmetric(horizontal: 25.0),
    child: Text(
      '완료',
      style: TextStyle(fontSize: 17, color: Color(0xffE3AC34)),
    ),
  ),
),
메모 리스트 개발
import 'package:cloud_firestore/cloud_firestore.dart';
import 'package:flutter_memo_app/memo_model.dart';
import 'package:get/get.dart';
class MemoListController extends GetxController {
late CollectionReference memoCollectionRef;
List<MemoModel> memoList = [];
void onInit() {
super.onInit();
memoCollectionRef = FirebaseFirestore.instance.collection('memo');
loadAllMemos();
}
void loadAllMemos() async {
var memoData = await memoCollectionRef.get();
memoList = memoData.docs
.map<MemoModel>(
(data) => MemoModel.fromJson(data.data() as Map<String, dynamic>))
.toList();
update();
}
}MemoListController를 생성해서 메모를 관리할수있게 한다.
이후 이 컨트롤러른 전에는 main build시 호출을했지만 이번엔 바인딩으로 진행을 해보겠다.
 initialBinding: BindingsBuilder(() {
      Get.put(MemoListController());
    }),
컨트롤러에서 파이어베이스 데이터 들고오기
import 'package:cloud_firestore/cloud_firestore.dart';
import 'package:flutter_application_8/memo_model.dart';
import 'package:get/get.dart';
class MemoListController extends GetxController {
late CollectionReference memoCollectionRef;
List<MemoModel> memoList = [];
void onInit() {
super.onInit();
memoCollectionRef = FirebaseFirestore.instance.collection('memo');
loadAllMemos();
}
void loadAllMemos() async {
var memoData = await memoCollectionRef.get();
memoList = memoData.docs
.map<MemoModel>(
(data) => MemoModel.fromJson(data.data() as Map<String, dynamic>))
.toList();
update();
}
}들고온 값을 메인 화면에서 위젯으로 보여주기
body: SafeArea(
  child: SingleChildScrollView(
    padding: const EdgeInsets.symmetric(horizontal: 25),
    child: Column(
      crossAxisAlignment: CrossAxisAlignment.stretch,
      children: [
        Text(
          '메모',
          style: TextStyle(
            fontSize: 35,
            fontWeight: FontWeight.bold,
          ),
        ),
        _searchBar(),
        GetBuilder<MemoListController>(builder: (controller) {
          return _monthlyMemoGroup(controller.memoList);
        }),
      ],
    ),
  ),
),
...
Widget _monthlyMemoGroup(List<MemoModel> memoList) {
  return Column(
    crossAxisAlignment: CrossAxisAlignment.stretch,
    children: [
      SizedBox(height: 30),
      Text(
        '8월',
        style: TextStyle(fontWeight: FontWeight.bold, fontSize: 20),
      ),
      SizedBox(height: 10),
      Container(
        decoration: BoxDecoration(
          borderRadius: BorderRadius.circular(8),
          color: Colors.white,
        ),
        padding: const EdgeInsets.only(left: 25),
        child: Column(
          crossAxisAlignment: CrossAxisAlignment.stretch,
          children: List.generate(
            memoList.length,
            (i) {
              return Container(
                padding: const EdgeInsets.symmetric(vertical: 10),
                decoration: BoxDecoration(
                  border: Border(
                    bottom: BorderSide(
                      color: Color(0xffECECEC),
                    ),
                  ),
                ),
                child: Column(
                  crossAxisAlignment: CrossAxisAlignment.stretch,
                  children: [
                    Text(
                      memoList[i].title,
                      style: TextStyle(
                        fontWeight: FontWeight.bold,
                        fontSize: 17,
                      ),
                    ),
                    Text(
                      memoList[i].memo,
                      style:
                          TextStyle(fontSize: 14, color: Color(0xff848484)),
                    ),
                  ],
                ),
              );
            },
          ),
        ),
      )
    ],
  );
}
메모의 월에 따라서 나눠보이게 위젯을 수정해본다.
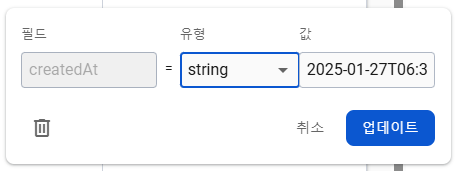
강제로 값을 수정해주고..
모델 생성시 createdAt값은 now로만 넣고있었기 때문에 갖고있는 값을 초기화값으로 사용
MemoModel({
    String? id,
    required this.title,
    required this.memo,
    DateTime? createdAt,
  })  : id = id ?? Uuid().v4(),
        createdAt = createdAt ?? DateTime.now();
이후 화면단에서 분기처리를 해준다.
 GetBuilder<MemoListController>(builder: (controller) {
  List<String> keys = [];
  List<List<MemoModel>> values = [];
  controller.memoGroup.forEach((key, value) {
    keys.add(key);
    values.add(value);
  });
  return Column(
    children: List.generate(keys.length, (i) {
      return _monthlyMemoGroup(keys[i], values[i]);
    }),
  );
}),
Widget _monthlyMemoGroup(String monthString, List<MemoModel> memoList) {
return Column(
crossAxisAlignment: CrossAxisAlignment.stretch,
children: [
SizedBox(height: 30),
Text(
'$monthString월',
style: TextStyle(fontWeight: FontWeight.bold, fontSize: 20),
),
SizedBox(height: 10),
Container(
decoration: BoxDecoration(
borderRadius: BorderRadius.circular(8),
color: Colors.white,
),
padding: const EdgeInsets.only(left: 25),
child: Column(
crossAxisAlignment: CrossAxisAlignment.stretch,
children: List.generate(
memoList.length,
(i) {
return Container(
padding: const EdgeInsets.symmetric(vertical: 10),
decoration: BoxDecoration(
border: Border(
bottom: BorderSide(
color: Color(0xffECECEC),
),
),
),
child: Column(
crossAxisAlignment: CrossAxisAlignment.stretch,
children: [
Text(
memoList[i].title,
style: TextStyle(
fontWeight: FontWeight.bold,
fontSize: 17,
),
),
Text(
memoList[i].memo,
style:
TextStyle(fontSize: 14, color: Color(0xff848484)),
),
],
),
);
},
),
),
)
],
);
}메모수정
메모 수정을 위해 모델을 파라미터로 넘겨준다.
return GestureDetector(
  onTap: () {
    Get.to(MemoWritePage(), binding: BindingsBuilder(() {
      Get.put(MemoWriteController(memoModel: memoList[i]));
    }));
  },
  child: Container(
    padding: const EdgeInsets.symmetric(vertical: 10),
    decoration: BoxDecoration(
      border: Border(
        bottom: BorderSide(
          color: Color(0xffECECEC),
        ),
      ),
    ),
    child: Column(
      crossAxisAlignment: CrossAxisAlignment.stretch,
      children: [
        Text(
          memoList[i].title,
          style: TextStyle(
            fontWeight: FontWeight.bold,
            fontSize: 17,
          ),
        ),
        Text(
          memoList[i].memo,
          style:
              TextStyle(fontSize: 14, color: Color(0xff848484)),
        ),
      ],
    ),
  ),
);
넘겨준 모델을 컨트롤러에서 활용할수있게 수정 및 textcontroller까지 초기화
MemoWriteController({this.memoModel});
MemoModel? memoModel;
final TextEditingController titleTextController = TextEditingController();
final TextEditingController memoTextController = TextEditingController();
void onInit() {
super.onInit();
memoCollectionRef = FirebaseFirestore.instance.collection('memo');
if (memoModel != null) {
title = memoModel!.title;
memo = memoModel!.memo;
memoDate = memoModel!.createdAt;
titleTextController.text = title;
memoTextController.text = memo;
} else {
memoDate = DateTime.now();
}
}
이후 작성부분 코드까지 수정
body: Padding(
  padding: const EdgeInsets.symmetric(horizontal: 25),
  child: Column(
    crossAxisAlignment: CrossAxisAlignment.stretch,
    children: [
      TextField(
        controller: Get.find<MemoWriteController>().titleTextController,
        decoration: InputDecoration(
          border: InputBorder.none,
          hintText: '제목을 입력해주세요.',
        ),
        style: TextStyle(
          fontSize: 27,
          height: 1.5,
          fontWeight: FontWeight.bold,
          letterSpacing: -1,
        ),
        maxLines: null,
        onChanged: (value) {
          Get.find<MemoWriteController>().setTitle(value);
        }, // 여러 줄 입력 가능
      ),
      Text(
        MemoDataUtils.formatDate(
            'yyyy-MM-dd', Get.find<MemoWriteController>().memoDate!),
        style: TextStyle(fontSize: 13, color: Color(0xffE3AC34)),
      ),
      Expanded(
        child: TextField(
          controller: Get.find<MemoWriteController>().memoTextController,
          decoration: InputDecoration(
            border: InputBorder.none,
            hintText: '내용을 입력해주세요.',
          ),
          style: TextStyle(
            fontSize: 15,
            height: 1.5,
            color: Color(0xff848484),
            letterSpacing: -1,
          ),
          maxLines: null, // 여러 줄 입력 가능
          onChanged: (value) {
            Get.find<MemoWriteController>().setMemo(value);
          },
        ),
      ),
    ],
  ),
),
수정후 save 코드 작성
void save() async {
  var newMemoModel = MemoModel(
    id: memoModel?.id,
    title: title,
    memo: memo,
    createdAt: DateTime.now(),
  );
  if (memoModel != null) {
    var doc =
        await memoCollectionRef.where('id', isEqualTo: memoModel!.id).get();
    memoCollectionRef.doc(doc.docs.first.id).update(newMemoModel.toMap());
  } else {
    memoCollectionRef.add(newMemoModel.toMap());
  }
  Get.back(result: newMemoModel);
}
저장후에 리로드 하는 코드 작성
var result = await Get.to(MemoWritePage(),
    binding: BindingsBuilder(() {
  Get.put(MemoWriteController(memoModel: memoList[i]));
}));
if (result != null) {
  Get.find<MemoListController>().reload();
}
...
void reload() {
  memoGroup = {};
  loadAllMemos();
}
...
floatingActionButton: FloatingActionButton(
  onPressed: () async {
    var result =
        await Get.to(MemoWritePage(), binding: BindingsBuilder(() {
      Get.put(MemoWriteController());
    }));
    if (result != null) {
      Get.find<MemoListController>().reload();
    }
  },
  backgroundColor: Color(0xffF7C354),
  shape: RoundedRectangleBorder(
    borderRadius: BorderRadius.circular(50),
  ),
  child: Image.asset('assets/images/plus.png'),
),
메모 삭제
작성 페이지 하단에 삭제 버튼 배치
bottomNavigationBar: Padding(
  padding: const EdgeInsets.all(15),
  child: GestureDetector(
    onTap: () {
      Get.find<MemoWriteController>().delete();
    },
    child: Container(
      height: 50,
      decoration: BoxDecoration(
        borderRadius: BorderRadius.circular(8),
        color: Color(0xffF81717),
      ),
      child: Center(
        child: Text(
          '삭제',
          style: TextStyle(fontSize: 17, color: Colors.white),
        ),
      ),
    ),
  ),
),
삭제 함수 작성후 팝업으로 삭제 실행
void delete() async {
  var doc =
      await memoCollectionRef.where('id', isEqualTo: memoModel!.id).get();
  memoCollectionRef.doc(doc.docs.first.id).delete();
  Get.back(result: true);
} onTap: () {
_showDeleteConfirmDialog(context);
},
...
void _showDeleteConfirmDialog(BuildContext context) {
showDialog(
context: context,
builder: (BuildContext context) {
return AlertDialog(
title: Text('메모 삭제'),
content: Text('메모를 삭제하시겠습니까?'),
actions: <Widget>[
TextButton(
onPressed: () {
Get.back();
},
child: Text('취소'),
),
TextButton(
onPressed: () {
Get.back();
Get.find<MemoWriteController>().delete();
},
child: Text(
'삭제',
style: TextStyle(color: Colors.red),
),
),
],
);
},
);
}검색기능
검색 기능은 크게 두가지로 나눌수 있는데
- 직접 서버에 요청하는경우
- 로컬에서 데이터를 갖고 탐색 하는경우
전자는 네트워크연결, 서버의 유무가 단점이지만 실시간과 필요한 데이터만 얻을수있는 장점.
후자는 데이터가 필요없지만 양이 많으면 느려지는점이 특징이다.
이번엔 로컬에서 검색하는 방식을 진행한다.
검색 위젯에 함수를 연결하고 컨트롤러에서 작성을한다
void search(String searchKeyword) {
  var searchResult = memoList.where((memo) {
    return memo.title.contains(searchKeyword) ||
        memo.memo.contains(searchKeyword);
  }).toList();
  memoGroup = {};
  var monthkey = -1;
  searchResult.map((memo) {
    monthkey = memo.createdAt.month;
    var group = memoGroup[monthkey.toString()];
    if (group == null) {
      group = [memo];
    } else {
      group.add(memo);
    }
    memoGroup[monthkey.toString()] = group;
  }).toList();
  update();
} TextField(
decoration: InputDecoration(
border: InputBorder.none,
hintText: '검색',
hintStyle: TextStyle(
color: Color(0xff888888),
fontSize: 15,
),
),
onChanged: (value) {
Get.find<MemoListController>().search(value);
},
),대부분의 검색 바에선 x로 표시되는 모두 지우기 기능이있다.
GestureDetector(
    onTap: () {
      Get.find<MemoListController>().clearSearchKeyword();
    },
    child: Icon(
      Icons.close,
      color: Color(0xff888888),
    ),
),

...
TextEditingController searchKeywordController = TextEditingController();

void clearSearchKeyword() {
  searchKeywordController.text = '';
  reload();
}
만든 컨트롤러를 버튼에 연결
TextField(
  controller:
      Get.find<MemoListController>().searchKeywordController,
  decoration: InputDecoration(
    border: InputBorder.none,
    hintText: '검색',
    hintStyle: TextStyle(
      color: Color(0xff888888),
      fontSize: 15,
    ),
  ),
  onChanged: (value) {
    Get.find<MemoListController>().search(value);
  },
),
편의 기능으로 키보드가 올라왔을때 주변을 터치하면 키보드를 내릴수 있다.
Widget build(BuildContext context) {
return Scaffold(
backgroundColor: Color(0xffEBEBEB),
body: GestureDetector(
behavior: HitTestBehavior.translucent,
onTap: () {
FocusScope.of(context).unfocus(); // 추가
},
child: SafeArea(
child: SingleChildScrollView(
padding: const EdgeInsets.symmetric(horizontal: 25),
child: Column(
crossAxisAlignment: CrossAxisAlignment.stretch,
children: [
Text(
'메모',
style: TextStyle(
fontSize: 35,
fontWeight: FontWeight.bold,
),
),
_searchBar(),
GetBuilder<MemoListController>(builder: (controller) {
List<String> keys = [];
List<List<MemoModel>> values = [];
controller.memoGroup.forEach((key, value) {
keys.add(key);
values.add(value);
});
return Column(
children: List.generate(keys.length, (i) {
return _monthlyMemoGroup(keys[i], values[i]);
}),
);
}),
],
),
),
),
),
floatingActionButton: FloatingActionButton(
onPressed: () async {
var result =
await Get.to(MemoWritePage(), binding: BindingsBuilder(() {
Get.put(MemoWriteController());
}));
if (result != null) {
Get.find<MemoListController>().reload();
}
},
backgroundColor: Color(0xffF7C354),
shape: RoundedRectangleBorder(
borderRadius: BorderRadius.circular(50),
),
child: Image.asset('assets/images/plus.png'),
),
);
}광고
어플에서 수익을 낼수있는 애드몹 광고를 연동해보겠다. 초기셋팅은 넘기고 코드부분작성.
https://developers.google.com/ad-manager/mobile-ads-sdk/flutter/quick-start?hl=ko
androidMaifest.xml에서 메타 데이터를 추가해준다
<meta-data
      android:name="com.google.android.gms.ads.APPLICATION_ID"
    android:value="ca-app-pub-xxxxxxxxxxxxxxxx~yyyyyyyyyy"/>
초기 main 시작할때 호출
MobileAds.instance.initialize();배너를 보여줄 위젯을 하나 생성해준다
class _AdmobBannerState extends State<AdmobBanner> {
AdManagerBannerAd? _bannerAd;
bool _isLoaded = false;
final adUnitId = '/21775744923/example/adaptive-banner';
void loadAd() {
_bannerAd = AdManagerBannerAd(
adUnitId: adUnitId,
request: const AdManagerAdRequest(),
sizes: [AdSize.banner],
listener: AdManagerBannerAdListener(
onAdLoaded: (ad) {
debugPrint('$ad loaded.');
setState(() {
_isLoaded = true;
});
},
onAdFailedToLoad: (ad, err) {
ad.dispose();
},
),
)..load();
}
void initState() {
super.initState();
loadAd();
}
Widget build(BuildContext context) {
if (_bannerAd != null && _isLoaded) {
return SizedBox(
width: _bannerAd!.sizes.first.width.toDouble(),
height: _bannerAd!.sizes.first.height.toDouble(),
child: AdWidget(ad: _bannerAd!),
);
}
return Container(height: 1);
}
}초기 광고 로드시 container의 높이를 정해주지 않으면 화면 전체를 덮게 되는 현상이 있다.
추가로 id가 adUnitId값은 디버깅시 실제 광고를 넣으면 부정광고로 차단이 들어갈수 있기에 테스트광고를 넣는다.
배포
안드로이드 배포에 필요한 내용이 몇가지 있다.
- 앱 아이콘 만들기 (512*512)
- 앱 출시 정보 준비하기
- 이름
- 설명(간단 설명, 자세한 설명)
- 키워드
- 앱을 소개하는 대표 이미지
- 1024 * 500 그래픽 이미지
- 320 * 3840 스크린샷 2~8장
- jks 키 만들기
- 배포를 위한 gradle 세팅
아이콘 만들기
아이콘 세팅
라이브러리 사용
https://pub.dev/packages/flutter_launcher_icons
pubspec.yaml에 아이콘 관련 코드를 작성 세팅후 스크립트 실행
flutter_launcher_icons:
  android: "launcher_icon"
  ios: false
  image_path: "assets/images/icon/memo_app_logo.png"

...
flutter pub run flutter_launcher_icons
jks 키
📚 JKS 파일이 Android 배포에서 필요한 이유
- 앱 무결성 보장
- 앱이 JKS 파일을 사용하여 서명되면, 사용자는 앱이 개발자에 의해 인증되었으며, 다운로드 이후에 변경되지 않았다는 것을 확신할 수 있습니다.
- 서명되지 않은 앱은 설치가 불가능하며, 이미 설치된 앱이 서명되지 않은 버전으로 교체될 수 없습니다. 이는 사용자에게 보안과 신뢰를 제공합니다.
- 업데이트 관리
- 앱이 악의적으로 변경되지 않도록 하며, 동일한 개발자가 배포하는 공식 업데이트임을 보장합니다.
- Google Play 등록
- Google Play는 이 서명을 사용하여 개발자의 신원을 확인하고, 사용자에게 안전한 앱을 제공합니다.
- APK파일 서명
- JKS 파일에는 개인 키(private key)와 공인된 인증서(certificate)가 포함되어 있으며, 이들이 APK 파일에 서명을 추가하는 데 사용됩니다.
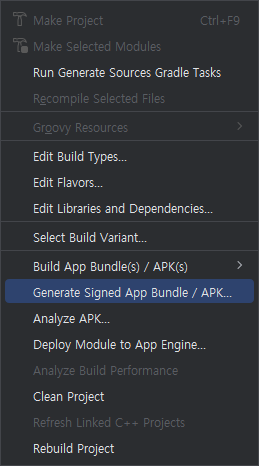
처음 만들땐 안드로이드스튜디오로 들어가서 작성을 하면된다.

키 파일이 작성이 되었으면 안드로이드 내부에 key.properties를 만들어
storeFile=jks파일 위치 절대경로
storePassword=jks 생성시 설정한 store 비밀번호
keyAlias=jks 생성시 설정한 alias
keyPassword=jks 생성시 설정한 key 비밀번호
다음과 같이 작성한다.
jks 셋팅은 완료가 되었고 프로젝트에서 이 파일을 호출 하는 코드를 작성한다.
def keystoreProperties = new Properties()
def keystorePropertiesFile = rootProject.file('key.properties')
if (keystorePropertiesFile.exists()) {
    keystoreProperties.load(new FileInputStream(keystorePropertiesFile))
}
이번엔 가져온 키를 릴리즈에서 어떻게 사용할지 셋팅.
signingConfigs {
    release {
        keyAlias keystoreProperties['keyAlias']
        keyPassword keystoreProperties['keyPassword']
        storeFile file(keystoreProperties['storeFile'])
        storePassword keystoreProperties['storePassword']
    }
}
세번째로 빌드 타입에 따라서 위에서 작성한 config의 설정을 따라간다고 작성을 한다.
 buildTypes {
    release {
        signingConfig signingConfigs.release

        minifyEnabled true
        shrinkResources true

        proguardFiles getDefaultProguardFile(
                'proguard-android-optimize.txt'),
                'proguard-rules.pro'
    }
    debug {
        signingConfig signingConfigs.debug
    }
}
배포 파일 만들기
flutter build appbundle명령어를 콘솔에 작성하면
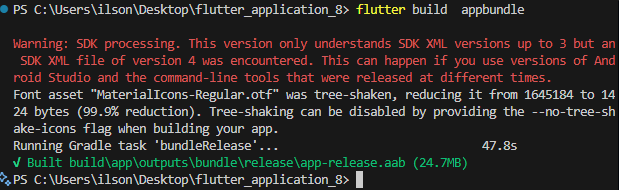
조금 시간이 지난후 aab파일이 생성이 된다
개발자 계정
https://developers.google.com/?hl=ko
해당 사이트로 들어가 로그인후 개발자 계정을 등록할수있다.
마지막단에 25달러 결제가 있으니 알아두면 될것같다
