Flask
Python 버전 - 3.12.9
IDE - VSCode
Flask는 Django처럼 풀스택 프레임워크가 아니라, 마이크로 웹 프레임워크
즉, 필요한 기능만 가져와서 간단하게 웹 서비스를 만들기에 적합
Flask 설치
$ pip install flaskHello World! 출력하기
가장 기본적인 Flask 코드
(app.py)
from flask import Flask
app = Flask(__name__)

@app.route("/")
def hello():
    return "Hello World!"
Flask 실행_1
간단하지만 요청하는 ip와 port가 고정
$ flask run
Flask 파이썬 명령어로 실행하기
(app.py)
from flask import Flask
app = Flask(__name__)

@app.route("/")
def hello():
    return "Hello World!"

if __name__ == "__main__":
    app.run(host="127.0.0.1", port=5000)
Flask 실행_2
$ python app.pyHTML 페이지 렌더링
웹 앱이라면 단순 문자열 대신 HTML 페이지를 띄우는 게 일반적이라
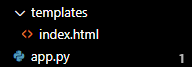
Flask는 templates라는 디렉토리의 HTML 파일을 자동으로 찾아 렌더링
template 디렉토리 생성, index.html 파일 생성
<!DOCTYPE html>
<html lang="en">
  <head>
    <meta charset="UTF-8" />
    <meta name="viewport" content="width=device-width, initial-scale=1.0" />
    <title>Document</title>
  </head>
  <body>
    <h1>Hello, World!</h1>
    <p>간단한 웹 어플리케이션입니다.</p>
  </body>
</html>
import된 flask옆에 render_template도 추가
루트 페이지를 index.html로 설정
from flask import Flask, render_template
app = Flask(__name__)

@app.route("/")
def hello():
    return render_template("index.html")

if __name__ == "__main__":
    app.run(host="127.0.0.1", port=5000)
실행 후 브라우저 창에서 127.0.0.1:5000 확인
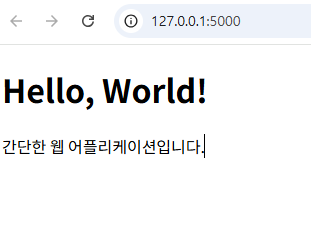
여기서 중요한 점은 템플릿 파일은 반드시 templates 폴더에 넣어야 한다는 것
Debug 모드
개발할 때는 매번 서버를 껐다 켜는 게 불편하기에
debug=True 옵션을 주면 코드 변경 시 자동으로 반영
debug=True 추가
from flask import Flask, render_template
app = Flask(__name__)

@app.route("/")
def hello():
    return render_template("index.html")

if __name__ == "__main__":
    app.run(debug=True, host="127.0.0.1", port=5000)
상속
웹 페이지를 만들다 보면 반복되는 부분(헤더, 푸터 등)이 많아서
Flask는 Jinja2 템플릿 엔진을 통해 상속 기능 구현 가능
부모는
{% block content %} {% endblock %}
를 넣으면 된다.
(car.html)
<!DOCTYPE html>
<html lang="en">
  <head>
    <meta charset="UTF-8" />
    <meta name="viewport" content="width=device-width, initial-scale=1.0" />
    <title>Carrrrrrr</title>
  </head>
  <body>
    <h1>Car Page</h1>

    <p>This is the car page.</p>
    <p>상속 시작</p>
    {% block content %} {% endblock %}
    <p>상속 끝</p>
  </body>
</html>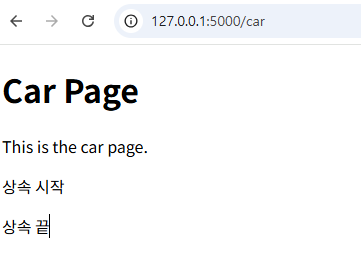
자식은 이렇게 작성
{% extends 'car.html'%} {% block content %}
~
{% endblock %}
(hyundai.html)
{% extends 'car.html'%} {% block content %}
<h2>Hyundai Car</h2>

<p>This is the Hyundai car page.</p>
{% endblock %}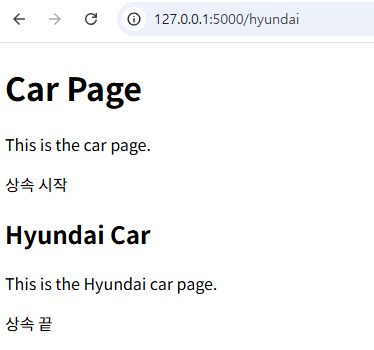
변수 설정
{{변수명}}
이 형태의 코드를 통해서 넘어오는 변수의 값을 사용할 수 있다.
(car.html)
<!DOCTYPE html>
<html lang="en">
  <head>
    <meta charset="UTF-8" />
    <meta name="viewport" content="width=device-width, initial-scale=1.0" />
    <title>Carrrrrrr</title>
  </head>
  <body>
    <h1>Car Page</h1>

    <p>This is the car page.</p>
    <p>차는 무슨 소리를 내나요? : {{car_sound}}</p>
    <p>상속 시작</p>
    {% block content %} {% endblock %}
    <p>상속 끝</p>
  </body>
</html>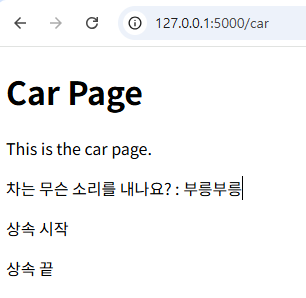
(hyundai.html)
{% extends 'car.html'%} {% block content %}
<h2>Hyundai Car</h2>

<p>This is the Hyundai car page.</p>
<p>현대차는 무슨 소리를 내나요? : {{hyundai_sound}}</p>
{% endblock %}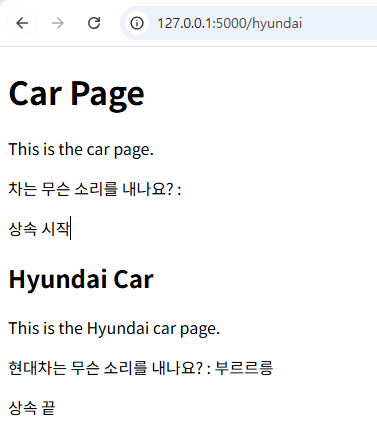
주의할 점: 부모 템플릿에 설정한 변수는 자식에게 자동으로 전달되지 않음
즉, 자식 템플릿에서 사용하려면 render_template 호출 시 직접 적어서 넘겨야 함
백엔드 프론트엔드 연결하기