Class Component
- ES6 문법을 사용해 extends 해야 한다.
- this 로 클래스의 요소들을 전달해서 사용한다.
- State Lifecycle(생명주기)을 사용할 수 있다.
- render() 함수 안에 JSX 를 return 해주어야 한다.
import React, {Component} from 'react'

class Welcome extends Component {
  render() {
    return <h1>Hello, {this.props.name}</h1>;
  }
}
Lifecycle
컴포넌트 생명주기는 아래 그림과 같이 설명할 수 있다. 생명주기를 사용하면 특정 시점에 코드가 실행되도록 설정할 수 있다.
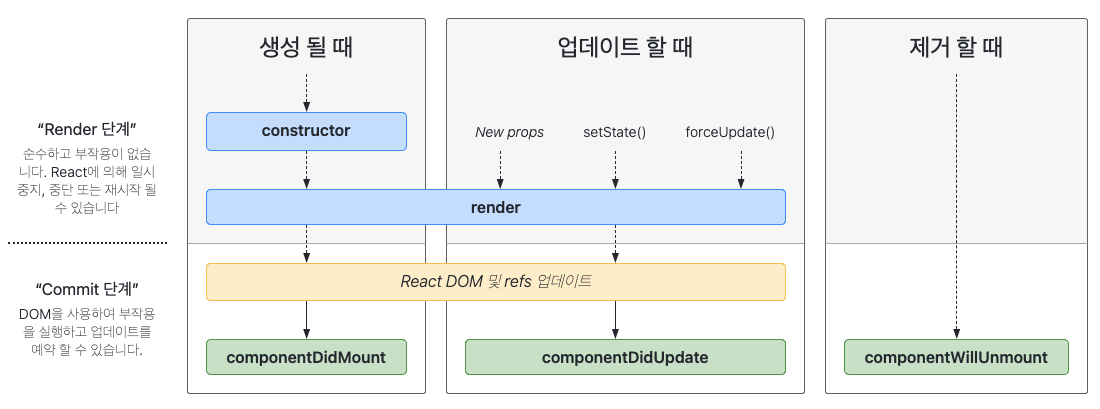
1 그리기 render
2 그리고 난 뒤 componentDidMount
3 그리고 난 뒤 변경됐을 때 componentDidUpdate
4 그리고 난 뒤 사라질 때 componentWillUnmout
export default class CounterPage extends Component {

componentDidMount() {
    console.log("그리고 난 뒤");
  }

  componentDidUpdate() {
    console.log("그리고 난 뒤 변경됐을 때");
  }

  componentWillUnmount() {
    console.log("그리고 난 뒤 사라질 때");
  }

  render() { // 그리기
    return (

      )
  }

}
Function Component
- JS의 함수이기 때문에 함수형 컴포넌트라고 부른다.
- 일반 함수와 화살표 함수 모두 사용 가능하다.
- React Hooks 를 사용할 수 있다.
- props로 객체 인자를 받아와 반환한다.
// 함수 컴포넌트
export default function Welcome(props) {
  return <h1>Hello, {props.name}</h1>;
}


// 화살표 함수 컴포넌트
const Welcome = (props) => {
  return <h1>Hello, {props.name}</h1>;
}

export default Welcome
useEffect
클래스형 컴포넌트에서는 컴포넌트 생명주기를 각각 단계마다 따로 줘야했다면 함수형 컴포넌트에서는 useEffect를 사용하여 줄일 수 있다.
export default function useEffect() {

// 1. DidMount
   useEffect(() => {
     console.log("그리고 난 뒤");
   }, []);


// 2. DidUpdate : DidUpdate와 완전히 동일하지 않다. 수정시에만 실행되지만 이건 처음에도 실행!
  useEffect(() => {
    console.log("그리고 난 뒤 변경됐을 때");
  });


// 3. WillUnmount
   useEffect(() => {
     return () => {
       console.log("그리고 난 뒤 사라질 때");
     }; // return 할 때 함수 실행
   }, []);

// 4. render
  return (

  )

}
DidMount와 WillUnmount를 함께 작성해 줄 수 있다.
useEffect(() => {
    console.log("그리고 난 뒤");
    inputRef.current?.focus();

    return () => {
      console.log("그리고 난 뒤 사라질 때"));
    };
  }, []);
useEffect는 모든 화면이 그려진 다음에 실행되기 때문에 만일 가장 마자막 useEffect 밑(return 바로 위)에 console.log("Hello") 를 써준다면 콘솔에는 Hello 부터 출력되고 그 다음으로 첫번째 useEffect에 선언해준 console.log부터 출력된다.