React Suspense?
React.Suspense 는 리액트 16.6버전에 출시된 따끈따끈한 신기능이다. JS 번들의 Lazy Loading을 위해 추가되었고, React.lazy 와 함께 사용하면 자동으로 번들링된 코드가 스플릿되어 초기 렌더링 시간을 줄일 수 있는 좋은 기능이다.
React 팀은 Suspense 를 리액트 18버전 이후로 크게 개선했다. Suspense 는 이제 Data Fetching, Image Loading 등 어떤 비동기 작업이든 기다릴 수 있는 컴포넌트로 확장되었다.
fallback 속성을 이용해 기다리는 동안 보여질 컴포넌트를 선언해주면 pending 상태일 때 해당 컴포넌트가 보여지고, 비동기 상황이 종료된다면 다시 원래의 컴포넌트가 보여진다.
Suspense for Data Fetching
웹에서의 Lazy Loading은 비단 컴포넌트만 말하는 것이 아니고, 어떤 종류든 필요한 자원이 있다면 미리 가져오지 않고 필요한 시점에 가져오는 전략을 말한다.
split된 JS 번들이나 이미지가 대표적인 사례이다. 같은 맥락에서 axios나 fetch를 이용한 AJAX도 Lazy loading의 한 종류이다.
React 18버전으로 올라가면서 Suspense 는 컴포넌트(코드) 뿐만 아니라 무엇이든 기다릴 수 있는 기능으로 확장되었고 Suspense 는 이제 이미지, 스크립트, 그 밖의 비동기 작업을 기다릴 수 있게 되었다.
비동기 작업이 진행되는 도중(pending)에 보여질 UI를 선언적으로 작성하는 것이 가능하다.
- 로딩, 실패, 성공 3가지 상태를 각각
Suspense,ErrorBoundary, 정상 UI로 나타내고, 선언적으로 작성한다.
// w/o Suspense + ErrorBoundary
// 가독성이 많이 떨어지고, 상태 변수들을 관리해주어야 한다.
{
	pending ? <Spinner /> : success ? <ComponentOnSuccess /> : <Error />
}

// w/ Suspense + ErrorBoundary
<ErrorBoundary fallback={<Error />}>
	<Suspense fallback={<Spinner />}>
		<ComponentOnSuccess />
	</Suspense>
</ErrorBoundary>- UI 로직이 매우 직관적이다.
Suspense 구현하기
#1. 자식 컴포넌트들에서 비동기 상태 추적하기
	1-1. 이미지, dynamic import, fetching을 모두 지원해야 한다.

#2. 자식 컴포넌트가 여러개일 경우 각각의 비동기 상태에 대해 마치 Promise.all()을 사용한 것처럼 동작

#3. 캐싱 기능
구현에 앞서 필요한 기능을 정리해보았는데 위처럼 3개가 있다면 좋겠다고 생각했다. 다만 시간적인 여유가 없을 것 같아 2번과 3번은 추후 시간이 된다면 구현할 선택사항으로 남겨두고 1번만이라도 제대로 하기로 했다.
1번 기능 구현을 위해 제일 먼저 생각난 방법은 ContextAPI를 사용하는건데, 키를 정해주는게 복잡하고 재사용이 어렵다는 점에서 포기하게 되었다.
그 다음 생각난 방법은 Class Component의 componentDidCatch() 와 getDerivedStateFromError() 를 활용하는건데, 비동기 값을 사용하는 자식 컴포넌트에서 비동기 상태를 throw한 후 부모 컴포넌트에서 throw된 Promise를 받아 처리하는 방법이다. 일반 프로미스는 상태에 접근할 수 없기 때문에 wrapping하는 과정이 필요하고 아래와 같이 해결했다.
const createResource = (promise: Promise<any>) => {
    return wrapPromise(promise);
};

const wrapPromise = <T>(promise: Promise<T>) => {
    let status = 'pending';
    let result: T | null;

    let suspender = promise.then(
        (response) => {
            status = 'success';
            result = response;
        },
        (error) => {
            status = 'error';
            result = error;
        },
    );

    return {
        read() {
            switch (status) {
                case 'pending':
                    throw suspender;
                case 'error':
                    throw result;
                default:
                    return result;
            }
        },
    };
};

// React Docs의 코드를 참고함.- 자식 컴포넌트에서는 axios를 통한 api 호출같은 프로미스를 리턴하는 함수를 사용할 때
createResource()의 인자로 그것을 넣어준다. - createResource()는 wrapPromise를 호출하는데, 여기서 프로미스의 상태에 접근할 수 없었던 문제를 해결한다. 클로저로 상태와 결과를 관리하고
suspender를 throw하는 것으로Suspense컴포넌트에 프로미스를 전달해줄 수 있게 된다. - pending 상태일 경우 상태에 접근할 수 있도록 status, result를 then으로 붙인 후 throw하고
Suspense는 이를 받아 상태값에 따라 무엇을 렌더링시킬지 결정할 수 있다. - error 상태일 경우에도 result를 throw하는데,
Suspense를 감싸는ErrorBoundary가 에러를 처리할 수 있도록 하기 위함이다.Suspense내부에서 Promise가 아닌 throw값이componentDidCatch()메소드로 넘어올 경우 그대로 다시 throw해서ErrorBoundary로 에러를 전달해 적절하게 처리할 수 있도록 했다. - 비동기 작업이 정상적으로 완료된 경우 result를 리턴시키는데 이는 원래 비동기 함수를 호출했던 자식 컴포넌트에서
createResource(promise).read()를 통해 가져와 렌더링에 사용할 수 있다.
createResource 함수는 Suspense 컴포넌트에서 비동기 상황을 인지하고 알맞게 처리할 수 있도록 Promise 객체를 래핑하는 역할이라고 봐도 좋다.
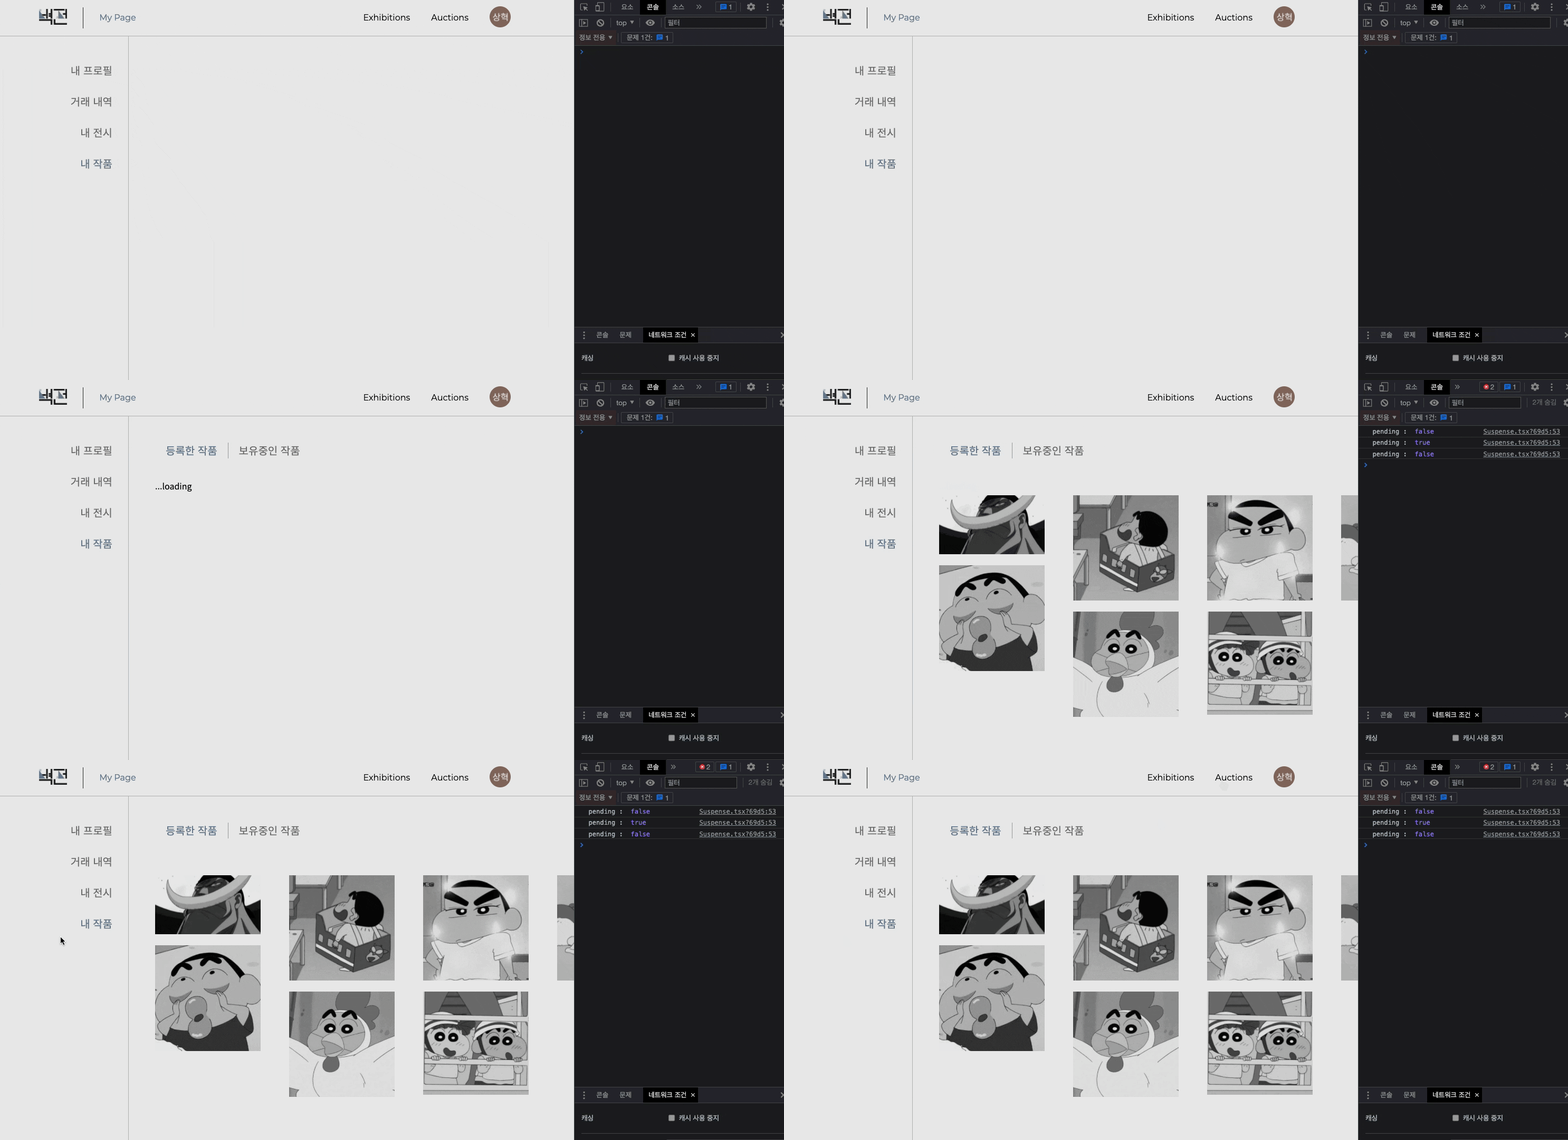
이 결과 React에 기본적으로 내장된 React.Suspense 컴포넌트로 비동기 상황을 포함하는 컴포넌트를 감쌌을 때 의도대로 작동함을 확인했다.
이제 Suspense 컴포넌트를 직접 구현해야 한다.
interface SuspenseProps {
    fallback: React.ReactNode;
}

interface SuspenseState {
    pending: boolean;
    error?: any;
}

function isPromise(i: any): i is Promise<any> {
    return i && typeof i.then === 'function';
}

class CSuspense extends Component<SuspenseProps, SuspenseState> {

    private state: SuspenseState = {
        pending: false,
    };

    public componentDidCatch(p: any) {
        if (isPromise(p)) {
            this.setState({ pending: true });
            err.then(() => {
                this.setState({ pending: false });
            }).catch((err) => {
                this.setState({ error: err || new Error('Suspense Error') });
            });
        } else {
            throw err;
        }
    }

    public componentDidUpdate() {
        if (this.state.pending && this.state.error) {
            throw this.state.error;
        }
    }

    public render() {
        return this.state.pending ? this.props.fallback : this.props.children;
    }
}

export default CSuspense;
하단에 첨부한 글들을 참고해 구현한 CSuspense 컴포넌트의 코드이다. 핵심은 자식 컴포넌트에서 throw 한 Promise 객체를 받아내는 것이고 그렇게 처리하기 위해 componentDidCatch 메소드가 있는 클래스 컴포넌트를 사용해야만 했다.
여기서 문제가 발생했다. throw한 Promise가 Suspense 컴포넌트로 넘어가는 도중 에러가 발생했고, 따라서 Suspense로 전달되는 내용은 Promise가 아닌 Error가 되었다.

fallback UI가 없다는 에러였고, 3시간 가량의 삽질 끝에 현재 componentDidCatch() 메소드 내에서 promise가 아닐 경우 throw하는 err에 대해 받아줄 ErrorBoundary 컴포넌트가 없어서 발생한 문제임을 확인했다. 하지만 에러 발생을 완전히 막는 것은 불가능하다는 결론을 냈고, 에러를 흘리더라도 로직에 영향을 주는 게 아니기 때문에 에러를 흘리고 처리하기로 했다.

결국 이렇게 pending 상태일때 속성으로 주었던 Fallback 컴포넌트를 로딩하는데 까지는 성공했다.
하지만 이 상태로 그대로 있기만 할 뿐 Promise 객체의 비동기 상황이 끝나더라도 원래의 컴포넌트를 로딩하지 못했다.
Promise가 Suspense 로 올라오지 못하는 문제를 해결하기 위해 코드를 아래와 같이 수정했다.
const createResource = (promise: Promise<any>) => {
    let status = 'pending';
    let result: any;

    let suspender = promise.then(
        (response) => {
            status = 'success';
            result = response;
        },
        (error) => {
            status = 'error';
            result = error;
        },
    );

    return {
        read() {
            switch (status) {
                case 'pending':
                    throw { suspender, status };  // 수정부분
                case 'error':
                    throw result;
                default:
                    return result;
            }
        },
    };
};
Promise가 올라오는 과정에서 문제가 있다고 생각해 상태를 나타내는 status 를 추가해 throw하도록 수정했고, 에러는 나지만 Promise 객체가 정상적으로 componentDidCatch() 메소드에게 전달됨을 확인했다.
그리고 Suspense 컴포넌트의 코드를 조금 수정했다.
class CSuspense extends Component<SuspenseProps, SuspenseState> {
    private mounted = false;
    state: SuspenseState = {
        pending: false,
    };

    constructor(props: SuspenseProps) {
        super(props);
    }

    public componentDidMount() {
        this.mounted = true;
    }

    public componentWillUnmount() {
        this.mounted = false;
    }

    public componentDidCatch(p: any) {
        if (!this.mounted) return;
        if (isPromise(p.suspender)) {
            if (p.status === 'pending') {
                p.suspender.then(
                    () => {
                        this.state.pending && this.setState({ pending: false });
                    },
                    () => {
                        throw new Error('요청에 실패했습니다.');
                    },
                );
                this.setState({ pending: true });
            }
        }
    }

    public componentDidUpdate() {
        if (this.state.pending && this.state.error) {
            throw this.state.error;
        }
    }

    public render() {
        console.log('pending : ', this.state.pending);
        if (this.state.pending) {
            return this.props.fallback;
        }
        return this.props.children;
    }
}
컴포넌트 생명주기에 따라 프로미스 조작 여부를 결정하기 위해 mounted 프로퍼티를 추가했고, 객체로 감싸진 프로미스 객체를 받아와 then 메소드를 통해 Suspense 컴포넌트의 상태를 바꿔 fallback / 자식 컴포넌트 렌더링 여부를 결정짓도록 했다.

결국 Data Fetching 에서 비동기 상황을 제대로 핸들링하는 Custom Suspense를 만드는데 성공했다!
콘솔에 보이는 pending : xxx 는 false일 경우 Suspense에서 자식 컴포넌트를 렌더링하고 true일 때 fallback을 렌더링한다.
즉 최초 Suspense 컴포넌트가 호출될 때는 자식 컴포넌트의 비동기 작업을 트리거하기 위해 자식 컴포넌트에 접근한다. 자식 컴포넌트에서는 createResource 함수에 의해 감싸진 Promise가 상태를 포함하는 객체에 한번 감싸진 다음 Suspense가 받고, 이후 비동기 상황이 어떻게 풀어져 나가는지에 따라 다른 동작을 취한다.
만약 비동기 요청이 실패한다면 에러를 throw해 Suspense를 감싸는 ErrorBoundary 컴포넌트에서 처리할 수 있다.
이로써 코드가 깔끔해졌습니다!
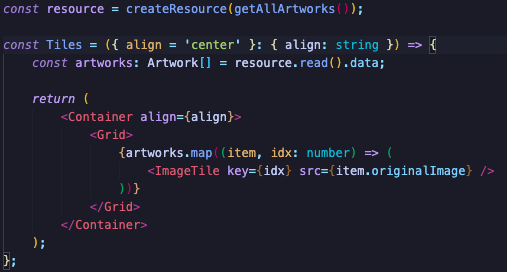
try...catch... 로 처리하듯 비동기 코드를 pending / fulfilled / rejected 각 상황에 맞게 분리시켰고, 아래 사진에서 감싸진 Tiles 컴포넌트는 성공했을때의 로직만 고려하도록 수정되었다.


ErrorBoundary 구현하기
Suspense를 직접 구현했으니 ErrorBoundary는 훨씬 쉽다.
Promise 상태에 따른 처리를 하지 않고 그냥 Error 여부만 판단하면 된다.
ErrorBoundary는 굳이 내가 아니어도 잘 구현해둔 코드가 많고, 공식문서에서도 만드는 방법을 알려준다.
import React, { Component } from 'react';

interface Prop {
    fallback: React.ReactNode;
}

interface State {
    error: boolean;
}

export class ErrorBoundary extends Component<Prop, State> {
    constructor(props: Prop) {
        super(props);
    }

    state = {
        error: false,
    };

    static getDerivedStateFromError() {
        return { error: true };
    }

    render() {
        if (this.state.error) {
            return this.props.fallback;
        }
        return this.props.children;
    }
}

export default ErrorBoundary;
참고
react custom suspense (forked)
Suspense for Data Fetching (Experimental) - React
Experimental React: Using Suspense for data fetching - LogRocket Blog

