2장. 트랜잭션, 지갑 생성하기
[Typescript] 블록체인 구현해보기

시작하기 전에
블록체인에서는 Transaction시 Unspent Transaction Output과 Transaction pool을 활용하게 됩니다.
이에 대해서 잘 모르신다면, 저의 네이버 블로그를 참고하시고 오시면 좋을 것 같습니다.
그리고 지난 번 장에 비해서 많은 양이 추가되어 복잡하다고 느끼실 수도 있으니 전체 코드를 꼭 참고해주세요.
여기서는 필요한 부분의 코드만 다룰 예정입니다.
2장. 트랜잭션, 지갑 생성하기
1. 목표
- Private Key, Public Key의 개념을 파악하고 지갑을 생성해본다.
- Transaction 구조를 파악하고 생성해본다.
2. 개발 환경
⚙ Dev Tools
Ubuntu-20.04VScode
📚 Languages & Framworks
TypeScriptJestNode-js
3. 소스 코드
4. 구현 과정
1) Wallet Class
각 지갑은 private key와 public key 두 가지를 갖고 있다.
말 그대로 private key는 누구에게도 공개하면 안되며, 본인만이 그 키를 갖고 있어야 한다.
public key는 공개되는 키로 보통 지갑의 주소를 나타낸다.
공개된 public key를 키를 이용해서 코인을 보내거나 받을 수 있다.
트랜잭션을 생성할 때 private key를 이용해서 내가 만든 트랜잭션이라는 전자서명을 남기게 된다.
다른 사람들은 나의 public key를 통해 이 전자 서명을 검증할 수 있지만, private key를 유추할 수 없다.
비트코인의 경우, 이 두 개의 키를 타원 곡선 암호화 방식 중 하나인 ECDSA를 통해 만든다.
이때 타원 곡선의 매개변수는 전자서명의 검증 속도를 고려해 secp256k1를 사용한다고 한다.
자세한 원리는 링크를 참조해주세요!
1-1) Private Key, Public Key 생성
여기서는ECDSA를 사용하기 위해 elliptic 모듈을 사용했다.
import { ec } from "elliptic"
const EC = new ec("secp256k1");

export default class Wallet {
...

  static generatePrivatePublicKeys = () => {
    const keyPair = EC.genKeyPair();
    const privateKey = keyPair.getPrivate().toString(16);
    const publicKey = keyPair.getPublic("hex");
    return {privateKey, publicKey};
  };

...
}
- generatePrivatePublicKeys() : privateKey와 publicKey 키를 생성하고 object 형식으로 반환
1-2) 개인 Wallet 생성하기
개인 월렛을 생성하면 지정된 경로에 파일을 생성하여 private Key를 저장한다.
static initWallet = () => {
  if (existsSync(privateKeyLocation)) {
    console.log("Wallet already exists.");
    return;
  }
  this.createNewWallet();
};

static createNewWallet = () => {
  if (!existsSync(privateKeyFolderPath)) {
    mkdirSync(privateKeyFolderPath, { recursive: true });
  }
  const newPrivateKey: string = this.generatePrivatePublicKeys().privateKey;
  writeFileSync(privateKeyLocation, newPrivateKey);
  console.log("New wallet with private key is created!");
  console.log(`Path : ${privateKeyLocation}`);
};
initWallet(): 현재 privateKey 파일이 없다면 새로운 지갑 생성createNewWallet(): privateKey를 생성하고 지정된 경로에 해당 내용을 가지는 파일 생성
1-3) 전자서명
private Key를 사용하여 전자서명을 만들며, public key를 이용해 전자 서명을 검증할 수 있다.
...
static signWithPrivateKey = (privateKey: string, txId: string): string => {
  const key = EC.keyFromPrivate(privateKey, "hex");
  const signature: string = this.decimalArrayToHexString(
    key.sign(txId).toDER()
  );
  return signature;
};

static isValidSignature = (
  address: string,
  txId: string,
  txInSign: string
): boolean => {
  const key = EC.keyFromPublic(address, "hex");
  return key.verify(txId, txInSign);
};
2) 트랜잭션 구조
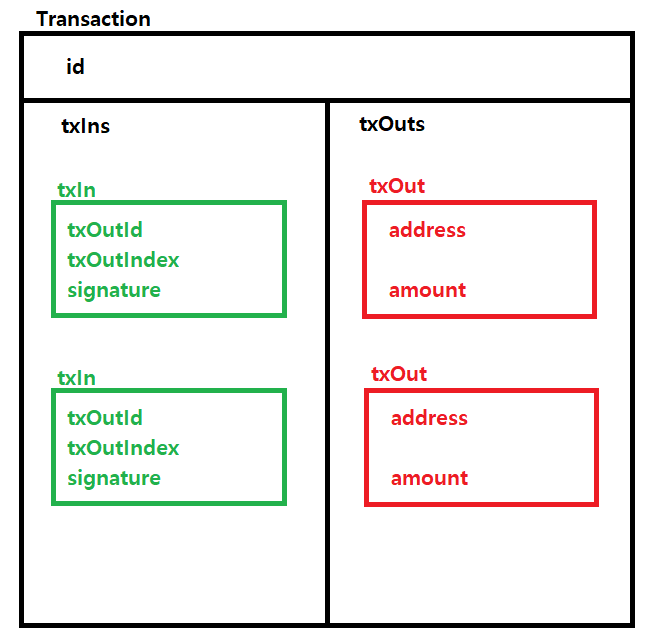
2-1) Transaction
트랜잭션 구조는 트랜잭션 ID, 트랜잭션 Input List(txIns), 트랜잭션 Output List(txOuts)로 구성되어있다.
export default class Transaction {
  public id: string;
  public txIns: TxIn[];
  public txOuts: TxOut[];

  constructor(id: string, txIns: TxIn[], txOuts: TxOut[]) {
    this.id = id;
    this.txIns = txIns;
    this.txOuts = txOuts;
  }
...
}
2-2) TxIn
TxIn 구조를 보면 signature를 제외하면, 특이하게 txOut의 정보들이 적혀있는 것을 확인할 수 있다.
이는 TxIn이 UTXO(Unspent Transaction Output)에서 가져왔기 때문인데, txOutId에는 해당 UTXO가 포함된 Transaction id 이며 txOutIndex는 해당 UTXO가 포함된 txOuts 안에서의 index를 넣은 것이다.
따라서 TxIn의 address와 amount는 참조한 UTXO의 값을 불러오면 된다.
export default class TxIn {
	public txOutId: string;
	public txOutIndex: number;
	public signature: string;

	constructor(txOutId: string, txOutIndex: number, signature: string) {
		this.txOutId = txOutId;
		this.txOutIndex = txOutIndex;
		this.signature = signature;
	}
...
}
2-3) TxOut
TxOut에는 코인의 양을 뜻하는 amount와 코인을 전달 받을 address를 갖고 있다.
이를 조금 다르게 해석하면, 해당 address가 amount 만큼의 잔고를 갖고 있다는 뜻이므로 사용되지 않은 TxOutput, 즉 UTXO(Unspent Transaction Output)라고 볼 수 있다.
export default class TxOut {
	public address: string;
	public amount: number;

	constructor(address: string, amount: number) {
		this.address = address;
		this.amount = amount;
	}
...
}
2-4) 새로운 Transaction 생성하기
2-2) TxIn에서 언급한 것처럼 Transaction를 생성할 때는 UTXO List를 참조하여 TxIn을 만들게 되는데, 이때 지갑 주소에 맞는 UTXO list를 먼저 찾아야한다.
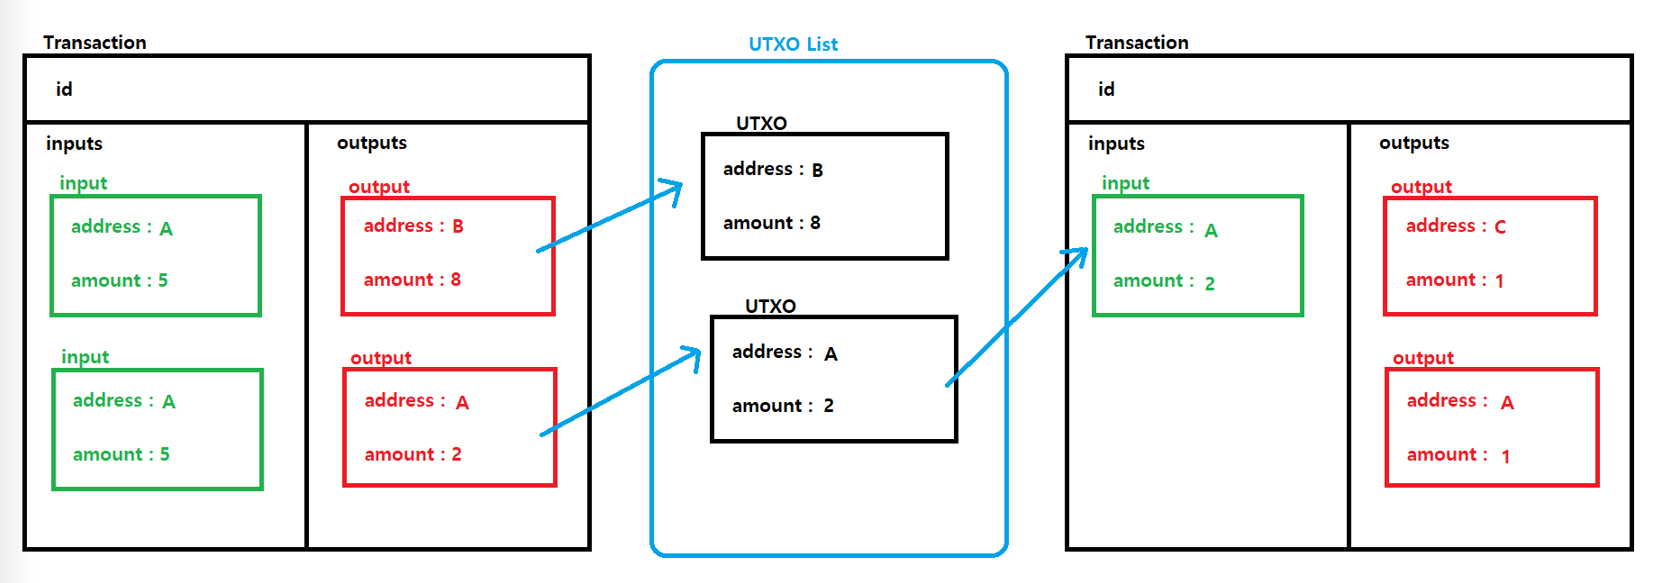
아래의 순서에 따라 새로운 트랜잭션을 생성할 수 있다.
- 내 지갑 주소와 같은 UTXO를 찾는다.
- 이미 사용된 UTXO는 제외한다. (사용된 UTXO는 Transaction Pool에 있다.)
- amount를 계산하여 TxOut들을 만든다.
- 전자 서명이 없는 TxIn들을 토대로 Transaction을 만든다. (아직 Transaction id는 없다.)
- Transaction id를 계산하여 입력한다.
- 모든 TxIn에 전자 서명을 한다.
  static createTx = (
    receiverAddress: string,
    sendingAmount: number,
    senderAddress: string,
    privateKey: string,
    utxoList: UnspentTxOutput[],
    txpool: Transaction[]
  ): Transaction | null => {
    // 1. Gets myUtxoList from utxoList
    if (senderAddress !== Wallet.getPublicKeyFromPrivateKey(privateKey)) {
      console.log("Sender's address and privateKey are not paired.");
      return null;
    }

    const myUtxoList: UnspentTxOutput[] = UnspentTxOutput.findMyUtxoList(
      senderAddress,
      utxoList
    );

    // 2. Checks if myUtxo is already used and filter it
    const avaliableMyUtxoList: UnspentTxOutput[] =
      UnspentTxOutput.filterConsumedMyUtxoList(myUtxoList, txpool);

    // 3. Gets available UTxOs equal to or greater than sending amount
    const { utxoListToBeUsed, leftOverAmount } =
      UnspentTxOutput.getUtxosForSending(avaliableMyUtxoList, sendingAmount);

    // ! Exceptio handling : cannot create transaction from the available UTxO list
    if (utxoListToBeUsed === null || leftOverAmount === null) {
      return null;
    }

    // 4. Creates Transaction without Id and signatures
    const newUnsignedTxIns: TxIn[] = TxIn.getUnSginedTxInList(utxoListToBeUsed);
    const newTxOuts: TxOut[] = TxOut.createTxOuts(
      receiverAddress,
      sendingAmount,
      senderAddress,
      leftOverAmount
    );

    // 5. Calculates Transaction Id
    const newUnsignedTx: Transaction = new Transaction(
      "",
      newUnsignedTxIns,
      newTxOuts
    );
    newUnsignedTx.id = Transaction.calTxId(newUnsignedTx);

    // 6. Gets Transaction Inputs' signature
    const newSignedTx: Transaction = { ...newUnsignedTx };
    const newSignedTxIns = TxIn.getSignedTxInList(
      newUnsignedTx.txIns,
      utxoListToBeUsed,
      privateKey,
      newUnsignedTx.id
    );
    newSignedTx.txIns = newSignedTxIns;

    return newSignedTx;
  };
3) Transaction Pool
생성된 Transaction은 바로 블록에 포함이 되는 것이 아니라, 블록이 채굴될 때 블록 데이터로 저장될 수 있다.
블록에 저장되기 전 Unconfirmed 상태의 Transaction은 Transaction Pool에 저장된다.
3-1) 새로운 Transaction 추가
새로운 Transcation을 추가할 때는 검증을 통해 올바른 트랜잭션인지 먼저 확인해야 한다.
그리고 이미 추가된 트랜잭션인지도 확인이 필요하다.
static addTxToTxpool = (
  newTx: Transaction,
  utxoList: UnspentTxOutput[],
  txpool: Transaction[]
): boolean => {
  /**
  * 1. Is valid transaction?
  * 2. Is Valid transaction structure?
  * 3. Is there duplicates in transaction pool?
  */
  if (!Transaction.isValidTx(newTx, utxoList)) {
    console.log("Invalid transaction");
  }
  if (!Transaction.isValidTxStructure(newTx)) {
    console.log("Invalid transaction structure");
  }
  if (TransactionPool.doesTxpoolContainTx(newTx, txpool)) {
    console.log("The transaction is already contained in txpool");
    return false;
  }

  console.log(`Successfully added to txpool, tx: ${JSON.stringify(newTx)}`);
  txpool.push(newTx);
  return true;
};
3-2) Transaction pool 갱신
Transaction pool을 갱신하는 경우는 두 가지가 있다.
첫째, 블록이 채굴 되었을 경우.
둘째, 다른 노드로 부터 받은 블록체인으로 현재 블록체인을 대체하는 경우.
추가되거나 바뀐 블록 데이터와 내 트랜잭션 풀의 데이터가 중복된다면, 이중 지불 문제가 발생할 수 있기 때문에 필요 없는 트랜잭션을 꼭 제거해줘야 한다.
static removeInvalidTxsFromTxpool = (
  utxoList: UnspentTxOutput[],
  txpool: Transaction[]
): Transaction[] => {
  const invalidTxList: Transaction[] = [];

  for (const tx of txpool) {
    if (!Transaction.isValidTx(tx, utxoList)) {
      invalidTxList.push(tx);
    }
  }

  if (invalidTxList.length > 0) {
    console.log("Found invalid transactions from txpool");
    txpool = _.without(txpool, ...invalidTxList);
    console.log("Removed invalid transactions successfully");
  } else {
    console.log(
      "Fount nothing invalid, all transactions from txpool are valid"
    );
  }

  return txpool
};
isValidTx(): 트랜잭션의 구조 및 id 등을 검증하고 TxIn이 UTXO List에 온 건지 확인
4) Unspent Transaction Output
UTXO는 말 그대로 사용되지 않은 Transaction Output이다.
UTXO가 생성되는 과정은 아래 그림과 같다.
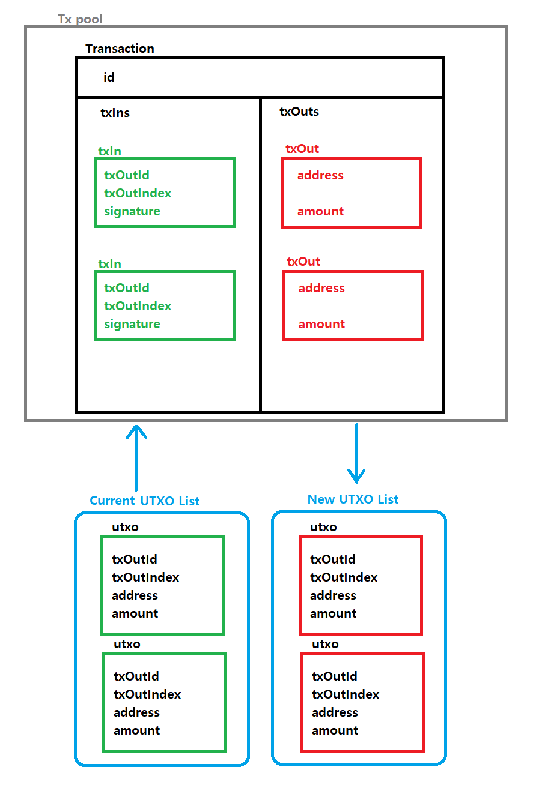
채굴 되기 전에는 현재 UTXO List를 참조하여 TxIn을 생성하고, 채굴이 완료 되면 Confirmed Transaction으로 부터 나온 TxOut을 새로운 UTXO List에 추가한다.
4-1) UTXO 구조
UTXO는 Transaction의 TxOut에서 나왔기 때문에 address와 amount를 가진다.
또한, 어떤 Transaction의 TxOut인지 알기 위해서, Transaction id를 txOutId에 넣고, txOuts에서의 index를 txOutIndex에 넣는다.
export default class UnspentTxOutput {
	public readonly txOutId: string;
	public readonly txOutIndex: number;
	public readonly address: string;
	public readonly amount: number;

	constructor(
		txOutId: string,
		txOutIndex: number,
		address: string,
		amount: number
	) {
		this.txOutId = txOutId;
		this.txOutIndex = txOutIndex;
		this.address = address;
		this.amount = amount;
	}
...
}
4-2) 사용된 UTXO 구별하기
사용한 UTXO의 경우, UTXO list에서 제거를 하는 것이 맞지만, 해당 Transaction이 Unconfirmed 상태라면 제거하면 안된다.
만약 Transaction이 fail이 되어 block에 추가가 되지 않는다면, 다시 사용 가능한 UTXO가 되어야 하기 때문이다.
그렇다면 UTXO가 사용 중인지 어떻게 판별할까?
2-4) 새로운 Transaction 생성하기 을 읽으신 분들은 답을 알 것이다.
바로 Transaction pool에 저장된 Uncofirmed Transaction과 비교하는 것이다.
이를 통해 현재 UTXO list는 그대로 유지한채, 사용 중인 UTXO들을 골라낼 수 있다.
static filterConsumedMyUtxoList = (
  myUtxoList: UnspentTxOutput[],
  txpool: Transaction[]
) => {
  // Get all txIn list from transaction list
  const everyTxIns: TxIn[] = TransactionPool.getEveryTxInsFromTxpool(txpool);
  const consumedUtxoList: UnspentTxOutput[] = [];

  // find consumed myUtxo and push it into consumedUtxoList
  everyTxIns.forEach((txIn) => {
    myUtxoList.forEach((myUtxo) => {
      if (
        myUtxo.txOutId == txIn.txOutId &&
        myUtxo.txOutIndex === txIn.txOutIndex
      ) {
        consumedUtxoList.push(myUtxo);
      }
    });
  });

  return _.without(myUtxoList, ...consumedUtxoList);
};
4-3) 새로운 UTXO로 갱신하기
새로운 UTXO list로 갱신할 때는 새로운 블록에 포함된 Transaction 데이터를 이용하면 된다.
과정 순서는 아래와 같다.
1. Transaction의 txOut들을 newUtxoList에 담아둔다.
2. Transaction의 txIn들을 consumedUtxoList에 담아둔다.
3. oldUtxoList에서 consumedUtxoList를 제거한다.
4. 사용된 utxo가 제거된 oldUtxoList에 newUtxoList를 추가한다. => updatedUtxoList
5. updatedUtxoList를 반환한다.
static updateUtxoList = (
  newTxList: Transaction[],
  oldUtxoList: UnspentTxOutput[]
): UnspentTxOutput[] => {
  // Get new utxo list from new tx's txOuts
  const newUtxoList: UnspentTxOutput[] = newTxList
  .map((tx) =>
       tx.txOuts.map(
    (txOut, index) =>
    new UnspentTxOutput(tx.id, index, txOut.address, txOut.amount)
  )
      )
  .reduce((a, b) => a.concat(b), []);

  // Get consumed utxo list from new tx's txIns
  const consumedUtxoList: UnspentTxOutput[] = newTxList
  .map((tx) => tx.txIns)
  .reduce((a, b) => a.concat(b), [])
  .map((txIn) => new UnspentTxOutput(txIn.txOutId, txIn.txOutIndex, "", 0));

  // remove consumed one from old utxo list
  // and then add new utxo list
  const updatedUtxoList = oldUtxoList
  .filter(
    (utxo) =>
    this.findUtxo(utxo.txOutId, utxo.txOutIndex, consumedUtxoList) ===
    undefined
  )
  .concat(newUtxoList);

  // return filtered new utxo list
  return updatedUtxoList;
};
5. 느낀점
좀 더 빨리 업로드를 하고 싶었지만, 정확하게 트랜잭션이 어떻게 이루어지는지 그리고 깔끔한 코드를 통해 모든 사람이 보기 편하도록 만들고 싶다는 욕심에 시간이 좀 길어졌습니다.
그만큼 1장에 비해 갑자기 코드의 양이 많아져서 보시는 분들이 이해하기가 어려울 것 같다는 생각이 듭니다ㅠㅠ
더 제대로 공부하고 시작했더라면 세분화할 수 있었을 것 같다는 아쉬움이 있지만, 하면서 더 배우는 점이 많은 것 같습니다.
다음 장에서는 지금까지 만든 것들을 활용하는 법에 대해서 써보겠습니다.
혹시라도 틀렸거나 수정이 필요한 부분이 있으면 알려주세요.
오늘도 읽어주셔서 감사합니다.
참고사이트 : naiveCoin