
이번 글에서는 여러 섹션이 있는 리스트를 성능적으로 손해를 보지 않으면서 구현하는 방법에 대해 적어보려고 한다.
우선, 여러 섹션이 있는 리스트가 무엇인지 살펴보자!
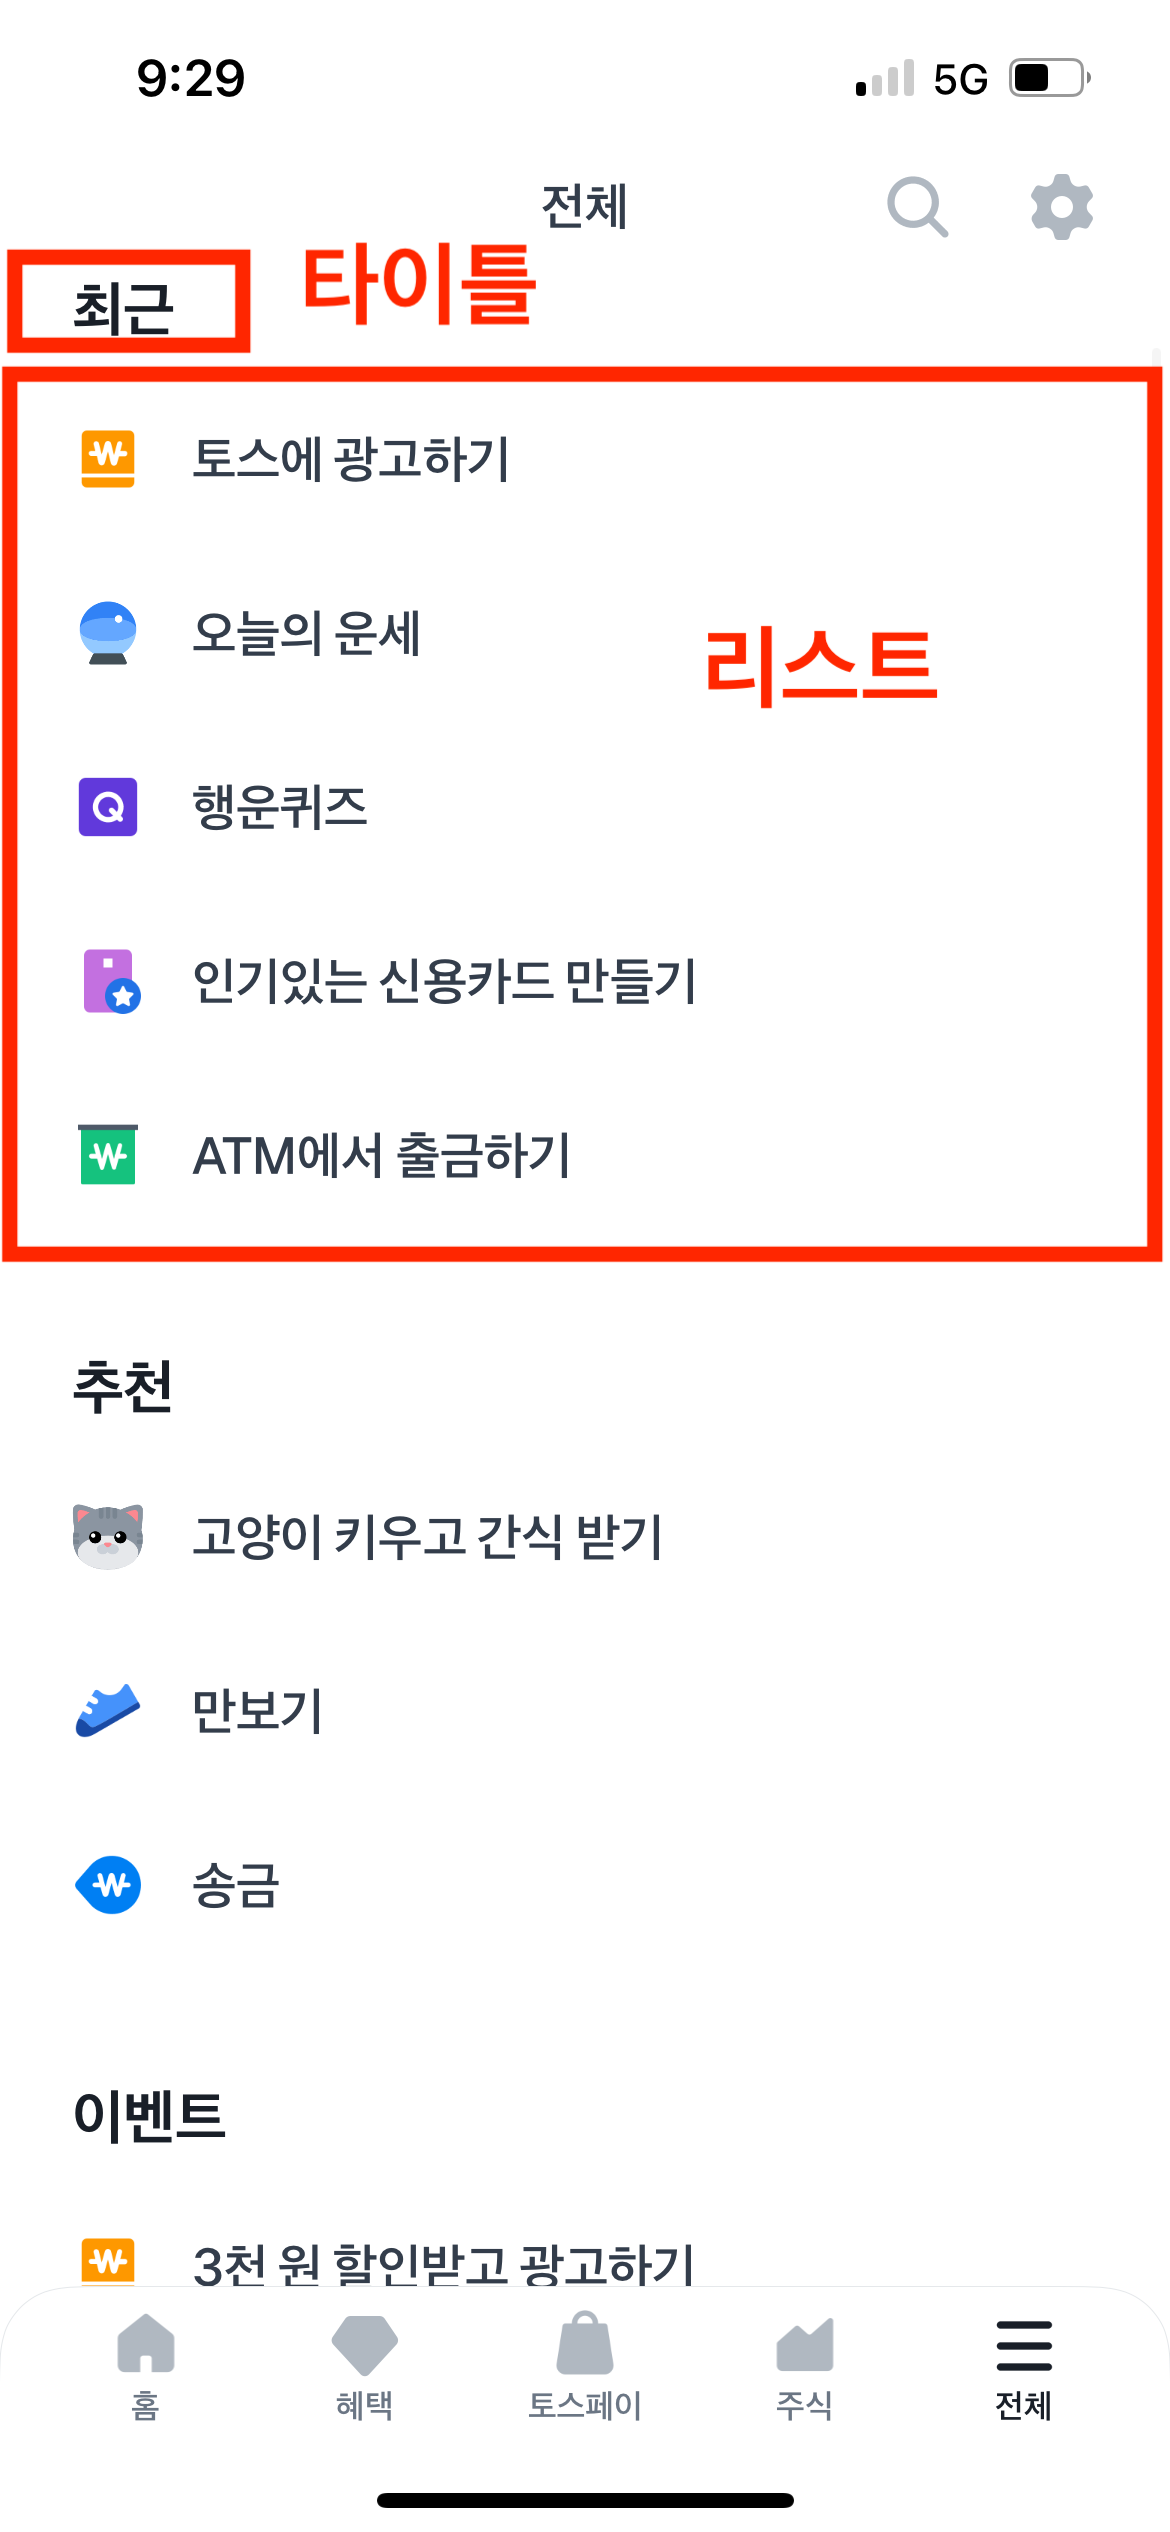
토스 전체 탭
 |  |
|---|
토스 전체 탭을 보면 전체 화면이 스크롤이 가능하고, 그 안에서 여러 섹션들로 나눠져서 리스트들이 들어있는 구조이다. 타이틀+리스트 가 반복되고 있다.
위와 같은 레이아웃 구현 시 고려할 사항
- 리스트들의 갯수가 동적으로 바뀔 것이다. → 고정적인 사이즈를 넣지 못함
- 중간 중간 타이틀이 있어 ListView 만으로는 중간 중간 타이틀을 넣어주기 어려움 → 인덱스를 조작하여 넣을 수 있지만 유지보수가 어려워짐
- 토스 전체 탭의 전체 스크롤 길이는 짧은 편에 속하지만, 리스트가 무한스크롤로 길어진다고 전제하면 → 성능 고려해야함
우선 떠오르는 방법 4가지로 구현해보기
- SingleChildScrollView + shrinkWrap: true
- ListView + shirinkWrap: true
- ListView.builder
- CustomScrollView
1. SingleChildScrollView + shrinkWrap: true
return Scaffold(
      appBar: const CustomAppBar(),
      body: SingleChildScrollView(
        child: Padding(
          padding: const EdgeInsets.symmetric(horizontal: 16),
          child: Column(
            crossAxisAlignment: CrossAxisAlignment.start,
            children: [
              TotalTitle(title: 'SingleChildScrollView 전체'),
              const SizedBox(height: 16),
              RowTotalCell(width: width),
              const SizedBox(height: 8),
              const ListCell(),
              const SizedBox(height: 8),
              const ListCell(),
              const SizedBox(height: 24),
              const RecentTitle(),
              ListView.separated(
                shrinkWrap: true,
                physics: const NeverScrollableScrollPhysics(),
                itemCount: 6,
                itemBuilder: (context, index) => const ListCell(),
                separatorBuilder: (context, index) => const SizedBox(height: 8,),
              ),
              const RecommendTitle(),
              ListView.separated(
                shrinkWrap: true,
                physics: const NeverScrollableScrollPhysics(),
                itemCount: 10,
                itemBuilder: (context, index) => const ListCell(),
                separatorBuilder: (context, index) => const SizedBox(height: 8,),
              )
            ],
          ),
        ),
      ),
    );
SingleChildScrollView body에 Column을 넣어주고 children에 ListView.separated을 자식들로 넣어주었다. 이 경우에는 shrinkWrap을 true로 설정해야한다. SingleChildScrollView 자식에 들어가는 위젯은 사이즈가 정해져 있어야 하기 때문이다. 이렇게 되면 아주 긴 리스트가 나와야하는 상황이면 성능상 손해를 볼 것이다.
장점: 리스트가 짧은 경우 간단한 구조로 구현하기 좋음
단점: shrinkWrap을 true로 설정하면서 성능상 손해를 봄
2. ListView + shirinkWrap: true
return Scaffold(
      body: Padding(
        padding: const EdgeInsets.symmetric(horizontal: 16.0),
        child: ListView(
          children: [
            const Text(
              '전체',
              style: TextStyle(fontSize: 24, fontWeight: FontWeight.w600),
            ),
            const SizedBox(height: 16),
            Row(
              children: [
                RowCell(width: width),
                const SizedBox(width: 8),
                RowCell(width: width),
                const SizedBox(width: 8),
                RowCell(width: width),
              ],
            ),
            const SizedBox(height: 8),
            const ListCell(),
            const SizedBox(height: 8),
            const ListCell(),
            const SizedBox(height: 24),
            const Text(
              '최근',
              style: TextStyle(fontSize: 20, fontWeight: FontWeight.w600),
            ),
            ListView.separated(
              shrinkWrap: true,
              physics: const NeverScrollableScrollPhysics(),
              itemCount: 6,
              itemBuilder: (context, index) => const ListCell(),
              separatorBuilder: (context, index) => const SizedBox(height: 8,),
            ),
            const Text(
              '추천',
              style: TextStyle(fontSize: 20, fontWeight: FontWeight.w600),
            ),
            ListView.separated(
              shrinkWrap: true,
              physics: const NeverScrollableScrollPhysics(),
              itemCount: 10,
              itemBuilder: (context, index) => const ListCell(),
              separatorBuilder: (context, index) => const SizedBox(height: 8,),
            )
          ],
        ),
      ),
    );
ListView 는 자식들이 많지 않은 경우 사용하기가 좋은 위젯이라고 알고 있다. 토스 전체 탭의 경우 리스트가 긴 편은 아니기 때문에 위와 같은 방법으로도 구현이 가능할 것 같다. 그렇지만 ListView 에 들어가는 자식들의 사이즈는 정해져 있어야 하기에 ListView.sperated에 shrinkWrap을 true로 설정해주었다. 이 점에서 성능상 손해를 볼 것 같다.
장점: 리스트가 짧은 경우 간단한 구조로 구현하기 좋음
단점: shrinkWrap을 true로 설정하면서 성능상 손해를 봄
3. ListView.builder
...

int recentListLength = 10;
int recommendListLength = 10;

...

return Scaffold(
      body: Padding(
        padding: const EdgeInsets.symmetric(horizontal: 16.0),
        child: ListView.builder(
          itemCount: recentListLength + recommendListLength + 3,
            itemBuilder: (context, index) {
            if(index == 0) {
              return Column(
                children: [
                  const Text(
                    '전체',
                    style: TextStyle(fontSize: 24, fontWeight: FontWeight.w600),
                  ),
                  const SizedBox(height: 16),
                  Row(
                    children: [
                      RowCell(width: width),
                      const SizedBox(width: 8),
                      RowCell(width: width),
                      const SizedBox(width: 8),
                      RowCell(width: width),
                    ],
                  ),
                  const SizedBox(height: 8),
                  const ListCell(),
                  const SizedBox(height: 8),
                  const ListCell(),
                  const SizedBox(height: 24),
                ],
              );
            }

            if(index == 1) {
              return const Text(
                '최근',
                style: TextStyle(fontSize: 20, fontWeight: FontWeight.w600),
              );
            }

            if(index > 1 && index < recentListLength + 2) {
              return const Padding(
                padding: EdgeInsets.only(bottom: 8.0),
                child: ListCell(),
              );
            }

            if(index == recentListLength + 2) {
              return const Text(
                '추천',
                style: TextStyle(fontSize: 20, fontWeight: FontWeight.w600),
              );
            }

            if(index > recentListLength + 2) {
              return const Padding(
                padding: EdgeInsets.only(bottom: 8.0),
                child: ListCell(),
              );
            }
        }),
      ),
    );
ListView.builder에서는 중간 중간 타이틀을 처리해주기 위해 index를 타이틀의 수만큼 인덱스에 + 해서 타이틀을 넣어주었다. 이렇게 구현하게 되면 위의 두 방법보다 성능상 이점은 챙길 수 있지만, 인덱스 조작하는 부분이 까다로워지면서 유지보수가 어려워 질 것이다. 실수할 확률도 높아진다.
장점: ListView.builder 특성상 lazy하게 렌더링하기 때문에 성능상 이점을 가져갈 수 있음
단점: index를 조작하기 때문에 유지보수가 어려워짐, 실수 유발 코드
4. CustomScrollView
...

int recentListLength = 10;
int recommendListLength = 10;

...

return Scaffold(
      body: Padding(
        padding: const EdgeInsets.symmetric(horizontal: 16.0),
        child: CustomScrollView(
          slivers: [
            SliverToBoxAdapter(
              child: Column(
                children: [
                  const Text(
                    '전체',
                    style: TextStyle(fontSize: 24, fontWeight: FontWeight.w600),
                  ),
                  const SizedBox(height: 16),
                  Row(
                    children: [
                      RowCell(width: width),
                      const SizedBox(width: 8),
                      RowCell(width: width),
                      const SizedBox(width: 8),
                      RowCell(width: width),
                    ],
                  ),
                  const SizedBox(height: 8),
                  const ListCell(),
                  const SizedBox(height: 8),
                  const ListCell(),
                  const SizedBox(height: 24),
                ],
              ),
            ),

            const SliverToBoxAdapter(
              child: Text(
                '최근',
                style: TextStyle(fontSize: 20, fontWeight: FontWeight.w600),
              ),
            ),

            SliverList(delegate: SliverChildBuilderDelegate(
              childCount: recentListLength,
                  (context, index) {
                return const Padding(
                  padding: EdgeInsets.only(bottom: 8.0),
                  child: ListCell(),
                );
              },
            ),),

            const SliverToBoxAdapter(
              child: Text(
                '추천',
                style: TextStyle(fontSize: 20, fontWeight: FontWeight.w600),
              ),
            ),

            SliverList(delegate: SliverChildBuilderDelegate(
              childCount: recommendListLength,
                  (context, index) {
                return const Padding(
                  padding: EdgeInsets.only(bottom: 8.0),
                  child: ListCell(),
                );
              },
            ),),
          ],
        ),
      ),
    );
CustomScrollView를 사용하여 구현했다. slivers에는 SliverConstraints를 사용하는 위젯들만 들어갈 수 있다. (보통 위젯이름이 Sliver로 시작하면 대부분 맞다. 우리가 일반적으로 많이 사용하는 위젯들을 BoxConstarints 레이아웃을 사용하는 위젯들이다.) 리스트가 나와야할 부분에는 SliverList를 사용했고, 타이틀 부분에는 SliverToBoxAdapter를 사용해서 BoxConstarints를 사용하는 위젯을 SliverConstraints를 사용하는 위젯으로 바꿔주었다.
장점: customScrollView 특성상 SliverConstraints를 사용하기 때문에 아이템들을 lazy하게 렌더링함 성능상 이점을 가져갈 수 있음
단점: 3. 과 비교하여 인덱스를 조작할 일이 없어지지만, slivers에 SliverConstraints를 따르는 위젯들만 넣어야한다는 점이 있음. BoxConstarints를 따르는 위젯들은 SliverToBoxAdapter로 한 번 감싸줘야함
이렇게 구현하게 되면 1. 2. 의 경우보다 성능은 좋고 3.보다 유지보수가 편하게 구현할 수 있다. 그런데, slivers만 넣어야한다는 점에서 약간 문제가 생길수도 있다는 생각인데 아직까지는 괜찮은 듯 하다.
정리
상황에 따라 리스트의 아이템이 적은 경우에는 간단하게 ListView, SingleChildScrollView를 사용해서 구현하는 것도 좋은 방법인 것 같다. 그렇지만 리스트가 길어질 것을 대비하여 미리 3. 4. 번과 같이 lazy하게 렌더링하는 리스트로 구현하는 것도 좋다.
이렇게 구현하게 되면 debug모드로 빌드를 해도 스크롤의 버벅거림이 덜하는게 느껴지고 devtools로 확인했을 때도 jank가 덜 하는 것을 확인할 수 있다. 성능을 비교하는 것은 다음 글에 정리해볼 예정이다.
그리고 리스트가 있는 뷰를 구현할 때 많이 사용하는 무한스크롤도 정리해봐야겠다. 위에서 깊게 다루지 못한 sliver에 관한 내용도 다른 글에서 정리할 예정이다. 생각보다 ListView 에 연관되어 생각나는 글 거리들이 많아 부지런히 정리해야겠다.