Java 빌드 모듈에는 여러종류가 있지만 그중에 가장 다루기 쉬운 Gradle 빌드에 대해서 알아보고자 한다. 물론 Maven 빌드도 있지만, Ant 빌드를 써온 나로서는 접근하기 쉽고 속도도 훨씬 빠르게 느껴졌다!
1. Plugin
플러그인은 가장 먼저 선언하는 명령으로써 기초적인 플랫폼 사용을 명시한다. 전체적인 어플리케이션 사용 환경을 설정한다고 볼 수 있다. 기본적인 설정은 다음과 같다.
apply plugin: 'java'
apply plugin: 'idea'
apply plugin: 'org.springframework.boot'
apply plugin: 'io.spring.dependency-managenment'
여기서, io.spring.dependency-management는 의존성을 관리해주는 모듈이므로 springframework와 반드시 설정해야 하는 플러그인이다.
2. Version 및 Group
플러그인 설정과 함께 기초적인 설정으로써 코드 패키지 상의 적용 범위와 어플리케이션 버전, Java 버전을 명시해야 한다. 설정 방법은 다음과 같다.
group = 'com.iniestar' // Component scan to package
version = '0.0.1-SNAPSHOT' // Application version
sourceCompatibility = '11' // Java version
3. Profile 설정
개발 환경에 따른 Profile 환경 파일을 빌드 시 능동적으로 적용이 가능하다. 예를 들어, Intellij 상의 Spring boot 실행 시 'Active profiles' 옵션 값을 가져와 빌드를 수행할 수도 있다.
ext.profile = (!project.hasProperty('profile') || !profile) ? 'dev' : profile
sourceSets {
main {
	resources {
    	srcDirs "src/main/resources", "src/main/resources/env/${profile}"
        }
     }
}
4. BuildScript
Gradle에서 BuildScript 영역은 앞서 선언한 플러그인의 의존성을 관리한다. 에를들어, Spring boot의 버전이 여기에 해당된다. 사용 방법은 다음과 같다.
buildscript {
	ext {
    	springBootVersion = '2.3.3.RELEASE'
    }
    repositories {
    maven { // Not the local manven central, like as nexus
    	credentials {
        	username 'iniestar'
            password 'iniestar@@'
        }
        url 'http://127.0.0.1/repository'
    }
    dependencies {
    	classpath("org.springframework.boot:spring-boot-gradle-plugin:${springBootVersion}")
    }
}
여기서, ext 영역은 전역으로 사용되는 변수들을 여기에 선언한다.
그리고 maven 영역의 repository 주소는 기본적으로 maven cental을 사용하지만 폐쇄망일 경우 위 코드 처럼 nexus 같은 특정 repository를 이용할 수 있다.
5. 그외 라이브러리
기본적인 플러그인 이외 개발에 필요한 추가 라이브러리를 연동하기 위해 repository와 dependencies를 선언하여 탑재할 수 있다. 설정 방법은 다음과 같다.
repositories {
    maven { // Not the local manven central, like as nexus
    	credentials {
        	username 'iniestar'
            password 'iniestar@@'
        }
        url 'http://127.0.0.1/repository'
}

dependencies {
	implementation 'org.springframework.boot:spring-boot-starter-security'
	implementation 'org.springframework.boot:spring-boot-starter-web'
	implementation 'org.springframework.boot:spring-boot-starter-data-jpa'
	compileOnly 'org.projectlombok:lombok:1.18.12'
	runtimeOnly 'org.postgresql:postgresql'
	annotationProcessor 'org.projectlombok:lombok:1.18.12'
	testImplementation 'org.springframework.boot:spring-boot-starter-test'
	testImplementation 'org.springframework.security:spring-security-test'
}
dependencies 영역은 추가적인 라이브러리를 선언하는 곳이다. 여기에서 모듈 명 앞에 있는 implementation, comileOnly, runtimeOnly 등은 해당 라이브러리가 빌드되는 시점을 설정하는 옵션이다.
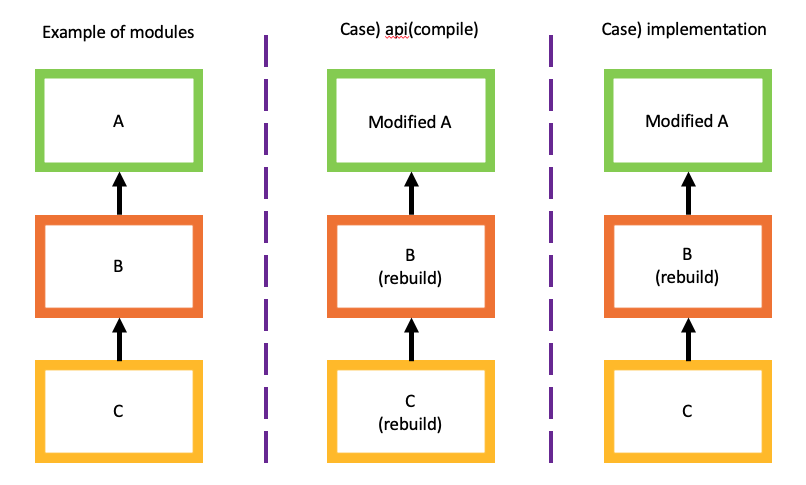
아래 그림과 함께 각 옵션들의 쓰임새를 설명하겠다!
그림은 compile 명령과 implementation의 차이를 설명하기위한 그림이며 B,C모듈은 A모듈에 의존하고 있다.

- implementation : A모듈이 변경되었을 경우 재빌드 시 직접적으로 의존하고 있는 B모듈 까지만 재빌드 한다. 지정한 모듈까지만 빌드되어 포함되기 때문에 compile보다 빠름.
- compile : 의존관계가 있는 모든 모듈을 재빌드해야 하고 빌드결과물에 포함하기 때문에 A,B,C의 모든 API를 접근할 수 있음(취약점 때문에 현재 Deprecated)
- compileOnly : 컴파일 시에만 빌드하고 빌드 결과물에는 포함되지 않음(ex. lombok)
- runtimeOnly : 런타임 시에만 필요한 라이브러리인 경우(ex. postgresql)
- annotationProcessor : 어노테이션을 사용하는 라이브러리인경우 명시(ex. lombok)
