프로젝트 준비
pom.xml
<?xml version="1.0" encoding="UTF-8"?>
<project xmlns="http://maven.apache.org/POM/4.0.0"
  xmlns:xsi="http://www.w3.org/2001/XMLSchema-instance"
  xsi:schemaLocation="http://maven.apache.org/POM/4.0.0
		http://maven.apache.org/xsd/maven-4.0.0.xsd">
  <modelVersion>4.0.0</modelVersion>
  <groupId>sp5</groupId>
  <artifactId>sp5-chap07</artifactId>
  <version>0.0.1-SNAPSHOT</version>

  <dependencies>
    <dependency>
      <groupId>org.springframework</groupId>
      <artifactId>spring-context</artifactId>
      <version>5.0.2.RELEASE</version>
    </dependency>
    <dependency>
      <groupId>org.aspectj</groupId>
      <artifactId>aspectjweaver</artifactId>
      <version>1.8.13</version>
    </dependency>
  </dependencies>

  <build>
    <plugins>
      <plugin>
        <artifactId>maven-compiler-plugin</artifactId>
        <version>3.7.0</version>
        <configuration>
          <source>1.8</source>
          <target>1.8</target>
          <encoding>utf-8</encoding>
        </configuration>
      </plugin>
    </plugins>
  </build>

</project>
Calculator
package chap07;

public interface Calculator {

    public long factorial(long num);
}
ImpeCalculator
package chap07;

public class ImpeCalculator implements Calculator{

    @Override
    public long factorial(long num) {
        long result = 1;
        for (long i = 1; i <= num; i++) {
            result *= i;
        }
        return result;
    }
}
RecCalculator
package chap07;

public class RecCalculator implements Calculator{

    @Override
    public long factorial(long num) {
        if (num == 0) {
            return 1;
        } else {
            return num * factorial(num - 1);
        }
    }
}
프록시와 AOP
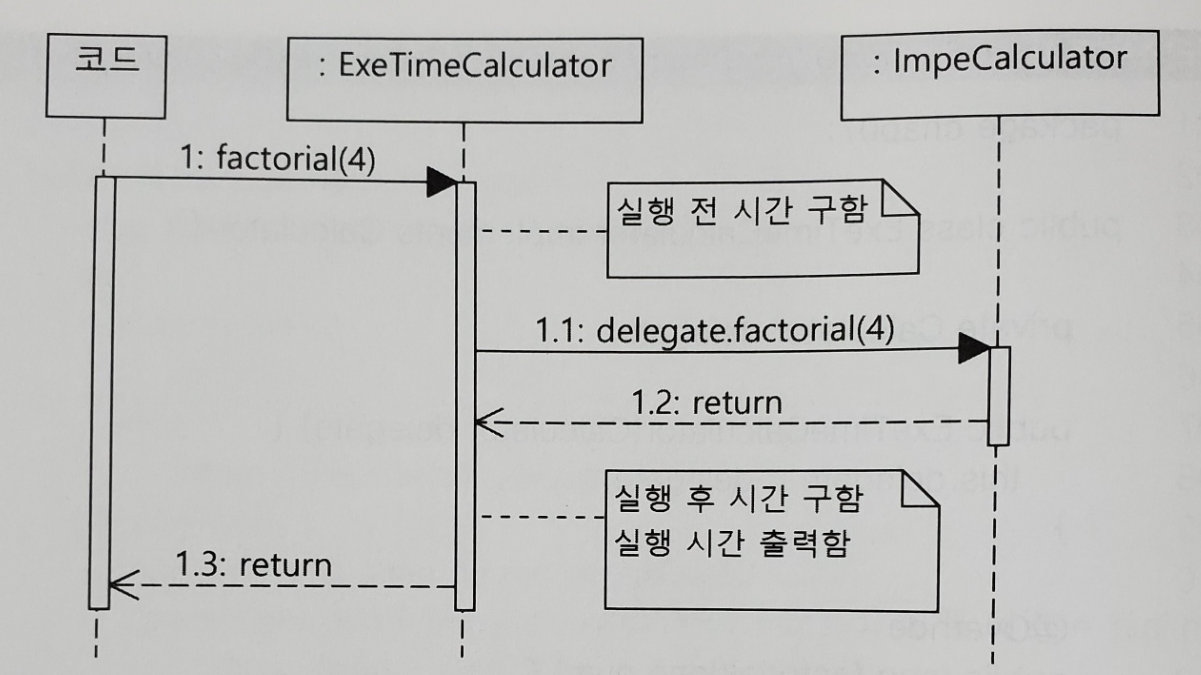
위에서 구현한 계승구현 클래스의 실행시간을 출력하려면 메서드의 시작과 끝에서 시간을 구하고 이 두 시간의 차이를 출력하는 것이다. 하지만 재귀이면 복잡해지고, 실행 시간을 밀리초가 아니라 나노초 단위로 구하려면 코드 수정이 필요하다.
기존 코드를 수정하지 않고 코드 중복도 피할 수 있는 방법이 프록시 객체다.
ExeTimeCalculator
package chap07;

public class ExeTimeCalculator implements Calculator{

    private Calculator delegate;

    public ExeTimeCalculator(Calculator delegate) {
        this.delegate = delegate;
    }

    @Override
    public long factorial(long num) {
        long start = System.nanoTime();
        long result = delegate.factorial(num);
        long end = System.nanoTime();
        System.out.printf("%s.factorial(%d) 실행 시간 = %d\n", delegate.getClass().getSimpleName(), num, (end - start));
        return result;
    }
}
MainProxy
package chap07.main;

import chap07.ExeTimeCalculator;
import chap07.ImpeCalculator;
import chap07.RecCalculator;

public class MainProxy {

    public static void main(String[] args) {
        ExeTimeCalculator ttCal1 = new ExeTimeCalculator(new ImpeCalculator());
        System.out.println(ttCal1.factorial(20));

        ExeTimeCalculator ttCal2 = new ExeTimeCalculator(new RecCalculator());
        System.out.println(ttCal2.factorial(20));

    }
}
ImpeCalculator.factorial(20) 실행 시간 = 2700
2432902008176640000
RecCalculator.factorial(20) 실행 시간 = 3500
2432902008176640000
기존 코드를 변경하지 않고 실행 시간을 출력할 수 있다. ImpeCalculator 클래스나 RecCalculator 클래스의 코드 변경 없이 이 두 클래스의 factorial() 메서드 실행시간을 출력할 수 있게 되었다.
실행 시간을 구하는 코드의 중복을 제거 했다. 나노초 대신에 밀리초를 사용해서 실행 시간을 구하고 싶다면 ExeTimeCalculator 클래스만 변경하면 된다.
이렇게 핵심 기능의 실행은 다른 객체에 위임하고 부가적인 기능을 제공하는 객체를 프록시(proxy) 라고 부른다. 실제 핵심 기능을 실행하는 객체는 대상 객체 라고 부른다. ExeTimeCalculator가 프록시이고, ImpeCalculator 객체가 프록시의 대상 객체가 된다.
엄밀히 말하면 지금 작성한 코드는 프록시라기 보다는 데코레이터 객체에 가깝다. 프록시는 접근 제어 관점에 초점이 맞춰져 있다면, 데코레이터는 기능 추가와 확장에 초점이 맞춰져 있기 때문이다. 예제에서는 기존 기능에 시간 측정 기능을 추가하고 있기 때문에 데코레이터에 가깝지만 스프링의 레퍼런스 문서에서 AOP를 설명할 때 프록시란 용어를 사용하고 있어 이 책에서도 프록시를 사용했다.
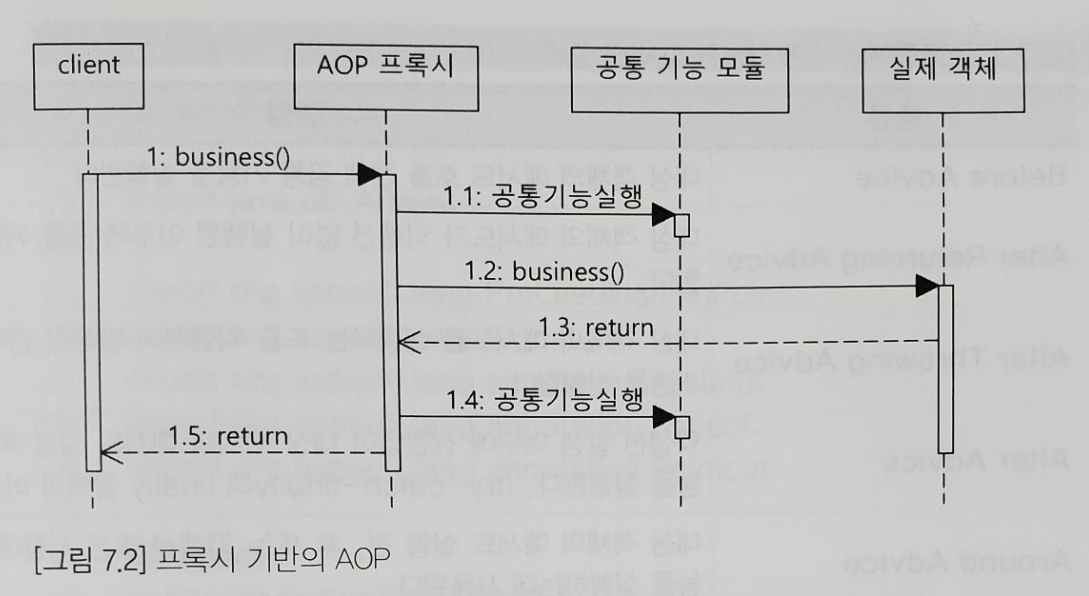
프록시의 특징은 핵심 기능은 구현하지 않는다는 점이다. 프록시는 핵심 기능을 구현하지 않는 대신 여러 객체에 공통으로 적용할 수 있는 기능을 구현한다. 이렇게 공통 기능 구현과 핵심 기능 구현을 분리하는 것이 AOP의 핵심이다.
AOP
AOP는 Aspect Oriented Programming의 약자로, 여러 객체에 공통으로 적용할 수 있는 기능을 분리해서 재사용성을 높여주는 프로그래밍 기법이다.
여기서 Aspect는 구분 되는 기능이나 요소를 의미하기 때문에 '관점'보다는 '기능' 내지 '관심'이라는 표현이 더 많다.
AOP의 기본 개념은 핵심 기능에 공통 기능을 삽입하는 것이다.
핵심 기능에 공통 기능을 삽입하는 방법
1. 컴파일 시점에 코드에 공통 기능을 삽입하는 방법
2. 클래스 로딩 시점에 바이트 코드에 공통 기능을 삽입하는 방법
3. 런타임에 프록시 객체를 생성해서 공통 기능을 삽입하는 방법
첫 번째 방법은 AOP 개발 도구가 소스 코드를 컴파일 하기 전에 공통 구현 코드를 소스에 삽입하는 방식.
두 번째 방법은 클래스를 로딩할 때 바이트 코드에 공통 기능을 클래스에 삽입하는 방식.
이 두가지는 스프링 AOP에서는 지원하지 않으며 AspectJ와 같이 AOP 전용 도구를 사용해서 적용할 수 있다.
스프링이 제공하는 AOP 방식은 프록시를 이용한 세 번째 방식이다. 널리 사용되는 방식은 프록시를 이용한 방식이다.
스프링 AOP는 프록시 객체를 자동으로 만들어준다. 공통 기능을 구현한 클래스만 알맞게 구현하면 된다.
AOP에서 공통 기능을 Aspect라고 하는데, Aspect 외에 알아두어야 할 용어다.
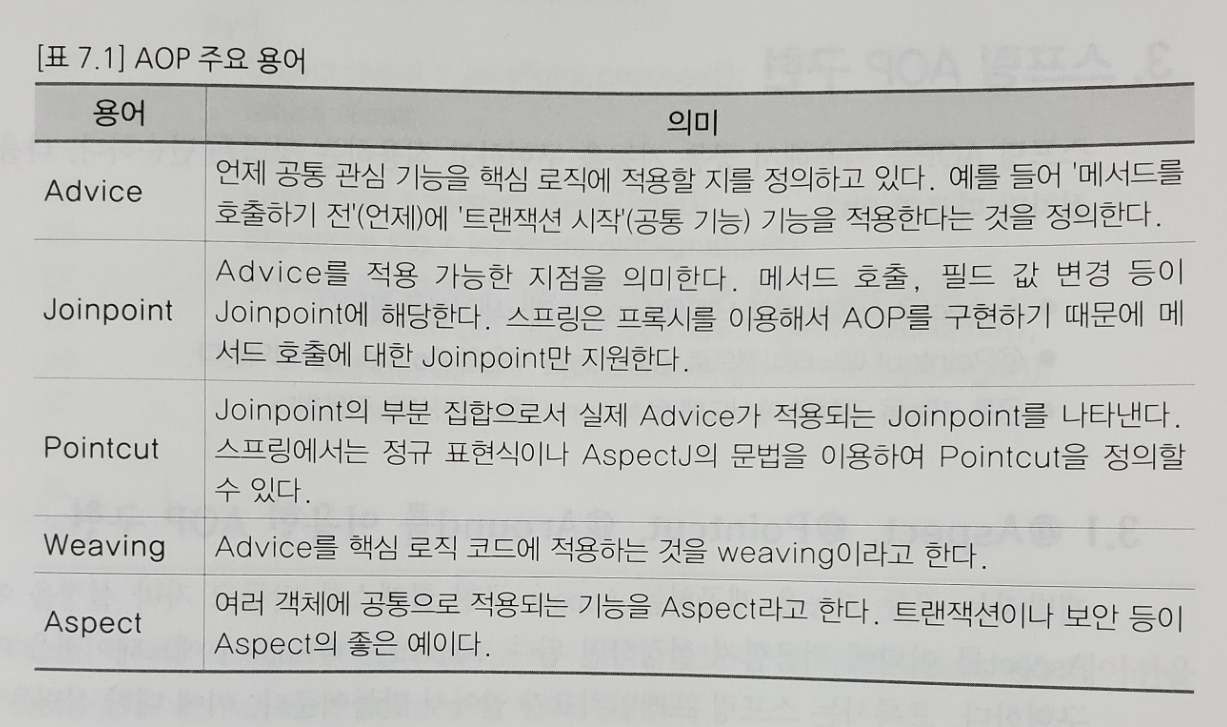
Advice의 종류
스프링에서 구현 가능한 Advice의 종류는 여러 개가 잇지만 가장 널리 사용되는 것은 Around Advice이다. 이유는 대상 객체의 메서드를 실행 하기 전/후, 익셉션 발생 시점 등 다양한 시점에 원하는 기능을 삽입할 수 있기 때문이다. 캐시 기능, 성능 모니터링 기능과 같은 Aspect를 구현할 때에는 Around Advice를 주로 이용한다.
스프링 AOP 구현
스프링 AOP를 적용하는 방법
1. Aspect로 사용할 클래스에 @Asepct 애노테이션을 붙인다.
2. @Pointcut 애노테이션으로 공통 기능을 적용할 Pointcut을 적용한다.
3. 공통 기능을 구현한 메서드에 @Around 애노테이션을 적용한다.
@Aspect, @Pointcut, @Around를 이용한 AOP 구현
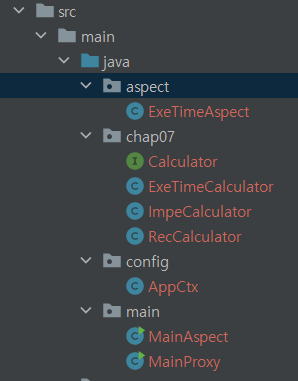
ExeTimeAspect
package chap07.aspect;

import java.util.Arrays;
import org.aspectj.lang.ProceedingJoinPoint;
import org.aspectj.lang.Signature;
import org.aspectj.lang.annotation.Around;
import org.aspectj.lang.annotation.Aspect;
import org.aspectj.lang.annotation.Pointcut;

@Aspect
public class ExeTimeAspect {

    @Pointcut("execution(public * chap07..*(..))")
    private void publicTarget() {
    }

    @Around("publicTarget()")
    public Object measure(ProceedingJoinPoint joinPoint) throws Throwable {
        long start = System.nanoTime();
        try {
            Object result = joinPoint.proceed();
            return result;
        } finally {
            long finish = System.nanoTime();
            Signature sig = joinPoint.getSignature();
            System.out.printf("%s.%s(%s) 실행 시간 : %d ns\n", joinPoint.getTarget().getClass().getSimpleName(), sig.getName(), Arrays
                .toString(joinPoint.getArgs()), (finish - start));
        }
    }
}
위 코드는 AroundAdvice에서 사용할 Aspect이다 = 메서드 실행 전/후(Around Advice)에 사용할 공통 기능(Aspect)이다.
@Aspect 애노테이션을 적용한 클래스는 Advice와 Pointcut을 함께 제공한다.
@Pointcut은 공통 기능을 적용할 대상을 설정한다. @Pointcut 애노테이션 값으로 사용할 수 있는 execution 명시자에 대해서는 뒤에서 살펴볼 것이다. 여기서는 chap07 패키지와 그 하위 패키지에 위치한 타입의 public 메서드를 Pointcut으로 설정한다.
@Around 애노테이션은 Around Advice를 설정한다. @Around 애노테이션의 값이 "publicTarget()"인데 이는 publicTarget() 메서드에 정의한 Pointcut에 공통 기능을 적용한다는 것을 의미한다. publicTarget() 메서드는 chap07 패키지와 그 하위 패키지에 위치한 public 메서드를 Pointcut으로 설정하고 있으므로, chap07 패키지나 그 하위 패키지에 속한 빈 객체의 public 메서드에 @Around가 붙은 measure() 메서드를 적용한다.
measure() 메서드의 ProceedingJoinPoint 타입 파라미터는 프록시 대상 객체의 메서드를 호출할 때 사용한다. 코드에서는 proceed() 메서드를 사용해서 실제 대상 객체의 메서드를 호출한다. 이 메서드를 호출하면 대상 객체의 메서드가 실행되므로 이 코드 이전과 이후에 공통 기능을 위한 코드를 위치시키면 된다.
자바에서 메서드 이름과 파라미터를 합쳐서 메서드 시그니처라고 한다. 메서드 이름이 다르거나 파라미터 타입, 개수가 다르면 시그니처가 다르다고 표현한다. 자바에서 메서드의 리턴 타입이나 익셉션 탕비은 시그니처에 포함되지 않는다.
AppCtx
package chap07.config;

import chap07.Calculator;
import chap07.RecCalculator;
import chap07.aspect.ExeTimeAspect;
import org.springframework.context.annotation.Bean;
import org.springframework.context.annotation.Configuration;
import org.springframework.context.annotation.EnableAspectJAutoProxy;

@Configuration
@EnableAspectJAutoProxy
public class AppCtx {

    @Bean
    public ExeTimeAspect exeTimeAspect() {
        return new ExeTimeAspect();
    }

    @Bean
    public Calculator calculator() {
        return new RecCalculator();
    }
}
@Aspect 애노테이션을 붙인 클래스를 공통 기능으로 적용하려면 @EnableAspctJAutoProxy 애노테이션을 설정 클래스에 붙여야 한다. 이 애노테이션을 추가하면 스프링은 @Aspect 애노테이션이 붙은 빈 객체를 찾아서 빈 객체의 @Pointcut 설정과 @Around 설정을 사용한다.
@Enable로 시작하는 애노테이션은 관련 기능을 적용하는데 필요한 다양한 스프링 설정을 대신 처리한다. 예를 들어 @EnableAspectJAutoProxy 애노테이션은 프록시 생성과 관련된 AnnotationAwareAspectJAutoProxyCreateor 객체를 빈으로 등록한다.
RecCalculator.factorial([5]) 실행 시간 : 22500 ns
cal.factorial(5) = 120
com.sun.proxy.$Proxy17

프록시 생성 방식
// AppCtx 파일의 19-22행
@Bean
public Calculator calculator() {
    return new RecCalculator();
}
//수정 전
Calculator cal = ctx.getBean("calculator", Calculator.class);
//수정 후
RecCalculator cal = ctx.getBean("calculator", RecCalculator.class);이렇게 하면 에러가 난다.
Bean named 'calculator' is expected to be of type 'chap07.RecCalculator' but was actually of type 'com.sun.proxy.$Proxy17'
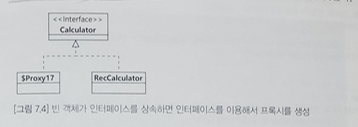
스프링인 AOP를 위한 프록시 객체를 생성할 때 실제 생성할 빈 객체가 인터페이스를 상속하면 인터페이스를 이용해서 프록시를 생성한다.
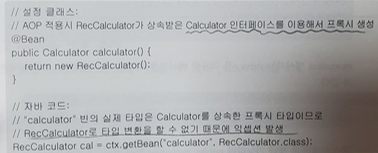
"calculator"빈의 실제 타입은 Calculator를 상속한 프록시 타입이므로 RecCalculator로 타입 변환을 할 수 없기 때문에 익셉션 발생.
AppCtx
@Configuration
@EnableAspectJAutoProxy(proxyTargetClass = true)
public class AppCtx {

	...
}
@EnableAspectJAutoProxy 애노테이션의 proxyTargetClass 속성을 true로 지정하면 인터페이스가 아닌 자바 클래스를 상속받아 프록시를 생성한다.
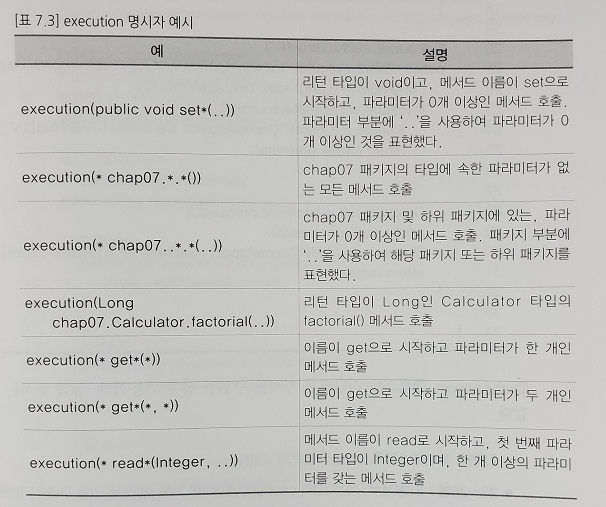
execution 명시자 표현식
execution 명시자는 Adivice를 적용할 메서드를 지정할 때 사용한다.
execution(수식어패턴? 리턴타입패턴 클래스이름패턴?메서드이름패턴(파라미터패턴))
수식어패턴은 생략 가능하며 public, protected 등이 온다. 스프링 AOP는 puiblic 메서드에만 적용할 수 있기 때문에 사실상 public만 의미가 있다.
Advice 적용 순서
한 Pointcut에 여러 Advice를 적용할 수도 있다.
CacheAspect
package aspect;

import java.util.HashMap;
import java.util.Map;
import org.aspectj.lang.ProceedingJoinPoint;
import org.aspectj.lang.annotation.Around;
import org.aspectj.lang.annotation.Aspect;
import org.aspectj.lang.annotation.Pointcut;

@Aspect
public class CacheAspect {

    private Map<Long, Object> cache = new HashMap<>();

    @Pointcut("execution(public * chap07..*(long))")
    public void cacheTarget() {
    }

    @Around("cacheTarget")
    public Object execute(ProceedingJoinPoint joinPoint) throws Throwable {
        Long num = (Long) joinPoint.getArgs()[0];
        if (cache.containsKey(num)) {
            System.out.printf("CacheAspect: Cache에서 구함 [%d]\n", num);
            return cache.get(num);
        }

        Object result = joinPoint.proceed();
        cache.put(num, result);
        System.out.printf("CacheAspect: Cache에 추가 [%sd]\n", num);
        return result;
    }
}
AppCtxWithCache
package config;

import aspect.CacheAspect;
import aspect.ExeTimeAspect;
import chap07.Calculator;
import chap07.RecCalculator;
import org.springframework.context.annotation.Bean;
import org.springframework.context.annotation.Configuration;
import org.springframework.context.annotation.EnableAspectJAutoProxy;

@Configuration
@EnableAspectJAutoProxy
public class AppCtxWithCache {

    @Bean
    public CacheAspect cacheAspect() {
        return new CacheAspect();
    }

    @Bean
    public ExeTimeAspect exeTimeAspect() {
        return new ExeTimeAspect();
    }

    @Bean
    public Calculator calculator() {
        return new RecCalculator();
    }
}
MainAspectWithCache
package main;

import chap07.Calculator;
import config.AppCtxWithCache;
import org.springframework.context.annotation.AnnotationConfigApplicationContext;

public class MainAspectWithCache {

    public static void main(String[] args) {
        AnnotationConfigApplicationContext ctx = new AnnotationConfigApplicationContext(
            AppCtxWithCache.class);

        Calculator cal = ctx.getBean("calculator", Calculator.class);
        cal.factorial(7);
        cal.factorial(7);
        cal.factorial(5);
        cal.factorial(5);
        ctx.close();
    }
}
RecCalculator.factorial([7]) 실행 시간 : 14500 ns
CacheAspect: Cache에 추가[7]
CacheAspect: Cache에서 구함[7]
RecCalculator.factorial([5]) 실행 시간 : 3500 ns
CacheAspect: Cache에 추가[5]
CacheAspect: Cache에서 구함[5]
첫 번째 factorial(7)을 실행할 때와 두 번째 factorial(7)을 실행할 때 콘솔에 출력되는 내용이 다르다. 첫 번째 실행 결과는 ExeTimeAspect와 CacheAspect가 모두 적용되었고, 두 번 째 실행 결과는 CacheAspect만 적용되었다. 이 이유는 Advice를 다음 순서로 적용했기 때문이다.
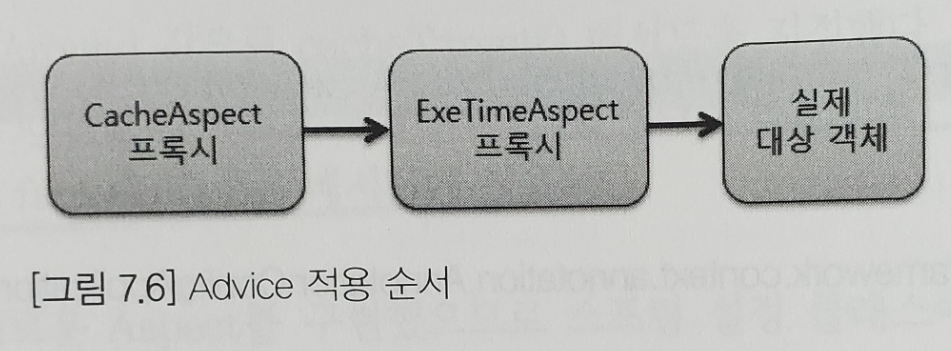
Calculator cal = ctx.getBean("calculator", Calculator.class);
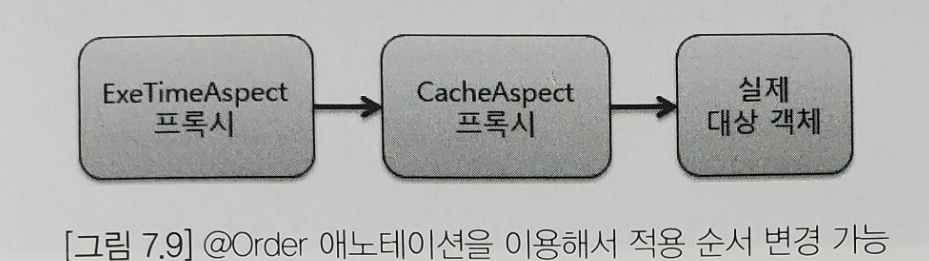
cal.factorial(7); // CacheAspect 실행 -> ExeTimeAspect 실행 -> 대상 객체 실행calculator 빈은 실제로는 CacheAspect 프록시 객체이다. 근데 CacheAspect 프록시 객체의 대상 객체는 ExeTimeAspect의 프록시 객체이다. 그리고 ExeTimeAspect 프록시의 대상 객체가 실제 대상 객체이다.
어떤 Aspect가 먼저 적용될지는 스프링 프레임워크나 자바 버전에 따라 달라질 수 있기 때문에 적용 순서가 중요하다면 직접 순서를 지정해야 한다. 이럴 때 사용하는 것이 @Order 애노테이션이다.
@Aspect
@Order(1)
public class ExeTimeAspect {
  ...
}

@Aspect
@Order(2)
public class CacheAspect {
  ...
}
@Around의 Pointcut 설정과 @Pointcut 재사용
@Pointcut 애노테이션이 아닌 @Around 애노테이션에 execution 명시자를 직접 지정할 수도 있다.
@Aspect
public class CacheAspect {

    @Around("execution(public * chap07..*(..))")
    public Object execute(ProceedingJoinPoint joinPoint) throws Throwable {
        ...
    }
}
만약 같은 Pointcut을 여러 Advice가 함께 사용한다면 공통 Pointcut을 재사용할 수도 있다. 해당 Pointcut을 public으로 만들고 완저한 클래스 이름을 포함한 메서드 일므을 @Around 애노테이션에서 사용하면 된다