해당 글은 제로베이스데이터스쿨 학습자료를 참고하여 작성되었습니다
1. OpenCV 그리기 함수
주의사항
-
OpenCV 그리기 함수
- OpenCV는 영상에 선, 도형, 문자열을 출력하는 그리기 함수를 제공
- 선 그리기: 직선, 화살표, 마커 등
- 도형 그리기: 사각형, 원, 타원, 다각형 등
- 문자열 출력
-
그리기 함수 사용 시 주의할 점
- 그리기 알고리즘을 이용하여 영상의 픽셀 값 자체를 변경
- 원본 영상이 필요하면 복사본을 만들어서 활용
- 그레이스케일 영상에는 컬러로 그리기 안 됨
- cv2.cvtColor() 함수로 BGR 컬러 영상으로 변환한 후 그리기 함수 호출
OpenCV 주요 그리기 함수
직선 그리기
cv2.line(img, pt1, pt2, color, thickness=1, lineType=cv2.LINE_8, shift=0)
- img: 그림을 그릴 영상
- pt1, pt2: 직선의 시작점과 끝점. (x, y) 튜플.
- color: 선 색상 또는 밝기. (B, G, R) 튜플 또는 정수값.
- thickness: 선 두께. 기본값은 1.
- lineType: 선 타입.
v2.LINE_4,cv2.LINE_8(Default),cv2.LINE_AA - shift: 그리기 좌표 값의 축소 비율. 기본값은 0.
사각형 그리기
cv2.rectangle(img, pt1, pt2, color, thickness=1, lineType=cv2.LINE_8, shift=0)
cv2.rectangle(img, rec, color, thickness=1, lineType=cv2.LINE_8, shift=0)
- img: 그림을 그릴 영상
- pt1, pt2: 사각형의 두 꼭지점 좌표. (x, y) 튜플.
- rec: 사각형 위치 정보. (x, y, w, h) 튜플.
- color: 선 색상 또는 밝기. (B, G, R) 튜플 또는 정수값.
- thickness: 선 두께. 음수(-1)를 지정하면 내부를 채움. 기본값은 1.
- lineType: 선 타입.
v2.LINE_4,cv2.LINE_8(Default),cv2.LINE_AA - shift: 그리기 좌표 값의 축소 비율. 기본값은 0.
원 그리기
cv2.circle(img, center, radius, color, thickness=1, lineType=cv2.LINE_8, shift=0
- img: 그림을 그릴 영상
- center: 원의 중심 좌표. (x, y) 튜플.
- radius: 원의 반지름
- color: 선 색상 또는 밝기. (B, G, R) 튜플 또는 정수값.
- thickness: 선 두께. 음수(-1)를 지정하면 내부를 채움. 기본값은 1.
- lineType: 선 타입.
v2.LINE_4,cv2.LINE_8(Default),cv2.LINE_AA(추천) - shift: 그리기 좌표 값의 축소 비율. 기본값은 0.
다각형 그리기
cv2.polylines(img, pts, isClosed, color, thickness=1, lineType=cv2.LINE_8, shift=0)
- img: 그림을 그릴 영상
- pts: 다각형 외곽 점들의 좌표 배열. numpy.ndarray의 리스트.
(e.g.) [np.array([[10, 10], [50, 50], [10, 50]], dtype=np.int32)] - isClosed: 폐곡선 여부. True 또는 False 지정
- color: 선 색상 또는 밝기. (B, G, R) 튜플 또는 정수값.
- thickness: 선 두께. 음수(-1)를 지정하면 내부를 채움. 기본값은 1.
- lineType: 선 타입.
v2.LINE_4,cv2.LINE_8(Default),cv2.LINE_AA - shift: 그리기 좌표 값의 축소 비율. 기본값은 0.
문자열 출력
cv2.putText(img, text, org, fontFace, fontScale, color, thickness=1, lineType=cv2.LINE_8, bottomLeftOrigin=False)
- img: 그림을 그릴 영상
- text: 출력할 문자열
- org: 영상에서 문자열을 출력할 위치의 좌측 하단 좌표. (x, y) 튜플.
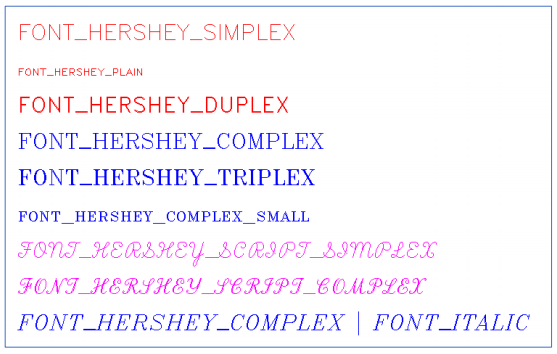
- fontFace: 폰트 종류. cv2.FONTHERSHEY 로 시작하는 상수 중 선택
- fontScale: 폰트 크기 확대/축소 비율
- color: 선 색상 또는 밝기. (B, G, R) 튜플 또는 정수값.
- thickness: 선 두께. 음수(-1)를 지정하면 내부를 채움. 기본값은 1.
- lineType: 선 타입. cv2.LINE_4, cv2.LINE_8, cv2.LINE_AA 중 선택.
- bottomLeftOrigin: True이면 영상의 좌측 하단을 원점으로 간주. 기본값은 False.
fontFace 종류
도형 그리기(Python)
import numpy as np
import cv2

img = np.full((400, 400, 3), 255, np.uint8)
#img = cv2.imread('cat.bmp')

cv2.line(img, (50, 50), (200, 50), (0, 0, 255), 5)
cv2.line(img, (50, 60), (150, 160), (0, 0, 128))

cv2.rectangle(img, (50, 200, 150, 100), (0, 255, 0), 2)
cv2.rectangle(img, (70, 220), (180, 280), (0, 128, 0), -1)

cv2.circle(img, (300, 100), 30, (255, 255, 0), -1, cv2.LINE_AA)
cv2.circle(img, (300, 100), 60, (255, 0, 0), 3, cv2.LINE_AA)

pts = np.array([[250, 200], [300, 200], [350, 300], [250, 300]])
cv2.polylines(img, [pts], True, (255, 0, 255), 2)

text = 'Hello? OpenCV ' + cv2.__version__
cv2.putText(img, text, (50, 350), cv2.FONT_HERSHEY_SIMPLEX, 0.8,
            (0, 0, 255), 1, cv2.LINE_AA)

cv2.imshow("img", img)
cv2.waitKey()
cv2.destroyAllWindows()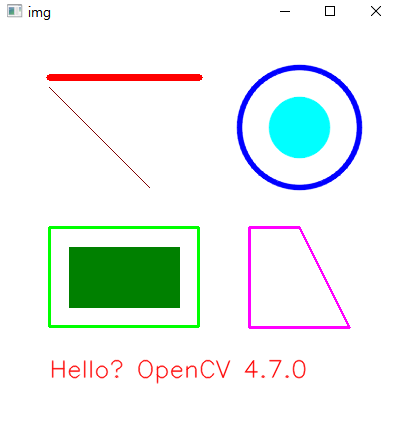
2. 카메라와 동영상 처리하기
cv2.VideoCapture 클래스
- OpenCV에서는 영상데이터를 프레임으로 받아오는 작업을 해당 클래스로 처리함
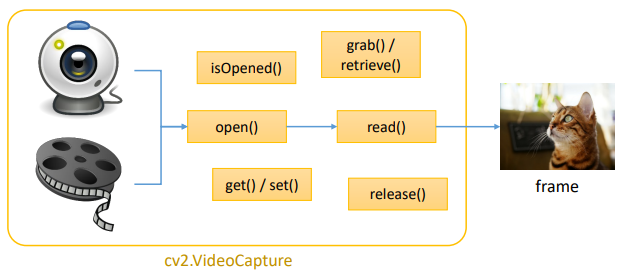
카메라 처리하기
카메라 열기
cv2.VideoCapture(index, apiPreference=AUTO)
- index: camera_id + domain_offset_id
시스템 기본 카메라를 기본 방법으로 열려면 index에 0을 전달 - apiPreference: 선호하는 카메라 처리 방법을 지정
- retval: cv2.VideoCapture 객체
cv2.VideoCapture.open(index, apiPreference=AUTO)
- retval : True or False
비디오 캡쳐 준비여부
cv2.VideoCapture.isOpened()
- retval ; True or False
프레임 받아오기
cv2.VideoCapture.read(image=one)
- 반환 값 두개
- retval : True or False
- image : 현재 프레임(numpy.ndarray)
카메라 출력(Python)
import sys
import cv2

# 카메라 열기
cap = cv2.VideoCapture(0)

if not cap.isOpened():
    print("Camera open Failed!")
    sys.exit()
else:
    print("Camera Opened!")

while True:
    ret, frame = cap.read()

    if not ret:
        break

    # 흑백처리
    gray = cv2.cvtColor(frame, cv2.COLOR_BGR2GRAY)

    # 1은 좌우반전, 0은 상하반전
    color_flip = cv2.flip(frame, 1)
    gray_flip = cv2.flip(gray, 1)

    cv2.imshow('frame', frame)
    cv2.imshow('gray', gray)
    cv2.imshow('color_flip', color_flip)
    cv2.imshow('gray_flip', gray_flip)

    if cv2.waitKey(1) == 27:  # ESC
        break

cap.release()
cv2.destroyAllWindows()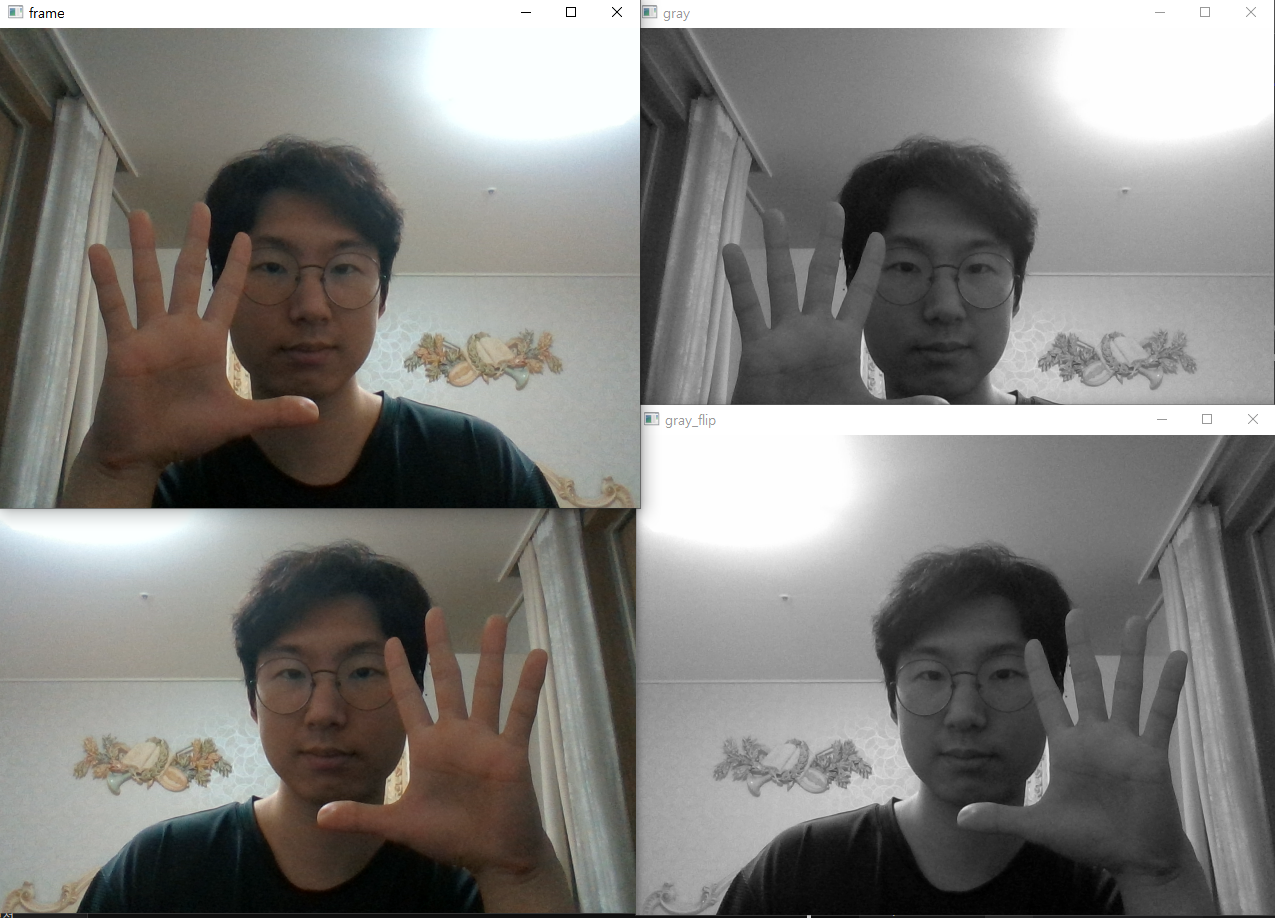
동영상 처리하기
동영상 열기
cv2.VideoCapture(filename, apiPreference=AUTO)
- filename: 비디오 파일 이름, 비디오 스트림 URL, image 파일
- apiPreference: 선호하는 카메라 처리 방법을 지정
- retval: cv2.VideoCapture 객체
cv2.VideoCapture.open(filename, apiPreference=AUTO)
- retval : True or False
장치 속성 값 읽기
cv2.VideoCapture.get(propId)
- propId : 속성상수 (OpenCV 문서 참조)
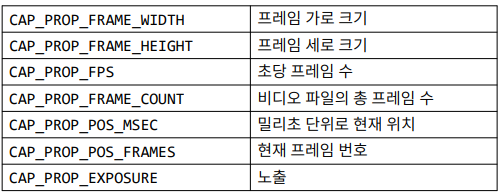
- retval : True or False
장치 속성 값 변경
cv2.VideoCapture.set(propId, value)
- propId : 속성 상수
- value : 속성 값
- retval : True or False
장치 속성 값 받기(Python)
import sys
import cv2


# 비디오 파일 열기
cap = cv2.VideoCapture('./data/video1.mp4')

if not cap.isOpened():
    print("Video open failed!")
    sys.exit()

# 비디오 프레임 크기, 전체 프레임수, FPS 등 출력
print('Frame width:', int(cap.get(cv2.CAP_PROP_FRAME_WIDTH)))
print('Frame height:', int(cap.get(cv2.CAP_PROP_FRAME_HEIGHT)))
print('Frame count:', int(cap.get(cv2.CAP_PROP_FRAME_COUNT)))

fps = cap.get(cv2.CAP_PROP_FPS)
print('FPS:', fps)

delay = round(1000 / fps)

# 비디오 매 프레임 처리
while True:
    ret, frame = cap.read()

    if not ret:
        break

    gray = cv2.cvtColor(frame, cv2.COLOR_BGR2GRAY)

    cv2.imshow('frame', frame)
    cv2.imshow('gray', gray)

    if cv2.waitKey(delay) == 27:	# delay 값이 들어가면 정상속도
        break

cap.release()
cv2.destroyAllWindows()
---------------------------------------------------------------------
Frame width: 1280
Frame height: 720
Frame count: 85
FPS: 24.0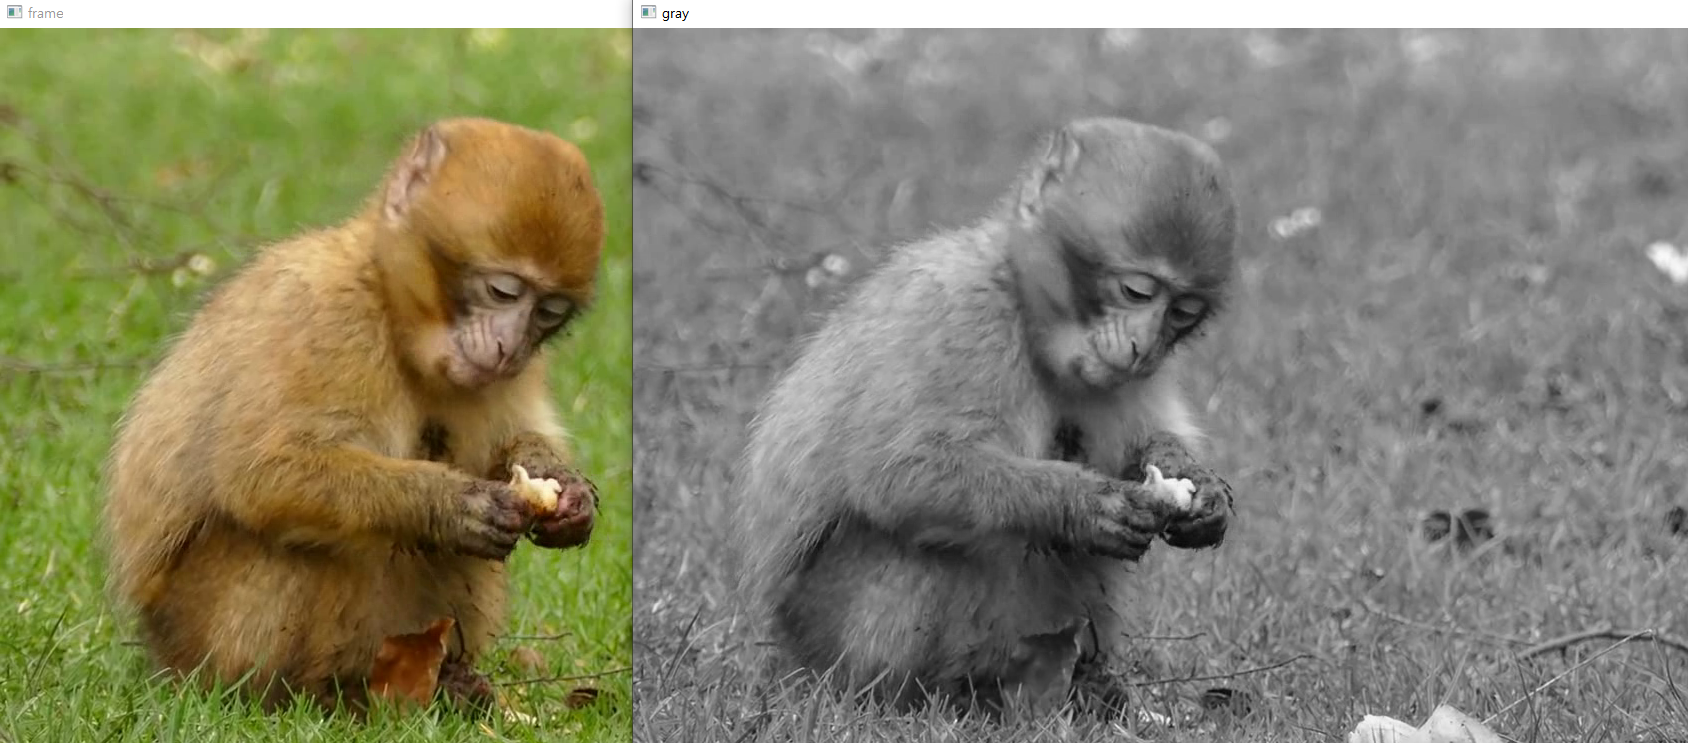
3. 동영상 저장하기
cv2.VideoWriter 클래스
- 해당 클래스를 이용하여 일련의 프레임을 동영상 파일로 저장함
- 일련의 프레임은 모두 크기와 데이터 타입이 동일해야 함
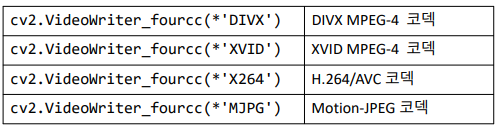
Fourcc(4-문자 코드, four character code)
- 동영상 파일의 코덱, 압축방식, 색상, 픽셀 포맷 등을 정의하는 정수 값(http://www.fourcc.org/codecs.php)
동영상 저장하기
cv2.VideoWriter(filename, fourcc, fps, frameSize, isColor=None)
- filename: 비디오 파일 이름 (e.g. 'video.mp4')
- fourcc: fourcc (e.g. cv2.VideoWriter_fourcc(*'DIVX'))
- fps: 초당 프레임 수 (e.g. 30)
- frameSize: 프레임 크기. (width, height) 튜플.
- isColor: 컬러 영상이면 True, 그렇지않으면 False.
- retval: cv2.VideoWriter 객체
cv2.VideoWriter.open(filename, fourcc, fps, frameSize, isColor=None)
- retval: True or False
동영상 파일 준비여부
cv2.VideoWriter.isOpened()
- retval : True or False
동영상 저장하기(Python)
cv2.VideoWriter.write(image=one)
- image : 저장할 프레임(numpy.ndarray)
import sys
import cv2
cap = cv2.VideoCapture(0)
if not cap.isOpened():
print("Camera open Failed!")
sys.exit()
w = round(cap.get(cv2.CAP_PROP_FRAME_WIDTH))
h = round(cap.get(cv2.CAP_PROP_FRAME_HEIGHT))
fps = cap.get(cv2.CAP_PROP_FPS)
fourcc = cv2.VideoWriter_fourcc(*"DIVX") # *'DIVX' == 'D', 'I', 'V', 'X'
delay = round(1000 / fps)
out = cv2.VideoWriter('./data/output.avi', fourcc, fps, (w, h))
if not out.isOpened():
print('File open Failed!')
cap.release()
sys.exit()
while True:
ret, frame = cap.read()
if not ret:
break
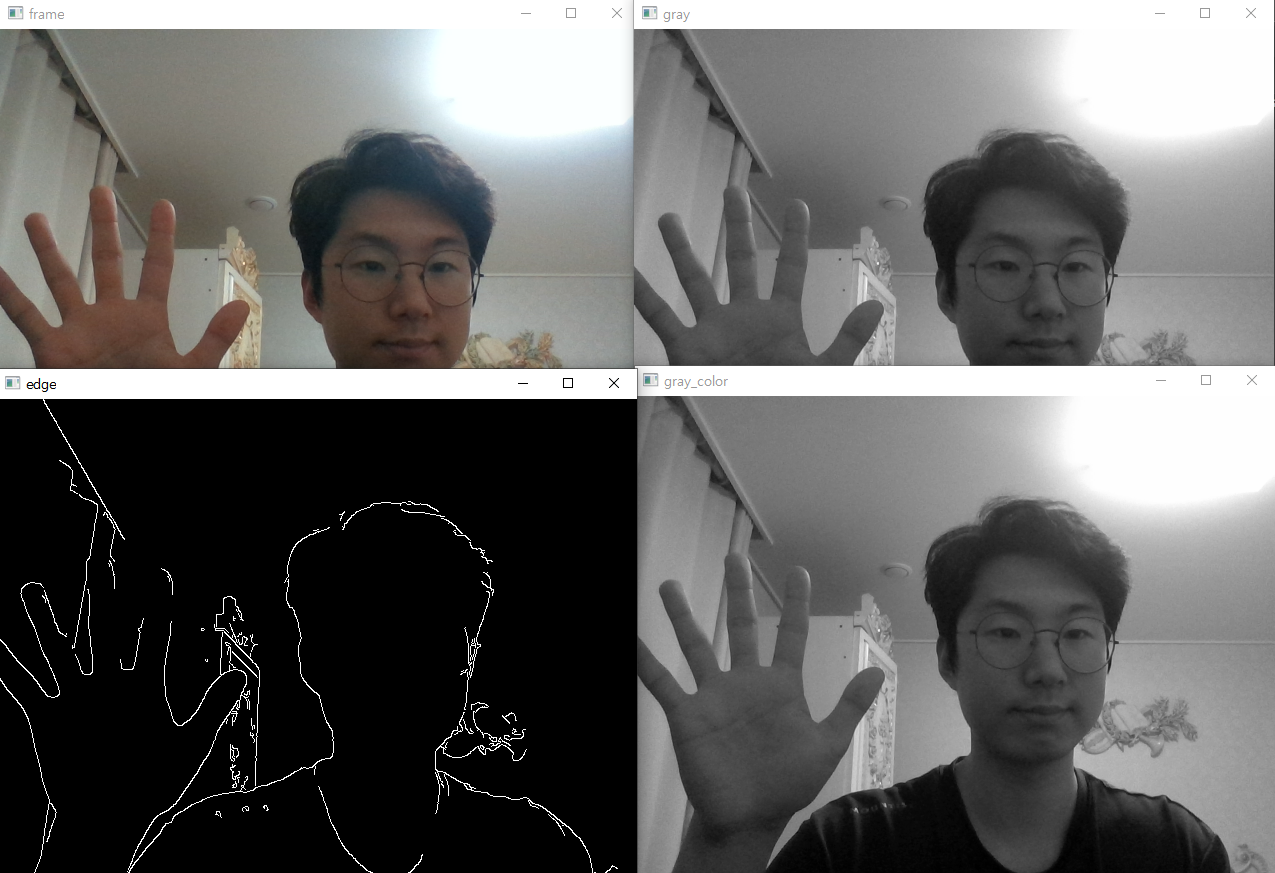
gray = cv2.cvtColor(frame, cv2.COLOR_BGR2GRAY) # 흑백
edge = cv2.Canny(gray, 100, 255) # 외곽선
gray_color = cv2.cvtColor(gray, cv2.COLOR_GRAY2BGR) # 저장을 위해 BGR로 변환
out.write(gray_color) # 흑백 저장
cv2.imshow('frame', frame)
cv2.imshow('gray', gray)
cv2.imshow('gray_color', gray_color)
cv2.imshow('edge', edge)
if cv2.waitKey(delay) == 27:
break
cap.release()
out.release()
cv2.destroyAllWindows()