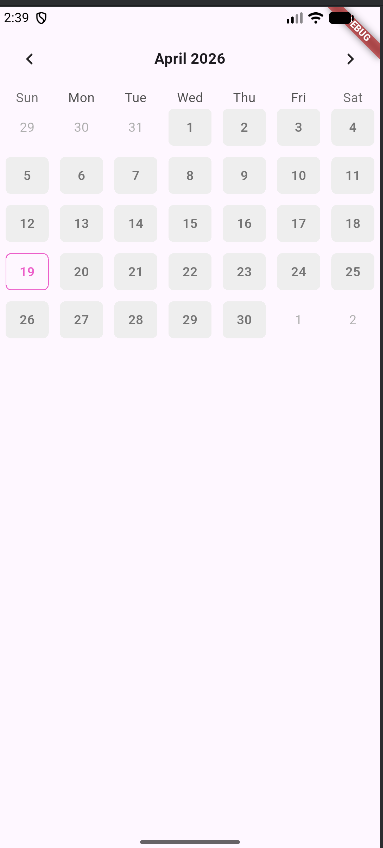
오늘의 수업 주제
table_calendar플러그인을 활용하여 Flutter 캘린더 UI를 구현하고, 날짜 선택·포커스·스타일링 기능을 적용하는 방법
에 대해 알아보겠습니다
코드 분석
main.dart
import 'package:flutter/material.dart';
import 'package:calendar_scheduler/screen/home_screen.dart';

void main() {
  runApp(
    MaterialApp(
      home: HomeScreen(),
    )
  );
}| 코드 | 역할 | 비고 |
|---|---|---|
void main() | 앱의 진입점(Entry Point) | Dart 프로그램은 반드시 main()에서 시작 |
runApp() | Flutter 앱 실행 시작 | 전달받은 위젯을 루트 위젯으로 등록 |
MaterialApp() | Material 디자인 기반 앱 설정 위젯 | 테마, 라우팅, 네비게이션 등 앱 전반 설정 담당 |
home: HomeScreen() | 앱 시작 시 처음 보여줄 화면 지정 | 앱을 켜면 제일 먼저 HomeScreen이 렌더링됨 |
이 파일이 하는 일: 앱의 시작점으로,
HomeScreen을 첫 화면으로 하는 Flutter 앱을 실행한다.
const/colors.dart
import 'package:flutter/material.dart';
const PRIMARY_COLOR = Color(0xFFEC5FC9);
final LIGHT_GREY_COLOR = Colors.grey[200]!;
final DARK_GREY_COLOR = Colors.grey[600]!;
final TEXT_FIELD_FILL_COLOR = Colors.grey[300]!;| 코드 | 역할 | 비고 |
|---|---|---|
import 'package:flutter/material.dart' | Flutter의 Material 디자인 라이브러리 불러오기 | Color, Colors 클래스를 쓰기 위해 필요 |
const PRIMARY_COLOR | 컴파일 타임에 고정되는 상수 선언 | 변경 불가, 앱 전체에서 동일한 값 보장 |
Color(0xFFEC5FC9) | 16진수 코드로 색상 직접 지정 | |
final LIGHT_GREY_COLOR | 런타임에 한 번만 할당되는 변수 | Colors.grey[200]은 런타임에 결정되므로 const 불가 |
Colors.grey[200] | Material 색상 팔레트에서 회색 200번 선택 | 숫자가 낮을수록 밝은 회색, 높을수록 어두운 회색 |
! (null assertion) | null이 아님을 강제로 보장 | Colors.grey[200]의 반환 타입이 Color?라 ! 없으면 컴파일 에러 |
TEXT_FIELD_FILL_COLOR | 텍스트 입력 필드 배경색 | 이번 코드에서 선언만 되고 아직 사용되지 않음 |
이 파일이 하는 일: 앱 전체에서 반복 사용되는 색상값을 한 곳에 모아 관리한다. 나중에 색상을 바꿀 때 이 파일 하나만 수정하면 앱 전체에 반영된다.
screen/home_screen.dart
import 'package:flutter/material.dart';
import 'package:calendar_scheduler/component/main_calender.dart';

class HomeScreen extends StatefulWidget {
  const HomeScreen({Key? key}) : super(key: key);

  @override
  State<HomeScreen> createState() => _HomeScreenState();
}

class _HomeScreenState extends State<HomeScreen> {
  DateTime selectedDate = DateTime.utc(
    DateTime.now().year,
    DateTime.now().month,
    DateTime.now().day,
  );

  @override
  Widget build(BuildContext context) {
    return Scaffold(
      body: SafeArea(
        child: Column(
          children: [
            MainCalender(
              selectedDate: selectedDate,
              onDaySelected: onDaySelected,
            ),
          ],
        ),
      ),
    );
  }

  void onDaySelected(DateTime selectedDate, DateTime focusedDate) {
    setState(() {
      this.selectedDate = selectedDate;
    });
  }
}
① 클래스 선언부
class HomeScreen extends StatefulWidget {
const HomeScreen({Key? key}) : super(key: key);
State<HomeScreen> createState() => _HomeScreenState();
}| 코드 | 역할 | 비고 |
|---|---|---|
extends StatefulWidget | 상태를 가질 수 있는 위젯으로 선언 | 날짜 선택처럼 화면이 바뀌어야 할 때 사용 |
const HomeScreen({Key? key}) | 위젯 생성자 선언 | Key?는 Flutter가 위젯 트리에서 위젯을 구분할 때 사용하는 식별자 |
: super(key: key) | 부모 클래스(StatefulWidget) 생성자에 key 전달 | 상속 구조에서 부모 초기화를 위해 필수 |
@override | 부모 클래스의 메서드를 재정의함을 명시 | 없어도 동작하지만 명시하는 게 좋은 습관 |
createState() | 이 위젯과 연결될 State 객체 생성 | StatefulWidget은 반드시 createState()를 구현해야 함 |
_HomeScreenState | 앞에 _가 붙으면 이 파일 내에서만 접근 가능 | Dart에서 _는 private을 의미 |
② State 클래스 — 상태 선언
class _HomeScreenState extends State<HomeScreen> {
  DateTime selectedDate = DateTime.utc(
    DateTime.now().year,
    DateTime.now().month,
    DateTime.now().day,
);| 코드 | 역할 | 비고 |
|---|---|---|
extends State<HomeScreen> | HomeScreen의 상태를 관리하는 클래스 | <HomeScreen>으로 어떤 위젯의 State인지 타입 지정 |
DateTime selectedDate | 현재 선택된 날짜를 저장하는 상태 변수 | 이 값이 바뀌면 setState()로 화면을 다시 그림 |
DateTime.utc(...) | UTC 기준 날짜 객체 생성 | DateTime.now()와 달리 시간대 영향을 받지 않음 |
DateTime.now().year | 현재 연도 추출 | 초기값을 오늘 날짜로 세팅하기 위해 연·월·일을 각각 분리 |
왜
DateTime.now()대신DateTime.utc()를 쓸까?
table_calendar는 날짜 비교 시 UTC 기준을 사용하기 때문에,DateTime.now()(로컬 시간)와 비교하면 시간대 차이로 날짜가 틀릴 수 있음
③ State 클래스 — build 메서드
Widget build(BuildContext context) {
return Scaffold(
body: SafeArea(
child: Column(
children: [
MainCalender(
selectedDate: selectedDate,
onDaySelected: onDaySelected,
),
],
),
),
);
}| 코드 | 역할 | 비고 |
|---|---|---|
Widget build(BuildContext context) | 화면에 그릴 위젯 트리를 반환 | 상태가 바뀔 때마다 이 메서드가 다시 호출됨 |
Scaffold | 앱 화면의 기본 뼈대 제공 | AppBar, body, FloatingActionButton 등의 슬롯을 가짐 |
SafeArea | 노치·상태바 등 시스템 UI를 피해 안전 영역에만 렌더링 | 아이폰 노치나 안드로이드 상태바에 가려지는 것 방지 |
Column | 자식 위젯들을 세로로 배치 | 나중에 캘린더 아래 일정 목록 등을 추가할 수 있는 구조 |
selectedDate: selectedDate | 현재 선택된 날짜를 MainCalender에 전달 | 부모 → 자식으로 데이터를 내려주는 Props 패턴 |
onDaySelected: onDaySelected | 날짜 선택 이벤트 핸들러를 MainCalender에 전달 | 자식에서 발생한 이벤트를 부모가 처리하는 콜백 패턴 |
④ State 클래스 — onDaySelected 메서드
void onDaySelected(DateTime selectedDate, DateTime focusedDate) {
  setState(() {
    this.selectedDate = selectedDate;
  });
}| 코드 | 역할 | 비고 |
|---|---|---|
void onDaySelected(...) | 날짜가 선택됐을 때 실행할 함수 | MainCalender의 onDaySelected 콜백으로 전달됨 |
DateTime selectedDate (파라미터) | 사용자가 실제로 탭한 날짜 | |
DateTime focusedDate (파라미터) | 현재 포커스된 날짜 (화면에 보이는 달 기준) | 이 코드에서는 받기만 하고 사용하지 않음 |
setState(() { ... }) | 상태 변경 후 화면 리빌드 요청 | setState 없이 값만 바꾸면 화면이 갱신되지 않음 |
this.selectedDate | 클래스 필드의 selectedDate를 명시적으로 지칭 | 파라미터명과 필드명이 같아서 this.로 구분 |
이 파일이 하는 일: 선택된 날짜를 상태로 관리하고, 날짜가 바뀔 때마다 캘린더를 다시 그리는 화면 전체의 상태 관리 허브 역할을 한다.
component/main_calender.dart
import 'package:flutter/material.dart';
import 'package:table_calendar/table_calendar.dart';
import 'package:calendar_scheduler/const/colors.dart';
class MainCalender extends StatelessWidget {
final OnDaySelected onDaySelected; //날짜 선택 시 실행
final DateTime selectedDate; //선택된 날짜
MainCalender({
required this.onDaySelected,
required this.selectedDate,
});
Widget build(BuildContext context) {
return TableCalendar(
onDaySelected: onDaySelected,
selectedDayPredicate: (data) =>
data.year == selectedDate.year &&
data.month == selectedDate.month &&
data.day == selectedDate.day ,
firstDay: DateTime(1800,1,1), //첫째날
lastDay: DateTime(3000,1,1), //마지막날
focusedDay: DateTime.now(), //화면에 보여지는 날
headerStyle: HeaderStyle(
titleCentered: true,
formatButtonVisible: false,
titleTextStyle: TextStyle(
fontWeight: FontWeight.w700,
fontSize: 16.0
)
),
calendarStyle: CalendarStyle(
isTodayHighlighted: false,
defaultDecoration: BoxDecoration(
borderRadius: BorderRadius.circular(6.0),
color: LIGHT_GREY_COLOR,
),
weekendDecoration: BoxDecoration(
borderRadius: BorderRadius.circular(6.0),
color: LIGHT_GREY_COLOR,
),
selectedDecoration: BoxDecoration(
borderRadius: BorderRadius.circular(6.0),
border: Border.all(
color: PRIMARY_COLOR,
width: 1.0,
)
),
defaultTextStyle: TextStyle(
fontWeight: FontWeight.w600,
color: DARK_GREY_COLOR,
),
weekendTextStyle: TextStyle(
fontWeight: FontWeight.w600,
color: DARK_GREY_COLOR,
),
selectedTextStyle: TextStyle(
fontWeight: FontWeight.w600,
color: PRIMARY_COLOR,
),
),
);
}
}① 클래스 선언 및 생성자
class MainCalender extends StatelessWidget {
  final OnDaySelected onDaySelected;
  final DateTime selectedDate;

  MainCalender({
    required this.onDaySelected,
    required this.selectedDate,
});| 코드 | 역할 | 비고 |
|---|---|---|
extends StatelessWidget | 자체 상태가 없는 위젯으로 선언 | 상태는 부모인 HomeScreen이 관리 |
final OnDaySelected onDaySelected | 날짜 선택 콜백 함수를 외부에서 주입받음 | OnDaySelected는 table_calendar가 제공하는 타입 |
final DateTime selectedDate | 현재 선택된 날짜를 외부에서 주입받음 | final이라 한 번 할당되면 변경 불가 |
required this.onDaySelected | 생성자 호출 시 반드시 전달해야 하는 파라미터 | required 없으면 null 가능성이 생겨 안전하지 않음 |
② TableCalendar 기본 설정
TableCalendar(
  firstDay: DateTime(1800,1,1),
  lastDay: DateTime(3000,1,1),
  focusedDay: DateTime.now(),
  onDaySelected: onDaySelected,
  selectedDayPredicate: (data) =>
    data.year == selectedDate.year &&
    data.month == selectedDate.month &&
data.day == selectedDate.day,| 코드 | 역할 | 비고 |
|---|---|---|
firstDay: DateTime(1800,1,1) | 달력에서 이동 가능한 가장 첫 날짜 | 이 날짜 이전으로 넘어갈 수 없음 |
lastDay: DateTime(3000,1,1) | 달력에서 이동 가능한 가장 마지막 날짜 | 사실상 제한 없이 설정한 것 |
focusedDay: DateTime.now() | 앱 실행 시 처음으로 보여줄 달 | 오늘이 속한 달이 기본으로 표시됨 |
onDaySelected: onDaySelected | 날짜 탭 시 실행할 함수 연결 | 부모에서 전달받은 콜백을 그대로 연결 |
selectedDayPredicate: (data) => ... | 각 날짜 셀이 "선택됨" 상태인지 판별하는 함수 | 달력의 모든 날짜에 대해 이 함수가 실행됨 |
data.year == selectedDate.year && ... | 연·월·일을 모두 비교 | data == selectedDate로 쓰면 시간(시·분·초)까지 비교해서 불일치 발생 가능 |
③ HeaderStyle — 달력 상단 헤더
headerStyle: HeaderStyle(
  titleCentered: true,
  formatButtonVisible: false,
  titleTextStyle: TextStyle(
    fontWeight: FontWeight.w700,
    fontSize: 16.0,
  ),
),| 코드 | 역할 | 비고 |
|---|---|---|
titleCentered: true | "2024년 1월"과 같은 헤더 타이틀을 가운데 정렬 | 기본값은 좌측 정렬 |
formatButtonVisible: false | "2 weeks" 같은 포맷 변경 버튼 숨김 | 기본값이 true라 명시적으로 꺼야 함 |
fontWeight: FontWeight.w700 | 글자 두께를 굵게 설정 | w700 = Bold. 숫자가 클수록 굵음 (w100~w900) |
fontSize: 16.0 | 글자 크기 16포인트로 설정 | double 타입이라 소수점 표기 |
④ CalendarStyle — 날짜 셀 스타일
calendarStyle: CalendarStyle(
  isTodayHighlighted: false,

  defaultDecoration: BoxDecoration(
    borderRadius: BorderRadius.circular(6.0),
    color: LIGHT_GREY_COLOR,
  ),
  weekendDecoration: BoxDecoration(
    borderRadius: BorderRadius.circular(6.0),
    color: LIGHT_GREY_COLOR,
  ),
  selectedDecoration: BoxDecoration(
    borderRadius: BorderRadius.circular(6.0),
    border: Border.all(
      color: PRIMARY_COLOR,
      width: 1.0,
    ),
  ),

  defaultTextStyle: TextStyle(
    fontWeight: FontWeight.w600,
    color: DARK_GREY_COLOR,
  ),
  weekendTextStyle: TextStyle(
    fontWeight: FontWeight.w600,
    color: DARK_GREY_COLOR,
  ),
  selectedTextStyle: TextStyle(
    fontWeight: FontWeight.w600,
    color: PRIMARY_COLOR,
  ),
),| 코드 | 역할 | 비고 |
|---|---|---|
isTodayHighlighted: false | 오늘 날짜 자동 강조 표시 끄기 | 기본값 true라 끄지 않으면 오늘 날짜에 파란 원이 생김 |
defaultDecoration | 평일 날짜 셀의 배경 스타일 | BoxDecoration으로 배경색, 테두리, 모서리 등을 지정 |
weekendDecoration | 주말(토·일) 날짜 셀의 배경 스타일 | 이 코드에선 평일과 동일하게 설정 |
selectedDecoration | 선택된 날짜 셀의 배경 스타일 | 배경색 없이 PRIMARY_COLOR 테두리만 표시 |
BorderRadius.circular(6.0) | 셀 모서리를 6px 반경으로 둥글게 | 숫자가 클수록 더 둥글어짐 |
Border.all(color: ..., width: 1.0) | 셀 전체 테두리를 1px로 그림 | selectedDecoration에만 적용해 선택된 날짜를 표시 |
defaultTextStyle | 평일 날짜 숫자의 글자 스타일 | |
weekendTextStyle | 주말 날짜 숫자의 글자 스타일 | 기본적으로 빨간색이 되는데, 여기선 평일과 동일하게 설정 |
selectedTextStyle | 선택된 날짜 숫자의 글자 스타일 | PRIMARY_COLOR(분홍색)로 강조 |
FontWeight.w600 | 글자 두께 Semi-Bold | w700(Bold)보다 살짝 얇음 |
이 파일이 하는 일:
table_calendar패키지를 받아서 날짜 범위, 선택 로직, 헤더·셀 스타일을 모두 적용한 커스텀 캘린더 컴포넌트를 만들어 화면에 렌더링한다.
pubspec.yaml
dependencies:
  flutter:
    sdk: flutter

  cupertino_icons: ^1.0.8
  table_calendar: 3.1.2
  intl: 0.19.0
  drift: 2.21.0
  drift_flutter: 0.1.0
  path_provider: 2.1.5
  path: ^1.9.0
  get_it: 8.0.2
  dio: 5.7.0
  provider: 6.1.2
  uuid: 4.5.1

  # The following adds the Cupertino Icons font to your application.
  # Use with the CupertinoIcons class for iOS style icons.

dev_dependencies:
  flutter_test:
    sdk: flutter

  # 개발할때만 사용되고, 앱을 실행할 때는 필요없는 플러그인을 여기다가 설치
  flutter_lints: ^6.0.0
  drift_dev: 2.21.0
  build_runner: 2.4.13
dependencies vs dev_dependencies 핵심 차이!
dependencies는 앱을 실행하는 사용자 기기에도 포함되고,dev_dependencies는 개발자 PC에서만 사용되고 배포 앱에는 들어가지 않음, 그래서drift_dev나build_runner처럼 코드 생성 용도의 패키지는 꼭 `dev_dependencie에 넣어야 앱 용량을 낭비하지 않아야함!
새롭게 알게 된 것
- Flutter에서 플러그인을 설치할 때
pubspec.yaml파일에 작성해야 한다. dependencies는 앱 실행 시에도 포함되어 실제 기능 구현에 필요한 패키지를 작성하는 공간이다.dev_dependencies는 개발 과정에서만 필요한 패키지를 추가하는 공간으로, 앱 실행 시에는 포함되지 않는다.- 캘린더처럼 날짜를 다룰 때는
DateTime.now()대신DateTime.utc()를 사용하여 시간 정보로 인한 오류를 방지할 수 있다는 것을 알게 되었다.
헷갈리는 부분
- DateTime.utc()를 사용하는 이유는 이해했지만, 실제 프로젝트에서 언제 now()를 쓰고 언제 utc()를 써야 하는지 상황에 따라 구분하는 것이 아직 헷갈린다.
focusedDay와selectedDate의 역할 차이가 명확하게 구분되지 않는다.selectedDayPredicate가 내부적으로 어떻게 동작하는지, 모든 날짜마다 실행되는 구조가 성능에 영향을 주지 않는지 궁금하다.
실습