Mar 30, 2021, TIL (Today I Learned) - AutoLayout, Constraints with Code
야곰 iOS 커리어 스타터 캠프 2기

Warning: 이해한 부분을 최대한 남기고 정리하려 남긴 글 입니다. 틀린 부분이 있을 수 있습니다. 이점 유의하고 읽어주시면 감사할 것 같습니다. 그리고 틀린 부분 알려주시면 바로바로 고치도록 하겠습니다.
오토레이아웃
Anatomy of a Constraint

Auto Layout Guide: Anatomy of a Constraint (apple.com)
Constraint는 위와 같은수식으로 나타낼 수 있다.
빨간색 Leading View에서 파란색 Trailing View 의 사이가 8 포인트 떨어져있다.
수식의 의미:
y = mx + C와 같은 의미
Auto Layout Attributes

Equality, Not Assignment
우리는 흔히 = 를 프로그래밍 언어에서 "왼쪽 값을 오른쪽 값에 할당한다''라고 이해한다.
하지만 iOS 에서는 이것을 "같다""라고 이해해야지 "할당"한다라고 이해하면 안됩니다..
// Setting a fixed distance between two buttons
Button_1.trailing = 1.0 * Button_2.leading - 8.0

// Aligning the leading edge of two buttons
Button_2.leading = 1.0 * Button_1.leading + 0.0

// Give two buttons the same width
Button_2.width = 1.0 * Button.width + 0.0

// Center a view in its superview
Superview.centerX = 1.0 * View.centerX + 0.0
Superview.centerY = 1.0 * View.centerY + 0.0

// Give a view a constant aspect ratio
View.width = 0.5 * View.height + 0.0
Intrinsic Content Size
텍스트와 같은 컨텐츠로 뷰의 사이즈를 정할 수 있는 것이 Intrinsic Content Size의 개념.
Label 같은 경우 자신의 텍스트 자체가 자신의 컨텐츠 사이즈이기 때문에 이를 인지하고 바로 화면에서 위치를 constraint하기 가능하다. 컨텐츠 고유 사이즈를 갖고 있기 때문에 가능한 것입니다..
반면에 그냥 일반뷰 같은 경우 자신의 교유 사이즈를 모르기 때문에 이를 지정 해 주기 전에 constraint를 사용하면 빨간 줄을 볼 수 있게 됩니다..
intrinsic content size를 지정 해 주려면
CocoaTouch 파일 생성 후 아래와 같이 클래스애 intrinsitContentSize 변수를 만들어 준 뒤 해당 View의 클래스로 지정 해 주면 이 문제를 해결 할 수 있습니다.


CRCH
Content Resistance & Content Hugging
content hugging
- 늘어나지 않으려는 힘
- huging priority가 높으면 높을 수록 해당 컨텐츠의 늘어나지 않는 힘이 강해집니다.
- 늘어나면 보기 싫은 컨텐츠가 있다. 그런 경우 hugging priority를 높게 설정하면 된다.
Compression resistance
- 외부에서 주는 힘을 버티려는 힘
- resistance priority가 높으면 높을 수록 해당 컨텐츠는 외부 힘에 의해 줄어들지 않는 힘이 강해진다.
- 왼쪽에 있는 컨텐츠가 아무리 커져도 오른쪽에 있는 컨텐츠의 resistance priority가 높을 경우 왼쪽 컨텐츠영역을 침범할 수 없다.
Constraints with Code
View: 화면의 전체 영역
Safe Area: 화면의 안전지대, [View와 다르다, View의 일부 영역]
간단하게 얘기하자면
두 물체를 비교할 때는
상단 그리고 하단 anchor간의 비교에서는:
기준이 되는 물체보다 내가 설정하고 싶은 오브젝트의 anchor가 더 위에 있을 경우 constant를 음수로, 더 밑에 있을 경우 constant를 양수로 설정하면 됩니다.
leading 그리고 trailing anchor간의 비교에서는
기준이 되는 물체보다 내가 제약을 주고 싶은 오브젝트의 anchor가 더 왼쪽에 있을 경우 constant를 음수로, 더 오른쪽에 있을 경우 constant를 양수로 설정하면 됩니다.
아래 예시를 보고 어떻게 코드를 작성하였는지 보면 더 이해하기 쉬울 것 같습니다.

NSLayoutConstraint.activate([
  	itemThumbnail.heightAnchor.constraint(greaterThanOrEqualToConstant: (contentView.bounds.height) - 10),            itemThumbnail.widthAnchor.constraint(lessThanOrEqualToConstant: (self.contentView.frame.width) / 5),
itemThumbnail.topAnchor.constraint(equalTo: self.contentView.topAnchor, constant: 5),
itemThumbnail.leadingAnchor.constraint(equalTo: self.contentView.leadingAnchor, constant: 5),
itemThumbnail.bottomAnchor.constraint(equalTo: self.contentView.bottomAnchor, constant: -5),

itemTitleLabel.topAnchor.constraint(equalTo: self.itemThumbnail.topAnchor),             itemTitleLabel.leadingAnchor.constraint(equalTo: itemThumbnail.trailingAnchor, constant: 5),         itemTitleLabel.bottomAnchor.constraint(lessThanOrEqualTo: itemPriceLabel.topAnchor, constant: -5 ),
  itemPriceLabel.topAnchor.constraint(equalTo: itemTitleLabel.bottomAnchor, constant: 5),
            itemPriceLabel.leadingAnchor.constraint(equalTo: itemThumbnail.trailingAnchor, constant: 5), 	 	  itemPriceLabel.bottomAnchor.constraint(equalTo: itemThumbnail.bottomAnchor),

            itemDiscountedPriceLabel.topAnchor.constraint(equalTo: itemPriceLabel.topAnchor),       itemDiscountedPriceLabel.leadingAnchor.constraint(equalTo: itemPriceLabel.trailingAnchor, constant: 5),          itemDiscountedPriceLabel.bottomAnchor.constraint(equalTo: self.contentView.bottomAnchor, constant: -5),         itemDiscountedPriceLabel.trailingAnchor.constraint(lessThanOrEqualTo: self.contentView.trailingAnchor, constant: -7),

itemStockLabel.topAnchor.constraint(equalTo: itemTitleLabel.topAnchor),           itemStockLabel.trailingAnchor.constraint(equalTo: self.contentView.trailingAnchor, constant: -5),          itemStockLabel.leadingAnchor.constraint(equalTo: itemTitleLabel.trailingAnchor, constant: 5),
itemStockLabel.bottomAnchor.constraint(equalTo: itemTitleLabel.bottomAnchor)
        ])
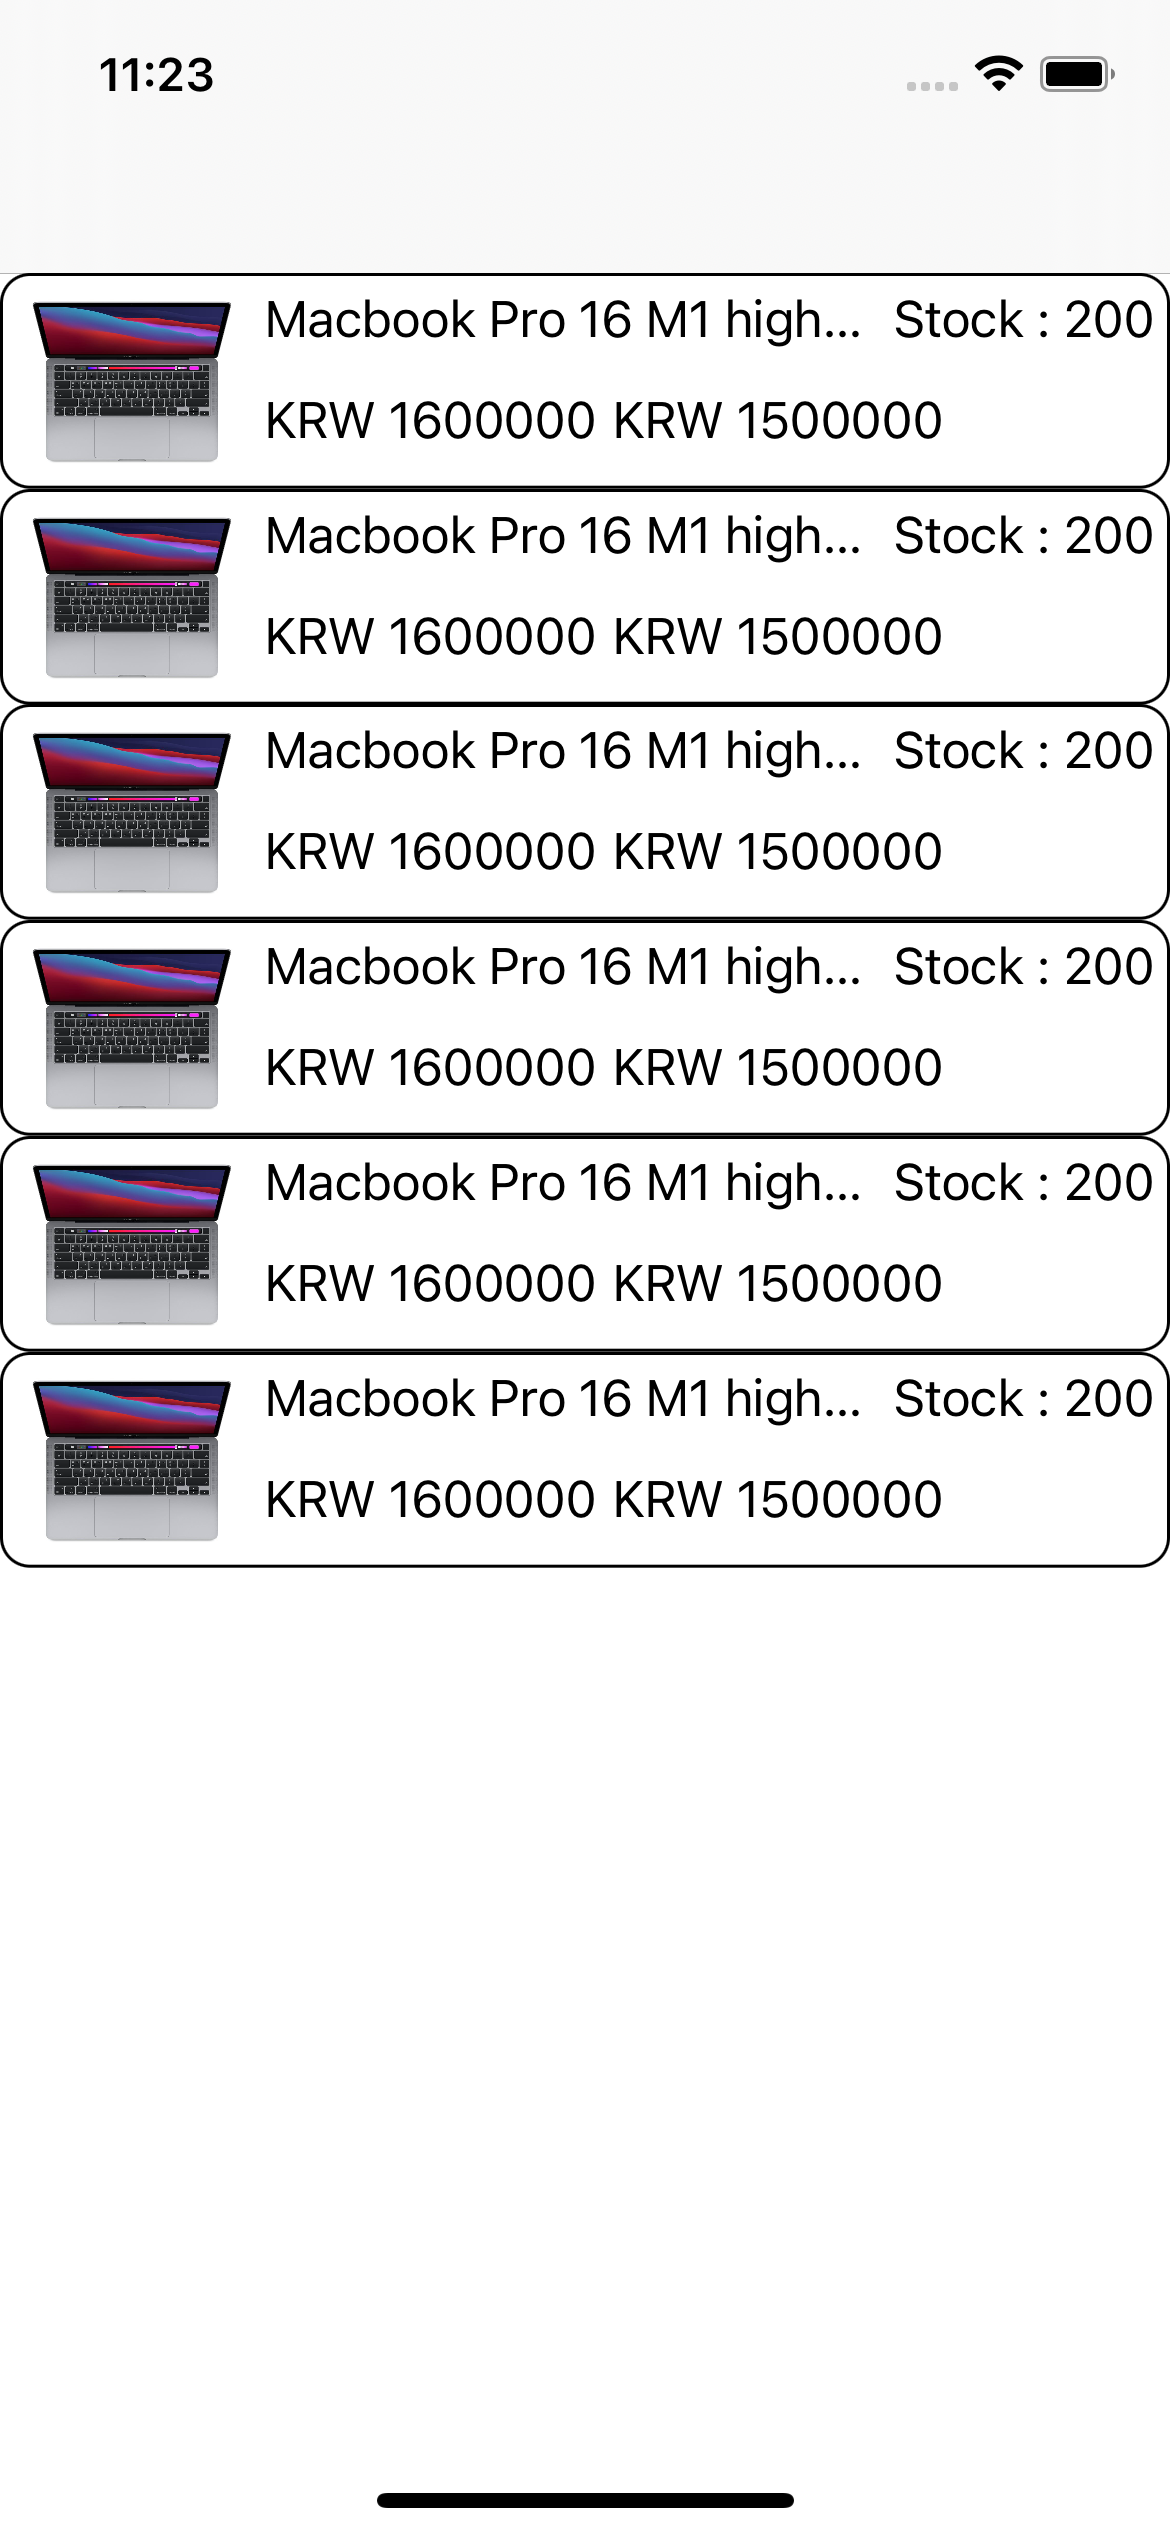
위에 보이는맥북프로가 바로바로 itemThumbnail 입니다.
저는 이 썸네일 사진을 cell의 위쪽 anchor, 좌측 anchor, 그리고 bottomAnchor와 5씩 차이나도록 제약을 주고 싶었습니다.
먼저 thumbnail의 topAnchor를 cell의 contentVie의 topAnchor 보다 5 차이나도록 설정하였습니다.
itemThumbnail.topAnchor.constraint(equalTo: self.contentView.topAnchor, constant: 5),*contentView의 top Anchor 기준으로 thumbnail의 top Anchor는 5 아래 있기 때문에 constant를 5 준 것이죠.
그리고 마찬가지로 thumbnail의 좌측 anchor를 contentView의 leading anchor 보다 5 차이나도록 설정하였습니다.
itemThumbnail.leadingAnchor.constraint(equalTo: self.contentView.leadingAnchor, constant: 5),썸네일의 좌측 anchor가 cell의 좌측 anchor 보다 더 오른쪽이기 때문이죠.
그런데 썸네일의 하단 anchor와 contentView의 anchor를 비교해봤을 때
썸네일의 하단 부분이 cell의 하단 부분보다 더 위에 있습니다.
이럴경우 위에 설명했다시피 기준이 되는 contentView(cell)의 bottom anchor보다 thumbnail의 bottom anchor가 더 위에 있습니다.
그렇기 때문에 constant를 5가 아닌 -5로 지정해 줘야 합니다.
itemThumbnail.bottomAnchor.constraint(equalTo: self.contentView.bottomAnchor, constant: -5),이렇게요.
constraint 정말 헷갈립니다만 나머지 코드도 천천히 읽어보시면 조금 더 감이 오실 것 같습니다.
CompressionResistancePriority

위 cell을 자세히 보시면 맥북의 이름이 길어질 경우 ...으로 대체되는 것을 확인할 수 있습니다. 이것도 의도한 거에요. compressionResistancePriority를 활용해서요!
항상 아이템을 지칭하는 이름이 짧으면 얼마나 좋을까요. 하지만 우리의 이름길이가 다 다르듯이 상품의 이름 길이도 제각각이에요. 그런데 저희에게는 한정된 공간만 허락 되죠. 그래서 해당 priority를 요긴하게 사용하면 좋습니다.
CompressionResistancePriority란?
위에도 content resistance를 잠깐 설명했습니다만 조금 더 살펴봅시다. 공식문서를 살펴보면 이 CompressionResistancePriority를 설정하면 고유한 설정보다 작아지기를 저항하는 제약을 줄 수 있는 것 같습니다.
Sets the priority with which a view resists being made smaller than its intrinsic size.
쉽게 말해서 작아지기를 거부할 수 있는 힘의 역량을 저희가 설정할 수 있는 것이죠.
저는 타이틀의 속성에 아래와 같은 설정을 주었습니다.
private lazy var itemTitleLabel: UILabel = {
 label.setContentCompressionResistancePriority(.defaultLow, for: .horizontal)
}
즉 label의 길이가 엄청 길어지더라도 옆에 있는 다른 친구들의 "고유한 설정보다 작아지기를 저항하는 힘" 보다 더 약해지기 때문에 제약조건 속에서 다른 오브젝트들의 영역을 침범하지 못하는 것이죠.
만약 설정을 .defaultHigh 로 한다면?

네 옆에있는 썸네일과 썸네일 label을 다 밀쳐내 버렸어요.
꼭 이런 상황이 아니더라도 어떤 물체가 어떤 순간에도 찌그러지지 않으면 안돼 라고 생각하는 오브젝트에게 setContentCompressionResistancePriority 를 high 로 설정할 때도 유용하게 사용할 수 있습니다.!
