Linux 커널 2.2 까지는
ipchains이라는 패킷 필터링/방화벽 프레임워크가 구현되어 있었고 2.4부터는 더 유연하고 다양한 기능을 가진netfilter로 프레임워크가 교체됨
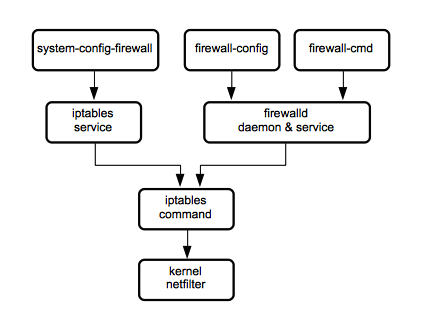
iptables는netfilter프레임워크의 최상단 위치하는 사용자 레벨의 프로그램으로 시스템 관리자가iptables명령어로 리눅스 서버나 패킬을 필터링함
그러나
iptables는 설정방법이 어렵고 rule(정책)적용 시 재시작을 해야하는 번거로움 존재
이에filrewall-cmd(CLI),firewall-config(GUI)로 프로그램을 사용중
firewall-cmd service
- CentOS7(RHEL7)부터 선보인 패킷 필터링 방화벽 프로그램
iptables의 대체로 사용되고 있는 방화벽 프로그램iptables는 설정 및 변경 후 재시작해야 하지만,firewalld는 동적 반영 및 재시작 필요 없음
(iptables는 service를 재시작해야함 /firewalld는--reload옵션으로 재시작 가능)
Network Zone
- 네트워크 구성의 zone(영역)을 의미하며, 해당 호스트 서버가 실제 어떤 영역에 있는지에 따라
firewalld를 설정을 논리적으로 zone 설정 가능
pre-defined Zone
| zone이름 | 설명 |
|---|---|
| drop | iptables에서 사용하던 Drop과 동일하며 들어오는 모든 패킷은 버려지고 이에대한 응답 메시지도 보내지 않으며 외부로 나가는 연결만 허용 |
| block | Drop 존처럼 들어오는 모든 네트워크 연결은 거부된다. 다만 icmp-host-prohibited와 icmp6-prohibited라는 응답 메시지를 보낸다. 시스템 내부에서 시작된 연결은 허용 |
| public | 서비스를 제공하는 특별한 포트로의 연결만 허용하고, 그 외 포트로의 연결은 모두 거부, 기본 Zone으로 사용 |
| external | 특별히 매스커레이딩 규칙이 적용되는 외부의 라우터를 위해 사용되며, 내부로의 연결 요청 중 선택된 연결만을 허용(내부로 들어오는 패킷을 SSH만 제외하고 거부, 외부는 모두 허용) |
| dmz | 내부 네트워크로의 접근은 제한적으로 허용되지만, 공개된 네트워크에 대한 접근을 허용하는 경우에 사용된다. 선택된 연결만이 허용 |
| work | 같은 회사에 위치한 네트워크를 위해 사용되며, 대부분 같은 네트워크에 위치한 다른 시스템을 신뢰하고 오직 선택된 연결만을 허용 |
| home | 홈 영역을 위해 사용되며, 네트워크에 존재하는 다른 시스템을 신뢰하고 오직 선택된 연결만을 접속 허용 |
| internal | 내부 네트워크를 위해 사용되고, 선택된 연결만을 허용 |
| trusted | 모든 네트워크 접속 연결을 허용하는 경우 사용 |
firewall-cmd 명령어 옵션
--state: firewalld 실행 상태 확인--get-default-zone: 현재 기본 영역 표시--set-default-zone [zone]: 기본 영역 설정--get-zones: 사용가능한 모든 영역 나열--get-services: 사용가능한 모든 서비스 나열--get-active-zones: 현재 사용중인 모든 영역과 인터페이스 및 소스정보 나열--add-source=[ip주소] --zone=[zone]: 출발지 주소 규칙 추가
=> '--zone' 옵션을 통해 zone 지정해주지 않으면 자동으로 기본영역에 추가--remove-source=[ip주소]: IP 주소를 지정된 영역에서 제거--add-interface=[ifname] --zone=[zone]: 특정 영역에 interface 연결 추가--change-interface=[ifname] --zone=[zone]: 영역에 연결된 interface 변경--list-all --zone=[zone]: 영역에 구성된 모든 인터페이스, 소스, 서비스, 포트 나열--add-service=[service] --zone=[zone]: 해당 서비스 트래픽 허용--add-port=[port|protocol] --zone=[zone]: 해당 포트나 프로토콜 트래픽 허용--permanent: 현재 설정을 서비스가 재시작되어도 반영(영구 설정), XML파일에 저장하는 옵션--reload: 런타임 구성 삭제, 영구 구성 적용--runtime-to-permanent: 실행중 설정을 영구 설정으로 변경
firewall-cmd 명령어 예제
방화벽 서비스 가동 및 확인
# systemctl start firewalld.service
# systemctl status firewalld.service
방화벽 서비스 정지
# systemctl stop firewalld.service방화벽 서비스 자동가동 설정 및 상태 확인
- 서버 재시작 시, 방화벽 서비스가 systemctl에 등록되어 있는지 확인 하는 명령어
# systemctl enable firewalld.service
# systemctl is-enabled firewalld.service
enabled
방화벽 상태 확인
# firewall-cmd --state
running
방화벽 Zone
방화벽 Zone 확인
- 현재 활성화 및 운영 중인 zone들을 확인하는 명령어
- zone과 interface도 확인 가능
# firewall-cmd --get-active-zones
public
interfaces eno1 eno2- public zone에 interface eno1과 eno2가 할당 되어 있음
default 설정된 zone 확인
# firewall-cmd --get-default-zone
public- 보통의 경우 public zone이 default로 초기 설정 되어 있음
default zone의 방화벽 설정 정책 확인
- 현재 설정 확인
# firewall-cmd --list-all
public (active)
  target: default
  icmp-block-inversion: no
  interfaces: eno1
  sources:
  services: dhcpv6-client http https ssh
  ports: 80/tcp 443/tcp
  protocols:
  masquerade: no
  forward-ports:
  source-ports:
  icmp-blocks:
rich rules:- 영구 설정 확인
# firewall-cmd --list-all --permanent
public (active)
  target: default
  icmp-block-inversion: no
  interfaces: eno1
  sources:
  services: dhcpv6-client http https ssh
  ports: 80/tcp 443/tcp
  protocols:
  masquerade: no
  forward-ports:
  source-ports:
  icmp-blocks:
  rich rules:
지정 zone의 방화벽 설정 정책 확인
# firewall-cmd --list-all --zone=home
home
  target: default
  icmp-block-inversion: no
  interfaces:
  sources:
  services: dhcpv6-client mdns samba-client ssh
  ports:
  protocols:
  masquerade: no
  forward-ports:
  source-ports:
  icmp-blocks:
  rich rules:
모든 zone의 방화벽 설정 정책 확인
# firewall-cmd --list-all-zonesblock
target: %%REJECT%%
icmp-block-inversion: no
interfaces:
sources:
services:
ports:
protocols:
masquerade: no
forward-ports:
source-ports:
icmp-blocks:
rich rules:
dmz
target: default
icmp-block-inversion: no
interfaces:
sources:
services: ssh
ports:
protocols:
masquerade: no
forward-ports:
source-ports:
icmp-blocks:
rich rules:
drop
target: DROP
icmp-block-inversion: no
interfaces:
sources:
services:
ports:
protocols:
masquerade: no
forward-ports:
source-ports:
icmp-blocks:
rich rules:
external
target: default
icmp-block-inversion: no
interfaces:
sources:
services: ssh
ports:
protocols:
masquerade: yes
forward-ports:
source-ports:
icmp-blocks:
rich rules:
home
target: default
icmp-block-inversion: no
interfaces:
sources:
services: dhcpv6-client mdns samba-client ssh
ports:
protocols:
masquerade: no
forward-ports:
source-ports:
icmp-blocks:
rich rules:
internal
target: default
icmp-block-inversion: no
interfaces:
sources:
services: dhcpv6-client mdns samba-client ssh
ports:
protocols:
masquerade: no
forward-ports:
source-ports:
icmp-blocks:
rich rules:
public (active)
target: default
icmp-block-inversion: no
interfaces: eno1
sources:
services: dhcpv6-client http https mysql ssh
ports: 80/tcp 443/tcp
protocols:
masquerade: no
forward-ports:
source-ports:
icmp-blocks:
rich rules:
trusted
target: ACCEPT
icmp-block-inversion: no
interfaces:
sources:
services:
ports:
protocols:
masquerade: no
forward-ports:
source-ports:
icmp-blocks:
rich rules:
work
target: default
icmp-block-inversion: no
interfaces:
sources:
services: dhcpv6-client ssh
ports:
protocols:
masquerade: no
forward-ports:
source-ports:
icmp-blocks:
rich rules:서비스 정책
정책 등록가능한 서비스의 종류 확인
firewall-cmd에서는 기본적으로 등록 가능한 서비스들이 있다. 등록 가능한 서비스는 다음과 같다.
# firewall-cmd --get-services
RH-Satellite-6 RH-Satellite-6-capsule amanda-client amanda-k5-client amqp amqps
apcupsd audit bacula bacula-client bgp bitcoin bitcoin-rpc bitcoin-testnet
bitcoin-testnet-rpc ceph ceph-mon cfengine condor-collector ctdb dhcp dhcpv6
dhcpv6-client distcc dns docker-registry docker-swarm dropbox-lansync
elasticsearch etcd-client etcd-server finger freeipa-ldap freeipa-ldaps
freeipa-replication freeipa-trust ftp ganglia-client ganglia-master git gre
high-availability http https imap imaps ipp ipp-client ipsec irc ircs
iscsi-target isns jenkins kadmin kerberos kibana klogin kpasswd kprop kshell
ldap ldaps libvirt libvirt-tls lightning-network llmnr managesieve matrix mdns
minidlna mongodb mosh mountd mqtt mqtt-tls ms-wbt mssql murmur mysql nfs nfs3
nmea-0183 nrpe ntp nut openvpn ovirt-imageio ovirt-storageconsole
ovirt-vmconsole plex pmcd pmproxy pmwebapi pmwebapis pop3 pop3s postgresql
privoxy proxy-dhcp ptp pulseaudio puppetmaster quassel radius redis rpc-bind
rsh rsyncd rtsp salt-master samba samba-client samba-dc sane sip sips slp smtp
smtp-submission smtps snmp snmptrap spideroak-lansync squid ssh steam-streaming
svdrp svn syncthing syncthing-gui synergy syslog syslog-tls telnet tftp
tftp-client tinc tor-socks transmission-client upnp-client vdsm vnc-server
wbem-http wbem-https wsman wsmans xdmcp xmpp-bosh xmpp-client xmpp-local
xmpp-server zabbix-agent zabbix-server
현재 추가된 서비스의 정책 확인
- zone 옵션 없을 시에는 default zone으로 확인
# firewall-cmd --list-services- 지정 zone의 현재 서비스 확인
firewall-cmd --list-services --zone=home- 지정 zone의 영구 설정된 서비스 확인
firewall-cmd --list-services --zone=home --permanent서비스 정책 추가
- zone 옵션 없을 시에는 default zone에 지정 서비스 추가
# firewall-cmd --add-service=http- 지정 zone의 지정 서비스 추가
# firewall-cmd --add-service=http --zone=home- 지정 zone의 영구적으로 지정 서비스 추가
# firewall-cmd --add-service=http --zone=home --permanent- 현 설정 적용
# firewall-cmd --reload서비스 정책 삭제
- zone 옵션 없을 시에는 default zone에 지정 서비스 삭제
# firewall-cmd --remove-service=http- 지정 zone의 지정 서비스 삭제
# firewall-cmd --remove-service=http --zone=home- 지정 zone의 영구적으로 지정 서비스 삭제
# firewall-cmd --remove-service=http --zone=home --permanent- 현 설정 적용
# firewall-cmd --reload서비스포트 정책
현재 추가된 서비스포트의 정책 확인
- zone 옵션 없을 시에는 default zone으로 확인
# firewall-cmd --list-ports- 지정 zone의 현재 서비스포트 확인
firewall-cmd --list-ports --zone=home- 지정 zone의 영구 설정된 서비스포트 확인
firewall-cmd --list-ports --zone=home --permanent서비스포트 정책 추가
- 지정 zone의 영구적으로 지정 서비스포트 추가
# firewall-cmd --add-port=8080/tcp --zone=home --permanent
# firewall-cmd --add-port=10080/udp --zone=home --permanent- 현 설정 적용
# firewall-cmd --reload서비스포트 정책 삭제
- zone 옵션 없을 시에는 default zone에 지정 서비스포트 삭제
# firewall-cmd --remove-port=8080/tcp --zone=home --permanent
# firewall-cmd --remove-port=10080/udp --zone=home --permanent- 현 설정 적용
# firewall-cmd --reloadIP주소 정책
IP주소 정책 확인
# firewall-cmd --list-sources --zone=public --permanentIP주소 Source 추가
# firewall-cmd --add-source=192.168.0.0/24 --zone=public --permanent
# firewall-cmd --reload
IP주소 drop 등록
- drop zone에 등록되는 IP주소는 트래픽 요청이 거부된다
# firewall-cmd --add-source=192.168.11.0/24 --zone=drop --permanent
# firewall-cmd --reload
등록된 IP주소 drop zone으로 변경
# firewall-cmd --change-source=192.169.11.0/24 --zone=drop --permanent지정 IP주소가 어느 zone에 할당되어 있는지 확인
# firewall-cmd --get-zone-of-source=192.168.11.0/24IP주소 정책 zone에서 삭제
firewall-cmd --remove-source=192.168.11.0/24 --zone=drop --permanentZone 변경
Active Zone의 변경
# firewall-cmd --zome=home --change-interface=eno3 --permanent
# firewall-cmd --reload
default zone 변경
# firewall-cmd --set-default-zone=homeCustom Service
Custom Service 생성
# firewall-cmd --permanent --new-service pang
# cat /etc/firewalld/services/pang.xml
<?xml version="1.0" encoding="utf-8"?>
<service>
</service>- 기존 xml 파일로 작성할 경우(복사-붙이기)
firewall-cmd --permanent --new-service-from-file=[기존file.xml] --name=pang.xmlCustom Service에 설명문 추가
# firewall-cmd --permanent --service=pang --set-description=[설명문]
# firewall-cmd --permanent --service=pang --set-short=[짧은설명문]
Custom Service 방화벽 설정 추가
pang서비스에20000/tcp서비스포트 허용 추가
# firewall-cmd --permanent --service=pang --add-port=20000/tcppang서비스에60000/udp에서65000/udp서비스포트 Source포트 정책 추가
# firewall-cmd --permanent --service=pang --add-source-port=60000-65000/udppang서비스에192.168.0.1/24IP주소 Destination 정책 추가
# # firewall-cmd --permanent --service=pang --set-destination=ipv4:192.168.0.1/24- 현 설정 적용
# firewall-cmd --reloadpang Service 삭제
# firewall-cmd --permanent --delete-service=pang
# firewall-cmd --reload
dev_hwang의 hwang.log