
저번 포스팅에서 구글 STT SPI 를 사용하기 위한 사전 작업을 해보았다.
이번엔 오디오 파일을 텍스트로 변환하여 json 으로 저장해보자!
기본적으로 공식문서를 따라가면서 감을 잡았다.
https://cloud.google.com/speech-to-text/v2/docs/transcribe-client-libraries?hl=ko
우선 내가 작성한 코드는 아래와 같다.
import io

from google.cloud.speech_v2 import SpeechClient
from google.cloud.speech_v2.types import cloud_speech

import json

filename = "result.json"


def transcribe_file_v2(project_id, recognizer_id, audio_file):
    # Instantiates a client
    client = SpeechClient()

    request = cloud_speech.CreateRecognizerRequest(
        parent=f"projects/{project_id}/locations/global",
        recognizer_id=recognizer_id,
        recognizer=cloud_speech.Recognizer(
            language_codes=["en-US"], model="latest_long"
        ),
    )

    # Creates a Recognizer
    operation = client.create_recognizer(request=request)
    recognizer = operation.result()

    # Reads a file as bytes
    with io.open(audio_file, "rb") as f:
        content = f.read()

    config = cloud_speech.RecognitionConfig(auto_decoding_config={})

    request = cloud_speech.RecognizeRequest(
        recognizer=recognizer.name, config=config, content=content
    )

    # Transcribes the audio into text
    response = client.recognize(request=request)
    data = []
    for result in response.results:
        data.append(result.alternatives[0].transcript)

    with open(filename, "w") as f:
        json.dump(data, f, ensure_ascii=False, indent=4)

    f.close()
    return response


if __name__ == "__main__":
    transcribe_file_v2("practice", "ex1", "ex.wav")
공식문서의 코드와 거의 차이점이 없지만, 하나씩 설명해 보자면 우선 프로젝트ID, 송신기ID, 오디오파일 3가지 매개변수를 필요로 한다. 프로젝트ID 는 전포스팅에서 설정한 구글 클라우드 프로젝트 아이디를 입력하면 되고, 송신기는 함수 내에서 생성되기 때문에 이름만 설정해 주면 된다. 마지막으로 해당 코드와 같은 디렉토리 내에있는 오디오 파일의 이름을 입력해 주면 된다.
(wave 파일을 사용한 이유는, 무압축 파일이기 때문에 손실문제를 피하고자 사용하였다.)
Google API 에 request를 보내는 코드를 보면, 텍스트로 변환할 언어를 설정할 수 있다. language_codes를 "en-US"로, model을 "latest_long"으로 설정하여 영어 모델을 사용하도록 지정하였다.
그 후 요청의 response의 결과값을 data 변수에 저장하고, data의 내용을 json 파일에 덤핑해준다.
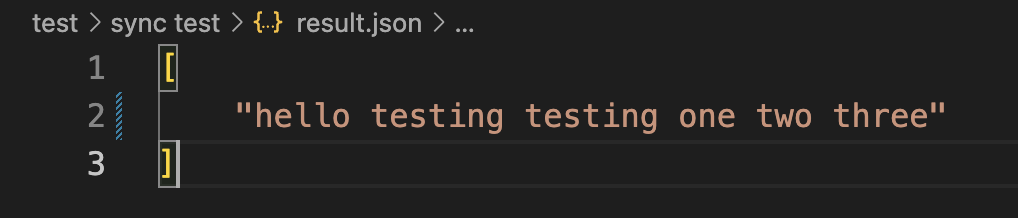
코드를 실행해보면 정상적으로 json 파일에 오디오 파일의 내용이 텍스트로 저장된 것을 확인할 수 있다!
테스트를 위해 다른 오디오파일을 찾던 도중, 그냥 마이크 인풋을 wave파일로 변환하면 좋겠다 라는 생각이 들어 그부분을 추가하였다. 마이크 인풋 -> .wav 파일 변환 -> STT json 변환 순으로 작업이 진행되도록 코드를 작성해 보았다.
오디오 변환을 위해 pyaudio 와 wave 모듈을 사용하였다.
import pyaudio
import wave


CHUNK = 1024
FORMAT = pyaudio.paInt16
CHANNELS = 1
RATE = 16000
RECORD_SECONDS = 5
WAVE_OUTPUT_FILENAME = "ex.wav"


def record():
    p = pyaudio.PyAudio()
    stream = p.open(format=FORMAT,
                    channels=CHANNELS,
                    rate=RATE,
                    input=True,
                    frames_per_buffer=CHUNK)

    print("start recording...")
    frames = []

    for i in range(0, int(RATE / CHUNK * RECORD_SECONDS)):
        data = stream.read(CHUNK)
        frames.append(data)

    print("recording is done.")

    stream.stop_stream()
    stream.close()
    p.terminate()

    wf = wave.open(WAVE_OUTPUT_FILENAME, "wb")
    wf.setnchannels(CHANNELS)
    wf.setsampwidth(p.get_sample_size(FORMAT))

    wf.setframerate(RATE)
    wf.writeframes(b"".join(frames))
    wf.close()
    print("file saved as " + WAVE_OUTPUT_FILENAME + "")


if __name__ == "__main__":
    record()
이후에, stt 코드와 오디오 변환 모듈을 각각 import 하여 실행해주면, 유저의 마이크 인풋이 ex.wav 파일로 디렉토리에 저장되고, 해당 파일을 사용하여 google api 에 요청을 보내 json 형태로 텍스트를 저장한다.