
해당 포스팅은 플리맨(FleaMan) 프로젝트의 광고 겸 개발일지입니다.
시간되실때 플리맨(https://fleaman.shop) 서비스 한번 사용해주시고 피드백주시면 감사하겠습니다.
뜬금없이 Monstache
뜬금없이 monstache를 소개한다. 사실 MongoDB > ElasticSeach > Monstache 순으로 소개하려고 계획하였으나, MongoDB와 ElasticSearch 관련 글은 좋은 글들이 널리고널리고널리고널렸다. 그래서 상대적으로 정보가 적은 Monstache를 소개해보려고 한다.
(프론트 포스팅하다가 갑자기 데이터 인프라를 포스팅하는 것은 Monstache가 기대이상으로 파워풀해 참기 어려웠기 때문이다!)
Monstache가 뭐야
공식문서: Monstache is a sync daemon written in Go that continously indexes your MongoDB collections into Elasticsearch.
쉽게 말해 Go로 개발된 MongoDB와 ElasticSearch 데이터 동기화 프로그램이다.
플리맨에서의 Monstache
플리맨같이 영세한 서비스에서 뭔가 거창한걸 쓴다고 생각하는 사람이 있을것이다. 그런데 영세하니까 쓰는거다. 관리해줄 사람이 없으니 관리해줄 프로그램을 잘 찾아서 써줘야한다는 것이다.
플리맨은 써본사람은 알겠지만 생각보다 많은 데이터와 검색엔진이 있다. 그래서 데이터를 입력, 갱신, 삭제하는 관리 작업은 MongoDB로 수행하고, 집계 및 검색 등의 작업은 ElasticSearch가 수행한다.
그리고 가장 중요한 MongoDB에서 관리되는 데이터를 ElasticSearch로 동기화해주는 작업은 Monstache님이 수행한다!
어떻게 쓸까
일단 MongoDB와 ElasticSearch는 이미 구축되어 있다고 가정하고 진행한다. 운영체제는 Ubuntu 20.04, amd CPU로 가정한다.
(전반적인 내용은 https://nehajirafe.medium.com/mongodb-to-elasticsearch-sync-using-monstache-cfe1177594b6 포스팅을 참고했다.)
Go 설치
Monstache 소개할때 Go로 개발됐다고 했다. 그래서 먼저 Go를 설치해줘야한다.
위 포스팅이 2019년 꺼여서 최신버전으로 설치하려고 https://go.dev/doc/install 를 참고했다.
rm -rf /usr/local/go && tar -C /usr/local -xzf go1.19.5.linux-amd64.tar.gz
export PATH=$PATH:/usr/local/go/bin
go version
Monstache 설치
https://github.com/rwynn/monstache/releases 여기에서 맘에드는 버전을 선택해서 압축풀고 경로지정해주면 된다. 아래는 위에서 소개한 포스팅에 나온 과정이다. 버전만 잘 확인하면 된다.
sudo mkdir monstache
cd monstache
sudo wget https://github.com/rwynn/monstache/releases/download/v4.15.0/monstache-eee3f26.zip
sudo unzip monstache-eee3f26.zip
export PATH=“<monstache Installation Path>:$PATH”
          Ex export PATH=/opt/monstache/build/linux-amd64:$PATH
monstache -v
위와 같이 설치하면 amd64에서는 정상적으로 설치가 되지만, arm64의 경우 운영체제 오류가 발생하면서 동작하지 않는다. 플리맨은 서버를 arm64로 쓰는데(비용 때문에..) 이때 약간 힘들었다.
Arm64에서의 Monstache 설치
먼저 https://github.com/rwynn/monstache 의 코드를 내려받는다.
git clone https://github.com/rwynn/monstache.git내려 받은 파일 중 Makefile을 수정해서 다시 컴파일시켜줄 것이다.
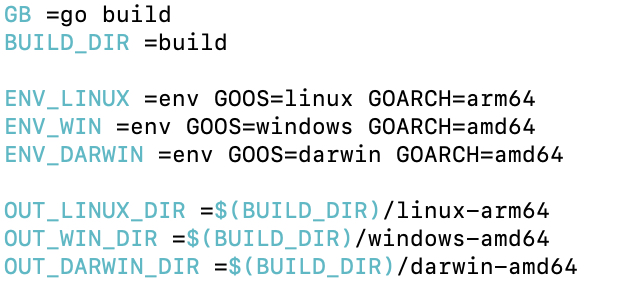
ENV_LINUX와 OUT_LINUX_DIR을 이미지처럼 수정해준다.
그리고 다시 컴파일해주면 build 폴더 안에 linux-arm64 폴더가 생겼을 것이다. 그 안에있는 monstache를 사용해주면 된다!
make본인은 이것 때문에 별걸 다해봤다. 이 포스팅을 보는 arm64 서버 사용자들은 삽질하지 말고 이대로 하면 된다.
monstache.toml
이제 연동정보를 정의하는 파일을 작성하고 실행시켜주면 끝난다. 대략 아래처럼 입력하고 실행해주면 연동이 되는데 옵션을 더 확인하고 싶으면 https://rwynn.github.io/monstache-site/config/ 에서 확인하면 된다.
# connect to MongoDB using the following URL
mongo-url = "MongoDB url"
# connect to the Elasticsearch REST API at the following node URLs
elasticsearch-urls = ["ElasticSearch Url들"]

# frequently required settings

# if you need to seed an index from a collection and not just listen and sync changes events
# you can copy entire collections or views from MongoDB to Elasticsearch
direct-read-namespaces = ["연결할 콜렉션(db.collection 형태로 입력해야 함)"]

# to listen to an entire db use only the database name.  For a deployment use an empty string.
change-stream-namespaces = ["추적할 콜렉션(db.collection 형태로 입력해야 함)"]

# compress requests to Elasticsearch
gzip = true
# generate indexing statistics
stats = true
# index statistics into Elasticsearch
index-stats = true

# use 4 go routines concurrently pushing documents to Elasticsearch
elasticsearch-max-conns = 4

# propogate dropped collections in MongoDB as index deletes in Elasticsearch
dropped-collections = true
# propogate dropped databases in MongoDB as index deletes in Elasticsearch
dropped-databases = true

# in Elasticsearch with a newer version. Elasticsearch is preventing the old docs from overwriting new ones.
replay = false
# resume processing from a timestamp saved in a previous run
resume = true
# do not validate that progress timestamps have been saved
resume-write-unsafe = false
# override the name under which resume state is saved
resume-name = "default"
# use a custom resume strategy (tokens) instead of the default strategy (timestamps)
# tokens work with MongoDB API 3.6+ while timestamps work only with MongoDB API 4.0+
resume-strategy = 1
# turn on indexing of GridFS file content
index-files = true
# turn on search result highlighting of GridFS content
file-highlighting = true
# print detailed information including request traces
verbose = true
이제 마지막으로 아래 명령어로 실행해주면 MongoDB와 ElasticSearch가 연동된다.
monstache -f monstache.toml그런데 혹시 로그 찍을 서버 용량이 부족하거나 백에서 돌리고 싶으면 아래 명령어로 실행시켜주면 된다.
nohup monstache -f monstache.toml 1> /dev/null 2>&1 &마무리
포스팅이 더 복잡해지기 전에 빨리 마무리해야겠다. 오늘 포스팅을 따라하면 누구나 쉽게 MongoDB와 ElasticSearch를 연동할 수 있을 것이다. 너무너무 편하고 좋으니 수동으로 동기화하는 사람은 얼른 설치해서 사용했으면 좋겠다.
그리고 주변에 linux arm64를 쓰면서 monstache 연동을 어려워하고 있는 사람이 있으면 얼른 소개시켜주길 바란다.
오늘 내용도 쉽게 전달한다고 했지만 조금 어려울 수 있는데, 앞으로 더 좋은 내용 쉽게 전달할 수 있도록 노력하겠다. 혹시나 궁금한 내용이 있다면 언제든 댓글 남겨주길 바란다.
포스팅을 읽고 플리맨이 궁금해졌거나, 힘을주고 싶은 사람은 https://fleaman.shop 한번씩 방문해주면 감사하겠다!