java.lang 패키지는 자바의 가장 기본이 되는 클래스들을 모아둔 패키지로, 별도로 import를 하지 않아도 자동으로 import가 되서 사용이 가능하다.
1. Object class
object class는 모든 클래스의 조상이 되는 클래스이다.
object class에는 아래와 같이 개발에 필요한 메소드들이 많이 들어 있다.
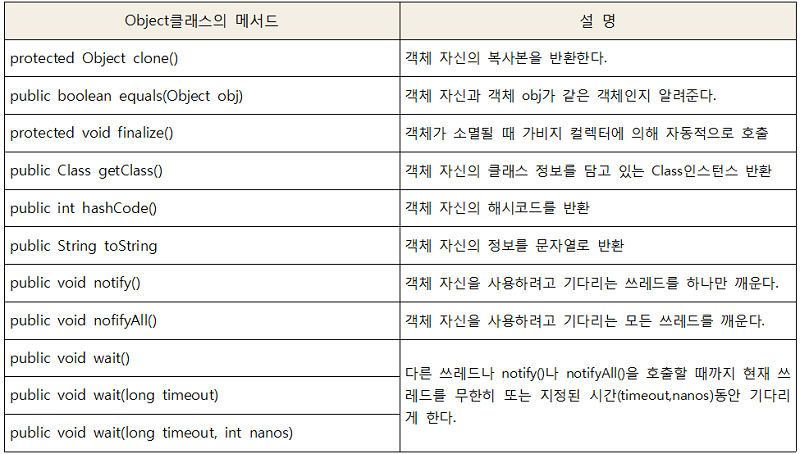
이 중에서 자주 사용하고 중요한 몇몇 클래스를 알아보도록 하자
1.1 equals(Object obj)
equals(Object obj)메소드는 참조변수를 비교해 동일 여부를 boolean값으로 반환한다.
equals(Object obj)메소드는 두 객체의 동일한지를 확인하는 메소드로, 참조변수의 동일 여부를 확인한다.
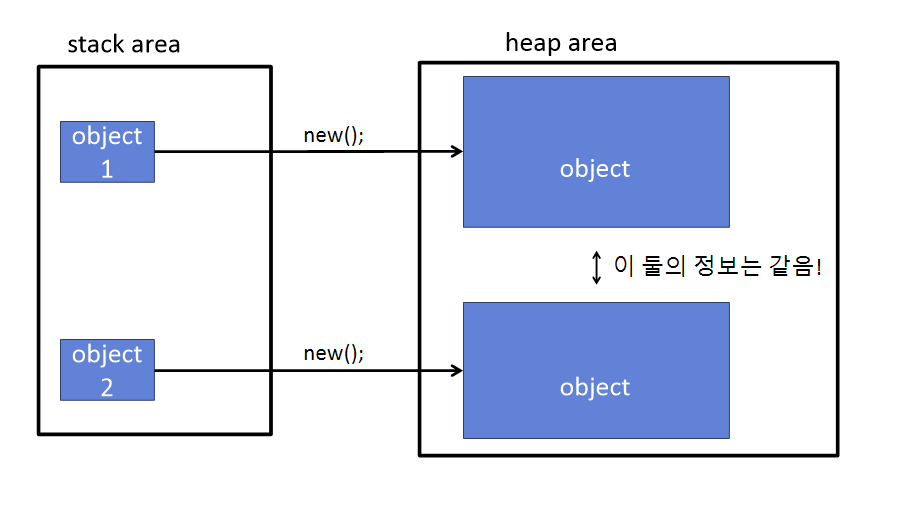
즉, 객체의 값이 전부 동일하더라도 아래와 같이 참조변수(객체의 주소값)이 다른 경우 false를 반환한다.
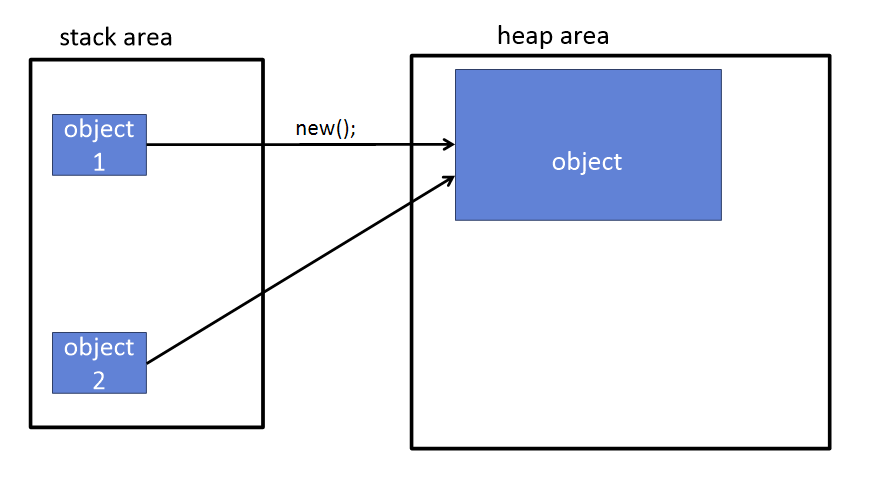
반대로 아래와 같이 참조변수가 같은 경우 true를 반환한다.
이를 코드를 통해 확인하면 다음과 같다.
Value class
public class Value {
    private int v;

    public void setV(int v){
        this.v=v;
    }

    public int getV(int v){
        return this.v;
    }
}
public class Main {
public static void main(String[] args){
Value v1= new Value();
Value v2= new Value();
v1.setV(10);
v2.setV(10);
System.out.println("v1, v2 equals: "+v1.equals(v2));
v1=v2;
System.out.println("v1, v2 equals: "+v1.equals(v2));
}
}output
v1, v2 equals: false
v1, v2 equals: true
1.2 toString()
toString()메소드는 해당 인스턴스에 대한 정보를 문자열로 변환한다.
위의 설명만 보면 객체에 toString을 사용하면 원하는 정보를 문자열로 쉽게 변환할 수 있을것 같지만 현실은 그렇지 않다. 실제로 정의된 toString을 보면 다음과 같다.
public String toString() {
    return getClass().getName() + "@" + Integer.toHexString(hashCode());
}
위 코드를 보면 클래스 이름@해쉬값 형태로 출력됨을 알 수 있다. 이때, 해쉬값은 객체마다 부여받는 고유한 번호이다. 중요한 것은 우리가 원하는 데이터를 문자열로 반환하는 것이 아니다. 즉, 정말로 우리가 원하는 데이터를 문자열로 반환하도록 하기 위해서는 아래와 같이 메소드를 오버라이딩 해야 한다.
Value class
public class Value {
    private int v;

    public void setV(int v){
        this.v=v;
    }

    public int getV(int v){
        return this.v;
    }

    @Override
    public String toString(){// toString 오버라이딩!
        return "value is " + Integer.toString(v);
    }
}
public class Main {
public static void main(String[] args){
Value v1= new Value();
v1.setV(10);
System.out.println(v1.toString());
}
}1.3 clone()
clone()메소드는 자신을 복제해 새로운 인스턴스를 생성하는 메소드이다.
clone()메소드는 인스턴스를 복제하는 메소드로, 원본 인스턴스는 보존하고 내부의 데이터만 복제해 새로운 인스턴스를 생성하는 깊은복사방식을 사용하는 메소드이기 때문에 원본의 손상 없이 복사한 인스턴스의 정보가 사용도중 손상 되더라도 원본의 영향이 없다.
clone()메소드는 원본의 데이터만 복제하기 때문에 참조타입의 인스턴스 변수가 있는 클래스는 완전히 복제하지 못한다. 따라서, 배열과 같이 인스턴스의 주소를 기반으로 접근하는 경우 clone메소드를 사용해 복제를 해야만 원본의 손상이 없이 올바르게 데이터를 복사할 수 있다.
또한, clone()메소드는 Cloneable이라는 인터페이스를 구현받은 경우에만 사용이 가능하므로, 임의로 만든 클래스를 복제하려면 아래와 같이 Cloneable인터페이스를 구현해야 한다.
Value class
public class Value implements Cloneable{
    private int v;

    public void setV(int v){
        this.v=v;
    }

    public int getV(int v){
        return this.v;
    }

    @Override
    public String toString(){
        return "value is " + Integer.toString(v);
    }

    @Override
    public Object clone() {// clone 구현
        Object obj = null;
        try {
            obj = super.clone();
        } catch (CloneNotSupportedException e) {
        }
        return obj;
    }
}
public class Main {
public static void main(String[] args){
Value v1= new Value();
Value v2;
v1.setV(10);
v2 = (Value)v1.clone();
System.out.println("v1: "+v1.toString());
System.out.println("clone: "+v2.toString());
}
}output
v1: value is 10
clone: value is 10
또한, 공변 반환 타입이라는 것을 이용해 오버라이딩시 부모 메소드의 반환타입을 자식 클래스의 반환타입으로 변경할 수 있는 것으로, 이를 이용하면 아래와 같이 수정할 수 있다.
Value class
public class Value implements Cloneable{
    private int v;

    public void setV(int v){
        this.v=v;
    }

    public int getV(int v){
        return this.v;
    }

    @Override
    public String toString(){
        return "value is " + Integer.toString(v);
    }

    @Override
    public Value clone() {// object->자식클래스
        Object obj = null;
        try {
            obj = super.clone();
        } catch (CloneNotSupportedException e) {
        }
        return (Value)obj;// 반환타입 수정
    }
}
public class Main {
public static void main(String[] args){
Value v1= new Value();
Value v2;
v1.setV(10);
v2 = v1.clone();//(Value) 없어짐(코드가 더 간결해짐)
System.out.println("v1: "+v1.toString());
System.out.println("clone: "+v2.toString());
}
}output
v1: value is 10
clone: value is 10
2. String class
우리가 지금까지 자주 사용해왔던 문자열인
Strnig은 일반적인 자료형이 아닌 클래스였다.
지금까지 자주 사용했던Strnig클래스에 대해서 자세히 알아보자.
2.1 String class 특징
- 변경 불가능한 클래스
String클래스에서는 문자열을 저장하기 위해 문자형 배열의 참조변수(char [])를 인스턴스 변수로 정의하고 있다. 또한 String클래스는 한번 문자열을 저장하면 해당 문자열을 변경할 수 없는 특징이 있다. 즉, 우리가 다음과 같이 문자열을 더하는 코드를 작성하면 내부에서는 다음과 같은 연산이 진행된다.
public class Main {
public static void main(String[] args){
String str1, str2;
str1="Hello";
str2="World";
str1= str1+ str2;
System.out.println(str1);
}
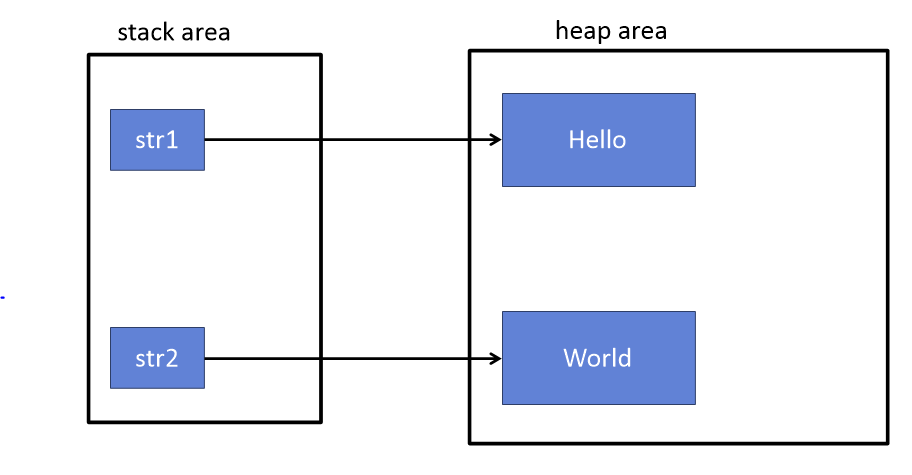
}str1= str1+ str2; 이전:
str1= str1+ str2; 이후:
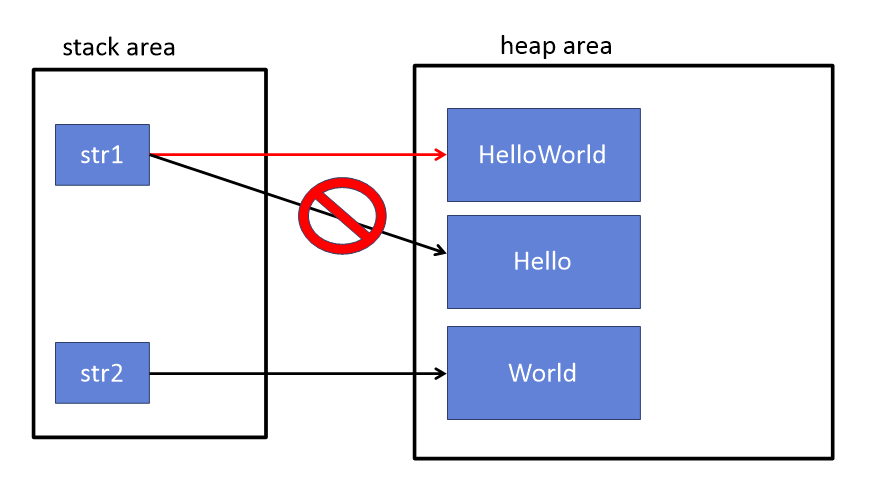
이처럼 String클래스를 사용하면 새로운 문자열을 생성하기 때문에 메모리를 많이 차지하므로 문자열의 수정이 많을 경우 StringBuffer클래스를 이용하는 것이 좋다.
- 생성방법에 따른 차이
String클래스에서 문자열을 저장할 수 있는 방법은 크게 2가지가 있다.
첫번째는 우리가 늘 사용해 왔던 것처럼 리터럴로 저장을 하는 것이다.
두번째는 아래와 같이 new()키워드를 통해 생성을 하는 것이다.
public class Main {
    public static void main(String[] args){

        String str1= "Hello";// 리터럴(첫번째 방법)
        String str2 = new String("World");// new 키워드 사용(두번째 방법)

    }
}
이 둘은 각 문자열을 저장한다는 공통점이 있으나, 저장 방식의 차이가 있다.
첫번째와 같이 리터럴로 생성한 문제는 JVM 의 heap 영역 내부의 Java Strnig Pool 이라는 공간에 저장이 된다.
반대로 두번째와 같이 new키워드를 통해 생성한 경우 아래와 같이 클래스 인스턴스를 생성한 것과 동일하게 heap 영역에 저장이 된다.
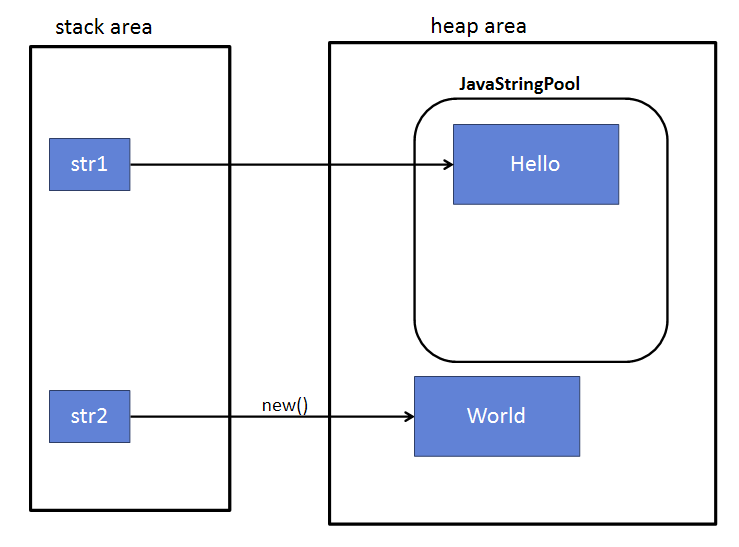
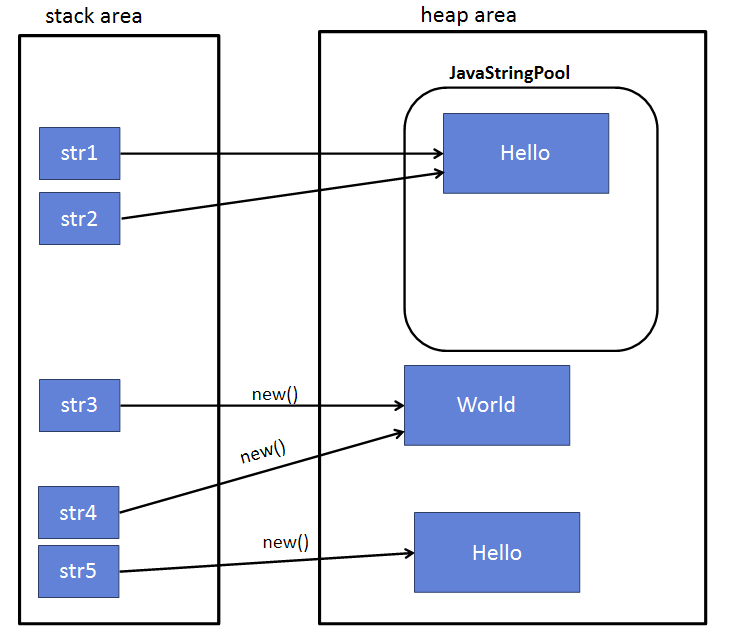
따라서, 리터럴로 문자열을 선언하면 문자열이 동일할 경우 각 변수가 달라도 같은 위치를 가리키게 된다.
또한, 같은 문자열이라고 해도 리터럴로 선언한 경우와 new키워드를 선언한 경우는 아래와 같이 다른 주소값을 갖는다.
이는 주소를 출력하는 System.identityHashCode()를 통해 쉽게 확인할 수 있다.
public class Main {
    public static void main(String[] args){

        String str1= "Hello";// 리터럴(첫번째 방법)
        String str2= "Hello";// 리터럴(첫번째 방법)

        String str3 = new String("World");// new 키워드 사용(두번째 방법)
        String str4 = new String("World");// new 키워드 사용(두번째 방법)
        String str5 = new String("Hello");// new 키워드 사용(두번째 방법)

        System.out.println("hash code:");
        System.out.println(System.identityHashCode(str1));
        System.out.println(System.identityHashCode(str2));
        System.out.println(System.identityHashCode(str3));
        System.out.println(System.identityHashCode(str4));
        System.out.println(System.identityHashCode(str5));
    }
}
output
hash code:
1537358694
1537358694
804581391
209813603
1057941451
2.2 자주 사용되는 메소드
charAt(int index)
charAt(int index)의 경우 해당 인덱스에 있는 문자를char타입으로 반환한다.(index는 0부터 시작한다.아직도 인덱스의 시작은 1부터 라고 생각한 사람은 약 먹을 시간이다.)

public class Main {
    public static void main(String[] args){

        String str = "hello world";

        System.out.println("String 0th index is: "+str.charAt(0));
    }
}
output
String 0th index is: hcompareTo(String str)
compareTo(String str)의 경우 해당 문자열과 사전 순서로 비교를 해서 같을 경우 0, 사전 순서로 이전이면 음수, 사전 순서로 이후이면 양수를 반환한다.
public class Main {
    public static void main(String[] args){

        String str1 = "abc";
        String str2 = "abc";
        String str3 = "aba";
        String str4 = "abe";

        System.out.println("Str1 compare:");
        System.out.println("str2: "+ str1.compareTo(str2));
        System.out.println("str3: "+ str1.compareTo(str3));
        System.out.println("str4: "+ str1.compareTo(str4));
    }
}
output
Str1 compare:
str2: 0
str3: 2
str4: -2
concat(String str)
concat(String str)은 두 문자열을 붙여서 반환을 한다.
public class Main {
    public static void main(String[] args){

        String str1 = "abc";
        String str2 = "def";
        String strCat;

        strCat= str1.concat(str2);
        System.out.println("str1: "+ str1);
        System.out.println("str2: "+ str2);
        System.out.println("str cat: "+ strCat);
    }
}
output
str1: abc
str2: def
str cat: abcdef
contains(String str)
contains(String str)은 해당 문자열에 지정된 문자열이 있는지 확인해서boolean타입으로 반환한다.
public class Main {
    public static void main(String[] args){

        String str1 = "abcdef";
        String str2 = "def";
        String str3 = "df";


        System.out.println(str1.contains(str2));
        System.out.println(str1.contains(str3));
    }
}
output
true
false
endsWith(String str)
endsWith(String str)은 해당 문자열이 지정된 문자열로 끝나는지 확인해boolean타입으로 반환한다.
public class Main {
    public static void main(String[] args){

        String str1 = "abcdefuck";
        String str2 = "fuck";


        System.out.println(str1.endsWith(str2));
        System.out.println(str1.endsWith("k"));
        System.out.println(str1.endsWith("c"));

    }
}
output
true
true
false
equals(Object obj)
equals(String str)는 두 객체를 비교하는 것으로, 문자열이 아니거나, 두 문자열이 같지 않을 경우false를 반환한다.
public class Main {
    public static void main(String[] args){

        String str1 = "abc";
        String str2 = new String("abc");
        String str3 = "abc";
        String str4 = "abb";

        System.out.println(str1.equals(str2));
        System.out.println(str1.equals(str3));
        System.out.println(str1.equals(str4));

    }
}
output
true
true
false
equalsIgnoreCase(String str)
equalsIgnoreCase(String str)은 문자열의대소문자 구분없이두 문자의 동일 여부를 비교해boolean타입으로 반환한다.
public class Main {
    public static void main(String[] args){

        String str1 = "abc";
        String str2 = new String("abc");
        String str3 = "abc";
        String str4 = "AbC";
        String str5 = "abcd";

        System.out.println(str1.equalsIgnoreCase(str2));
        System.out.println(str1.equalsIgnoreCase(str3));
        System.out.println(str1.equalsIgnoreCase(str4));
        System.out.println(str1.equalsIgnoreCase(str5));

    }
}
output
true
true
true
false
indexOf(char ch)
indexOf(char ch)는 해당 문자가 문자열의 몇번째 인덱스에 있는 지 반환하며, 만약 해당 문자가 문자열에 없으면 -1을 반환하다.(index는 0부터 시작한다.아직도 인덱스의 시작은 1부터 라고 생각한 사람은 다시 한번 약 먹을 시간이다.)
public class Main {
    public static void main(String[] args){

        String str1 = "abcdef";

        System.out.println(str1.indexOf('a'));
        System.out.println(str1.indexOf('h'));


    }
}
output
0
-1
또한 indexOf(String str)메소드를 사용하면 해당 문자열이 있는 위치를 반환하고, 없으면 -1을 반환한다.
lastIndexOf(char ch)
lastIndexOf(char ch)는 해당 문자가 문자열의 뒤에서 몇번째 인덱스에 있는 지 반환하며, 만약 해당 문자가 문자열에 없으면 -1을 반환하다.
public class Main {
    public static void main(String[] args){
        String str = "com.java.study";

        System.out.println(str.lastIndexOf('.'));
        System.out.println(str.lastIndexOf("java"));
    }
}
output
8
4
또한 lastIndexOf(String str)메소드를 사용하면 해당 문자열이 있는 위치를 반환하고, 없으면 -1을 반환한다.
replace(char old, char new)
replace(char old, char new)는 문자열에서old문자/문자열을new문자/문자열로 변환해서 반환한다.
public class Main {
    public static void main(String[] args){
       String str= "hello world";

       System.out.println(str.replace('h', 'H'));
       System.out.println(str.replace("hello", "HELLO"));
    }
}
output
Hello world
HELLO world
split(String regex)
rsplit(String regex)은 문자열을 나누는 것으로, 문자열regex를 기준으로 나눠 문자열 배열로 반환을 한다.
public class Main {
    public static void main(String[] args){
       String str= "com.study.java.langPackageStudy";

       String strs[] = str.split("\\.");// "."을 인식하려면 \\. 으로 해야됨!

       for(String splitString: strs){
           System.out.println(splitString);
       }
    }
}
output
com
study
java
langPackageStudy
2.3 join(), StringJoiner
join() 메소드는 앞에서 본 split()과 반대로 아래와 같이 문자열 사이에 구분자를 넣어서 결합을 하는 메소드다.
public class Main {
    public static void main(String[] args){
       String str= "com.study.java.langPackageStudy";

       System.out.println("original: ");
       System.out.println(str);

       String strs[] = str.split("\\.");

       System.out.println("------------split:---------------");
       for(String splitString: strs){
           System.out.println(splitString);
       }

        System.out.println("----------------join------------");
       String joinStr= String.join("-", strs);
       System.out.println(joinStr);
    }
}
output
original:
com.study.java.langPackageStudy
------------split:---------------
com
study
java
langPackageStudy
----------------join------------
com-study-java-langPackageStudyStringJoiner는 join()과 같이 문자열을 합치고, 문자열 앞 뒤에 prefix와 suffix 역시 작성할 수 있다.
import java.util.StringJoiner;

public class Main {
    public static void main(String[] args){
       String str= "com.study.java.langPackageStudy";

       System.out.println("original: ");
       System.out.println(str);

       String strs[] = str.split("\\.");

       System.out.println("------------split:---------------");
       for(String splitString: strs){
           System.out.println(splitString);
       }

       System.out.println("----------------join------------");

       StringJoiner sj = new StringJoiner("-");
       for(String s : strs){
           sj.add(s);
       }
       System.out.println(sj.toString());
    }
}
output
original:
com.study.java.langPackageStudy
------------split:---------------
com
study
java
langPackageStudy
----------------join------------
com-study-java-langPackageStudy
또한, 옵션으로 prefix, suffix를 붙일 수 있다.
import java.util.StringJoiner;

public class Main {
    public static void main(String[] args){
       String str= "com.study.java.langPackageStudy";

       System.out.println("original: ");
       System.out.println(str);

       String strs[] = str.split("\\.");

       System.out.println("------------split:---------------");
       for(String splitString: strs){
           System.out.println(splitString);
       }

       System.out.println("----------------join------------");

       StringJoiner sj = new StringJoiner("-", "[", "]");
       for(String s : strs){
           sj.add(s);
       }
       System.out.println(sj.toString());
    }
}
output
original:
com.study.java.langPackageStudy
------------split:---------------
com
study
java
langPackageStudy
----------------join------------
[com-study-java-langPackageStudy]