UINavigationController 에 대해
UIViewController와의 관계 및 기본기를 위한 정리를 해보자.
부족하거나 잘못된 내용은 지적 부탁드려요!
우선 애플 공식 문서
설명이 다른 Documents에 비해 엄청 길지만 의역을 해보면..
A container view controller that defines a stack-based scheme for navigating hierarchical content.
UINavigationController는 navigating 계층 content를 위한 Stack 기반의 Container view controller이다.
A navigation controller is a container view controller that manages one or more child view controllers in a navigation interface.
네비게이션 컨트롤러는 앞서말한 한 개 혹은 그 이상의 child vc를 관리하는 Container view controller이다.
In this type of interface, only one child view controller is visible at a time.
네비게이션 컨트롤러는 스택 기반의 인터페이스이기 때문에 최상단의 VC만이 보여지게 된다.
-> Push or Pop으로 Visible managing
초기 root view controller를 제외하면 Navigation Bar 최상단에 뒤로가기 버튼이 생기며 top view controller를 지울 수 있다.
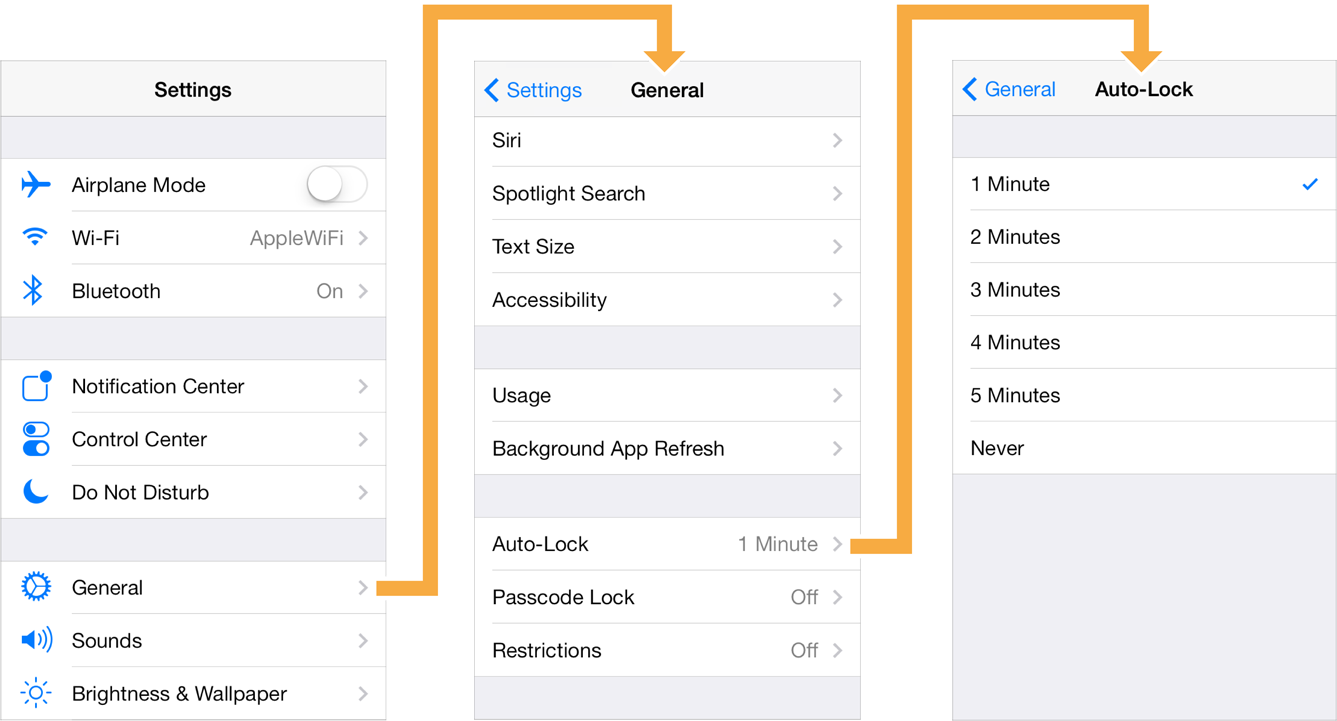
iOS Setting App의 초기화면에서 root view controller를 제외한 나머지 VC에서, 네비게이션 컨트롤러가 제공하는 Back Button을 볼 수 있다.
UINavigationController의 요소를 살펴보자.
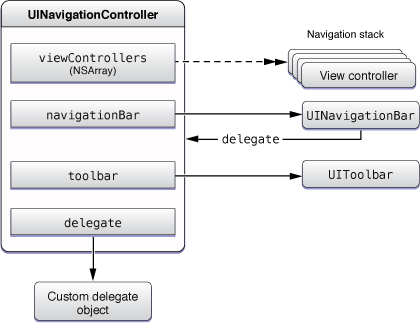
viewController
앞서말한 Navigation Stack으로 관리.
navigationBar
특정 행동을 처리하는 UINavigationBarDelegate로 상단의 타이틀, 뒤로가기 버튼이나 설정 등의 데이터를 주고받을 수도 있음.
navigation controller에 의해 항상 표시되어 있음.
toolbar
interface bottom에 있는 optional toolbar
delegate
UINavigationControllerDelegate protocol 준수.
delegate object는 특정 view controller의 push/pop(visible) 처리나 이동 애니메이션 처리를 담당.
그래서 어떻게 쓰는건데?
저는 Snapkit을 사용해서 개발하는 걸 좋아하므로... main storyboard 없이 사용한 걸 기록해봅니다.
UINavigationController 선언 및 사용
SceneDelegate.swift
rootViewController를 지정한다.
    func scene(_ scene: UIScene, willConnectTo session: UISceneSession, options connectionOptions: UIScene.ConnectionOptions) {

        //UINavigationController를 Base로 갖는 Scene 생성
        guard let windowScene = (scene as? UIWindowScene) else { return }
        window = UIWindow(windowScene: windowScene)
        window?.backgroundColor = .systemBackground
        window?.rootViewController = UINavigationController(rootViewController: ViewController())
        window?.makeKeyAndVisible()
    }
ViewController.swift - navigationBar 설정
override func viewDidLoad() {
		super.viewDidLoad()
        navigationController?.navigationBar.prefersLargeTitles = true
        navigationItem.title = "NavigationBar 타이틀 입력"
 }
만약 UINavigationController의 rootviewController로 사용된 ViewController에서
UITableView()를 사용하여 특정 Cell이 선택 되었을 때 화면을 push하기 위해서는
extension ViewController: UITableViewDelegate {
    func tableView(_ tableView: UITableView, didSelectRowAt indexPath: IndexPath) {
        let vc = ViewController()
        navigationController?.pushViewController(vc, animated: true)
    }
}
참고로 tableView는 lazy로 선언 및 초기화해서
viewDidLoad에서 view.addSubView(tableView) 해주면 된다
    //create tableview
    private lazy var tableView: UITableView = {
        let tableView = UITableView()
        tableView.dataSource = self
        tableView.delegate = self

        return tableView
    }()
//set layout and initialized into viewDidLoad method
private func setTableViewLayout() {
view.addSubview(tableView)
tableView.snp.makeConstraints {
$0.edges.equalToSuperview()
}
}TableView의 UI에 뿌려질 DataSource 프로토콜의 Cell도 잊지말자~
extension StationSearchViewController: UITableViewDataSource {
    func tableView(_ tableView: UITableView, numberOfRowsInSection section: Int) -> Int {
        return 10
    }

    func tableView(_ tableView: UITableView, cellForRowAt indexPath: IndexPath) -> UITableViewCell {
        //이번에는 tableviewcell을 custom 하지 않으므로 바로 초기화해서 사용
        let cell = UITableViewCell()
        cell.textLabel?.text = "\(indexPath.item)"

        return cell
    }
}
결론
이렇게 선택된 TableView의 선택된 Cell을 누르면
UIViewController를 present 시킨 것과는 다르게
UINavigationController에 의해 관리되는 View Controller를 추가해주고 Stack의 최상단으로 추가하게 된다!
以上!