[JavaFX] 스레드 동시성(1)
출처 - 이것이 자바다.
JavaFX UI는 스레드에 안전하지 않기 때문에 UI를 생성하고 변경하는 작업은 JavaFXApplication Thread가 담당하고, 다른 작업 스레드들은 UI를 생성하거나 변경할 수 없다.
main스레드가 Application의 launch() 메소드를 호출하면서 생성된 JavaFX Application Thread()는 start()메소드를 실행시키면서 모든 UI를 생성한다.
컨트롤에서 이벤트가 발생할 경우 컨트롤러의 이벤트 처리 메소드를 실행하는 것도 javaFX Application Thread이다.
javaFX 애플리케이션을 개발할 때 주의할 점은 JavaFX Application Thread가 시간을 요하는 작업을 하지 않도록 하는 것이다.
다른 작업 스레드를 생성해서 처리하는 것이 좋다.
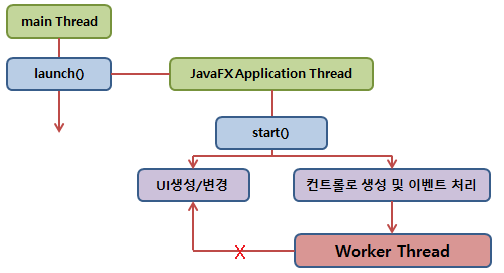
예를 들어 파일을 읽고 쓰거나, 네트워크 상에서 데이터를 주고 받을 때 얼만큼 시간이 필요한지 모르기 때문에 반드시 작업 스레드를 생성해서 처리해야 한다.
⭐작업 스레드가 직접 UI를 변경할 수 없기 때문에 UI 변경이 필요할 경우 두 가지 방법으로 처리해야 한다.
- Platform.runLater()
- javafx.concurrent API인 Task또는 Service를 이용하는 것이다.
javaFX프로젝트를 생성하면 기본적으로 fxml파일(view), Controller,Main 클래스가 생성이 된다.
이를 이용하여 시계 프로그램을 만들어보았다.
fxml 파일
<?import javafx.scene.control.Button?>
<?import javafx.scene.control.Label?>
<?import javafx.scene.layout.AnchorPane?>
<AnchorPane xmlns ="http://javafx.com/javafx"
            xmlns:fx="http://javafx.com/fxml"
            prefHeight="100" prefWidth="200"
            fx:controller="sample.Controller">
    <children>
        <Label fx:id="lblTime" alignment="CENTER" layoutX="25.0" layoutY="15"
               prefHeight="35" prefWidth="150"
               style="-fx-background-color: black; -fx-text-fill: yellow;
                -fx-font-size: 20; -fx-background-radius: 10;" text="00:00:00"/>
        <Button fx:id="btnStart" layoutX="46" layoutY="63" text="시작" />
        <Button fx:id="btnStop" layoutX="110" layoutY="63" text="멈춤" />
    </children>
</AnchorPane>
controller 속성에 Controller 클래스의 위치를 적어주어야 actionEventHandler가 동작할 수 있다.
Controller Class
public class Controller implements Initializable {
    @FXML private Label lblTime;
    @FXML private Button btnStart;
    @FXML private Button btnStop;

    private boolean stop;

    @Override
    public void initialize(URL location, ResourceBundle resources) {
        btnStart.setOnAction(event -> handleBtnStart(event));
        btnStop.setOnAction(event -> handleBtnStop(event));
    }


    //이벤트 핸들러
    public void handleBtnStart(ActionEvent event) {
        stop = false;
        Thread thread = new Thread(){
            @Override
            public void run() {
                SimpleDateFormat sdf = new SimpleDateFormat("HH:mm:ss");
                    while(!stop) {
                    String strTime = sdf.format(new Date());
                    //UI변경작업
                    Platform.runLater(() -> {
                       lblTime.setText(strTime);
                  });
                    try {
                        Thread.sleep(100);
                    } catch (InterruptedException e){}
               }
            };
        };
        //스레드를 데몬스레드로 설정함
        thread.setDaemon(true);
        thread.start();
    }

    public void handleBtnStop(ActionEvent event) {
        stop= true;
    }
}
@FXML 어노테이션을 활용하여 xml파일에 있는 요소들을 가지고 올 수 있다.
Thread를 생성하여 시작버튼을 누르면 작동을 하는 예제이다.
Platform.runLater()을 이용하여 스레드가 돌아가면서 UI에 적용이 될 수 있도록 한다.
+)
 public void run() {
                int tmp = (int)lblTime.getLayoutY();
                    while(!stop&&tmp<=275-35) {
                        tmp++;
                    //UI변경작업
                        int finalTmp = tmp;
                        Platform.runLater(() -> {
                       lblTime.setLayoutY(finalTmp);
                  });
                    try {
                        Thread.sleep(50);
                    } catch (InterruptedException e){}
               }
            };
다음 주차 내용이지만 테트리스 moveDown()과도 비슷하게 바꾸어보았다.
fxml의 라벨을 정사각형 모양으로 바꾸고
스레드의 run 부분에서 label의 좌표를 이용해서 라벨이 위에서 아래로 떨어지도록 했다.
컨테이너의 높이는 275이고 label의 크기는 (35,35)로 맞춰놨기 때문에
떨어지는게 끝나는 좌표 값을 275-35로 했다.