
1. 실습환경 - VS Code
- (1) 아래 쿼리 실행
- 기존 police_staion 데이터 삭제
C:\Users\PC\Documents\sql_ws> mysql -h "database-1.cj22sogoe8oa.ap-southeast-2.rds.amazonaws.com" -P 3306 -u admin -p[비밀번호]
mysql: [Warning] Using a password on the command line interface can be insecure.
Welcome to the MySQL monitor. Commands end with ; or \g.
Your MySQL connection id is 82
Server version: 8.0.35 Source distribution
Copyright (c) 2000, 2023, Oracle and/or its affiliates.
Oracle is a registered trademark of Oracle Corporation and/or its
affiliates. Other names may be trademarks of their respective
owners.
Type 'help;' or '\h' for help. Type '\c' to clear the current input statement.
mysql> show databases;
+--------------------+
| Database |
+--------------------+
| information_schema |
| mysql |
| performance_schema |
| sys |
| zerobase |
| zerodb |
+--------------------+
6 rows in set (0.15 sec)
mysql> use zerobase
Database changed
mysql> show tables;
+--------------------+
| Tables_in_zerobase |
+--------------------+
| celeb |
| crime_status |
| oil_price |
| person |
| police_station |
| refueling |
| snl_show |
| test1 |
| test2 |
+--------------------+
9 rows in set (0.15 sec)
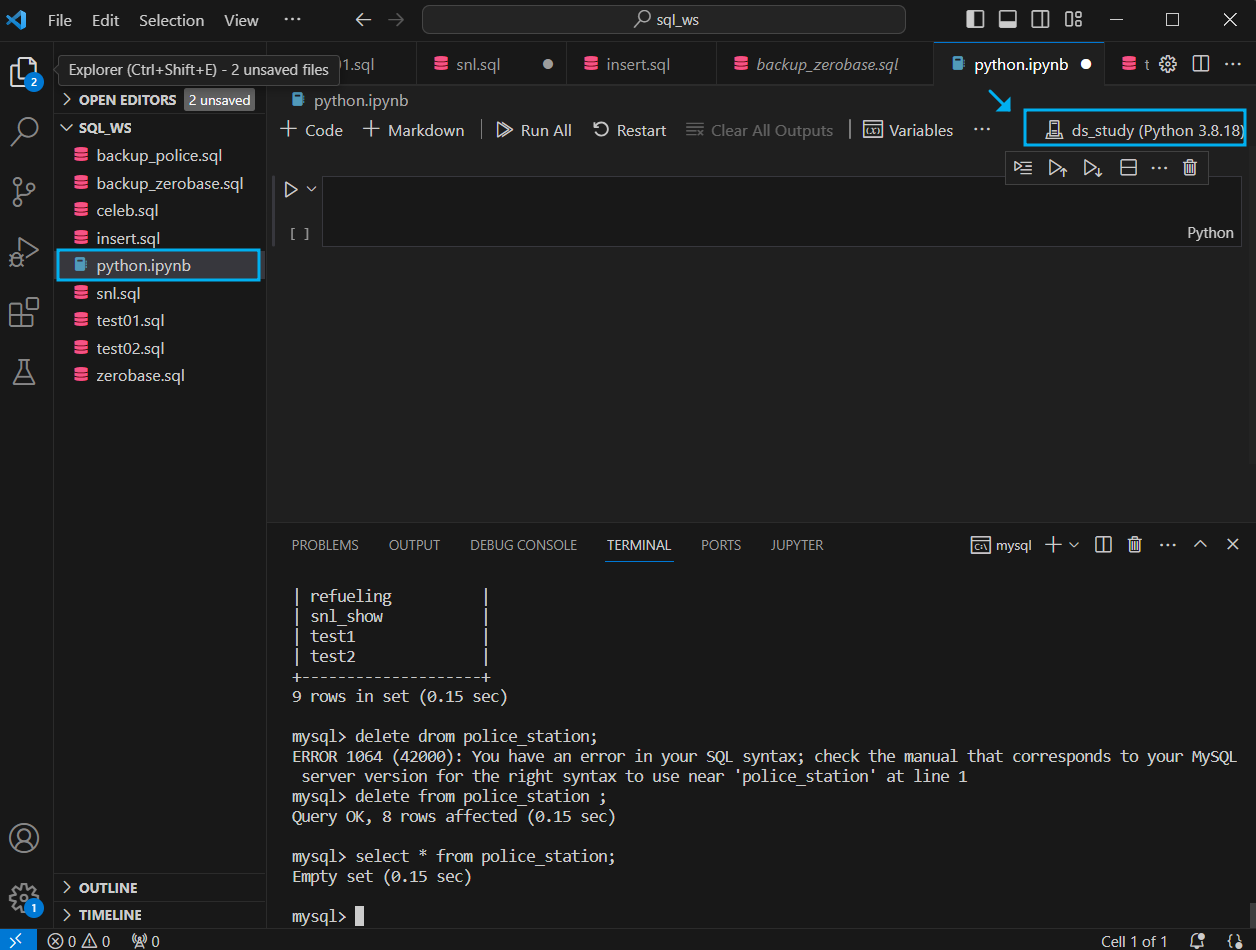
mysql> delete from police_station ;
Query OK, 8 rows affected (0.15 sec)
mysql> select * from police_station;
Empty set (0.15 sec)- (2) python.ipynb 생성
- jupyternotebook 환경으로 설정
- jupyternotebook 환경으로 설정
2. install MySQL Driver
- Python에서 MySQL을 사용하기 위해서는 먼저 'MySQL Driver'를 설치
C:\Users\PC\Documents\sql_ws>pip install mysql-connector-python
C:\Users\PC\Documents\sql_ws>pip install mysql-connector-python
Requirement already satisfied: mysql-connector-python in c:\users\pc\miniconda3\lib\site-packages (8.2.0)Requirement already satisfied: protobuf<=4.21.12,>=4.21.1 in c:\users\pc\miniconda3\lib\site-packages (from mysql-connector-python) (4.21.12)
🙄설치 실패...아래 코드로 성공
!pip install mysql-connector-python- 설치 확인
import mysql.connector
3. 연결 & 종료
- 기본 모양
    mydb = mysql.connector.connect(
        host = "<hostname>",
        user = "<username>",
        password = "<password>"
(1) local database 연결
local = mysql.connector.connect(
	host = "localhost",
    user = "root",
    password = "[비밀번호]"
)
(2) AWS RDS(database-1) 연결
remote = mysql.connector.connect(
	host = "database-1.cj22sogoe8oa.ap-southeast-2.rds.amazonaws.com",
    port = 3306,
    user = "admin",
    password = "[비밀번호]"
)
(3) close database
local.close()remote.close()(4) 예제
- Local MySQL의 zerobase 연결
local = mysql.connector.connect(
    host = "localhost",
    user = "root",
    password = "[비밀번호]",
    database = "zerobase"
)local.close()- AWS RDS (database-1)의 zerobase에 연결
remote = mysql.connector.connect(
    host = "database-1.cj22sogoe8oa.ap-southeast-2.rds.amazonaws.com",
    port = 3306,
    user = "admin",
    password = "[비밀번호]",
    database = "zerobase"
)remote.close()4. Execute SQL (쿼리 실행문)
💡 cusur 를 이용해서 실행
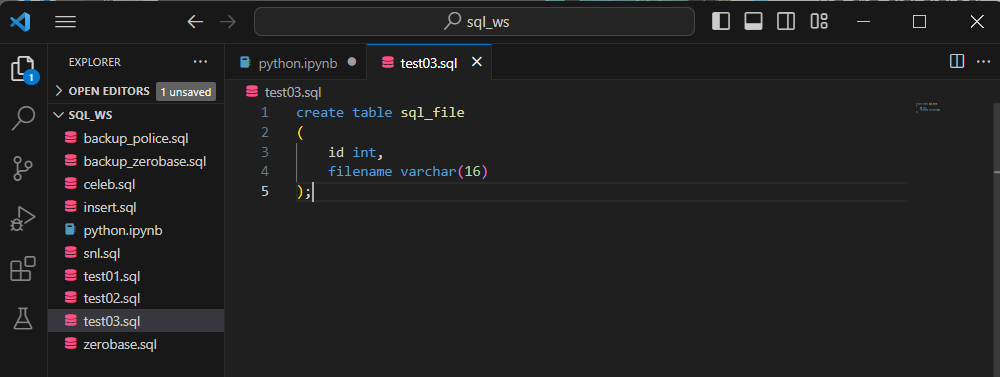
1. Table 'sql_file' 생성
- VS Code
remote = mysql.connector.connect(
    host = "database-1.cj22sogoe8oa.ap-southeast-2.rds.amazonaws.com",
    port = 3306,
    user = "admin",
    password = "[비밀번호]",
    database = "zerobase"
)

# 커서를 만들고
cur = remote.cursor()

#execute 로 쿼리를 보내준다
cur.execute("CREATE TABLE sql_file (id int, filename varchar(16))")

remote.close()- VS Code_cmd
C:\Users\PC\Documents\sql_ws> mysql -h "database-1.cj22sogoe8oa.ap-southeast-2.rds.amazonaws.com" -P 3306 -u admin -p[비밀번호] zerobase

mysql> show tables;
+--------------------+
| Tables_in_zerobase |
+--------------------+
| celeb              |
| crime_status       |
| oil_price          |
| person             |
| police_station     |
| refueling          |
| snl_show           |
| sql_file           |
| test1              |
| test2              |
+--------------------+
10 rows in set (0.15 sec)

mysql> desc sql_file
    -> ;
+----------+-------------+------+-----+---------+-------+
| Field    | Type        | Null | Key | Default | Extra |
+----------+-------------+------+-----+---------+-------+
| id       | int         | YES  |     | NULL    |       |
| filename | varchar(16) | YES  |     | NULL    |       |
+----------+-------------+------+-----+---------+-------+
2 rows in set (0.15 sec)
2. Table 'sql_file' 삭제
- VS Code
remote = mysql.connector.connect(
    host = "database-1.cj22sogoe8oa.ap-southeast-2.rds.amazonaws.com",
    port = 3306,
    user = "admin",
    password = "[비밀번호]"
    database = "zerobase"
)

cur = remote.cursor()
cur.execute("DROP TABLE sql_file")

remote.close()- VS Code_cmd
mysql> desc sql_file
    -> ;
ERROR 1146 (42S02): Table 'zerobase.sql_file' doesn't exist

mysql> show tables;
+--------------------+
| Tables_in_zerobase |
+--------------------+
| celeb              |
| crime_status       |
| oil_price          |
| person             |
| police_station     |
| refueling          |
| snl_show           |
| test1              |
| test2              |
+--------------------+
9 rows in set (0.15 sec)
3. .sql 파일로 쿼리문 삭제
- 파일 직접 생성 & 입력
- VS Code
remote = mysql.connector.connect(
    host = "database-1.cj22sogoe8oa.ap-southeast-2.rds.amazonaws.com",
    port = 3306,
    user = "admin",
    password = "[비밀번호]",
    database = "zerobase"
)

cur = remote.cursor()
sql = open("test03.sql").read()
cur.execute(sql)

remote.close()- VS Code_cmd
mysql> show tables;
+--------------------+
| Tables_in_zerobase |
+--------------------+
| celeb |
| crime_status |
| oil_price |
| person |
| police_station |
| refueling |
| snl_show |
| sql_file |
| test1 |
| test2 |
+--------------------+
10 rows in set (0.16 sec)
mysql> desc sql_file;
+----------+-------------+------+-----+---------+-------+
| Field | Type | Null | Key | Default | Extra |
+----------+-------------+------+-----+---------+-------+
| id | int | YES | | NULL | |
| filename | varchar(16) | YES | | NULL | |
+----------+-------------+------+-----+---------+-------+
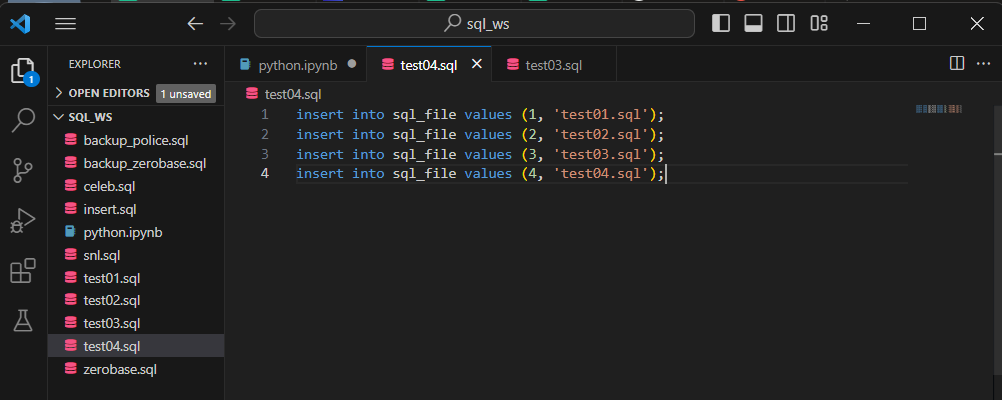
2 rows in set (0.25 sec)4. SQL 파일에 쿼리가 여러개인 경우
- test04.sql 생성
- VS Code
remote = mysql.connector.connect(
    host = "database-1.cj22sogoe8oa.ap-southeast-2.rds.amazonaws.com",
    port = 3306,
    user = "admin",
    password = "[비밀번호]",
    database = "zerobase"
)

cur = remote.cursor()
sql = open("test04.sql").read()
# 원래는 아래 쿼리만 실행해도 됨
# cur.execute(sql,multi=True)

# 값을 보기 위해 for문 사용
for result_iterator in cur.execute(sql,multi=True):
    if result_iterator.with_rows:
        print(result_iterator.fetchall())
    else:
        print(result_iterator.statement)
remote.commit()
remote.close()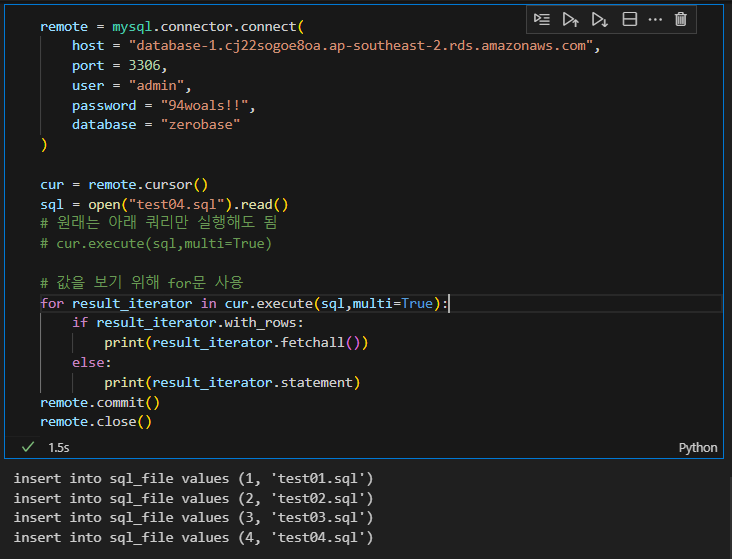
- VS Code_cmd
mysql> select * from sql_file;
+------+------------+
| id   | filename   |
+------+------------+
|    1 | test01.sql |
|    2 | test02.sql |
|    3 | test03.sql |
|    4 | test04.sql |
+------+------------+
4 rows in set (0.23 sec)
5. Fetch All
쿼리 실행 후 결과 값이 row를 포함하고 있으면 Fetch All 해서 출력
그냥 실행하는 쿼리가 아니라, 조회하는 select문의 경우 데이터를 가져 오는데,
💡 데이터를 Fetch All을 써서 변수에 담을 수 있음
💡읽어올 데이터 많은 경우 buffered=True
1. sql_file 테이블 조회
- 테이블 조회 (Fetch All, buffered=True 사용)
remote = mysql.connector.connect(
    host = "database-1.cj22sogoe8oa.ap-southeast-2.rds.amazonaws.com",
    port = 3306,
    user = "admin",
    password = "[비밀번호]",
    database = "zerobase"
)

# data는 사이즈가 커서, 읽어올 양이 많은 경우 'buffered=True'옵션을 줘야 함
cur = remote.cursor(buffered=True)
cur.execute("SELECT * FROM sql_file")

# 결과 값이 보고싶다면, cur.fetchall()
# result 라는 변수에 담아줌
result = cur.fetchall()
for result_iterator in result:
    print(result_iterator)

remote.close()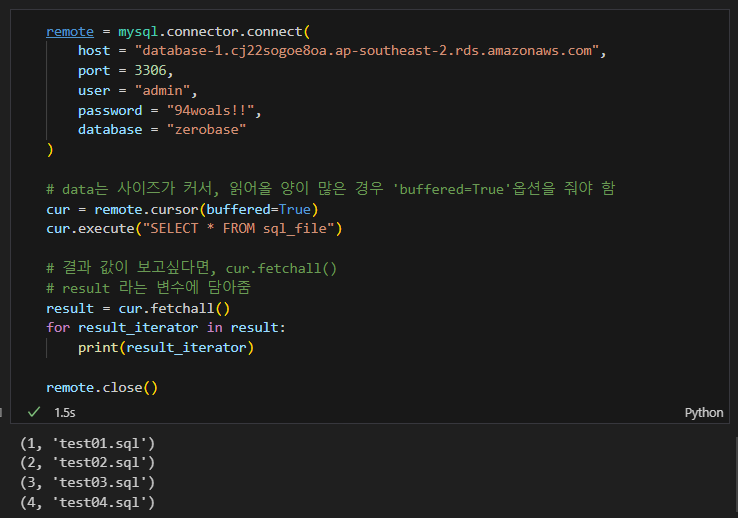
- 검색 결과 PANDAS 로 읽기
import pandas as pd
df = pd.DataFrame(result)
df.head()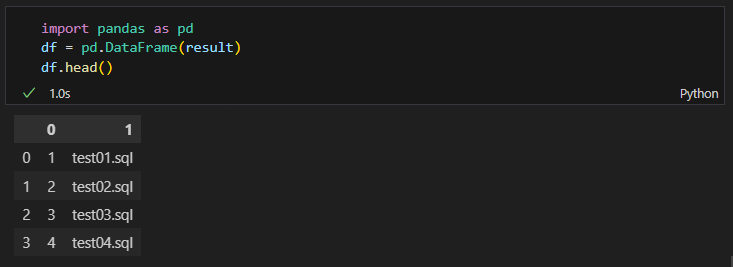

비전공자의 데이터 공부법