
⬅️ App Router (1/3)
Route Groups
/app 내 폴더들은 URL 경로로 직접 매핑된다. 하지만 폴더명을 () 로 감싼 route group을 생성하면 포함되지 않는다.
- 특정 화면들에 공통 레이아웃을 삽입할 때
- 어플리케이션을 분할해 다수의 root layout을 생성할 때
- URL 구조에 영향을 주지 않고 라우트를 조직화 할 때
주로 사용한다.

이번 Clone Coding에도 사용했으며 로그인 & 비로그인 상황에서의 레이아웃을 다르게 하기 위함이였다. 이렇게 () 로 감싸놓으면 /(afterLogin)/home 이 아닌 /home 이렇게 접근이 가능하다.
Parallel Routes
병렬 라우팅은 특정 경로에 들어 왔을때 하나 이상의 페이지를 동시 또는 조건부로 렌더링 할 수 있게 해준다.

이와 같이 컴포넌트 안에 자식 컴포넌트 두개를 두는 방식이 아니라, 병렬 라우팅을 통해 등록한 페이지들이 자동으로 렌더링 되는 방식이다.
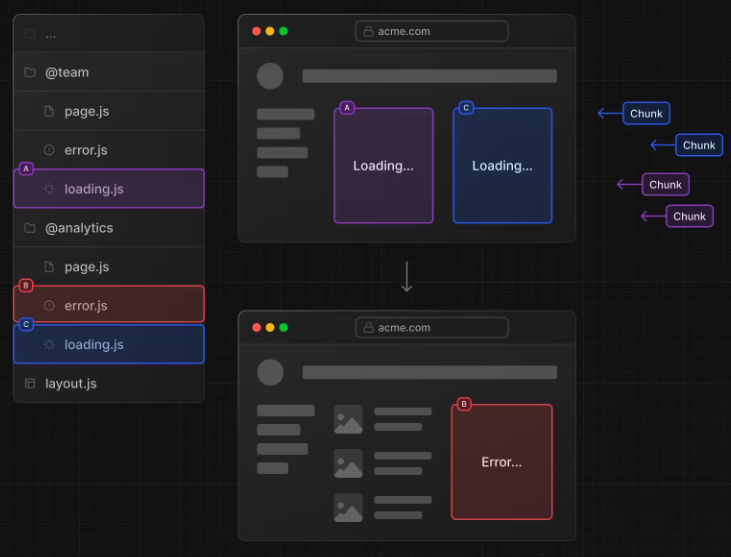
각각의 컴포넌트이기 때문에 각자 설정한 error와 loading을 설정할 수 있고 독립적으로 Stream 된다.
Convention
병렬 라우트는 폴더명 앞에 @를 붙여 만든다. 그리고 같은 레벨의 layout에 props로 전달된다. 디렉토리를 만들었다고 해서 URL 에 포함되는 것은 아니다.
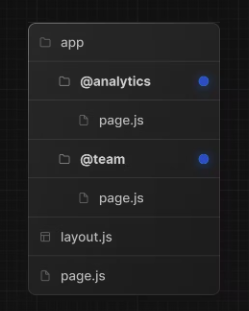
위 폴더구조에서 layout.js 는 @analytics 와 @team 슬롯을 props로 전달받아 children과 함께 렌더링 할 수 있게 된다.
export default function Layout(props: {
  children: React.ReactNode;
	// 이런식으로 slot들을 전달받는다.
  analytics: React.ReactNode;
  team: React.ReactNode;
}) {
  return (
    <>
      {props.children}
      {props.team}
      {props.analytics}
    </>
  );
}
Unmatched routes
default.js 파일을 정의하면 현재 URL에 기반해 slot의 활성화 상태를 회복할 수 없는 경우 fallback으로 보여줄 UI를 정할 수 있다.
useSelectedLayoutSegements
useSelectedLayoutSegement 와 useSelectedLayoutSegements 훅은 해당 화면 내 활성화된 라우트 segment를 리턴해준다.
'use client';
import { useSelectedLayoutSegment } from 'next/navigation';

export default async function Layout(props: {
  //...
  authModal: React.ReactNode;
}) {
	// 유저가 @authModal/login이나 /login URL로 이동 시 loginSegements의 값이 "login"이 된다.
  const loginSegments = useSelectedLayoutSegment('authModal');
  // ...
}
'use client';
import { useSelectedLayoutSegment, useSelectedLayoutSegments } from 'next/navigation';
export default async function Layout(props: {
//...
}) {
const segment = useSelectedLayoutSegment()
const segments = useSelectedLayoutSegments()
// /compose/tweet 로 진입할 경우 아래와 같이 리턴한다.
console.log(segment) // 'compose'
console.log(segments) // ['compose', 'tweet' ]
}Example
//layout.js
type Props = {children: ReactNode, modal:ReactNode}
export default function Layout({children, modal}: Props){
return(
<div className={styles.container}>
{children}
{modal}
</div>
)
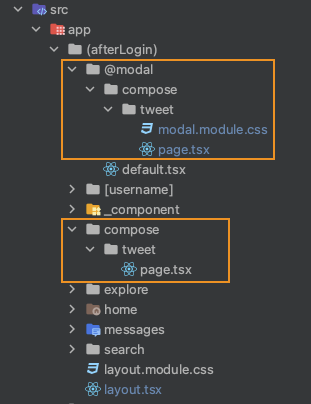
}현재 클론 코딩중인 X(구트위터)의 파일 구조 이다. /compose/tweet으로 들어가게 되면 /compose/wteet/page.tsx 와 /@modal/compose/tweet/page.tsx가 함께 렌더링 되어진다.

modal에 있는 tweet은 CSS로 모달 처럼 보이게 해놓았다. 모달이 활성화 상태가 아닐 때 렌더링 하지 않기 위해서 default.js 파일을 만들어 null을 반환해 주었다.
// default.js
export default function Default() {
  return null;
}
만약, 다른 곳으로 이동했을 때 모달을 닫고 싶으면 catch-all-route를 사용할 수 있다. catch-all 폴더의 page.js 에서 return null 해주면 된다.

Intercepting Routes
Intercepting Routes는 말 그대로 라우팅을 가로채가는 것이다.
- 권한 없는(만료된) 사람이 특정 페이지에 진입했을 때 권한확인 모달을 띄울 때
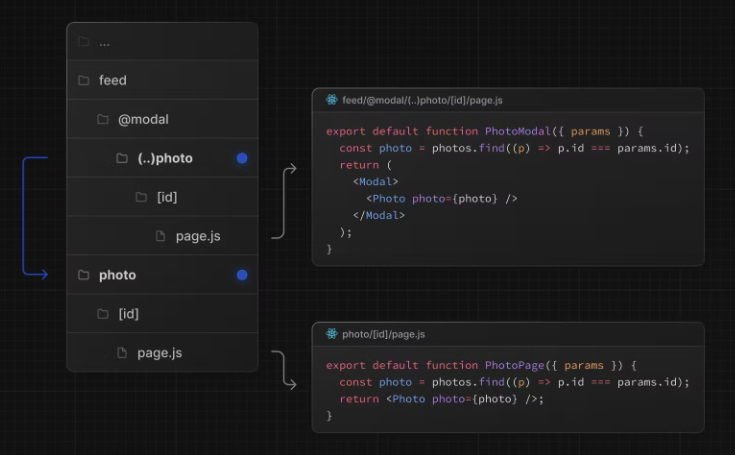
- 사진 게시판에서 사진을 클릭했을때 상세 게시물을 모달로 피드위에 띄울 때
- /feed route를 가로채서 URL 을 /photo/123 으로 이동시킨다
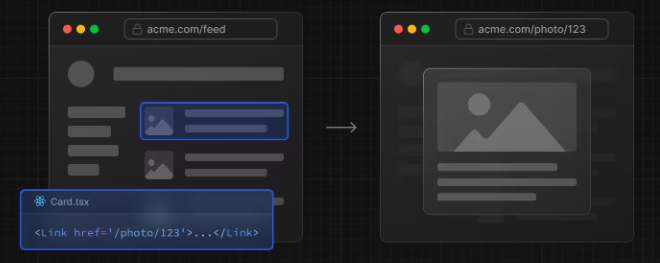
이렇게 하지 않으면 모달 대신 photo 페이지 전체가 렌더링 될것이다.
Convention
폴더명 앞에 (.), (..)를 붙여 처럼 상대경로 느낌으로 만든다.
(.)같은 레벨의 segment에 매치된다.(..)한 레벨 위의 segment에 매치된다.(..)(..)두 레벨 위의 segment에 매치된다.(...)root의 segment랑 매치된다.

조금 헷갈리긴 하지만 자세히 보면, /photo/[id]로 진입하게 되면 /feed/photo/[id] 로 라우팅하게 된다.
With Modals
Parallel Routes와 함께 모달을 만들기 위해 사용하면 아래와 같은 특징이 있다.
- 모달 Content를 URL을 통해 공유할 수 있다.
- 컴포넌트가아닌 페이지를 모달로 띄우기 때문에 해당 모달의 url이 있다.
- 모달을 닫지않고 page가 새로고침 되었을 때 문맥을 유지할 수 있다.
- route 이동이 아닌 뒤로가기를 통해 모달을 닫을 수 있다.
- 앞으로 가기를 통해 모달을 다시 켤수 있다.
Example

// (afterLogin)/@modal/(.)compose/tweet/page.tsx
"use client";

import style from './modal.module.css';
import {useRef, useState} from "react";
import {useRouter} from "next/navigation";
export default function TweetModal() {
	...

  return (
    <div className={style.modalBackground}>
      <div className={style.modal}>
        <button className={style.closeButton} onClick={onClickClose}>
          ...
        </button>
        <form className={style.modalForm} onSubmit={onSubmit}>
          ...
              <textarea className={style.input} placeholder="무슨 일이 일어나고 있나요?"
                     value={content}
                     onChange={onChangeContent}
              />
			...
              <button className={style.actionButton} disabled={!content}>게시하기</button>
        </form>
      </div>
    </div>
  )
}
// (afterLogin)/compose/tweet/page.tsx
import Home from "@/app/(afterLogin)/home/page";
export default function Page(){
return(
<Home/>
)
}Client 에서 /compose/tweet 으로 이동할 경우 인터셉터 되어(.compose)/tweet/page.tsx 가 Parallel로 모달로 렌더링 될 것이다.

이 경우 어떤 메뉴에서 게시하기 버튼을 누르더라도 modal로 해당 화면을 유지하면서 게시글 작성 모달이 뜨게된다.
사진상에는 URL이 보이지 않지만 http://localhost:3000/compose/tweet로 변경되어 있다.
💡알아두기💡
이렇게 Interceptor Route 설정을 해놓으면
/compose/tweet/page.tsx는 접근할 수 없으니 불필요하다고 생각할 수 있지만 아니다.
새로고침을 하거나 Route 이동이 아닌 직접http://localhost:3000/compose/tweet주소를 치고 접근하면 해당 파일로 연결된다.
글쓴이의 경우<Home/>를 리턴하도록 되어 있어서 새로고침 시 홈 메뉴가 나타난다.
Next.js App Router(3/3) ➡️
참조
Route Group
Parallel Routes
Intercepting Routes
@asdf99245