
서론
실무에서는 상태관리 라이브러리로 Recoil을 사용하고 있지만, 이번 트위터 클론코딩을 진행하면서 새로운 라이브러리인 Zustand를 접하게 되었다.
패키지 크기가 작고 사용법이 간단하다는 점에서 Redux, Mobx와 더불어 많이 사용되고 있다고 하여 이번 기회에 간단하게 정리해보고자 한다.
Zustand 란?
리액트에는 Recoil, Redux, MobX, Jotai 등 다양한 상태관리 라이브러리들이 존재한다. Zustand 도 이들 중 하나로 독일어로 '상태'라는 의미를 갖는다.
Zustand의 가장 큰 장점은 최소한의 코드로 상태를 관리할 수 있다는 점이고 아래의 특정을 갖는다.
-
Redux와 같이 Flux 패턴을 활용한다.
-
보일러플레이트 코드가 거의 없다.
-
npm Trend 상 redux 다음으로 가장 많이 사용된다.
-
store 구조를 활용하면서 상태를 정의하고 사용하는 방법이 간단하다.
-
Redux Devtools로 디버깅이 가능하다.
Zustand 사용법
설치
$ npm install zustand
or
$ yarn add zustand
Store 생성
zustand 에서 제공하는 create로 Store를 생성해 사용한다.
Store는 Hooks으로 되어있으며 객체, 함수 등 구분없이 넣을 수 있다.
// /src/store/modal.tsx

import {create} from "zustand";
import {Post} from "@/model/Post";

// TypeScript 을 위한 interface 생성
interface ModalState {
    // 'new': 새글, 'comment': 답글
    mode: 'new' | 'comment',
    data: Post | null,
	setMode: (mode: 'new' | 'comment') => void;
    setData: (data: Post) => void;
    reset: () => void;
}

export const useModalStore = create<ModalState>((set) => ({
    mode: 'new',
    data: null,
    setMode: (mode) =>{
        set({ mode });
    },
    setData: (data) => {
        set({ data });
    },
    reset: () => {
        set({
            mode: 'new',
            data: null,
        })
    }
}));

// state 를 직접 변경하는 경우
export const useNumStore = create<numState>((set) => ({
    num: 0,
	increase: () => {
        // state 를 통해 직접 변수에 접근해야 한다.
        set((state) => ({num: state.num + 1}))
    },
    decrease: () =>{
        // state 를 통해 직접 변수에 접근해야 한다.
        set((state) => ({num: state.num - 1}))
    }
}));
useModalStore 에는 mode, data 변수와 setMode, setData, reset 함수가 들어있다.
mode : 'new(신규글 작성)' 와 'comment(답변하기)' 값만 들어올 수 있다.
data : mode 가 comment 인 경우에만 값을 갖으며 원글 데이터가 들어있다.
Store 사용
트위터 클론코딩에서는 게시글 등록 모달을 띄울 때 신규 게시글 등록인지, 글에 대한 답글을 등록하는 것인지를 ModalState 로 확인한다.
1) 답글등록 버튼 클릭

// /(afterLogin)/_component/ActionsButtons.tsx
type Props = {
    white?: boolean,
    post: Post
}

export default function ActionButtons ({ white, post }: Props){
    const queryClient = useQueryClient()
    const router = useRouter()
    const {data: session} = useSession()

    // Modal Store 사용
    const {setMode, setData} = useModalStore()

    const onClickComment: MouseEventHandler<HTMLButtonElement> = (e) => {
      // 답글달기 모드, 게시글 세팅
        e.stopPropagation()

        setMode('comment')
        setData(post)

        router.push('/compose/tweet')
    }

    ...

    return (
        <div className={style.actionButtons}>
            <div className={cx(style.commentButton, white && style.white)}>
                <button onClick={onClickComment}>
                   // 답글 등록 버튼
                </button>
                <div className={style.count}>{post?._count?.Comments || ''}</div>
            </div>
            <div className={cx(style.repostButton, reposted && style.reposted, white && style.white)}>
                <button onClick={onClickRepost}>
                    // 리포스트 버튼
                </button>
                <div className={style.count}>{post._count?.Reposts || ''}</div>
            </div>
            <div className={cx([style.heartButton, liked && style.liked, white && style.white])}>
                <button onClick={onClickHeart}>
                    // 좋아요 버튼
                </button>
                <div className={style.count}>{post._count?.Hearts || ''}</div>
            </div>
        </div>
    )
}
사용하고자 하는 컴포넌트에서 useModalStore() 로 호출할 수 있다.
답글 등록 버튼을 선택하면 modalStore 의 mode 값이 'comment'로 바뀌고, data에 해당 게시물 정보가 들어간다.
2) 답글등록 화면
// (afterLogin)/@modal/(.compose)/tweet/page.tsx
export default function TweetModal() {
...
const modalStore = useModalStore();
const parent = modalStore.data;
// 답글 게시
const comment = useMutation({
mutationFn: ...,
async onSuccess(response, variable) {
...
});
},
onError(error) {
...
},
onSettled() {
// 상태 초기화
modalStore.reset();
router.back();
}
})
// 게시하기 버튼 클릭
const onSubmit: FormEventHandler<HTMLFormElement> = (e) => {
if (modalStore.mode === 'new') {
// 새글 게시하기
newPost.mutate(e);
} else {
// 답글 게시하기
comment.mutate(e);
}
}
...
return (
...
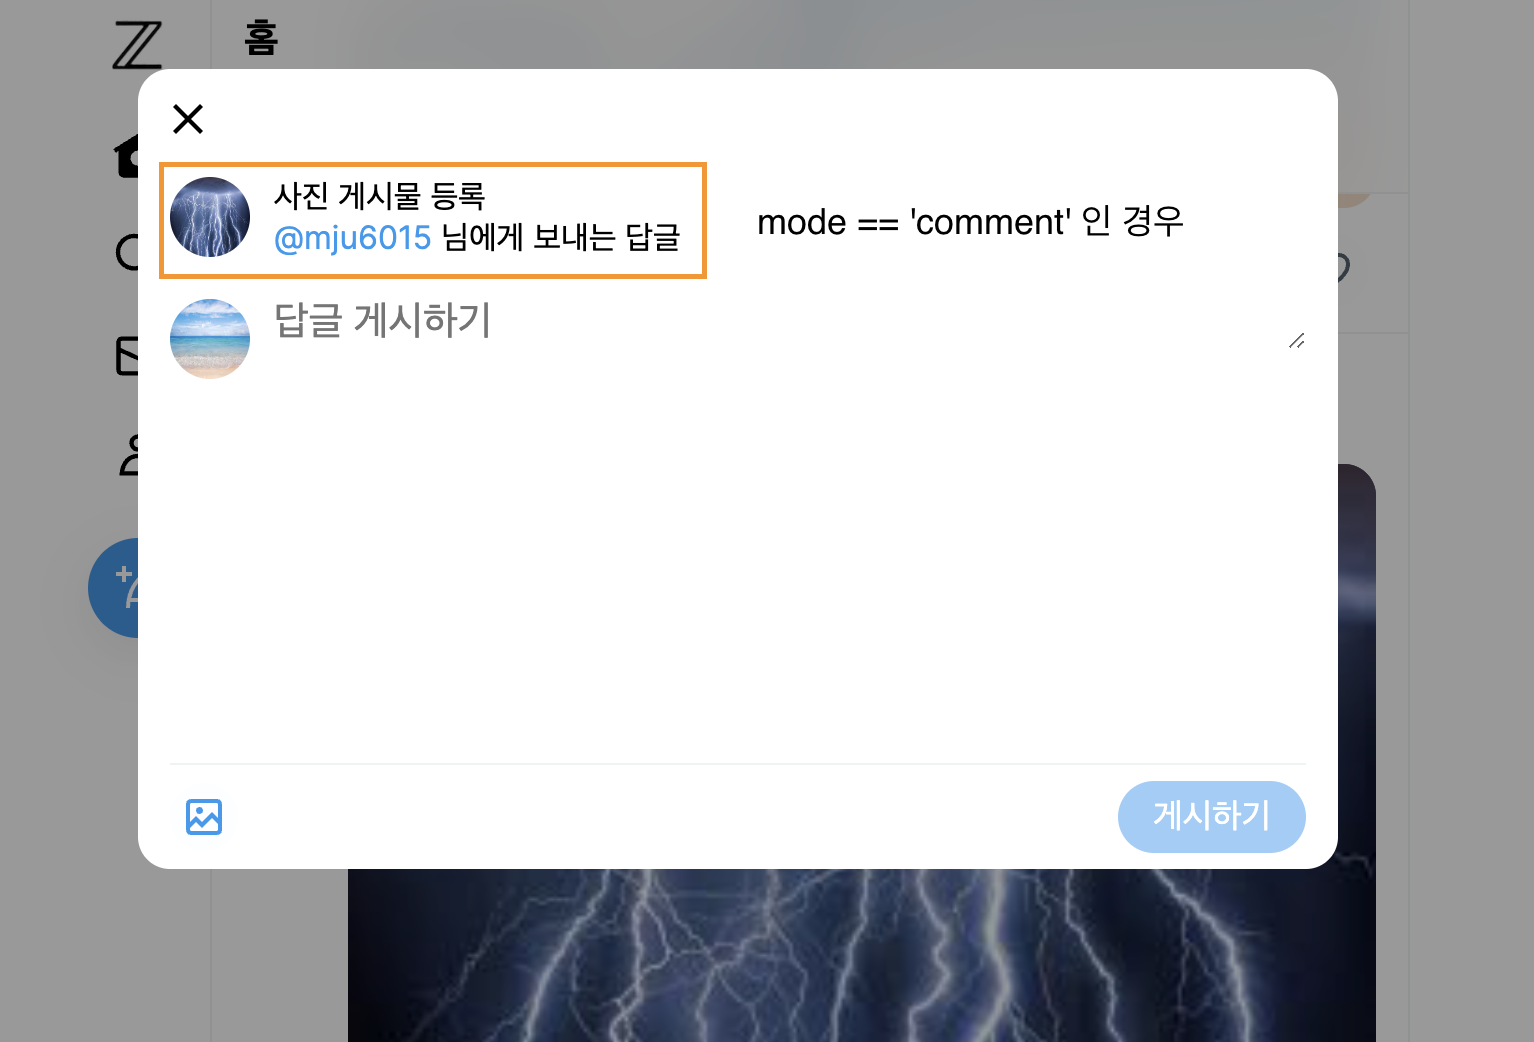
{modalStore.mode === 'comment' && parent && (
<div className={style.modalOriginal}>
<div className={style.postUserSection}>
<div className={style.postUserImage}>
<img src={parent.User.image} alt={parent.User.id}/>
</div>
</div>
<div>
{parent.content}
<div>
<Link href={`/${parent.User.id}`} style={{color: 'rgb(29, 155, 240)'}}>@{parent.User.id}</Link> 님에게
보내는 답글
</div>
</div>
</div>
)}
...
)
}mode에 따라 보여지는 화면 UI가 달라지고, 게시글 등록 시 호출하는 API가 달라진다.
Shallow를 활용한 렌더링 최적화
Zustand 에서 관리되는 데이터들이 변경되었을 경우에만 리렌더링이 발생하게 된다. 즉, 이전값과 새로운 값이 다른 경우 리렌더링 된다.
일반적으로 number, string 타입의 데이터를 비교할 경우 값 자체를 비교하기 때문에 문제가 되지 않지만 array, object 타입을 사용하는 경우 문제가 발생한다.
// store 데이터
export const useNumberShallowStore = create<UseNumberShallowStore>()((set, get) => ({
numberA: 0,
numberB: 0,
numberC: 0,
// numberA 증가 함수
increaseNumberA: () =>
set((state) => ({
numberA: state.numberA + 1, // state 를 이용하여 state 값 변경
})),
// numberB 증가 함수
increaseNumberB: (value: number) =>
set({
numberB: get().numberB + value, // get 을 이용하여 state 값 변경
}),
// numberC 증가 함수
increaseNumberC: () =>
set((state) => ({
numberC: state.numberC + 2, // state 를 이용하여 state 값 변경
})),
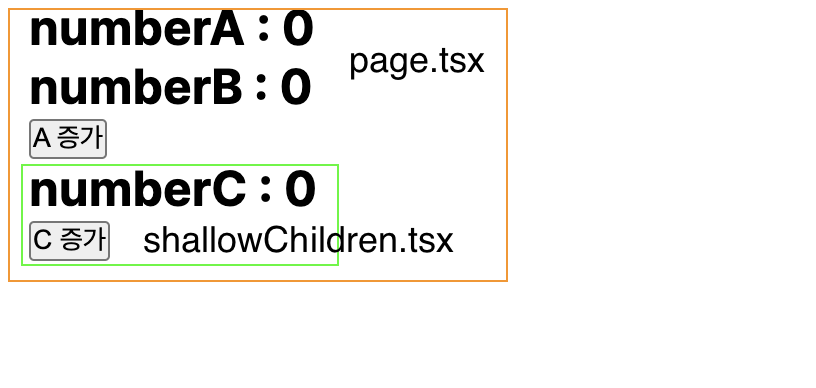
}));export default function Shallow(){
// atomic state 방식으로 store 사용
const numberA = useNumberShallowStore((state) => state.numberA);
const numberB = useNumberShallowStore((state) => state.numberB);
const increaseNumberA = useNumberShallowStore((state) => state.increaseNumberA);
return (
<div>
<h2>numberA : {numberA}</h2>
<h2>numberB : {numberB}</h2>
<button onClick={increaseNumberA}>A 증가</button>
<ShallowChildren />
</div>
);
};// ShallowChildren.tsx
export const ShallowChildren = () => {
const numberC = useNumberShallowStore((state) => state.numberC);
const increaseNumberC = useNumberShallowStore((state) => state.increaseNumberC);
return (
<div>
<h2>numberC : {numberC}</h2>
<button onClick={increaseNumberC}>C 증가</button>
</div>
);
};위의 소스는 page.tsx 에서 state값을 불러올 때 하나 씩 가져온다.
그렇기 때문에 ShallowChildren 컴포넌트에서 NumberC 의 값을 증가시켜도 numberA, numberB의 값은 변화가 없기때문에 자식 컴포넌트만 리렌더링 된다.
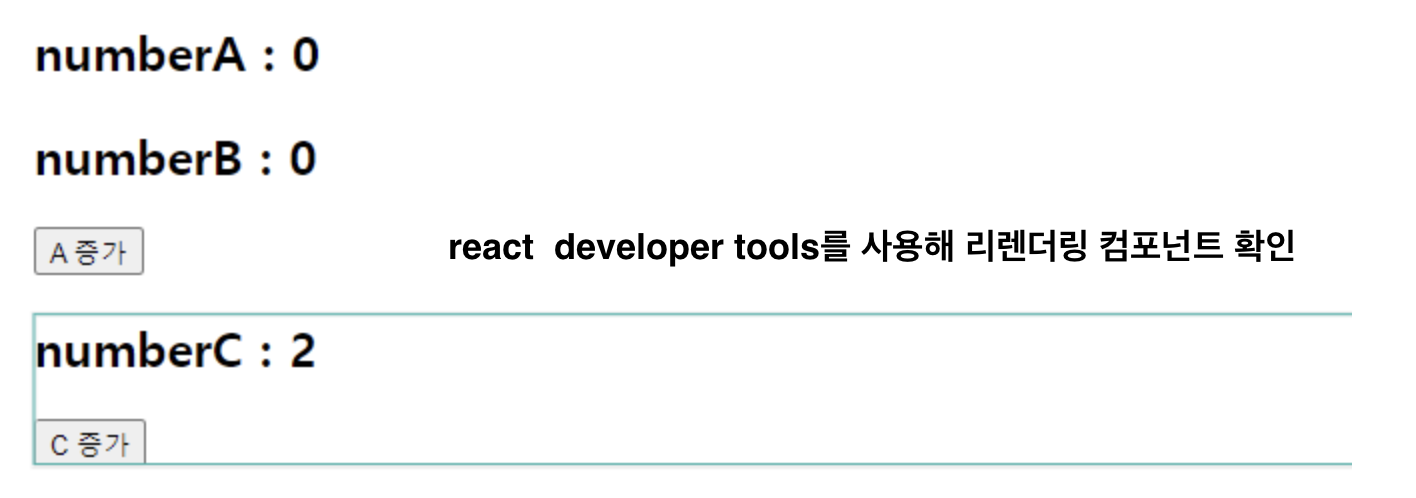
하지만 multiple state-picks 를 사용하면 부모도 리렌더링 된다.
// page.tsx
export default function Shallow(){

    // multiple state-picks 방식으로 store 사용
    const { numberA, numberB } = useNumberShallowStore((state) => ({
        numberA: state.numberA,
        numberB: state.numberB,
    }));
    const increaseNumberA = useNumberShallowStore((state) => state.increaseNumberA);

    return (
        <div>
            <h2>numberA : {numberA}</h2>
            <h2>numberB : {numberB}</h2>
            <button onClick={increaseNumberA}>A 증가</button>

            <ShallowChildren />
        </div>
    );
};
아까와 동일하게 C증가 버튼을 클릭하면 NumberA, NumberB 값은 변화가 없지만 저장되는 메모리 주소 값이 변경되기 때문에 page.tsx 전체가 리렌더링 된다.
export default function Shallow(){

  	// multiple state-picks 방식으로 store 사용 (shallow 적용)
    const { numberA, numberB } = useNumberShallowStore((state) => ({
        numberA: state.numberA,
        numberB: state.numberB,
    }),
        shallow // <<< 추가
    );
    const increaseNumberA = useNumberShallowStore((state) => state.increaseNumberA);

    return (
        <div>
            <h2>numberA : {numberA}</h2>
            <h2>numberB : {numberB}</h2>
            <button onClick={increaseNumberA}>A 증가</button>

            <ShallowChildren />
        </div>
    );
};
이때, shallow 를 추가해 object를 얕게 비교하기 원한다고 Zustand에게 알려준다.
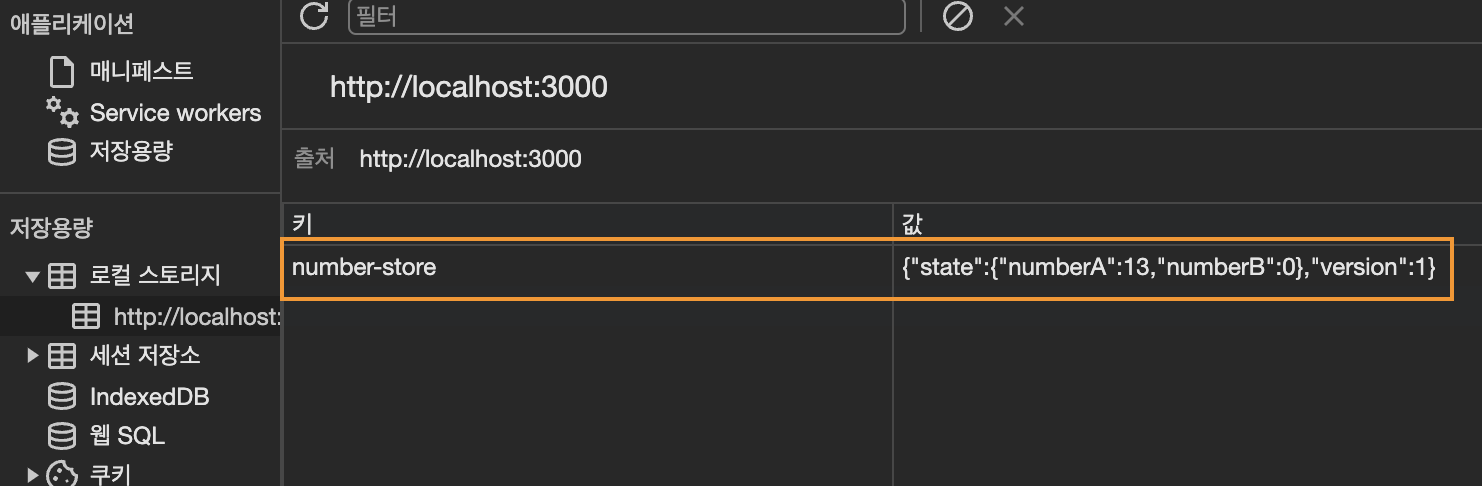
Persist Middleware
Store에 저장되어 있는 데이터들은 새로고침이나, 페이지 이동을 하게되면 값이 초기화된다.
Persist Middleware를 활용해 값을 유지할 수 있는데 이는 브라우저의 localStorage를 사용한다.
export const useNumberPersistStore = create<UseNumberPersistStore>()(
    persist(
        (set, get) => ({
            numberA: 0, // store state
            numberB: 0, // store state
            // numberA 증가 함수
            increaseNumberA: () =>
                set((state) => ({
                    numberA: state.numberA + 1, // state를 이용하여 state 값 변경
                })),
            // numberB 증가 함수
            increaseNumberB: (value: number) =>
                set({
                    numberB: get().numberB + value, // get을 이용하여 state 값 변경
                }),
        }),
        {
            name: 'number-store', // 저장소 key값
            storage: createJSONStorage(() => localStorage), // 저장소
            version: 1.0, // version 정보
        },
    ),
);
해당 store 정보가 브라우저 localstorage에 저장된다.
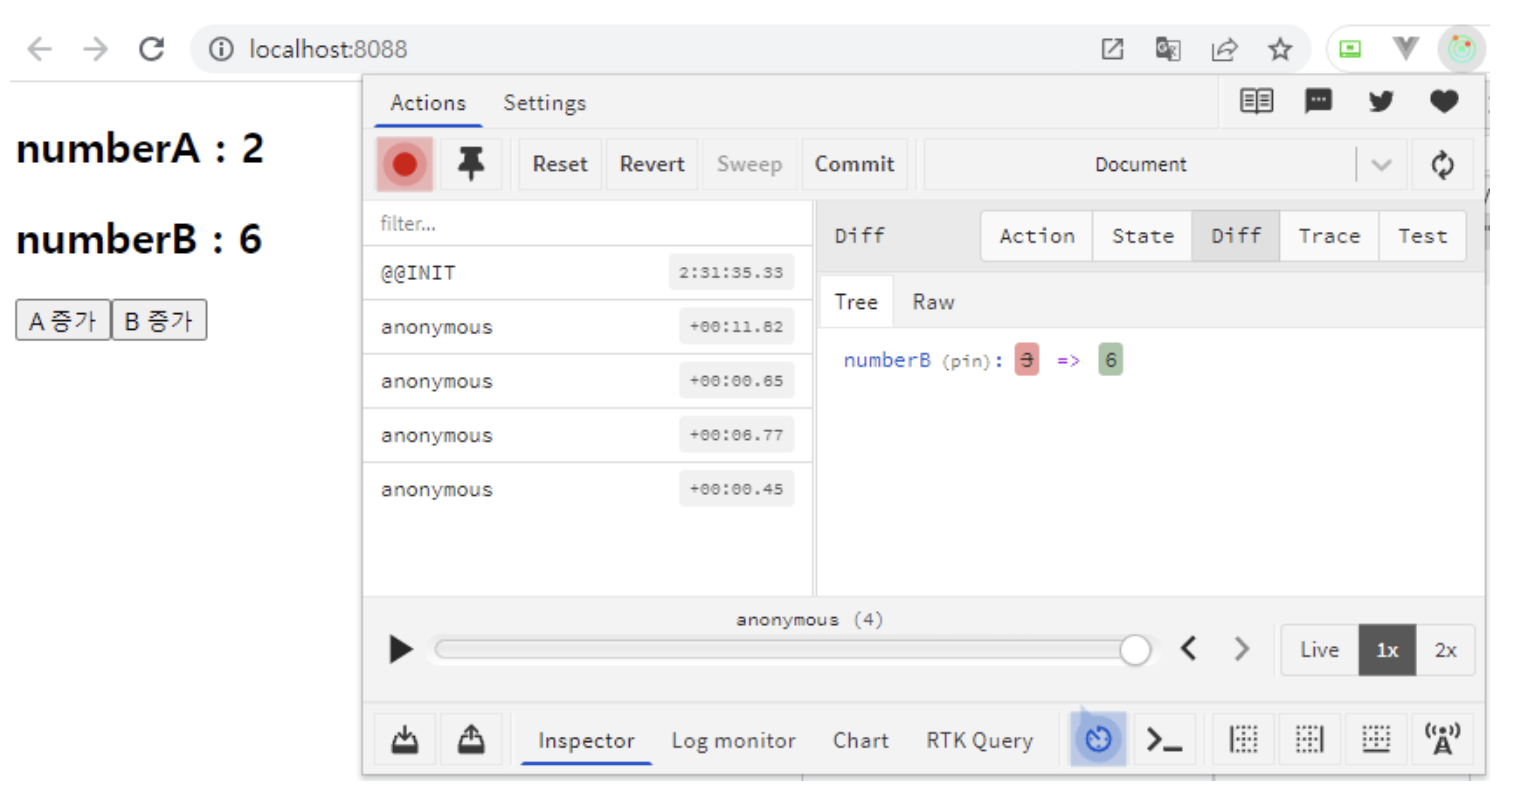
Devtools 적용
devtools 로 감싸주면 redux devtools에 history가 남는 것을 확인 할 수 있다.
export const useNumberDevtoolsStore = create<UseNumberDevtoolsStore>()(
    devtools((set, get) => ({
        numberA: 0, // store state
        numberB: 0, // store state
        // numberA 증가 함수
        increaseNumberA: () =>
            set((state) => ({
                numberA: state.numberA + 1, // state를 이용하여 state 값 변경
            })),
        // numberB 증가 함수
        increaseNumberB: (value: number) =>
            set({
                numberB: get().numberB + value, // get을 이용하여 state 값 변경
            }),
    })),
);
참고
https://www.nextree.io/zustand/
https://ingg.dev/zustand-work/
https://jforj.tistory.com/341

잘 보았습니다 ^^