로그인 화면
로그인 기능은 Next-Auth 라는 라이브러리를 사용해 개발했다. 로그인에 성공하면 Cookie 에 authjs.session-token 이 추가되며 인증 정보는 next-auth 의 훅을 통해 클라이언트에서 사용할 수 있다.
// main.tsx
export default function Main() {
return (
<>
<div className={styles.left}>
<Image src={zLogo} alt="logo" />
</div>
<div className={styles.right}>
<h1>지금 일어나고 있는 일</h1>
<h2>지금 가입하세요.</h2>
<Link href="/signup" className={styles.signup}>계정 만들기</Link>
<h3>이미 트위터에 가입하셨나요?</h3>
<Link href="/login" className={styles.login}>로그인</Link>
</div>
</>
)
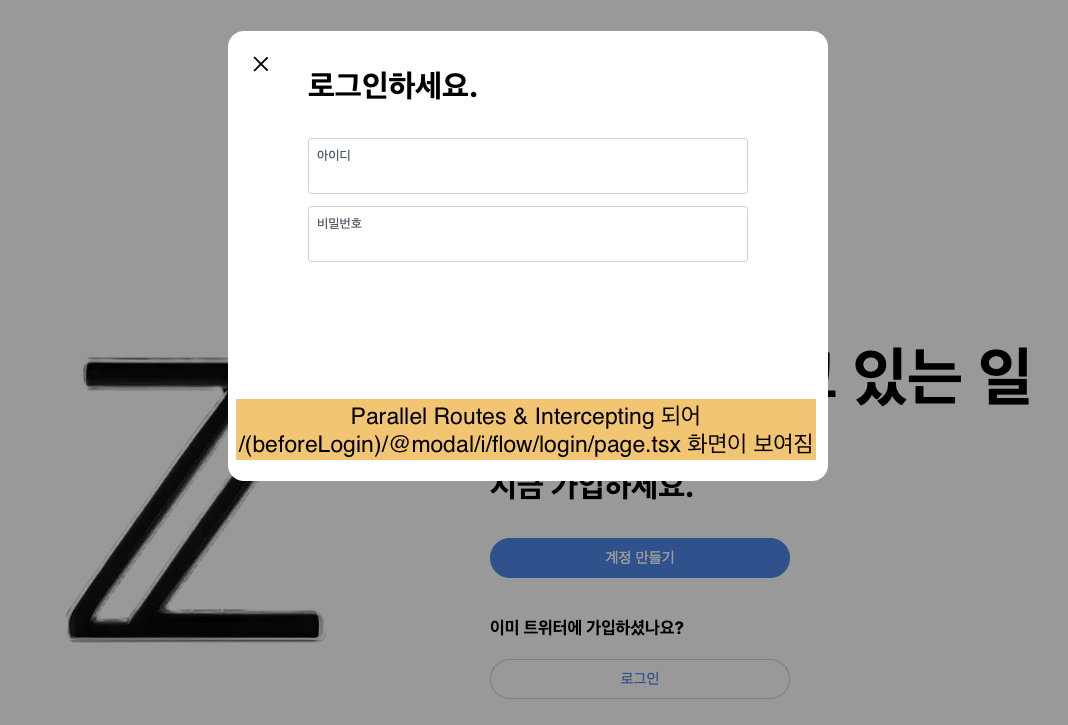
}main 페이지에서 로그인 버튼을 클릭하면 /login 페이지로 라우팅 이동 시키고 /login 페이지에서 /i/flow/login 으로 Parallel Routes & Intercepting 시켜야 한다.
하지만 서버 컴포넌트에서는 useRouter를 사용할 수 없을뿐더러 redirect 시킬경우 인터셉팅이 작동하지 않는다. 따라서 Client Component(RedirectToLogin.tsx)를 만들어 라우팅 시켜준다.
// (beforeLogin)/login/page.tsx
export default async function Login() {
    const session = await auth();

    if (session?.user) {
        redirect('/home');
        return null;
    }
    return (
        <>
            <RedirectToLogin />
            <Main/>
        </>
    );
}
// RedirectToLogin.tsx
"use client";
import {useEffect} from "react";
import {useRouter} from "next/navigation";
export default function RedirectToLogin() {
// 클라이언트 컴포넌트에서 이동시켜야 인터셉팅이 가능하다.
const router = useRouter();
useEffect(() => {
router.replace('/i/flow/login');
}, []);
return null;
}즉, 로그인 버튼을 클릭하면 /login/page.tsx 로 이동했다가 내부 RedirectToLogin.tsx 컴포넌트에 의해 (beforeLogin)/i/flow/login/page.tsx로 이동하는데, 인터셉팅 되어 (beforeLogin)/@modal/i/flow/login/page.tsx 화면이 보여진다.
로그인 기능 With next-auth
💡 Next-Auth
Next JS 프로젝트에서 Oauth 인증 방식의 로그인 서비스를 쉽게 구현할 수 있도록 Provider를 제공해 준다. 이를 통해 ID/PW 로그인, 소셜 로그인, 유저 정보, 인증 여부 등 유용하게 활용할 수 있다.
환경변수 설정
.env 파일에 AUTH_URL 값과 AUTH_SECRET 값을 추가해준다.
// .env
AUTH_URL=http://localhost:9090
AUTH_SECRET=mustkeepinsecret

// .env.local
NEXT_PUBLIC_API_MOCKING=enabled
NEXT_PUBLIC_BASE_URL=http://localhost:9090
AUTH_URL=http://localhost:9090
NEXT_PUBLIC_MODE=locals
NextAuth 선언
Client Component 에서는 next-auth 의 기능을 임포트해 사용하면 되고, Server Component 에서는 /auth.ts 에서 export 한 메서드를 사용하면 된다.
// /auth.ts

import NextAuth from "next-auth";
import CredentialsProvider from "next-auth/providers/credentials";
import {cookies} from "next/headers";
import cookie from 'cookie';

export const {
  handlers:{GET, POST}, // api route
  auth, // 로그인 했는지 여부
  signIn // 로그인 하는 용
} = NextAuth({
  pages:{
    // login 페이지 등록
    signIn: '/i/flow/login',
    newUser: '/i/flor/signup'
  },
  providers: [
    CredentialsProvider({
      async authorize(credentials) {
        const authResponse = await fetch(`${process.env.AUTH_URL}/api/login`, {
          method: "POST",
          headers: {
            "Content-Type": "application/json",
          },
          body: JSON.stringify({
            id: credentials.username,
            password: credentials.password,
          }),
        })


        // 프론트 서버에서 백엔드 서버의 토큰을 받아오는 과정
        let setCookie = authResponse.headers.get('Set-Cookie')
        console.log('$$$$ Set-Cookie: ', setCookie)
        if(setCookie){
          // 브라우저에 쿠키를 심어주는 과정
          const parsed = cookie.parse(setCookie);
          cookies().set('connect.sid', parsed['connect.sid'], parsed)
        }

        if (!authResponse.ok) {
          // 로그인이 실패한 경우
          return null
        }

        const user = await authResponse.json()
        console.log('user', user);
        return {
          email: user.id,
          name: user.nickname,
          image: user.image,
          ...user,
        }
      },
    }),
  ]
})
Next-Auth 함수에는 configs 가 들어가게 되는데 아래와 같다.
- pages: Auth.js에서 제공하는 로그인/회원가입 등의 기본 페이지 대신 커스텀 페이지를 사용하는 경우
- providers: 로그인 방식을 결정한다. ( ID/PW, 네이버, 카카오 등 )
- ID, PW를 통한 로그인은 CredentialsProvider로 구현하고 구체적인 로직은 authorize 함수를 오버라이딩 한다.
- authorize: credentials를 인자로 받으며 사용자가 로그인 시 입력한 username 과 password가 들어있다.
- authorize 내에서 data fetch를 통해 로그인에 성공할 경우 {email, name, image} 로 고정된 객체로 속성으로 반환된다.
- authrize 함수는 Middleware를 사용해 호출한다.
- callbacks
- authorized: middleware에 matcher를 추가했는데도 작동하지 않는다면, authorized 콜백 함수를 작성해 로그인 페이지로 이동시킬 수 있다. 하지만 middleware에서 이동 시키는게 더 자연스럽다.
로그인 화면은 form 태그를 사용해 만들었고, submit 함수는 아래와 같다.
// (beforeLogin)/_component/loginModal.tsx

const [id, setId] = useState('');
const [password, setPassword] = useState('');
const [message, setMessage] = useState('');
const router = useRouter();

const onSubmit:FormEventHandler<HTMLFormElement> = async (e) => {
  e.preventDefault();
  setMessage('');
  // Client Component 에서는 next-auth 의 signIn을 사용하면된다.
  // id/pw 로그인이기 때문에 credentials 를 입력하고 카카오나 구글 로그인을 추가하려면
  // "kakao", "google" 을 넣어주고 @/auth.ts 에 provider 배열에 kakao, google 을 추가해주면 된다.
  try{
    const response = await signIn("credentials", {
      username: id,
      password,
      redirect: false,
    })

    if (!response?.ok) {
        setMessage('아이디와 비밀번호가 일치하지 않습니다.');
    } else {
      router.replace('/home');
    }

  }catch (e) {
    console.error(e)
    setMessage('아이디와 비밀번호가 일치하지 않습니다.')
  }
};
화면별 권한 체크 with Middleware
app 디렉토리와 동일한 위치에 middleware.ts 파일을 생성하면 라우팅이 되기 전에 특정 액션을 수행할 수 있다.
주로 아래와 같은 액션을 수행한다.
- 인증(쿠키 처리)
- 국가별 페이지 처리
- 크로스 브라우징
- 봇 탐지 및 접근 제한
- 리다이렉트 / rewrite (페이지는 그대로, url 주소를 변경)
- A/B 테스트
- 로깅
// middleware.ts

import {NextResponse} from "next/server";
import {auth} from "./auth";

export async function middleware() {
  //  config 에 정의되어 있는 주소에 접근 할 때 아래의 코드가 실행된다.
  const session = await auth()
  if (!session) {
    return NextResponse.redirect('http://localhost:3000/i/flow/login');
  }
}
export const config = {
  // middleware 를 적용할 Route 들. (로그인을 해야 접근 할 수 있는 화면들)
  matcher: ['/compose/tweet', '/home', '/explore', '/messages', '/search']
}
클라이언트에서 인증 정보를 확인하기 위해선 next-auth 의 useSession 훅을 사용하면 된다.
로그아웃
로그아웃을 하기 전에 쿼리 캐시를 초기화 하고 백앤드 쿠키를 제거해 주어야 한다.
Next-Auth 의 signOut은 session-token 만 제거하기 때문에 connect.sid를 제거하는 API를 별도로 실행시킨다.
// /(afterLogin)/_component/LogoutButton.tsx
"use client"

import style from "./logoutButton.module.css";
import {signOut} from "next-auth/react";
import {useRouter} from "next/navigation";
import {Session} from "@auth/core/types"
import {useQueryClient} from "@tanstack/react-query";

type Props = {
    userInfo:Session | null
}
export default function LogoutButton({userInfo}:Props) {
    const router = useRouter()
    const queryClient = useQueryClient()

    if(!userInfo?.user){
        return null
    }

    const onLogout = () => {
        // 캐싱된 데이터를 없애기 위해 invalidate 시킨다.
        queryClient.invalidateQueries( {
            queryKey:["posts"]
        })
        queryClient.invalidateQueries({
            queryKey:["users"]
        })

        signOut({redirect: false})
            .then(()=>{
                // 브라우저 쿠키에서 백앤드 토큰 제거
                fetch(`${process.env.NEXT_PUBLIC_BASE_URL}/api/logout`,{
                    method:'post',
                    credentials: 'include'
                })
                router.replace('/')
            })
    };

    return (
        <button className={style.logOutButton} onClick={onLogout}>
            <div className={style.logOutUserImage}>
                <img src={userInfo?.user?.image as string} alt={userInfo?.user?.email as string}/>
            </div>
            <div className={style.logOutUserName}>
                <div>{userInfo?.user?.name}</div>
                <div>@{userInfo?.user?.email}</div>
            </div>
        </button>
    )
}
참고