붕어빵 틀로 붕어빵을 찍어내는 마법 같은 매직!
클래스를 사용하여 객체를 만드는 방법! 생성자에 대해 알아보자.
생성자란
생성자의 역할
생성자 호출과 정의
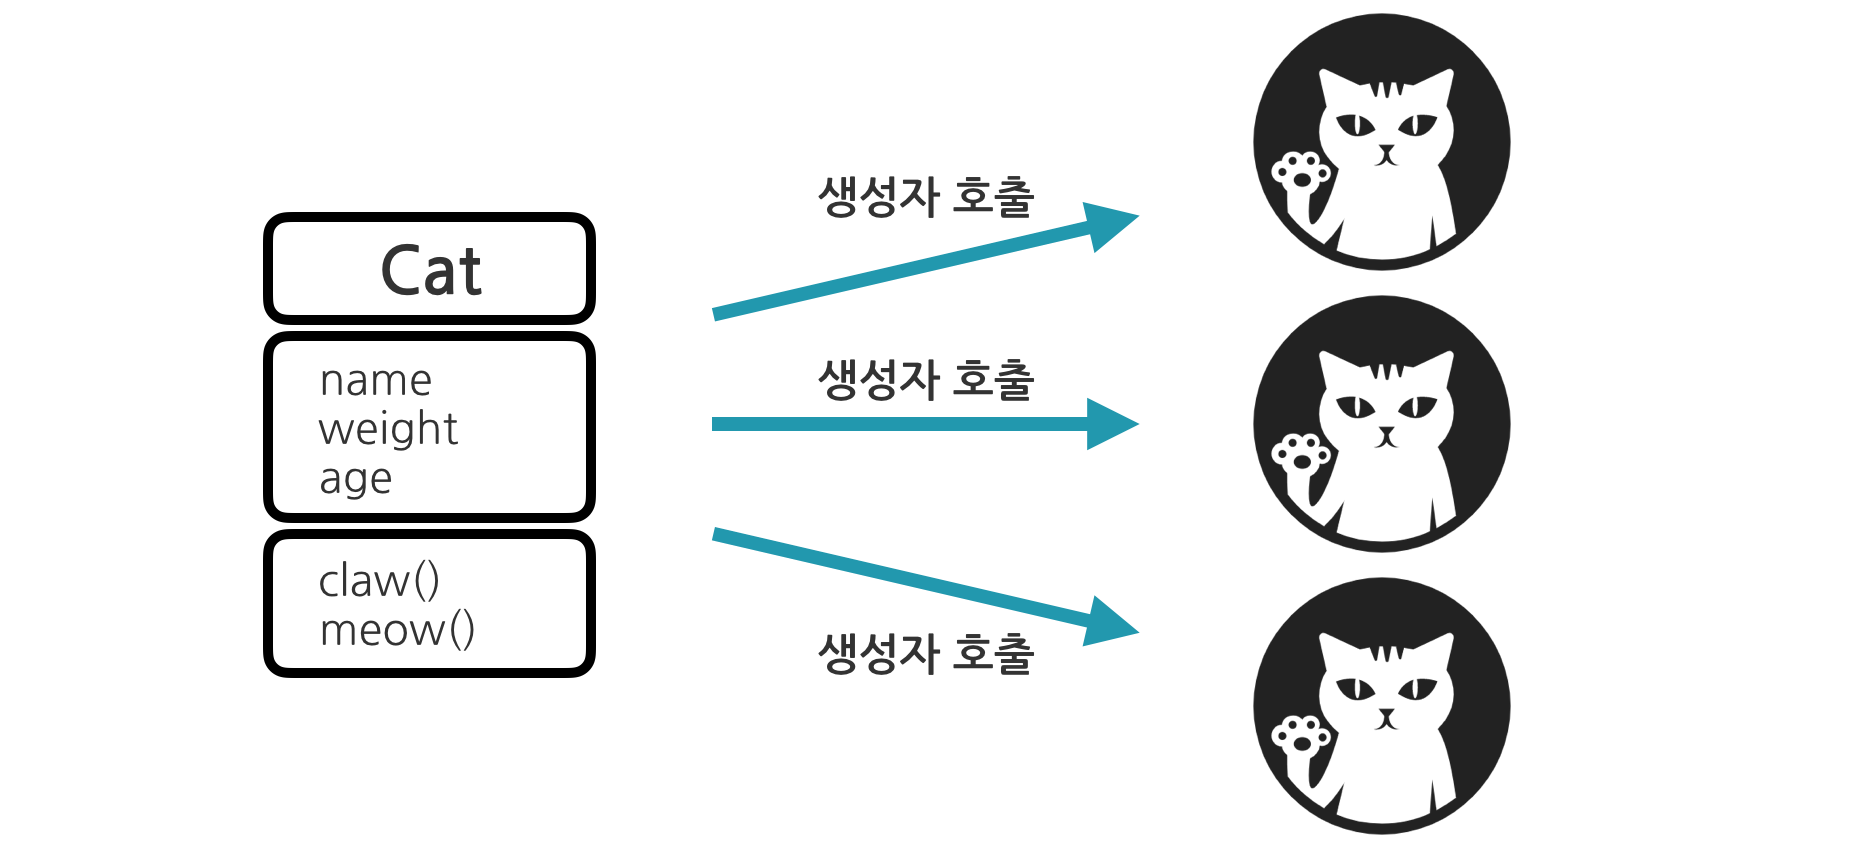
Constructor
definition >> 생성자란, 객체를 만드는 특별한 메소드다.
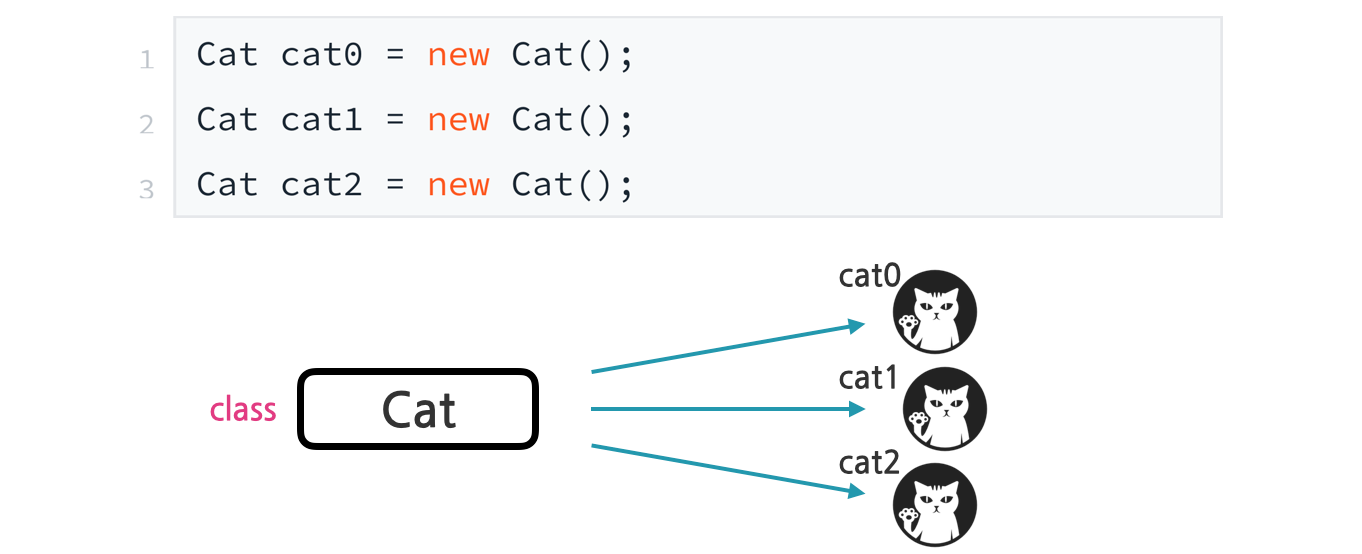
example code >> 우리는 이미 생성자를 사용했었다. 아래 코드에서 생성자를 찾아보자. 정답은 new Cat()이다.
Role of constructor
생성자는 두가지 역할을 한다.
객체 생성 - 객체를 만드는 것
객체 초기화 - 객체의 필드 값을 설정하는 것
before >> 이전 생성자를 몰랐을 당시. 생성자는 객체를 만들기만 했다. 초기화는 따로 진행했었다./* 1. 객체 생성 */ Cat c = new Cat(); /* 2. 필드 초기화 */ c.name = "네로"; c.weight = 3.78; c.age = 3;uses of constuctor >> 생성자를 활용하면, 위 코드를 단 한 줄로 만들 수 있다.
/* 객체 생성과 동시에 초기화 */
Cat c = new Cat("네로", 3.78, 3);
Call out constructor and definition
생성자 또한 특별하지만 메소드이다. 따라서 호출과 정의로 나뉘어 사용된다.
call out constructor >> 생성자 호출 방식은 아래와 같다.// 클래스_타입 변수명 = new 클래스_이름(전달 값); Cat c = new Cat("네로", 3.78, 3);definition of constructor >> 생성자 또한 메소드이므로 사용을 위해 먼저 정의되어야 한다. 일반 메소드와 차이는 리턴 타입이 없다는 것.
class Cat {
  String name;
  double weight;
  int age;
  /* 생성자 정의 */
  Cat (String s, double d, int i) {
    name = s;
    weight = d;
    age = i;
  }
}

1) reset instance as calling out constructor
structure of calling out constructor >> 생성자 호출은, 아래와 같은 형태를 가집니다.
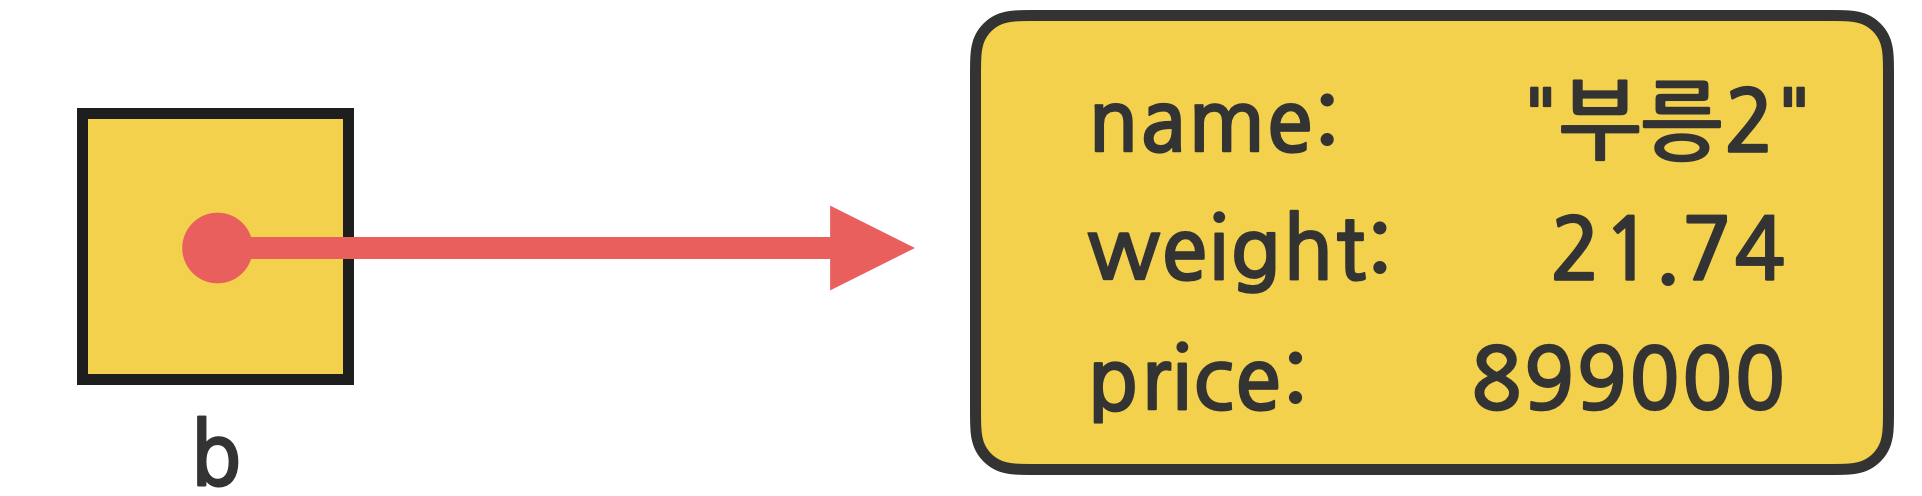
클래스_타입 변수명 = new 클래스_이름(전달값);example of calling out >> 아래는 그 예로, 자전거 객체를 생성과 동시에 초기화하고 있습니다.
Bicycle b = new Bicycle("부릉2", 21.74, 899000);위 코드로 생성되는 객체는 아래와 같은 형태를 지니게 됩니다.
CODEpublic class BicycleTest { public static void main(String[] args) { // 객체 생성 및 초기화 Bicycle b1 = new Bicycle("부릉2", 21.74, 899000); Bicycle b2 = new Bicycle("씽씽2", 12.57, 495000); // 객체 정보 출력 System.out.printf("Bicycle { %s, %.2fkg, %d원 }\n", b1.name, b1.weight, b1.price); System.out.printf("Bicycle { %s, %.2fkg, %d원 }\n", b2.name, b2.weight, b2.price); } } class Bicycle { // 필드 String name; double weight; int price; // 생성자 - 파라미터를 통한 초기화 Bicycle(String n, double w, int p) { name = n; weight = w; price = p; } }
2) String.format() method
string.format() method >> String.format() 메소드는 형식 문자열을 만들어주는 메소드입니다.
String name = "피자맛";
int price = 1200;
String str = String.format("Goroke { %s, %d원 }", name, price);
System.out.println(str);
// => "Goroke { 피자맛, 1200원 }"
difference of printf() >> printf() 메소드와 흡사하지만 출력을 하지 않습니다. 문자열만을 생성합니다.
CODEpublic class GorokeTest { public static void main(String[] args) { /* 1. TOP 3 고로케를 객체로 만드세요. */ Goroke g1 = new Goroke("피자", 1000); Goroke g2 = new Goroke("야채", 800); Goroke g3 = new Goroke("팥", 500); /* 2. 고로케 정보를 출력하세요. */ System.out.println(g1.str()); System.out.println(g2.str()); System.out.println(g3.str()); } } class Goroke { // 필드 String name; int price; // 생성자 Goroke(String n, int p) { name = n; price = p; } // 메소드 String str() { return String.format("Goroke { name: %s, price: %d원 }", name, price); } }
3) definition of constructor
role of constructor >> 적절한 생성자를 정의하면 “객체 생성”뿐만 아니라 동시에 “초기화”까지 할 수 있습니다. 여기서 초기화란, 객체의 초기값을 설정하는 것입니다.
example of calling out constructor >> 예를 들어 콜라 객체를 다음과 같이 생성한다 할 때,Cola c1 = new Cola("코크", 2000);example of constructor definition >> 이를 위한 클래스와 그 생성자는 아래와 같습니다.
class Cola {
  String name;
  int price;
  // 생성자: 이름과 가격을 입력 받아 객체를 초기화
  Cola(String n, int p) {
    name = n;
    price = p;
  }
}
CODE
public class HeroTest {
  public static void main(String[] args) {
    // 객체 생성
    Hero ironMan = new Hero("아이언맨", 80);
    Hero thanos = new Hero("타노스", 160);
    Hero thor = new Hero("토르", 150);
    Hero groot = new Hero("그루트", 40);
    // 모든 객체 정보를 출력
    System.out.println(ironMan.toStr());
    System.out.println(thanos.toStr());
    System.out.println(thor.toStr());
    System.out.println(groot.toStr());
  }
}
// Hero 클래스
class Hero {
  // 필드
  String name;
  int hp;
  // 생성자
  Hero(String NAME, int HP) {
    /* 2. 필드 값을 초기화하세요. */
    name = NAME;
    hp = HP;
  }
  // 메소드
  String toStr() {
    return String.format("Hero { name: %s, hp: %d }", name, hp);
  }
}
4) default constructor
no constructor >> 생성자가 없는 클래스의 경우 객체를 어떻게 만들어야 할까요?
class Hero {
  String name;
  int hp;
}
정답은 아래와 같습니다.
Hero h1 = new Hero(); // 디폴트 생성자 호출
System.out.println(h1.name); // null
System.out.println(h1.hp); // 0
default constructor >> 정의된 생성자 분명 없는데 어떻게 호출이 가능한 것일까요? 생성자가 없는 경우, 자바는 기본 생성자를 추가합니다. 이를 “디폴트 생성자”라 합니다.
class Hero {
  String name;
  int hp;
  // 디폴트 생성자
  // - 파라미터 및 중괄호 내부 없음
  // - 생성자가 없는 경우, 자동 기입 됨
  Hero() { }
}
생성자 없는 경우 >> 디폴트 생성자 자동 기입
생성자가 있는 경우 >> 디폴트 생성자 기입 X
CODEpublic class DrinkTest { public static void main(String[] args) { // 디폴트 생성자로 객체 만들기 Drink d1 = new Drink(); d1.name = "포카리"; d1.price = 1000; // 다른 생성자로 객체 만들기 Drink d2 = new Drink("박카스", 800); // 모든 객체 출력 System.out.println(d1.toStr()); System.out.println(d2.toStr()); } } // 드링크 객체 class Drink { // 필드 String name; int price; /* 1. 디폴트 생성자를 추가하세요. */ Drink() { } // 생성자 Drink(String n, int p) { name = n; price = p; } // 메소드 String toStr() { return String.format("Drink { name: %s, price: %d }", name, price); } }
5) make instance array
객체 또한 배열에 담길 수 있습니다. 아래는 Book 클래스의 배열생성 예입니다.
Book naruto = new Book("나루토");
Book onepiece = new Book("원피스");
Book slamdunk = new Book("슬램덩크");
Book[] comics = { naruto, onepiece, slamdunk };
위 코드를 수행결과는 다음과 같습니다.
CODEpublic class SongTest { public static void main(String[] args) { // 객체 생성 Song s0 = new Song("별헤는 밤", "유재하"); Song s1 = new Song("비상", "임재범"); Song s2 = new Song("비밀", "박완규"); // 객체 배열 생성 Song[] songs = {s0, s1, s2}; // 모든 배열 속 객체 출력 for (int i = 0; i < songs.length; i++) { /* 2. 객체 정보를 출력하세요. */ System.out.println(songs[i].toStr()); } } } class Song { // 필드 String name; String singer; // 생성자 Song(String n, String s) { name = n; singer = s; } // 메소드 String toStr() { return String.format("Song { name: %s, singer: %s }", name, singer); } }

6) send instance as parameter
class type parameter >> 객체 또한 메소드의 파라미터로 전달 가능합니다.
class Hero {
  String name;
  int hp;
  Hero(String n, int h) {
    name = n;
    hp = h;
  }
  void punch(Hero enemy) {
    // 내용 생략
  }
}
send instance as parameter >> 위 punch() 메소드는 아래와 같이 호출할 수 있습니다.
// 객체 생성
Hero ironMan = new Hero("아이언 맨", 30);
Hero captain = new Hero("캡틴 아메리카", 30);
// 아이언 맨의 펀치 -> 캡틴 아메리카
ironMan.punch(captain);
// 캡틴 아메리카의 펀치 -> 아이언맨
captain.punch(ironMan);
CODE
public class HeroTest {
  public static void main(String[] args) {
    // 객체 생성
    Hero thor = new Hero("토르", 150);     // thor -> {"토르", 150}
    Hero thanos = new Hero("타노스", 160); // thanos -> {"타노스", 160}
    // 토르의 펀치 -> 타노스
    thor.punch(thanos);
    /* 2.코드를 추가하여 펀치를 주고 받으세요. */
    thanos.punch(thor);
    thanos.punch(thor);
  }
}
class Hero {
  // 필드
  String name;
  int hp;
  // 생성자
  Hero(String s, int i) {
    name = s;
    hp = i;
  }
  // 메소드
  void punch(Hero enemy) {
    // 때린 주체 객체
    System.out.printf("[%s]의 펀치!! ", name);
    /* 1. 맞은 객체에 대한 정보를 출력하세요. */
    System.out.printf("%s의 HP: %d -> ", enemy.name, enemy.hp);
    enemy.hp -= 10;
    System.out.printf("%d\n", enemy.hp);
  }
}
7) review: marine and medic
CODE
public class Starcraft {
  public static void main(String[] args) {
    // 객체 생성
    Marine marine = new Marine("레이너", 80);
    Medic medic = new Medic("모랄레스", 60);
    // 마린 스팀팩 버프~
    marine.stimpack();
    // 메딕의 치료 -> 마린
    medic.heal(marine);
  }
}
// 마린 클래스
class Marine {
  // 필드
  String name;
  int hp;
  // 생성자
  public Marine(String name, int hp) {
    this.name = name;
    this.hp = hp;
  }
  // 메소드
  public void stimpack() {
    System.out.printf("[%s]의 스팀팩! HP: %d -> ", name, hp);
    hp -= 10;
    System.out.printf("%d\n",hp);
  }
}
// 메딕 클래스
class Medic {
  // 필드
  String name;
  int hp;
  // 생성자
  public Medic(String name, int hp) {
    this.name = name;
    this.hp = hp;
  }
  // 메소드
  public void heal(Marine target) {
    System.out.printf("[%s]의 치유! => [%s] HP(%d -> ", name, target.name, target.hp);
    target.hp += 10;
    System.out.printf("%d)\n", target.hp);
  }
}