
안녕하세요
😀 오랜만에 글을 적네요. 이번에는 뷰바인딩에 대해 한번 적어보겠습니다
뷰바인딩이란..
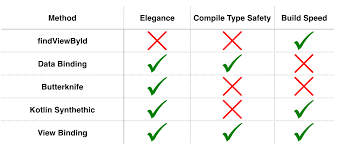
밑에 보이는 것 처럼 엘레강스, 컴파일 세이프티, 빌드 스피드에서 다른 것들보다 우월하고 findViewById를 사용 안하고 binding.각 id 로 사용할 수 있습니다. 코드 수를 줄일 수 있고 위에서 말했듯이 여러 장점이 있습니다.
뷰바인딩 사용법 (액티비티)
빌드.그래들 (모듈) 에 이것을 넣어 주세요
1.
android {

buildFeatures {
	viewBinding true
 	}
}
2. onCreat 위에 이것을 넣어 주세요.
//뷰바인딩
    private var mBinding : ActivityMainBinding? = null
    private val binding get() = mBinding!!
3. super.onCreat 밑에 이것을 넣어주세요. ActivityMainBinding은 각 파일 이름을 넣으시면 됩니다.
mBinding = ActivityMainBinding.inflate(layoutInflater)
setContentView(binding.root)
4. 3번을 했다면 onCreat 밖에 이것을 넣어주세요. 이 코드는 메모리 누수를 막기 위한 코드 입니다.
override fun onDestroy() {
        mBinding = null
        super.onDestroy()
    }
이 코드는 액티비티 페이지에서만 사용이 가능하고 프래그 먼트에서 사용을 하시려면 밑에 있는 것을 따라와 주시면 됩니다
뷰바인딩 사용법 (프래그먼트)
1.
android {

buildFeatures {
	viewBinding true
 	}
}
2. onCreat 위에 이것을 넣어 주세요.
//뷰바인딩
    private var mBinding : ActivityMainBinding? = null
    private val binding get() = mBinding!!
3. onCreatView 에서 View 안에 이 코드를 넣어 주세요. FragmentMainBinding은 파일 이름 입니다.
mBinding = FragmentMainBinding.inflate(inflater, container, false)
	여
	기
	에
	코
	드
return binding.root
위에 보이시는 것 처럼 저 두 사이에 코드를 적어주시면 됩니다.
4. 3번을 했다면 onCreat 밖에 이것을 넣어주세요. 이 코드는 메모리 누수를 막기 위한 코드 입니다.
override fun onDestroy() {
        mBinding = null
        super.onDestroy()
    }
Law of Attraction