들어가며
최근에 쿠버네티스의 kubectl 명령어를 사용하다 CRD(CustomResourceDefinition)의 정보 출력이 너무 빈약해 가시성이 부족하다는 생각을 했습니다.
Pod에 대한 정보를 보고자 할 때를 보면 아래처럼 기본적으로 다양한 Column을 통해 메타데이터를 보여줍니다.
$ kubectl get pod -A
NAMESPACE           NAME                                  READY   STATUS    RESTARTS      AGE
istio-system        istiod-d56968787-h7mvp                1/1     Running   0             17d
istio-system        jaeger-697d898d6-89glh                1/1     Running   0             17d
하지만, CRD의 경우는 기본적으로 (NAME, CREATED AT) 단 두 개의 정보만 보여주고 있습니다.
$ kubectl get crd
NAME                                         CREATED AT
authorizationpolicies.security.istio.io      2025-04-14T08:52:44Z
ciliumcidrgroups.cilium.io                   2025-04-14T08:51:22Z
그래서 "CRD도 조금 더 가시성을 위한 Column 지정과 출력이 있었으면 좋겠다"고 생각했고, 현재 이에 대한 Pull Request를 올려놓았고, 이를 어떻게 진행했는지 기록하고자 합니다.
Column Print 구현 찾기
먼저, kubectl get 요청을 debug level을 설정해서 한 번 보겠습니다.
$ kubectl get pod -v=7
...
I0504 20:35:22.698355    7669 round_trippers.go:527] "Request" verb="GET" url="https://801B829705CF18B56638CE5A83789AE4.sk1.ap-northeast-1.eks.amazonaws.com/api/v1/namespaces/default/pods?limit=500" headers=<
	Accept: application/json;as=Table;v=v1;g=meta.k8s.io,application/json;as=Table;v=v1beta1;g=meta.k8s.io,application/json
	User-Agent: kubectl/v1.33.0 (darwin/arm64) kubernetes/60a317e
 >
I0504 20:35:23.142952    7669 round_trippers.go:632] "Response" status="200 OK" milliseconds=444
No resources found in default namespace.
위 출력에서 application/json;as=Table;v=v1;g=meta.k8s.io 헤더는 Kubernetes API 서버에 “응답을 Table 형식으로 가공해서 JSON으로 보내 달라”는 요청을 나타냅니다. 각 부분의 의미는 다음과 같습니다:
application/json
결과를 JSON 포맷으로 받고 싶다는 뜻입니다.
as=Table
Kubernetes API의 Table “subresource” 타입으로 변환해 달라는 요청입니다.
원래 API 리소스(예: Pod, Deployment 등)는 JSON 객체로 오는데, Table 형식을 요청하면 사람이 읽기 편한 표(table) 구조—즉 columnDefinitions, rows 등으로 구성된 JSON-로 바꿔서 내려줍니다.
이러한 ConvertToTable을 행하는 TableConvertor를 각 Resource가 가지게 되는데, 아래의 Deployment의 NewRest 함수를 보면 TableConvertor가 있는 것을 알 수 있습니다.
// NewREST returns a RESTStorage object that will work against deployments.
func NewREST(optsGetter generic.RESTOptionsGetter) (*REST, *StatusREST, *RollbackREST, error) {
	store := &genericregistry.Store{
		NewFunc:                   func() runtime.Object { return &apps.Deployment{} },
		NewListFunc:               func() runtime.Object { return &apps.DeploymentList{} },
		DefaultQualifiedResource:  apps.Resource("deployments"),
		SingularQualifiedResource: apps.Resource("deployment"),

		CreateStrategy:      deployment.Strategy,
		UpdateStrategy:      deployment.Strategy,
		DeleteStrategy:      deployment.Strategy,
		ResetFieldsStrategy: deployment.Strategy,

		TableConvertor: printerstorage.TableConvertor{TableGenerator: printers.NewTableGenerator().With(printersinternal.AddHandlers)},
	}
	options := &generic.StoreOptions{RESTOptions: optsGetter}
	if err := store.CompleteWithOptions(options); err != nil {
		return nil, nil, nil, err
	}

	statusStore := *store
	statusStore.UpdateStrategy = deployment.StatusStrategy
	statusStore.ResetFieldsStrategy = deployment.StatusStrategy
	return &REST{store}, &StatusREST{store: &statusStore}, &RollbackREST{store: store}, nil
}
CRD의 경우 TableConvertor를 보니, 아래와 같이 Name, Creation Timestamp만 출력하는 NewDefaultTableConvertor가 설정되어 있었고 8년 전에 적힌 //TODO로 다른 정보도 보여주는 것에 대해 고민한 부분이 있었습니다.
// NewREST returns a RESTStorage object that will work against API services.
func NewREST(scheme *runtime.Scheme, optsGetter generic.RESTOptionsGetter) (*REST, error) {
	strategy := NewStrategy(scheme)

	store := &genericregistry.Store{
		NewFunc:                   func() runtime.Object { return &apiextensions.CustomResourceDefinition{} },
		NewListFunc:               func() runtime.Object { return &apiextensions.CustomResourceDefinitionList{} },
		PredicateFunc:             MatchCustomResourceDefinition,
		DefaultQualifiedResource:  apiextensions.Resource("customresourcedefinitions"),
		SingularQualifiedResource: apiextensions.Resource("customresourcedefinition"),

		CreateStrategy:      strategy,
		UpdateStrategy:      strategy,
		DeleteStrategy:      strategy,
		ResetFieldsStrategy: strategy,

		// TODO: define table converter that exposes more than name/creation timestamp
		TableConvertor: rest.NewDefaultTableConvertor(apiextensions.Resource("customresourcedefinitions")),
	}
	options := &generic.StoreOptions{RESTOptions: optsGetter, AttrFunc: GetAttrs}
	if err := store.CompleteWithOptions(options); err != nil {
		return nil, err
	}
	return &REST{store}, nil
}
그래서 TableConver와 관련된 구현을 파고 파서 CRD 전용 Column Print를 구현하였고, 이는 PR에서 더 자세히 볼 수 있습니다.
수정사항에 대한 TEST를 어떻게 하나 ?
제가 수정한 부분이 반영되어 실제 클러스터에서 동작하는지 알아봐야 했기에 Deepwiki-kubernetes를 참고해서 테스트를 수행했습니다.
prerequisite
저의 경우 MAC M3 환경에서 쿠버네티스의 shell script를 동작시키는 데 있어서 아래와 같이 Bash의 버전 때문에 실행이 안되었습니다.
$ hack/install-etcd.sh
ERROR: This script requires a minimum bash version of 4.2, but got version of 3.2
On macOS with homebrew 'brew install bash' is sufficient.
만약, 저처럼 MAC 환경에서 쿠버네티스 sh를 실행해야 한다면 https://edu.chainguard.dev/open-source/update-bash-macos/ 를 수행해주신 후 동작시키셔야 합니다.
local up cluster
fork한 쿠버네티스 저장소의 코드를 베이스로 클러스터를 셋업 시켜주는 스크립트가 아래와 같습니다.
hack/local-up-cluster.sh 를 실행시킬 때는 sudo로 해줘야 권한 문제가 나타나지 않습니다.
$ pwd
/Users/byeonjaehan/projects/kubernetes
$ hack/install-etcd.sh
export PATH="${PATH}:/Users/byeonjaehan/projects/kubernetes/third_party/etcd"
$ export PATH="${PATH}:/Users/byeonjaehan/projects/kubernetes/third_party/etcd"
$ sudo hack/local-up-cluster.sh
아래 결과가 나오면 성공적으로 클러스터가 셋업된 것이고, 다른 터미널을 열어
export KUBECONFIG=/var/run/kubernetes/admin.kubeconfig 입력하면 접근이 가능합니다.
No kubelet was started because you set START_MODE=nokubelet
Run this script again with START_MODE=kubeletonly to run a kubelet

To start using your cluster, you can open up another terminal/tab and run:

  export KUBECONFIG=/var/run/kubernetes/admin.kubeconfig
  cluster/kubectl.sh

Alternatively, you can write to the default kubeconfig:

  export KUBERNETES_PROVIDER=local

  cluster/kubectl.sh config set-cluster local --server=https://localhost:6443 --certificate-authority=/var/run/kubernetes/server-ca.crt
  cluster/kubectl.sh config set-credentials myself --client-key=/var/run/kubernetes/client-admin.key --client-certificate=/var/run/kubernetes/client-admin.crt
  cluster/kubectl.sh config set-context local --cluster=local --user=myself
  cluster/kubectl.sh config use-context local
  cluster/kubectl.sh
셋업한 클러스터에 kubectl get crd 명령을 날려보면 제 의도와 맞게 구현된 것을 확인할 수 있습니다.
jaehan 🚀 ~/projects/kubernetes ↱ master
export KUBECONFIG=/var/run/kubernetes/admin.kubeconfig
jaehan 🚀 ~/projects/kubernetes ↱ master
k get crd
No resources found
jaehan 🚀 ~/projects/kubernetes ↱ master
>apiVersion: apiextensions.k8s.io/v1
kind: CustomResourceDefinition
metadata:
name: foos.sample.example.com
spec:
group: sample.example.com
versions:
- name: v1
served: true
storage: true
schema:
openAPIV3Schema:
type: object
properties:
spec:
type: object
properties:
bar:
type: string
- name: v1beta1
served: true
storage: false
schema:
openAPIV3Schema:
type: object
properties:
spec:
type: object
properties:
bar:
type: string
scope: Namespaced
names:
plural: foos
singular: foo
kind: Foo
shortNames:
- f
EOF
customresourcedefinition.apiextensions.k8s.io/foos.sample.example.com created
jaehan 🚀 ~/projects/kubernetes ↱ master
k get crd
NAME GROUP SCOPE VERSIONS CREATED AT
foos.sample.example.com sample.example.com Namespaced v1,v1beta1 2025-05-04T12:03:10ZPR 제출하기 전 수행해야 할 프로세스
쿠버네티스 컨트리뷰션 가이드를 보면, 아래와 같이 Run Local Verifications을 수행하라고 나와 있습니다.
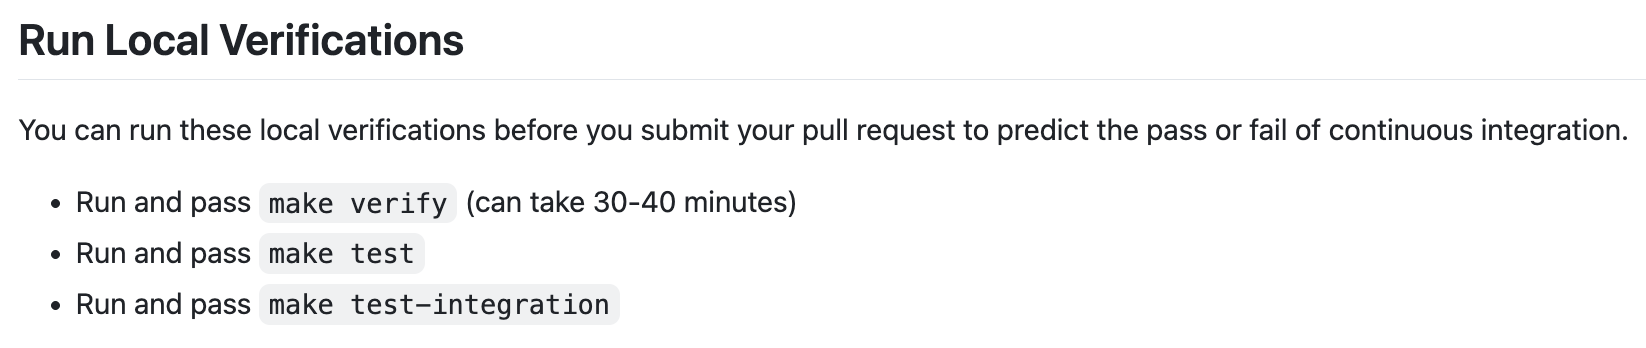
저도 첫 번째 단계인 make verify 과정에서 시간을 좀 많이 잡아먹혔는데요.
boilerplate 검증, vendor 검증 등 테스트가 실패할 때마다 각 테스트 sh을 실행시켜 문제를 해결해나갔고 모든 테스트를 pass 하게 하였습니다.
특히, 위 세 개의 Test는 MAC 환경이 아닌, Ubuntu와 같은 실 Linux 환경에서 수행하시는 것을 추천드립니다. GOOS=linux를 기준으로 대부분의 테스트가 셋팅되어 추가적인 환경 변수 셋팅이나 작업이 필요하기 때문에 저는 Ubuntu EC2에서 해당 부분은 진행했습니다.
PR 올리기
위 과정이 끝났으면 PR을 올리면 됩니다.
쿠버네티스의 경우 Pull Request Template이 다른 오픈소스와는 다르게 간소하여 포맷에 맞춰서 올리는 데 어려움은 없으리라고 생각합니다.
마무리하며
이번 글에서는 CRD(CustomResourceDefinition)의 기본 출력 정보가 부족해 가시성이 떨어진다는 문제의식에서 출발해, TableConvertor 구조와 ConvertToTable 동작 방식을 분석하고, CRD 전용 컬럼 출력을 추가하기까지의 과정을 살펴보았습니다.