1. Views(뷰)와 Templates(템플릿)
-
Views : 장고의 모델(DB)을 읽어서 정보를 활용하여 출력(렌더링)하는 역할.
-
Temaplates : html 코드를 활용하여 데이터를 예쁘게 출력하는 도구.
이를 활용한 예시 절차는 다음과 같습니다.
- polls/views.py를 다음과 같이 수정.
from django.http import HttpResponse
from .models import *
from django.shortcuts import render

def index(request):
	# 가장 최근에 생성된 5개의 질문
	latest_question_list = Question.objects.order_by('-pub_date')[:5]
    # 템플릿에 넘겨 주기 위한 context 변수에 값 입력.
	context = {'first_question' : latest_question_list[0]}
	# request에 대해서 polls/index.html을 렌더링하며 이때 인자로 context를 넘겨 줌.
    return render(request, 'polls/index.html', context)

def some_url(request):
return HttpResponse("Some URL !!")-
polls 디렉토리에서 templates/polls 디렉토리 생성.
-
polls/templates/polls/index.html 코드를 다음과 같이 수정.
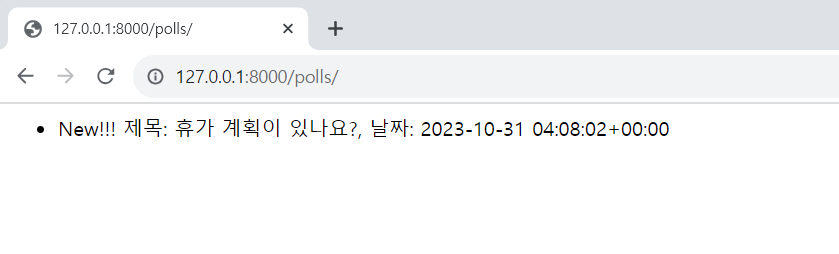
<ul>
    <li>{{first_question}}</li>
</ul>
출력화면)
추가로, Templates을 활용하여 반복문 및 조건문을 실행할 수도 있습니다.
그 예시는 다음과 같습니다.
- polls/views.py 파일을 다음과 같이 수정.
from django.http import HttpResponse
from .models import *
from django.shortcuts import render

def index(request):
	latest_question_list = Question.objects.order_by('-pub_date')[:5]
	context = {'questions' : []}
	return render(request, 'polls/index.html', context)

def some_url(request):
return HttpResponse("Some URL !!")- polls/templates/polls/index.html 파일을 다음과 같이 수정.
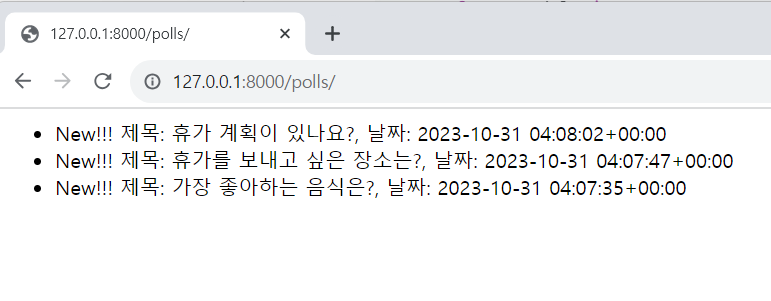
파이썬과 유사한 방식으로 제어문 사용이 가능하지만, 문법이 약간 다르므로 이를 주의해야 합니다. 제어문 : {% %} / 변수 : {{ }}
<!-- 만약 questions가 있다면 -->
{% if questions %}
<ul>
{% for question in questions %}
<li>{{question}}</li>
{% endfor %}
</ul>
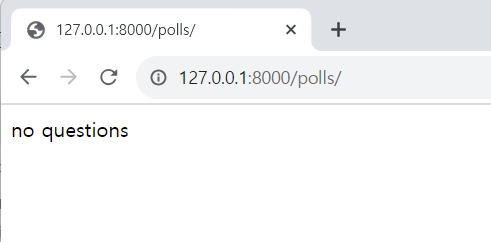
<!-- questions가 없다면 -->
{% else %}
<p>no questions</p>
{% endif %}결과 화면1(questions가 있는 경우)
결과 화면2(questions가 없는 경우)
2. 상세 페이지 만들기
question의 id에 따라 특정 상세 페이지를 만들 수가 있습니다.
예시 코드 절차는 다음과 같습니다.
- polls/urls.py를 다음과 같이 수정.
from django.urls import path
from . import views

urlpatterns = [
	# url이 비어서 들어올 경우(예, 127.0.0.1:8000/polls or 127.0.0.1:8000/polls/)
    # 해당 처리를 views.index로 보내며, 해당 이름은 'index'로 한다.
	path('', views.index, name='index'),
    path('some_url', views.some_url),

    # "polls/숫자/" URL이 입력되면 views.detail로
    # 전송(request)하며, question_id를 인자로 전달.
    path('<int:question_id>/', views.detail, name='detail')
]- polls/views.py를 다음과 같이 수정.
from django.http import HttpResponse
from .models import *
from django.shortcuts import render

def index(request):
	latest_question_list = Question.objects.order_by('-pub_date')[:5]
	context = {'questions' : latest_question_list}
	return render(request, 'polls/index.html', context)

def some_url(request):
	return HttpResponse("Some URL !!")

# detail
def detail(request, question_id):
	# 해당 question_id를 갖는 Question을 찾아 question에 저장.
	question = Question.objects.get(pk=question_id)
	# polls/detail.html 템플릿으로 렌더링 처리.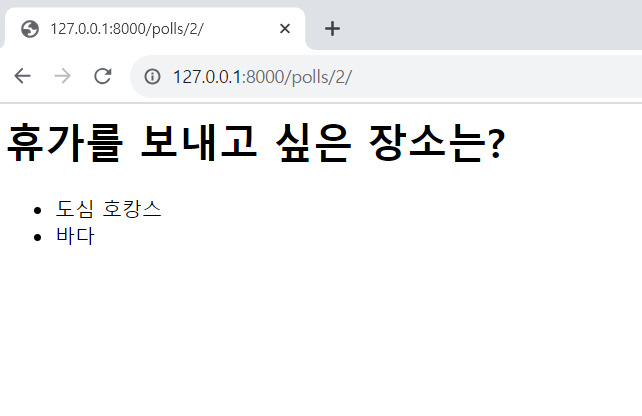
return render(request, 'polls/detail.html', {'question' : question})- polls/templates/polls/detail.html 파일을 다음과 같이 수정.
<h1>{{question.question_text}}</h1>
<ul>
    <!-- **주의사항** -->
  	<!-- django shell과 달리, set.all() 함수 호출을 set.all로 호출. -->
    {% for choice in question.choice_set.all %}
        <li>{{choice.choice_text}}</li>
    {% endfor %}
</ul>
출력 화면)
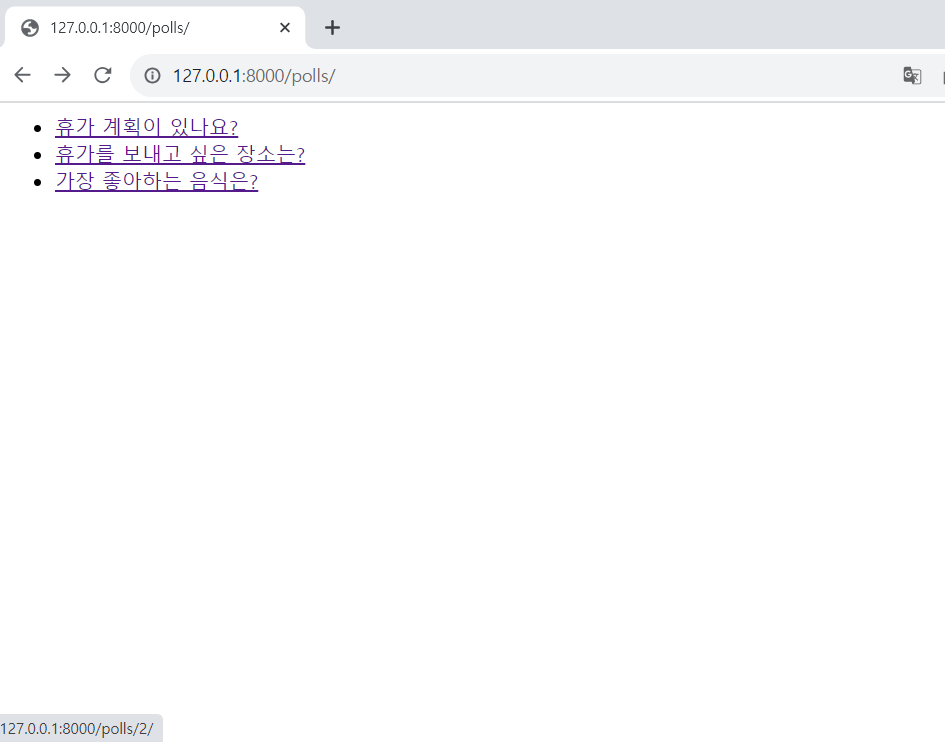
3. 상세 페이지 링크 추가하기
html 코드에서 <a href=""></a> 형식으로 링크를 추가하는 것을 django에서는 다음과 같이 활용합니다.
- polls/urls.py 파일을 다음과 같이 수정. (해당 app의 이름 설정.)
from django.urls import path
from . import views

# 해당 앱의 이름 설정.
app_name = 'polls'
urlpatterns = [
	# url이 비어서 들어올 경우(예, 127.0.0.1:8000/polls or 127.0.0.1:8000/polls/)
    # 해당 처리를 views.index로 보내며, 해당 이름은 'index'로 한다.
	path('', views.index, name='index'),
    path('some_url', views.some_url),
    path('<int:question_id>/', views.detail, name='detail')
]- polls/templates/polls/index.html 파일을 다음과 같이 수정.
<!-- 만약 questions가 있다면 -->
{% if questions %}
<ul>
    {% for question in questions %}
        <!-- href="/polls/{{question.id}}"와 똑같지만, 더욱 간편함. -->
  		<!-- polls 앱의 detail이라는 name을 가진 url을 입력하고 -->
  		<!-- 이때, detail에 question.id를 인자로 넘겨준다. -->
        <li><a href="{% url 'polls:detail' question.id %}">{{question.question_text}}</a></li>
    {% endfor %}
</ul>
<!-- questions가 없다면 -->
{% else %}
<p>no questions</p>
{% endif %}
출력 화면)
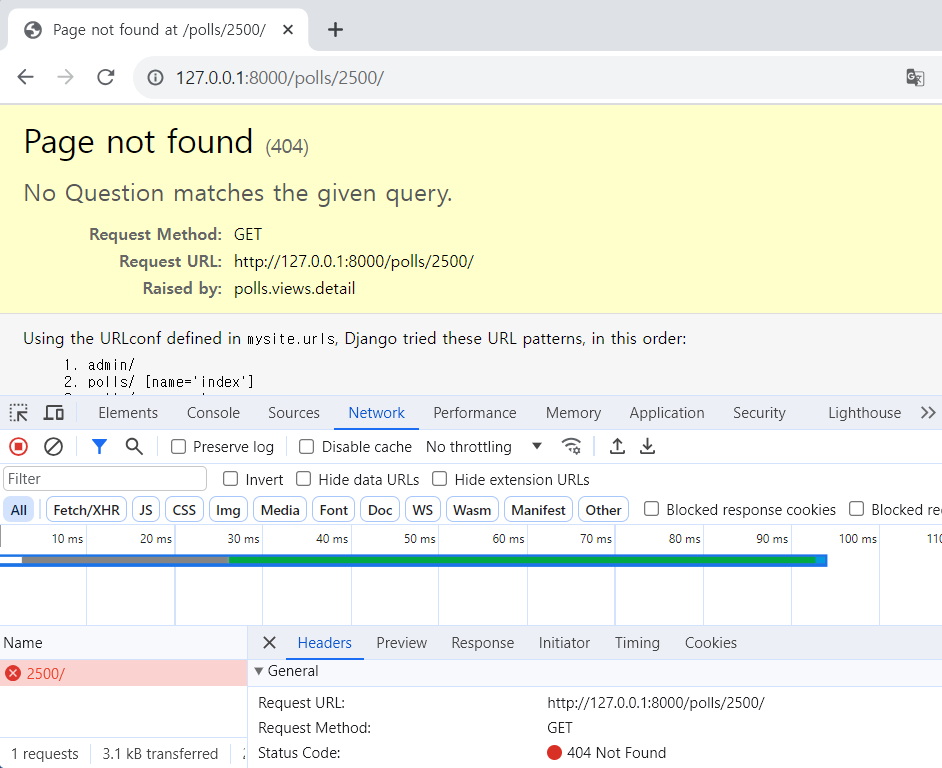
4. 404 Error 처리하기
- Status code 500 : server 문제.
- Status code 404 : 페이지 없음.
위와 같이 페이지가 없는 경우 404 error가 발생해야 합니다. 하지만, "http://127.0.0.1:8000/polls/2500/" 와 같이 입력하면 404 error가 아닌 500 error가 발생합니다.
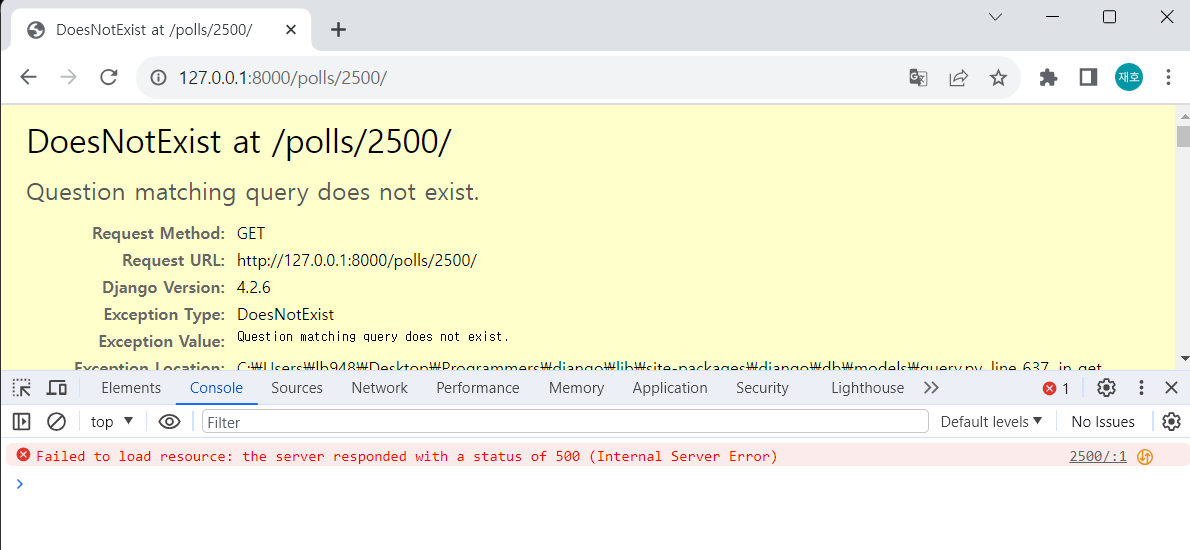
이는 get(pk=2500)의 쿼리에 대한 결과를 찾을 수가 없어 발생한 것입니다.
따라서 존재하지 않는 pk에 대해서 예외 처리를 해 주어야 합니다.
예외 처리가 적용된 코드는 다음과 같습니다.
- polls/views.py
from django.http import HttpResponse
from .models import *
from django.shortcuts import render
from django.http import Http404 # Http404 임포트

def index(request):
	latest_question_list = Question.objects.order_by('-pub_date')[:5]
	context = {'questions' : latest_question_list}
	return render(request, 'polls/index.html', context)

def some_url(request):
	return HttpResponse("Some URL !!")

def detail(request, question_id):
	# 예외 처리문 추가
    try:
		question = Question.objects.get(pk=question_id)
	except Question.DoesNotExist:
		raise Http404("Question does not exist")
	return render(request, 'polls/detail.html', {'question' : question})
하지만 장고에서는 위 404 error에 대한 편리한 모듈("get_object_or_404")을 제공하고 있어, 위 코드보다 보다 간편한 방법이 있습니다.
코드는 다음과 같습니다.
- polls/views.py
from django.http import HttpResponse
from .models import *
from django.shortcuts import render, get_object_or_404
# from django.http import Http404

def index(request):
	latest_question_list = Question.objects.order_by('-pub_date')[:5]
	context = {'questions' : latest_question_list}
	return render(request, 'polls/index.html', context)

def some_url(request):
	return HttpResponse("Some URL !!")

def detail(request, question_id):
    """
    try:
        question = Question.objects.get(pk=question_id)
    except Question.DoesNotExist:
        raise Http404("Question does not exist")
    """
    question = get_object_or_404(Question, pk=question_id)
    return render(request, 'polls/detail.html', {'question': question})
결과 화면)
5. Forms(폼) 처리
Django에서 여러 폼을 다룰 수가 있습니다.
예시로 웹 페이지에서 사용자들에게 투표를 받는 기능을 만들어 봅니다.
- Choice를 선택 가능한 폼으로 변경.
polls/templates/polls/detail.html을 수정.
<form action='#' method='post'>
    <h1>{{question.question_text}}</h1>

    {% for choice in question.choice_set.all %}
        <input type="radio" name="choice" id="choice{{ forloop.counter}}" value="{{choice.id}}">
        <label for="choice{{ forloop.counter }}">
            {{ choice.choice_text }}
        </label>
        <br>
    {% endfor %}

<input type="submit" value="Vote">
</form>
결과 화면)

- 위 페이지에서 Vote를 누르면, 403 Error가 발생합니다. 원인은 token을 지정해 주지 않고 제출하였기 때문입니다. 따라서, detail.html에 token을 만들어 주어야 합니다.
- polls/templates/polls/detail.html
<form action='#' method='post'>
  <!-- token 추가 -->
    {% csrf_token %}
    <h1>{{question.question_text}}</h1>

    {% for choice in question.choice_set.all %}
        <input type="radio" name="choice" id="choice{{ forloop.counter}}" value="{{choice.id}}">
        <label for="choice{{ forloop.counter }}">
            {{ choice.choice_text }}
        </label>
        <br>
    {% endfor %}

<input type="submit" value="Vote">
</form>- token을 만들었으니 이제 action의 주소를 설정해 주어야 합니다. 선택에 따른 투표수 증가 기능을 구현합니다.
- polls/urls.py
from django.urls import path
from . import views

app_name = 'polls'
urlpatterns = [
	path('', views.index, name='index'),
    path('<int:question_id>/', views.detail, name='detail'),
    # vote에 대한 경로 추가
    path('<int:question_id>/vote/', views.vote, name='vote'),
]- polls/views.py
from django.http import HttpResponse
from .models import *
from django.shortcuts import render, get_object_or_404
# from django.http import Http404

def index(request):
	latest_question_list = Question.objects.order_by('-pub_date')[:5]
	context = {'questions' : latest_question_list}
	return render(request, 'polls/index.html', context)

def some_url(request):
	return HttpResponse("Some URL !!")

def detail(request, question_id):
    """
    try:
        question = Question.objects.get(pk=question_id)
    except Question.DoesNotExist:
        raise Http404("Question does not exist")
    """
    question = get_object_or_404(Question, pk=question_id)
    return render(request, 'polls/detail.html', {'question': question})

# vote view 정의
def vote(request, question_id):
	question = get_object_or_404(Question, pk=question_id)
    # 선택된 초이스는 request의 name='choice'인
    # input의 값(choice.id)을 받아서 pk가 같은 초이스를 찾음.
	selected_choice = question.choice_set.get(pk=request.POST['choice'])
    selected_choice.votes += 1
    selected_choice.save()
    # vote 처리 후 polls의 index로 이동.
return HttpResponseRedirect(reverse('polls:index'))- polls/templates/polls/detail.html
<!-- polls의 vote에 question.id를 함께 전송한다. -->
<form action='{% url 'polls:vote' question.id %}' method='post'>
    {% csrf_token %}
    <h1>{{question.question_text}}</h1>

    {% for choice in question.choice_set.all %}
  		<!-- forloop.counter로 숫자를 1씩 증가시킨다. -->
        <input type="radio" name="choice" id="choice{{ forloop.counter}}" value="{{choice.id}}">
        <label for="choice{{ forloop.counter }}">
            {{ choice.choice_text }}
        </label>
        <br>
    {% endfor %}

<input type="submit" value="Vote">
</form>- 결과 화면)
투표 전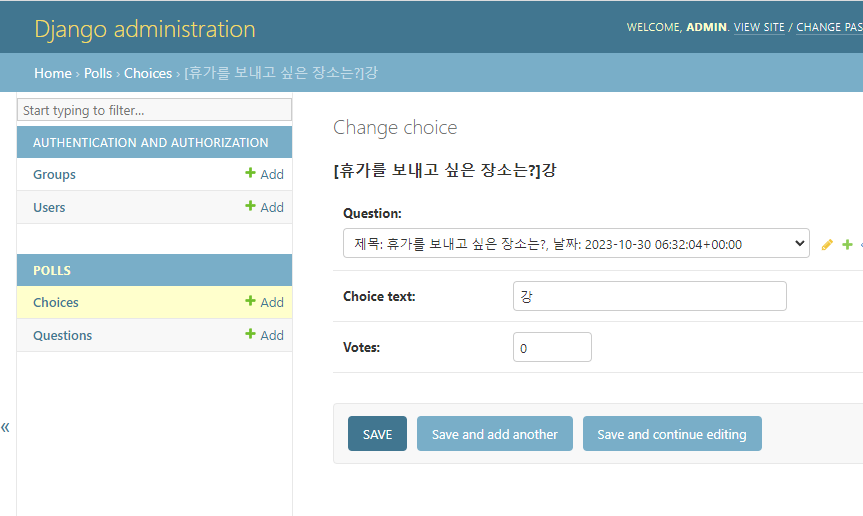
투표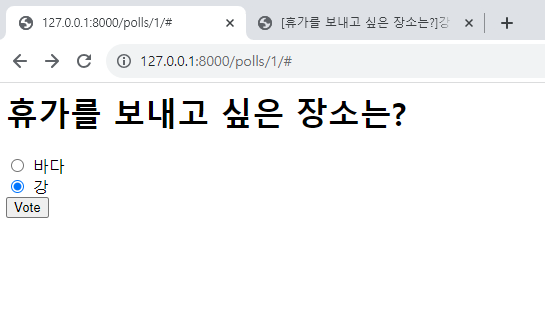
투표 후
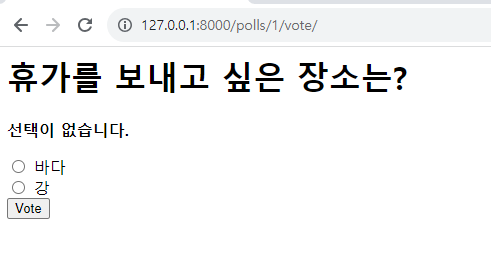
- 다만, 위 상황에서 선택을 하지 않고 Vote를 누를 경우, 에러가 발생합니다. 따라서, 예외 처리(방어 코드)를 추가해 줍니다.
- polls/views.py
from django.http import HttpResponse, HttpResponseRedirect
from .models import *
from django.shortcuts import render, get_object_or_404
from django.urls import reverse

def index(request):
	latest_question_list = Question.objects.order_by('-pub_date')[:5]
	context = {'questions' : latest_question_list}
	return render(request, 'polls/index.html', context)

def detail(request, question_id):
    question = get_object_or_404(Question, pk=question_id)
    return render(request, 'polls/detail.html', {'question': question})

def vote(request, question_id):
    question = get_object_or_404(Question, pk=question_id)
    # selected_choice가 있으면 받고, 없으면 error message 출력.
    try:
        selected_choice = question.choice_set.get(pk=request.POST['choice'])
    except (KeyError, Choice.DoesNotExist):
        return render(request, 'polls/detail.html', {'question' : question, 'error_message' : '선택이 없습니다.'})
    selected_choice.votes += 1
    selected_choice.save()
return HttpResponseRedirect(reverse('polls:index'))- 선택하지 않고 Vote 클릭 시의 화면)
6. 에러 방어하기
브라우저 혹은 서버 상에서 여러 가지 에러가 발생할 수 있습니다. 따라서, 이러한 에러들에 대한 방어 처리가 필요합니다.
- 투표 웹 페이지에서 투표를 하려고 하는데, 해당 선택이 서버 DB에서 사라진 경우 -> "Choice.DoesNotExist"가 필요.
- 투표 후 해당 value 값을 넘겨주는데, 해당 id를 가진 선택이 없는 경우(브라우저 상의 오류) -> id 값의 확인 필요.
- polls/views.py
def vote(request, question_id):
    question = get_object_or_404(Question, pk=question_id)
    try:
        selected_choice = question.choice_set.get(pk=request.POST['choice'])
    # 예외 처리 구문
    except (KeyError, Choice.DoesNotExist):
    	# 에러 메시지 출력 및 전달 받은 값 출력
        return render(request, 'polls/detail.html', {'question': question, 'error_message': f"선택이 없습니다. id={request.POST['choice']}"})
    else:
        selected_choice.votes += 1
        selected_choice.save()
return HttpResponseRedirect(reverse('polls:index'))- 두 사람이 동시에 서버에 접속한 후, 같은 DB에 대해 수행하는 경우 -> 투표수가 +2가 되어야 하지만, +1만 됩니다. -> 따라서, 해당 연산을 서버에서 하지 않고 DB에서 수행되도록 해야 합니다.
- polls/views.py
def vote(request, question_id):
    question = get_object_or_404(Question, pk=question_id)
    try:
        selected_choice = question.choice_set.get(pk=request.POST['choice'])
    except (KeyError, Choice.DoesNotExist):
        return render(request, 'polls/detail.html', {'question': question, 'error_message': f"선택이 없습니다. id={request.POST['choice']}"})
    else:
        # F : DB에서 읽는다는 의미.
        selected_choice.votes = F('votes') + 1
        selected_choice.save()
        return HttpResponseRedirect(reverse('polls:detail', args=(question.id,)))
7. 결과 출력 페이지
투표 결과를 확인하는 페이지를 만들어 봅니다.
- polls/urls.py에 result 페이지 경로 추가.
from django.urls import path
from . import views

# 해당 앱의 이름 설정.
app_name = 'polls'
urlpatterns = [
	path('', views.index, name='index'),
    path('<int:question_id>/', views.detail, name='detail'),
    path('<int:question_id>/vote/', views.vote, name='vote'),
    path('<int:question_id>/result', views.result, name='result'),
]- polls/templates/polls/result.html 작성.
<h1>{{question.question_text}}</h1><br>
{% for choice in question.choice_set.all %}

    <label>
        {{ choice.choice_text }} -- {{ choice.votes }}
    </label>
    <br>
{% endfor %}- polls/views.py에 result 뷰 추가 및 vote 후 result 페이지로 redirect(302코드)하도록 수정.
def vote(request, question_id):
    question = get_object_or_404(Question, pk=question_id)
    try:
        selected_choice = question.choice_set.get(pk=request.POST['choice'])
    except (KeyError, Choice.DoesNotExist):
        return render(request, 'polls/detail.html', {'question': question, 'error_message': f"선택이 없습니다. id={request.POST['choice']}"})
    else:
        # F : DB에서 읽는다는 의미.
        selected_choice.votes = F('votes') + 1
        selected_choice.save()
        # 투표 후, result 페이지로 redirect 및 question.id 인자 전달.
        return HttpResponseRedirect(reverse('polls:result', args=(question.id,)))

def result(request, question_id):
    question = get_object_or_404(Question, id=question_id)
return render(request, 'polls/result.html', {'question' : question})- 투표 후 화면)

8. Django Admin 커스터마이징
Django Admin 페이지를 커스터마이징하는 방법을 알아 봅니다.
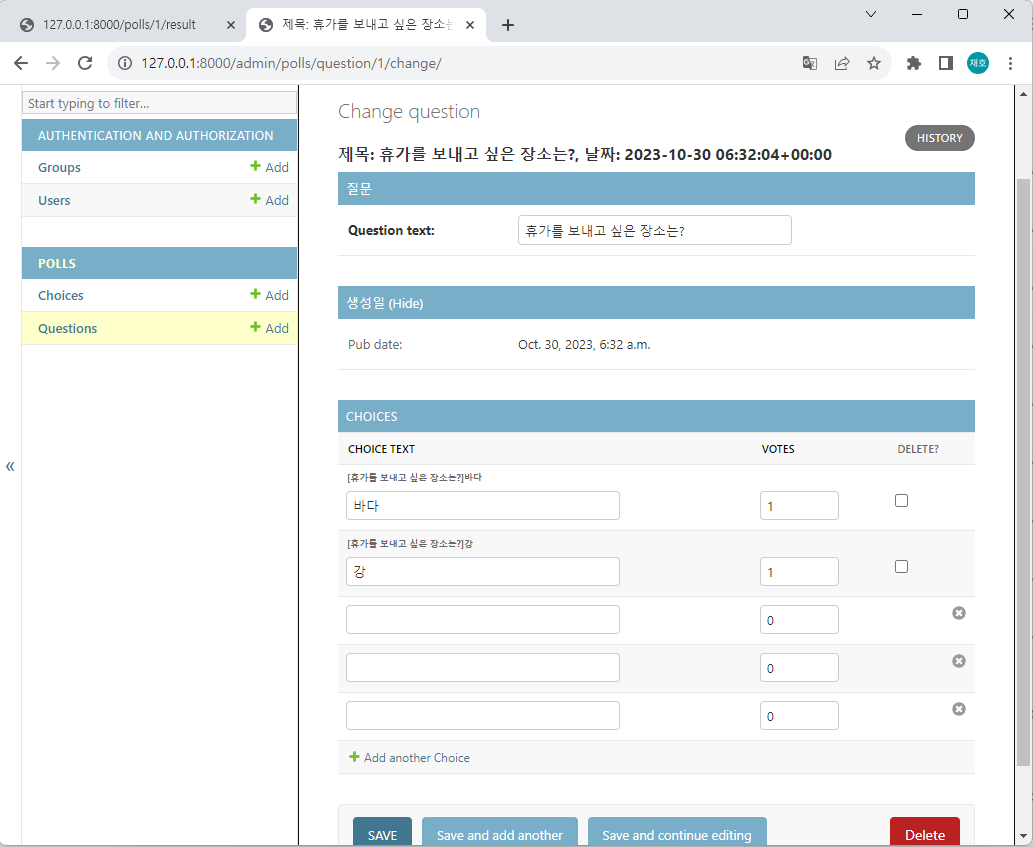
- polls.admin.py 파일에 커스텀 클래스를 정의합니다.
from django.contrib import admin
from .models import *

# Register your models here.
admin.site.register(Choice)
# CRUD Create Read Update Delete

# 인라인 모델
class ChoiceInline(admin.TabularInline):
    model = Choice
    # 각 Question마다 보여줄 Choice의 수.
    extra = 3

# 커스텀 모델
class QuestionAdmin(admin.ModelAdmin):
    # 필드들의 목록 정의. (제목, {필드 : '필드 종류'})
    fieldsets = [
        ('질문', {'fields' : ['question_text']}),
        # 'classes' : ['collapse']를 사용함으로써, 숨김 처리 가능.
        ('생성일', {'fields' : ['pub_date'], 'classes' : ['collapse']}),
    ]
    # readonly인 필드 정의
    readonly_fields = ['pub_date']
    # 해당 모델 내부에 ChoiceInline도 출력
    inlines = [ChoiceInline]

# 해당 모델 등록
admin.site.register(Question, QuestionAdmin)- 결과 화면)
- 목록 페이지 커스터마이징.
커스터마이징 전)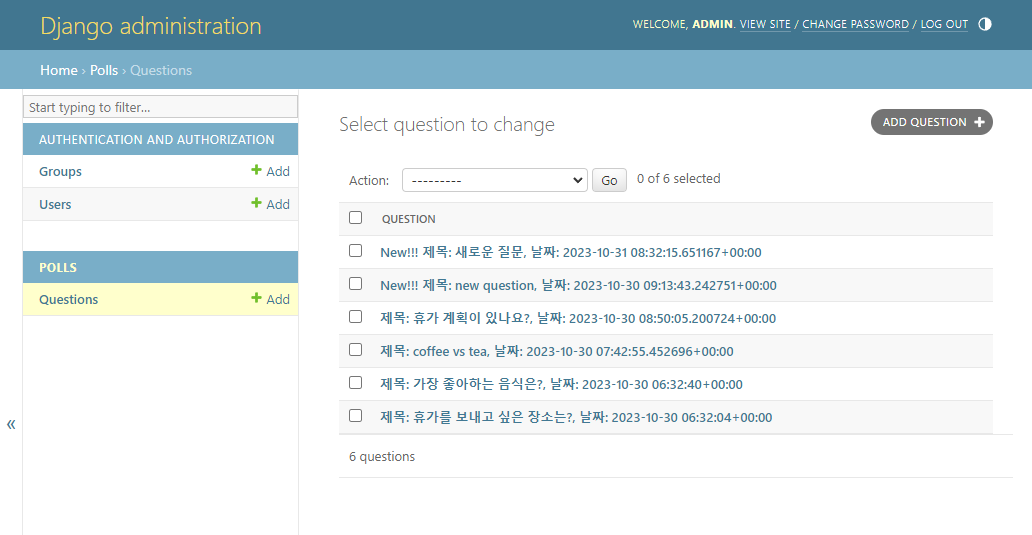
커스터마지잉 후)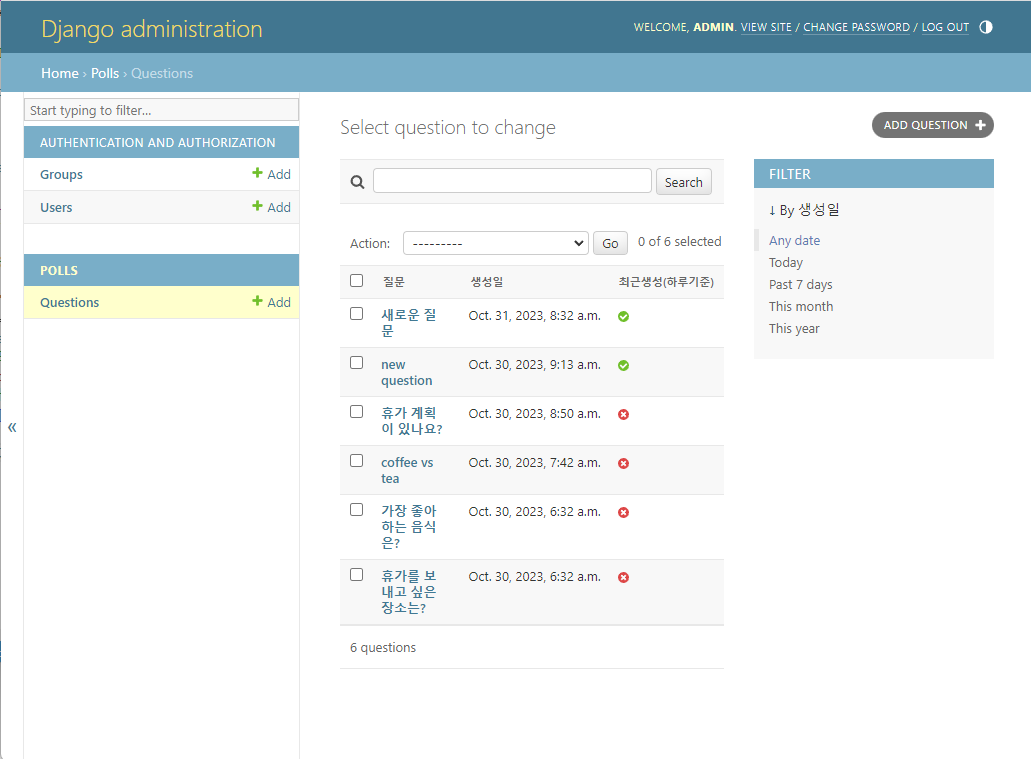
위 그림에서 보시다시피 여러 기능들을 활용할 수가 있습니다. 필드를 칼럼별로 예쁘게 나누거나, 날짜를 기준으로 필터링하거나, 특정 문자열을 검색해서 해당되는 필드 값의 목록을 확인하는 등의 여러 기능을 수행할 수가 있습니다.
코드는 다음과 같습니다.
- polls/admin.py
from django.contrib import admin
from .models import *

# Register your models here.

class ChoiceInline(admin.TabularInline):
    model = Choice
    extra = 3

class QuestionAdmin(admin.ModelAdmin):
    fieldsets = [
        ('질문', {'fields' : ['question_text']}),
        ('생성일', {'fields' : ['pub_date'], 'classes' : ['collapse']}),
    ]
    # str 메소드를 사용하지 않고, 제목 / 날짜가 예쁘게 나오도록 리스트화.
    # (필드명, )
    list_display = ('question_text', 'pub_date', 'was_published_recently')
    readonly_fields = ['pub_date']
    inlines = [ChoiceInline]
    # 필터링 기능. 필드의 타입에 맞춰 자동으로 제공함.
    list_filter = ['pub_date']
    # 문자열 검색에 따른 필터링 기능. question_text와 choice_text에 대해 검색.
    search_fields = ['question_text', 'choice__choice_text']

admin.site.register(Question, QuestionAdmin)- polls/models.py
from django.db import models

from django.utils import timezone
import datetime
from django.contrib import admin

class Question(models.Model):
    # verbose_name 옵션에 필드의 칼럼명 입력
    question_text = models.CharField(max_length=200, verbose_name="질문") # 텍스트를 저장하는 필드
    pub_date = models.DateTimeField(auto_now_add=True, verbose_name="생성일") # 날짜를 저장하는 필드

    # @admin.display 어노테이션으로 함수의 칼럼명 입력
    @admin.display(boolean=True, description='최근생성(하루기준)')
    def was_published_recently(self):
        return self.pub_date >= timezone.now() - datetime.timedelta(days=1)

    def __str__(self):
        if self.was_published_recently():
            new_badge = "New!!!"
        else:
            new_badge = ''
        return f'{new_badge} 제목: {self.question_text}, 날짜: {self.pub_date}'


class Choice(models.Model):
    question = models.ForeignKey(Question, on_delete=models.CASCADE) # 외래키 Question을 CASCADE로 참조한다.
    choice_text = models.CharField(max_length=200) # 텍스트를 저장하는 필드
    votes = models.IntegerField(default=0) # 숫자를 저장하는 필드
    def __str__(self):
        return f'[{self.question.question_text}]{self.choice_text}'