
JUnit 5 가이드
※ 본 포스트는 JUnit 5 공식 가이드 문서를 개인적으로 정리한 문서입니다.
- JUnit 5.7.2 버전 기반으로 2021년 6월 21일에 작성되었습니다.
- JUnit 5 공식 가이드 문서의 "번역"이 아닌 "정리"입니다.
- 다음 내용들은 생략되어 있을 수 있습니다:
- JUnit 4 관련 내용
- Java 이외의 언어(ex. Kotlin) 관련 내용
- 사용이 권장되지 않는 기능 (Deprecated Features)
- 실험적인 기능 (Experimental Features)
- 고급 주제 (Advanced Topics)
- 기타 빌드 도구나 IDE 설정 관련 내용
- 일부 잘못된 내용이나 오타가 있을 수 있습니다.
- 문서가 상당히 길기 때문에 간추린 핵심 내용만 보고 싶다면 제가 작성한 JUnit 5 가이드 핵심 요약을 참고하세요.
- 가이드 문서의 한국어 번역본이 궁금하신 분들께는 민동현님의 JUnit5 완벽 가이드를 추천합니다.
개요(Overview)
JUnit 5의 구조
JUnit 5 = JUnit Platform + JUnit Jupiter + JUnit Vintage
- JUnit Platform
- JVM에서 Test Framework를 실행하기 위한 토대를 제공
- 플랫폼 상에서 Test Framework를 개발하고 실행하기위한 Test Engine API 제공
- 커맨드 라인에에서 플랫폼을 실행하기 위한 Console Launcher 제공
- JUnit 4 기반 환경의 Test Engine을 구동하기 위한 JUnit 4 based Runner 제공
- JUnit Jupiter
- JUnit 5 테스트를 작성하기 위한 새로운 프로그래밍 모델과 익스텐션 모델 제공
- Jupiter 기반 테스트를 실행하기 위한 Test Engine 제공
- JUnit Vintage
- JUnit 3와 JUnit 4 기반 테스트를 실행하기 위한 Test Engine 제공

JUnit 5 환경 설정하기
Stand-alone build.gradle 예시
plugins {
	id 'java'
}

repositories {
	mavenCentral()
}

dependencies {
	testImplementation(platform('org.junit:junit-bom:5.7.2'))
	testImplementation('org.junit.jupiter:junit-jupiter')
}

test {
	useJUnitPlatform()
}
Spring Boot build.gradle 예시
plugins {
    id 'org.springframework.boot' version '2.5.1'
    id 'io.spring.dependency-management' version '1.0.11.RELEASE'
    id 'java'
}

repositories {
    mavenCentral()
}

dependencies {
    implementation 'org.springframework.boot:spring-boot-starter'
    testImplementation 'org.springframework.boot:spring-boot-starter-test'
}

test {
    useJUnitPlatform()
}
테스트 작성하기(Writing Tests)
애노테이션(Annotations)
| 애노테이션 | 대상 | 설명 | 상속 여부 |
|---|---|---|---|
@Test | 메서드 | 테스트 메서드임을 나타낸다. | O |
@ParameterizedTest | 메서드 | 파라미터화 된 테스트임을 나타낸다. | O |
@RepeatedTest | 메서드 | 반복 테스트를 위한 테스트 템플릿임을 나타낸다. | O |
@TestFactory | 메서드 | 다이나믹 테스트를 위한 테스트 팩토리임을 나타낸다. | O |
@TestTemplate | 메서드 | 테스트 케이스에 대한 템플릿임을 나타낸다. | O |
@TestMethodOrder | 클래스 | 테스트 클래스의 테스트 메서드 실행 순서를 설정하는데 사용한다. | O |
@TestInstance | 클래스 | 테스트 클래스의 테스트 인스턴스 라이프사이클을 설정하는데 사용한다. | O |
@DisplayName | 클래스, 메서드 | 테스트 클래스 또는 테스트 메서드에 대한 표시 이름을 지정한다. | X |
@DisplayNameGeneration | 클래스 | 테스트 클래스에서 사용할 표시 이름 생성기를 지정한다. | O |
@BeforeEach | 메서드 | 현재 클래스의 각 테스트 메서드를 실행하기 전에 실행되어야 하는 메서드임을 나타낸다. | O |
@AfterEach | 메서드 | 현재 클래스의 각 테스트 메서드를 실행한 후에 실행되어야 하는 메서드임을 나타낸다. | O |
@BeforeAll | 메서드 | 현재 클래스의 모든 테스트 메서드를 실행하기 전에 실행되어야 하는 메서드임을 나타낸다. | O |
@AfterAll | 메서드 | 현재 클래스의 모든 테스트 메서드를 실행한 후에 실행되어야 하는 메서드임을 나타낸다. | O |
@Nested | 클래스 | 해당 클래스가 non-static 내부 테스트 클래스임을 나타낸다. 내부 테스트 클래스에서는 @BeforeAll과 @AfterAll 메서드를 직접적으로 사용할 수 없다. | X |
@Tag | 클래스, 메서드 | 필터링 테스트를 위한 태그를 선언하는데 사용한다. | O |
@Disabled | 클래스, 메서드 | 해당 테스트 클래스 또는 테스트 메서드를 비활성화 하는데 사용한다. | X |
@Timeout | 메서드 | 테스트, 테스트 팩토리, 테스트 템플릿 또는 라이프사이클 메서드가 주어진 실행 시간을 초과하면 실패시키기 위해 사용한다. | O |
@ExtendWith | 클래스 | Extension을 선언적으로 등록하는데 사용한다. | O |
@RegisterExtension | 클래스 | 프로그래밍적으로 Extension을 등록하는데 사용한다. | O |
@TempDir | 클래스 | 라이프사이클 메서드 또는 테스트 메서드에서 필드 또는 파라미터 주입을 통해 임시 디렉토리를 제공하는데 사용한다. | X |
메타 애노테이션과 조합 애노테이션(Meta-Annotations and Composed Annotations)
- 동일한 애노테이션 또는 애노테이션의 조합이 코드 베이스 여러 군데에서 중복된다면, 이를 메타 애노테이션 또는 조합 애노테이션으로 추출할 수 있다.
- 메타 애노테이션으로 추출하면 다음과 같은 장점이 있다.
- 중복이 감소하여 유지보수성이 증가한다.
- 오타 발생 가능성이 줄어든다.
- IDE 자동완성의 도움을 받아 코드 작성 시간이 줄어든다.
- 다음과 같은 상황을 고려해보자.
@Tag("fast")
@Test
void myTest1() {
}

@Tag("fast")
@Test
void myTest2() {
}

@Tag("fast")
@Test
void myTest3() {
}- 다음과 같이 메타 애노테이션을 정의해서 사용할 수 있다.
@Target({ ElementType.TYPE, ElementType.METHOD })
@Retention(RetentionPolicy.RUNTIME)
@Tag("fast")
public @interface Fast {
}
@Fast
@Test
void myTest1() {
}
@Fast
@Test
void myTest2() {
}
@Fast
@Test
void myTest3() {
}@Test애노테이션도 조합하여 메타 애노테이션에 포함시킬 수 있다.
@Target(ElementType.METHOD)
@Retention(RetentionPolicy.RUNTIME)
@Tag("fast")
@Test
public @interface FastTest {
}
@FastTest
void myTest1() {
}
@FastTest
void myTest2() {
}
@FastTest
void myTest3() {
}테스트 클래스와 메서드(Test Classes and Methods)
구성요소
- 테스트 클래스
- 정적(
static) 멤버 클래스,@Nested클래스, 테스트 메서드 등을 포함하고 있는 최상위 클래스 - 추상(
abstract) 클래스일 수 없다. - 반드시 하나의 생성자만 가져야 한다.
- 정적(
- 테스트 메서드
- 테스트 애노테이션을 가진 메서드
- 테스트 애노테이션:
@Test,@RepeatedTest,@ParameterizedTest,@TestFactory,@TestTemplate
- 라이프사이클 메서드
- 라이프사이클 애노테이션을 가진 메서드
- 라이프사이클 애노테이션:
@BeforeAll,@AfterAll,@BeforeEach,@AfterEach.
테스트 메서드와 라이프사이클 메서드
- 현재 테스트 클래스에 정의될 수도 있고, 부모 클래스 또는 인터페이스로부터 상속받을 수도 있다.
- 추상(
abstract) 메서드일 수 없다. - 리턴 타입은
void여야 한다. - 접근 제어자는
public일 필요는 없지만,private이면 안된다.
표준 테스트 클래스 구조
class StandardTests {

	@BeforeAll
	static void setUpAll() {
		System.out.println("setUpAll");
	}

	@BeforeEach
	void setUp() {
		System.out.println("setUp");
	}

	@Test
	void succeedingTest() {
		System.out.println("succeedingTest");
		assertTrue(true);
	}

	@Test
	void failingTest() {
		System.out.println("failingTest");
		fail("의도적으로 실패시킨 테스트");
	}

	@Test
	@Disabled("의도적으로 비활성화한 테스트")
	void skippedTest() {
		System.out.println("skippedTest");
	}

	@Test
	void abortedTest() {
		assumeTrue(false);
		System.out.println("abortedTest");
	}

	@AfterEach
	void tearDown() {
		System.out.println("tearDown");
	}

	@AfterAll
	static void tearDownAll() {
		System.out.println("tearDownAll");
	}
}
표시 이름(Display Names)
- 테스트 클래스와 테스트 메서드에는 사용자 지정 표시 이름을 선언할 수 있다.
- 표시 이름에는 공백, 특수문자, 이모지 등이 들어갈 수 있다.
@DisplayName("A special test case")
class DisplayNameDemo {

    @Test
    @DisplayName("Custom test name containing spaces")
    void testWithDisplayNameContainingSpaces() {
    }

    @Test
    @DisplayName("╯°□°)╯")
    void testWithDisplayNameContainingSpecialCharacters() {
    }

    @Test
    @DisplayName("😱")
    void testWithDisplayNameContainingEmoji() {
    }

}
표시 이름 생성기
@DisplayNameGeneration애노테이션을 통해 표시 이름 생성기를 설정할 수 있다.- 생성기는
DisplayNameGenerator를 구현해서 만들 수 있다. - 생성기에 의해 생성된 이름보다
@DisplayName에 제공된 표시 이름이 우선 순위가 높다. - 기본적으로 제공되는 생성기:
DisplayNameGenerator.Standard.class: 메서드 이름과 괄호를 그대로 표시한다. (JUnit 5 기본값)DisplayNameGenerator.Simple.class: 테스트 메서드에 파라미터가 없다면, 메서드 이름 뒤의 괄호(())를 제거한다.DisplayNameGenerator.ReplaceUnderScores.class: 언더스코어(_)를 공백(``)으로 치환한다.DisplayNameGenerator.IndicativeSentences.class: 테스트 클래스 이름과 테스트 이름을 이어서 표시한다.@IndicativeSentencesGeneration애노테이션을 이용하면 구분자를 추가로 명시할 수 있다.
class DisplayNameGeneratorDemo {

    @Nested
    @DisplayNameGeneration(DisplayNameGenerator.ReplaceUnderscores.class)
    class A_year_is_not_supported {

        @Test
        void if_it_is_zero() {
        }

        @DisplayName("A negative value for year is not supported by the leap year computation.")
        @ParameterizedTest(name = "For example, year {0} is not supported.")
        @ValueSource(ints = { -1, -4 })
        void if_it_is_negative(int year) {
        }

    }

    @Nested
    @IndicativeSentencesGeneration(separator = " -> ", generator = DisplayNameGenerator.ReplaceUnderscores.class)
    class A_year_is_a_leap_year {

        @Test
        void if_it_is_divisible_by_4_but_not_by_100() {
        }

        @ParameterizedTest(name = "Year {0} is a leap year.")
        @ValueSource(ints = { 2016, 2020, 2048 })
        void if_it_is_one_of_the_following_years(int year) {
        }

    }

}
+-- DisplayNameGeneratorDemo [OK]
+-- A year is not supported [OK]
| +-- A negative value for year is not supported by the leap year computation. [OK]
| | +-- For example, year -1 is not supported. [OK]
| | '-- For example, year -4 is not supported. [OK]
| '-- if it is zero() [OK]
'-- A year is a leap year [OK]
+-- A year is a leap year -> if it is divisible by 4 but not by 100. [OK]
'-- A year is a leap year -> if it is one of the following years. [OK]
+-- Year 2016 is a leap year. [OK]
+-- Year 2020 is a leap year. [OK]
'-- Year 2048 is a leap year. [OK]표시 이름 생성기 기본값 지정하기
junit.jupiter.displayname.generator.default프로퍼티에 기본으로 사용할 표시 이름 생성기의 FQCN(Fully Qualified Class Name)을 지정할 수 있다.- 예를 들어,
src/test/resources/junit-platform.properties에 다음과 같이 기본 생성기를 지정할 수 있다.
junit.jupiter.displayname.generator.default=org.junit.jupiter.api.DisplayNameGenerator$ReplaceUnderscores표시 이름의 우선순위
- 테스트 클래스나 메서드의 표시 이름의 우선순위는 다음과 같이 정해진다:
@DisplayName으로 지정한 표시 이름@DisplayNameGenerator로 지정한 생성기에 의해 생성된 표시 이름- 프로퍼티 설정 값으로 설정한 기본 생성기에 의해 생성된 표시 이름
- JUnit 5 기본 생성기(
org.junit.jupiter.api.DisplayNameGenerator.Standard)에 의해 생성된 표시 이름
단언(Assertions)
org.junit.jupiter.api.Assertions클래스는 다양한 정적 단언 메서드를 제공한다.- fail
fail(String|Supplier?, Throwable?)- 테스트를 실패 처리한다.
- 특정
Throwable을cause로 넘길 수 있다.
- assertTrue
assertTrue(boolean|BooleanSupplier, String|Supplier?)- 제공된 인자가
true인지 검사한다.
- assertFalse
assertFalse(boolean|BooleanSupplier, String|Supplier?)- 제공된 인자가
false인지 검사한다.
- assertNull
assertNull(Object, String|Supplier?):- 제공된 객체가
null인지 검사한다.
- assertNotNull
assertNotNull(Object, String|Supplier?)- 제공된 객체가
null이 아닌지 검사한다.
- assertSame
assertSame(Object, Object, String|Supplier?)- 두 객체가 동일한 객체인지 검사한다.
- assertNotSame
assertNotSame(Object, Object, String|Supplier?)- 두 객체가 동일한 객체가 아닌지 검사한다.
- assertEquals
assertEquals(T, S, String|Supplier?)- 첫번째 인자(기댓값)이 두번째 인자(실제값)과 동등한지 검사한다.
- assertNotEquals
assertNotEquals(T, S, String|Supplier?)- 첫번째 인자(특정값)이 두번째 인자(실제값)과 동등하지 않은지 검사한다.
- assertArrayEquals
assertArrayEquals(T[], T[], String|Supplier?)- 첫번째 배열(기댓값)이 두번째 배열(실제값)과 동등한지 검사한다.
- assertIterableEquals
assertIterableEquals(Iterable, Iterable, String|Supplier?)- 첫번째
Iterable(기댓값)이 두번째Iterable(실제값)과 동등한지 검사한다.
- assertLinesMatch
assertLinesMatch(List, List, String|Supplier?)- 첫번째 문자열 리스트(기댓값)가 두번째 문자열 리스트(실제값)와 일치하는지 검사한다.
- assertAll
assertAll(String?, Executable...|Collection|Stream)Executable목록을 가변인자로 전달받아 각Executable을 모두 실행한 뒤, 모두 성공했는지 검사한다.- 실패한
Executable이 있다면, 실패한 검증 결과를 모아서 에러 메시지로 보여준다.
- assertThrows
assertThrows(Class, Executable, String|Supplier?)- 제공된
Executable을 실행했을 때, 첫번째 인자로 명시한 타입의 예외가 발생하는지 검사한다. - 발생한 예외 객체를 리턴하므로, 리턴된 예외 객체를 이용해서 추가로 검증을 수행할 수도 있다.
- assertDoesNotThrow
assertDoesNotThrow(Executable|ThrowingSupplier, String|Supplier?)- 제공된
Executable을 실행했을 때 예외가 발생하지 않는지 검사한다.
- assertTimeout
assertTimeout(Duration, Executable|ThrowingSupplier, String|Supplier?)- 제공된
Executable또는ThrowingSupplier를 실행했을 때 명시한 시간 안에 실행이 완료되는지 확인한다.
- assertTimeoutPreemptively
assertTimeoutPreemptively(Duration, Executable|ThrowingSupplier, String|Supplier?)- 제공된
Executable또는ThrowingSupplier를 실행했을 때 명시한 시간 안에 실행이 완료되는지 확인한다. assertTimeoutPreemptively는 제공된Executable또는ThrowingSupplier를 다른 스레드에서 실행한다.- 제공된
Executable또는ThrowingSupplier의 코드들이ThreadLocal에 의존하면 부작용이 발생할 수 있다. - ex) 스프링에서
@Transactional테스트를 진행할 때, 제공된Executable또는ThrowingSupplier가 트랜잭션에 참여하는 스프링 컴포넌트를 호출하면, 이 컴포넌트는 테스트가 종료된 이후 롤백되지 않을 수 있다.
- 제공된
- fail
assertEquals,assertNotEquals,assertArrayEquals의 타입이 부동 소수점 타입인 경우, 세 번째 파라미터로delta값(float|double)을 전달할 수 있다.- 각 단언 메서드는 실패하면 다음 코드를 실행하지 않고 바로
AssertionFailedError예외를 발생시킨다.
class AssertionsDemo {

    private final Calculator calculator = new Calculator();

    private final Person person = new Person("Jane", "Doe");

    @Test
    void standardAssertions() {
        assertEquals(2, calculator.add(1, 1));
        assertEquals(4, calculator.multiply(2, 2),
                "The optional failure message is now the last parameter");
        assertTrue('a' < 'b', () -> "Assertion messages can be lazily evaluated -- "
                + "to avoid constructing complex messages unnecessarily.");
    }

    @Test
    void groupedAssertions() {
        // In a grouped assertion all assertions are executed, and all
        // failures will be reported together.
        assertAll("person",
            () -> assertEquals("Jane", person.getFirstName()),
            () -> assertEquals("Doe", person.getLastName())
        );
    }

    @Test
    void dependentAssertions() {
        // Within a code block, if an assertion fails the
        // subsequent code in the same block will be skipped.
        assertAll("properties",
            () -> {
                String firstName = person.getFirstName();
                assertNotNull(firstName);

                // Executed only if the previous assertion is valid.
                assertAll("first name",
                    () -> assertTrue(firstName.startsWith("J")),
                    () -> assertTrue(firstName.endsWith("e"))
                );
            },
            () -> {
                // Grouped assertion, so processed independently
                // of results of first name assertions.
                String lastName = person.getLastName();
                assertNotNull(lastName);

                // Executed only if the previous assertion is valid.
                assertAll("last name",
                    () -> assertTrue(lastName.startsWith("D")),
                    () -> assertTrue(lastName.endsWith("e"))
                );
            }
        );
    }

    @Test
    void exceptionTesting() {
        Exception exception = assertThrows(ArithmeticException.class, () ->
            calculator.divide(1, 0));
        assertEquals("/ by zero", exception.getMessage());
    }

    @Test
    void timeoutNotExceeded() {
        // The following assertion succeeds.
        assertTimeout(ofMinutes(2), () -> {
            // Perform task that takes less than 2 minutes.
        });
    }

    @Test
    void timeoutNotExceededWithResult() {
        // The following assertion succeeds, and returns the supplied object.
        String actualResult = assertTimeout(ofMinutes(2), () -> {
            return "a result";
        });
        assertEquals("a result", actualResult);
    }

    @Test
    void timeoutNotExceededWithMethod() {
        // The following assertion invokes a method reference and returns an object.
        String actualGreeting = assertTimeout(ofMinutes(2), AssertionsDemo::greeting);
        assertEquals("Hello, World!", actualGreeting);
    }

    @Test
    void timeoutExceeded() {
        // The following assertion fails with an error message similar to:
        // execution exceeded timeout of 10 ms by 91 ms
        assertTimeout(ofMillis(10), () -> {
            // Simulate task that takes more than 10 ms.
            Thread.sleep(100);
        });
    }

    @Test
    void timeoutExceededWithPreemptiveTermination() {
        // The following assertion fails with an error message similar to:
        // execution timed out after 10 ms
        assertTimeoutPreemptively(ofMillis(10), () -> {
            // Simulate task that takes more than 10 ms.
            new CountDownLatch(1).await();
        });
    }

    private static String greeting() {
        return "Hello, World!";
    }

}
써드파티 단언 라이브러리
- JUnit에서 제공하는 단언 메서드가 특정 테스트 시나리오를 구현하기에 충분하지 않다면, 다음과 같은 써드파티 단언 라이브러리를 함께 사용할 수 있다.
- AssertJ
- Hamcrest
- Truth
가정(Assumptions)
org.junit.jupiter.api.Assumptions클래스는 다양한 정적 가정 메서드를 제공한다.- 가정 메서드를 이용하면 조건부로 테스트를 수행할 수 있다.
- 가정 메서드가 실패하면, 테스트가 실패하는 것이 아니라 테스트가 취소된다.
- assumeTrue
assumeTrue(boolean|BooleanSupplier, String|Supplier)- 제공된 인자가
true인 경우에는 테스트를 이어서 진행하고,false인 경우 테스트를 취소한다.
- assumeFalse
assumeFalse(boolean|BooleanSupplier, String|Supplier)- 제공된 인자가
false인 경우에는 테스트를 이어서 진행하고,true인 경우 테스트를 취소한다.
- assumingThat
assumingThat(boolean|BooleanSupplier, Executable)- 제공된 인자가
true인 경우에만Executable을 실행한다. Executable실행 도중 예외가 발생하면,unchecked예외로 다시 던진다.
class AssumptionsDemo {

    private final Calculator calculator = new Calculator();

    @Test
    void testOnlyOnCiServer() {
        assumeTrue("CI".equals(System.getenv("ENV")));
        // remainder of test
    }

    @Test
    void testOnlyOnDeveloperWorkstation() {
        assumeTrue("DEV".equals(System.getenv("ENV")),
            () -> "Aborting test: not on developer workstation");
        // remainder of test
    }

    @Test
    void testInAllEnvironments() {
        assumingThat("CI".equals(System.getenv("ENV")),
            () -> {
                // perform these assertions only on the CI server
                assertEquals(2, calculator.divide(4, 2));
            });

        // perform these assertions in all environments
        assertEquals(42, calculator.multiply(6, 7));
    }

}
테스트 비활성화(Disabling Tests)
- 테스트 클래스나 테스트 메서드에
@Disabled애노테이션을 이용해서 비활성화 할 수 있다. @Disabled애노테이션에 값으로 설명을 전달해서 해당 테스트가 왜 비활성화 되었는지에 대한 설명을 명시할 수 있다.
조건부 테스트 실행(Conditional Test Execution)
ExecutionConditionAPI를 이용해서 특정 조건에 따라 테스트를 실행할 수 있다.- 등록된
ExecutionCondition이 여러 개라면, 조건 중 하나만 만족해도 테스트가 비활성화된다. - 비활성화된 이유를
disabledReason으로 명시할 수 있다. - 각각의 조건부 애노테이션은 각 테스트 인터페이스, 테스트 클래스 또는 테스트 메서드에 한번만 선언할 수 있다.
- 조건부 애노테이션이 여러 개라면 JUnit이 첫번째로 발견한 애노테이션만 사용되고 나머지는 무시된다.
운영체제에 따른 조건부 실행
@EnabledOnOs: 특정 운영체제에서만 테스트를 실행한다.@DisabledOnOs: 특정 운영체제에서 테스트를 비활성화한다.
@Test
@EnabledOnOs({ LINUX, MAC })
void onLinuxOrMac() {
}

@Test
@DisabledOnOs(WINDOWS)
void notOnWindows() {
}
자바 런타임 환경에 따른 조건부 실행
@EnabledOnJre: 특정 자바 런타임 버전에서만 테스트를 실행한다.@DisabledOnJre: 특정 자바 런타임 버전에서 테스트를 비활성화한다.@EnabledForJreRange:min≤ 자바 런타임 버전 ≤max일 경우에만 테스트를 실행한다.@DisabledForJreRange:min≤ 자바 런타임 버전 ≤max일 경우 테스트를 비활성화한다.min의 기본값은JRE.JAVA_8,max의 기본값은JRE.OTHER이다.
@Test
@EnabledOnJre(JAVA_8)
void onlyOnJava8() {
}

@Test
@EnabledOnJre({ JAVA_9, JAVA_10 })
void onJava9Or10() {
}

@Test
@EnabledForJreRange(min = JAVA_9, max = JAVA_11)
void fromJava9to11() {
}

@Test
@EnabledForJreRange(min = JAVA_9)
void fromJava9toCurrentJavaFeatureNumber() {
}

@Test
@EnabledForJreRange(max = JAVA_11)
void fromJava8To11() {
}

@Test
@DisabledOnJre(JAVA_9)
void notOnJava9() {
}

@Test
@DisabledForJreRange(min = JAVA_9, max = JAVA_11)
void notFromJava9to11() {
}

@Test
@DisabledForJreRange(min = JAVA_9)
void notFromJava9toCurrentJavaFeatureNumber() {
}

@Test
@DisabledForJreRange(max = JAVA_11)
void notFromJava8to11() {
}
시스템 속성 값에 따른 조건부 테스트 실행
@EnabledIfSystemProperty:named로 제공된 JVM 시스템 속성 값이matches정규식과 일치하면 테스트를 실행한다.@DisabledIfSystemProperty:named로 제공된 JVM 시스템 속성 값이matches정규식과 일치하면 테스트를 비활성화 한다.- 위 두 애노테이션은 하나의 테스트 인터페이스, 테스트 클래스, 또는 테스트 메서드에 여러번 선언할 수 있다.
@Test
@EnabledIfSystemProperty(named = "os.arch", matches = ".*64.*")
void onlyOn64BitArchitectures() {
}

@Test
@DisabledIfSystemProperty(named = "ci-server", matches = "true")
void notOnCiServer() {
}
환경 변수 값에 따른 조건부 테스트 실행
@EnabledIfEnvironmentVariable:named로 제공된 운영체제 시스템의 환경 변수 값이matches정규식과 일치하면 테스트를 실행한다.@DisabledIfEnvironmentVariable:named로 제공된 운영체제 시스템의 환경 변수 값이matches정규식과 일치하면 테스트를 비활성화 한다.- 위 두 애노테이션은 하나의 테스트 인터페이스, 테스트 클래스, 또는 테스트 메서드에 여러번 선언할 수 있다.
@Test
@EnabledIfEnvironmentVariable(named = "ENV", matches = "staging-server")
void onlyOnStagingServer() {
}

@Test
@DisabledIfEnvironmentVariable(named = "ENV", matches = ".*development.*")
void notOnDeveloperWorkstation() {
}
사용자 지정 조건에 따른 조건부 테스트 실행
@EnabledIf: 명시된 조건 메서드의boolean리턴 값이true라면 테스트를 실행한다.@DisabledIf: 명시된 조건 메서드의boolean리턴 값이true라면 테스트를 비활성화 한다.- 조건 메서드가 테스트 클래스 내부라면 메서드 이름만으로 명시할 수 있지만, 테스트 클래스 외부에 존재한다면 FQCN을 제공해야 한다.
- 필요할 경우, 조건 메서드는
ExtensionContext타입의 단일 파라미터를 받을 수 있다. @EnabledIf또는@DisabledIf가 클래스 레벨에 사용될 경우, 조건 메서드는 반드시 정적(static) 메서드여야 한다.
@Test
@EnabledIf("customCondition")
void enabled() {
}

@Test
@DisabledIf("customCondition")
void disabled() {
}

boolean customCondition() {
}
태그와 필터링(Tagging and Filtering)
- 테스트 클래스와 메서드는
@Tag애노테이션으로 태그 할 수 있다. - 이러한 태그들은 이후에 실행할 테스트를 필터링하는데 사용된다.
태그 이름 명명법
- 태그는
null또는 공백일 수 없다. - 트림(
trim())된 태그는 다음과 같은 문자를 포함하면 안된다:- 공백 문자
- ISO 제어 문자
- 콤마(
,) - 괄호(
(,),) - 앰퍼샌드(
&) - 수직바(
|) - 느낌표(
!)
테스트 실행 순서(Test Execution Order)
- 기본적으로 테스트 실행 순서는 어떤 알고리즘에 따라 결정적으로 정해지지만, 결정된 실행 순서는 자명하지 않을 수 있다.
- 유닛 테스트는 일반적으로 실행 순서에 의지하면 안되지만, 통합 테스트나 기능 테스트와 같은 특정한 경우에 테스트의 실행 순서를 지정해야 할 경우도 있다.
- 이러한 경우
@TestMethodOrder애노테이션을 이용해 실행 순서를 지정할 수 있다. @TestMethodOrder애노테이션에는MethodOrderer의 구현체를 제공해야 한다.- 기본적으로 제공되는
MethodOrderer구현체로는 다음과 같은 것들이 있다:MethodOrderer.DisplayName.class: 테스트의 표시 이름 순으로 실행한다. (alphanumerically)MethodOrderer.MethodName.class: 테스트 메서드의 이름 순으로 실행한다. (alphanumerically)MethodOrderer.OrderAnnotation.class:@Order애노테이션에 지정된 값 오름차순으로 실행한다. (numerically)MethodOrderer.Random.class: 특정seed값에 따른 임의 순서로 실행한다. (pseudo-randomly)
@TestMethodOrder(OrderAnnotation.class)
class OrderedTestsDemo {

    @Test
    @Order(1)
    void nullValues() {
    }

    @Test
    @Order(2)
    void emptyValues() {
    }

    @Test
    @Order(3)
    void validValues() {
    }
}
테스트 실행 순서 기본값 지정하기
junit.jupiter.testmethod.order.default프로퍼티에 기본으로 사용할 표시 이름 생성기를 지정할 수 있다.- 예를 들어,
src/test/resources/junit-platform.properties에 다음과 같이 기본 생성기를 지정할 수 있다.
junit.jupiter.testmethod.order.default=org.junit.jupiter.api.MethodOrderer$OrderAnnotation테스트 인스턴스 라이프사이클(Test Instance Lifecycle)
- 테스트 인스턴스의 상태는 불변이 아니므로 예기치못한 부작용이 발생할 위험이 있다.
- 이러한 위험을 피하고, 각 테스트 메서드를 격리해서 실행하기 위해서 JUnit은 각 테스트 메서드를 실행하기 전에 해당 테스트 클래스의 인스턴스를 새로 만든다.
- 각 테스트 메서드 마다(per-method) 새로운 테스트 인스턴스가 만들어지는 것은 JUnit의 기본 동작방식이다.
- 모든 테스트 메서드를 동일한 인스턴스에서 실행하고 싶다면 테스트 클래스에
@TestInstance(Lifecycle.PER_CLASS)애노테이션을 사용하면 된다.- 이 경우, 각 테스트 클래스 마다(per-class) 하나의 인스턴스만 만들어지게 된다.
- 이 모드에서는
@BeforeAll또는@AfterAll애노테이션을 정적 메서드가 아닌 메서드에서 붙일 수 있다. - 따라서
@Nested테스트 클래스에서도@BeforeAll또는@AfterAll애노테이션을 사용할 수 있다.
테스트 인스턴스 라이프사이클 기본값 변경하기
- 테스트 클래스 또는 테스트 인터페이스가
@TestInstance를 지정하지 않았다면, JUnit은 기본값인PER_METHOD모드를 사용한다. - 기본 라이프사이클 설정값을 바꾸고 싶다면, JVM 시스템 속성
junit.jupiter.testinstance.lifecycle.default에TestInstance.Lifecycle에 정의된enum값을 설정하면 된다. - 시스템 속성 값으로 지정하고 싶다면, 다음 파라미터로 JVM을 구동한다.
-Djunit.jupiter.testinstance.lifecycle.default=per_class - 설정 파일로 지정하고 싶다면,
src/test/resources/junit-platform.properties에 다음과 같이 지정한다.
junit.jupiter.testinstance.lifecycle.default = per_class중첩 테스트(Nested Tests)
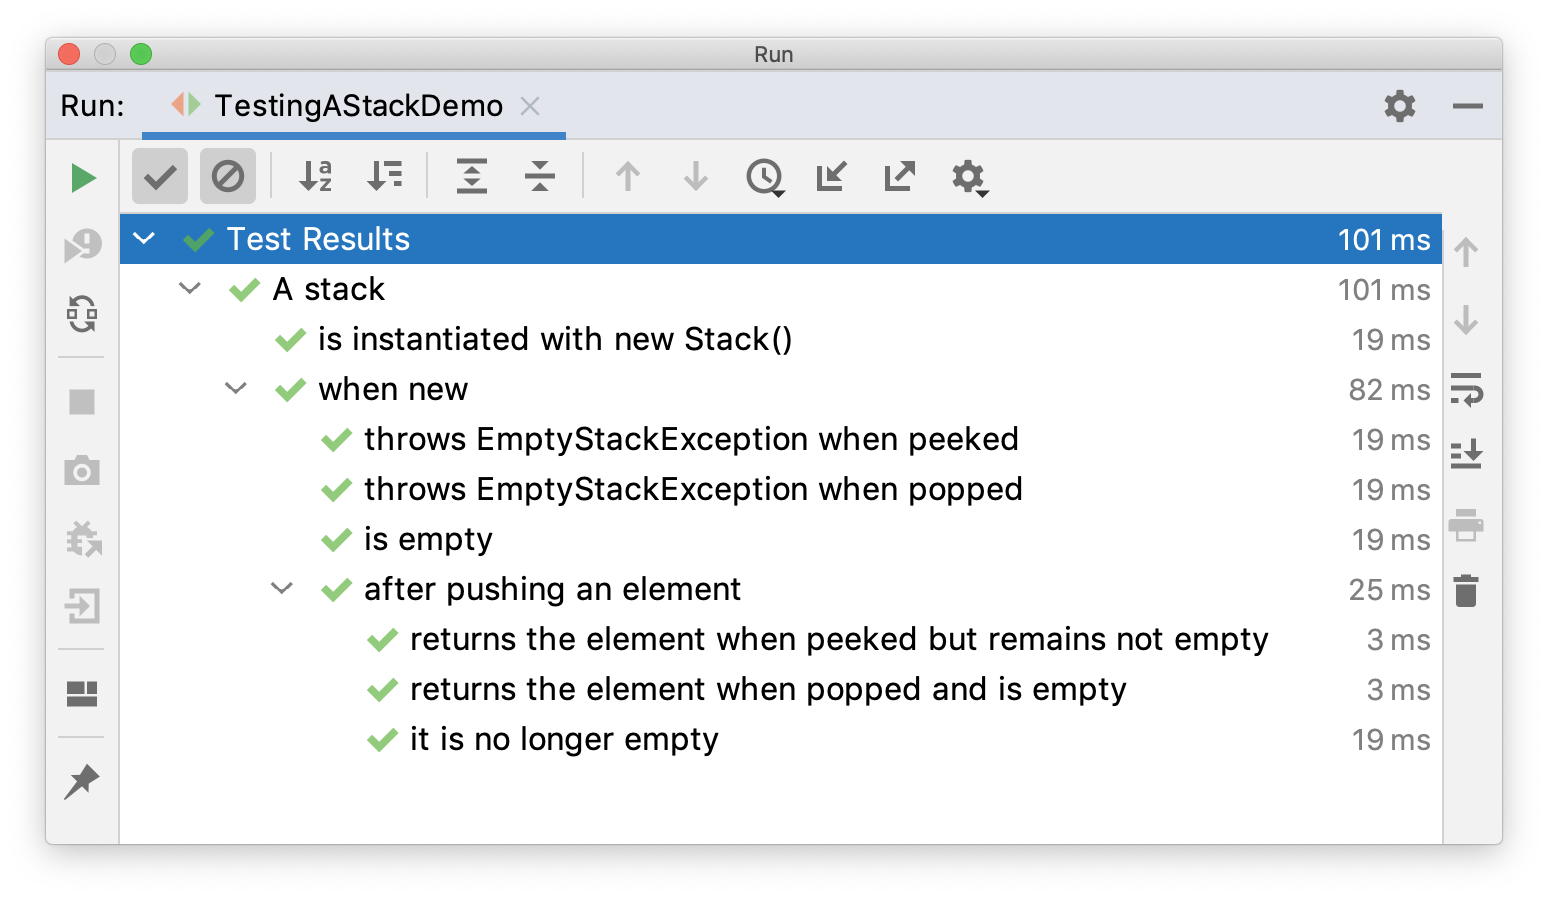
@Nested테스트는 계층적인 테스트 구조를 통해 여러 테스트 간의 관계를 표현하는데 도움을 준다.@Nested를 붙일 테스트 클래스는 정적 클래스가 아니어야 한다.
@DisplayName("A stack")
class TestingAStackDemo {

    Stack stack;

    @Test
    @DisplayName("is instantiated with new Stack()")
    void isInstantiatedWithNew() {
        new Stack<>();
    }

    @Nested
    @DisplayName("when new")
    class WhenNew {

        @BeforeEach
        void createNewStack() {
            stack = new Stack<>();
        }

        @Test
        @DisplayName("is empty")
        void isEmpty() {
            assertTrue(stack.isEmpty());
        }

        @Test
        @DisplayName("throws EmptyStackException when popped")
        void throwsExceptionWhenPopped() {
            assertThrows(EmptyStackException.class, stack::pop);
        }

        @Test
        @DisplayName("throws EmptyStackException when peeked")
        void throwsExceptionWhenPeeked() {
            assertThrows(EmptyStackException.class, stack::peek);
        }

        @Nested
        @DisplayName("after pushing an element")
        class AfterPushing {

            String anElement = "an element";

            @BeforeEach
            void pushAnElement() {
                stack.push(anElement);
            }

            @Test
            @DisplayName("it is no longer empty")
            void isNotEmpty() {
                assertFalse(stack.isEmpty());
            }

            @Test
            @DisplayName("returns the element when popped and is empty")
            void returnElementWhenPopped() {
                assertEquals(anElement, stack.pop());
                assertTrue(stack.isEmpty());
            }

            @Test
            @DisplayName("returns the element when peeked but remains not empty")
            void returnElementWhenPeeked() {
                assertEquals(anElement, stack.peek());
                assertFalse(stack.isEmpty());
            }
        }
    }
}
생성자와 메서드를 위한 의존성 주입 (Dependency Injection for Constructors and Methods)
ParameterResolver는 런타임에 파라미터를 동적으로 결정(resolve)하는 테스트 익스텐션에 대한 API를 정의한다.- 테스트 클래스 생성자, 테스트 메서드, 또는 라이프사이클 메서드의 파라미터는 등록된
ParameterResolver에 의해 런타임에 결정된다. - 자동으로 등록되는 빌트인
ParameterResolver는 세 종류가 있다.TestInfoParameterResolver- 생성자나 메서드 파라미터가
TestInfo타입이라면,TestInfoParameterResolver는TestInfo인스턴스를 제공해준다. TestInfo는 현재 컨테이너 또는 테스트 표시 이름, 테스트 클래스, 테스트 메서드, 태그 등의 정보를 제공한다.
- 생성자나 메서드 파라미터가
RepetitionInfoParameterResolver@RepeatedTest,@BeforeEach,@AfterEach메서드 파라미터의 타입이RepetitionInfo라면,RepetitionInfoParameterResolver는RepetitionInfo인스턴스를 제공한다.RepetitionInfo는 현재 반복 횟수와 총 반복 횟수 등의 정보를 제공한다.
TestReporterParamterResolver- 생성자나 메서드 파라미터가
TestReporter타입이라면,TestReporterParamterResolver는TestReporter인스턴스를 제공해준다. TestReporter는 현재 테스트 실행에 대한 추가적인 데이터를 발행(publish)하는데 사용할 수 있다.- 발행된 데이터는
TestExecutionListener의reportingEntryPublished()메서드에 의해 사용(consume)된다.
- 생성자나 메서드 파라미터가
@DisplayName("TestInfo Demo")
class TestInfoDemo {

    TestInfoDemo(TestInfo testInfo) {
        assertEquals("TestInfo Demo", testInfo.getDisplayName());
    }

    @BeforeEach
    void init(TestInfo testInfo) {
        String displayName = testInfo.getDisplayName();
        assertTrue(displayName.equals("TEST 1") || displayName.equals("test2()"));
    }

    @Test
    @DisplayName("TEST 1")
    @Tag("my-tag")
    void test1(TestInfo testInfo) {
        assertEquals("TEST 1", testInfo.getDisplayName());
        assertTrue(testInfo.getTags().contains("my-tag"));
    }

    @Test
    void test2() {
    }

}
class TestReporterDemo {
@Test
void reportSingleValue(TestReporter testReporter) {
testReporter.publishEntry("a status message");
}
@Test
void reportKeyValuePair(TestReporter testReporter) {
testReporter.publishEntry("a key", "a value");
}
@Test
void reportMultipleKeyValuePairs(TestReporter testReporter) {
Map values = new HashMap<>();
values.put("user name", "dk38");
values.put("award year", "1974");
testReporter.publishEntry(values);
}
}- 자동으로 등록되는
ParameterResolver이외의ParameterResolver를 사용하고 싶다면@ExtendWith애노테이션으로 명시적으로ParameterResolver를 지정해주어야 한다.- ex)
@ExtendWith(MockitoExtension.class),@ExtendWith(SpringExtension.class)
- ex)
- 파라미터 타입만으로 주입을 하고 싶은 경우,
TypeBasedParameterResolver추상 클래스 구현한 후 이를@ExtendWith애노테이션으로 등록해서 사용할 수 있다.
테스트 인터페이스와 기본 메서드(Test Interfaces and Default Methods)
- 인터페이스 기본(
default) 메서드에는@Test,@RepeatedTest,@ParameterizedTest,@TestFactory,@TestTemplate,@BeforeEach,@AfterEach등을 선언할 수 있다. - 테스트 인터페이스나 클래스가
@TestInstance(Lifecycle.PER_CLASS)로 선언되어 있다면,static메서드 또는default메서드에@BeforeAll,@AfterAll을 선언할 수 있다. @ExtendWith과@Tag는 테스트 인터페이스에 선언할 수 있고, 해당 인터페이스를 구현한 테스트 클래스는 자동으로 태그와 익스텐션을 상속받는다.- 이러한 기능을 인터페이스 계약(contracts)을 작성하는데 사용할 수 도 있다.
@TestInstance(Lifecycle.PER_CLASS)
interface TestLifecycleLogger {

    static final Logger logger = Logger.getLogger(TestLifecycleLogger.class.getName());

    @BeforeAll
    default void beforeAllTests() {
        logger.info("Before all tests");
    }

    @AfterAll
    default void afterAllTests() {
        logger.info("After all tests");
    }

    @BeforeEach
    default void beforeEachTest(TestInfo testInfo) {
        logger.info(() -> String.format("About to execute [%s]",
            testInfo.getDisplayName()));
    }

    @AfterEach
    default void afterEachTest(TestInfo testInfo) {
        logger.info(() -> String.format("Finished executing [%s]",
            testInfo.getDisplayName()));
    }

}
interface TestInterfaceDynamicTestsDemo {
@TestFactory
default Stream dynamicTestsForPalindromes() {
return Stream.of("racecar", "radar", "mom", "dad")
.map(text -> dynamicTest(text, () -> assertTrue(text,equals(text)))); }
}public interface Testable {
T createValue();
}public interface EqualsContract extends Testable {
T createNotEqualValue();
@Test
default void valueEqualsItself() {
T value = createValue();
assertEquals(value, value);
}
@Test
default void valueDoesNotEqualNull() {
T value = createValue();
assertFalse(value.equals(null));
}
@Test
default void valueDoesNotEqualDifferentValue() {
T value = createValue();
T differentValue = createNotEqualValue();
assertNotEquals(value, differentValue);
assertNotEquals(differentValue, value);
}
}public interface ComparableContract> extends Testable {
T createSmallerValue();
@Test
default void returnsZeroWhenComparedToItself() {
T value = createValue();
assertEquals(0, value.compareTo(value));
}
@Test
default void returnsPositiveNumberWhenComparedToSmallerValue() {
T value = createValue();
T smallerValue = createSmallerValue();
assertTrue(value.compareTo(smallerValue) > 0);
}
@Test
default void returnsNegativeNumberWhenComparedToLargerValue() {
T value = createValue();
T smallerValue = createSmallerValue();
assertTrue(smallerValue.compareTo(value) < 0);
}
}class StringTests implements ComparableContract, EqualsContract {
@Override
public String createValue() {
return "banana";
}
@Override
public String createSmallerValue() {
return "apple"; // 'a' < 'b' in "banana"
}
@Override
public String createNotEqualValue() {
return "cherry";
}
}반복 테스트(Repeated Tests)
@RepeatedTest애노테이션을 이용하면 원하는 횟수만큼 반복 테스트를 할 수 있다.- 반복테스트에 대한 각 호출은
@Test메서드와 동일한 라이프사이클 콜백과 익스텐션을 지원한다.
@RepeatedTest(10)
void repeatedTest() {
}- 반복 횟수를 지정하는 것 외에도
name속성을 사용해서 사용자 지정 표시 이름도 설정할 수 있다.- 표시 이름은 정적 텍스트와 동적 자리 표시자(placeholder)의 조합을 사용할 수도 있다.
- 다음의 자리 표시자들이 지원된다:
DisplayName:@RepeatedTest메서드의 표시 이름{currentRepetition}: 현재 반복 횟수{totalRepetition}: 총 반복 횟수
- 각 반복에 대한 표시 이름 패턴의 기본값은
"repetition {currentRepetition} of {totalRepetitions}"이다. - 표시 이름에 메서드 이름을 포함하고 싶다면 표시 이름의 패턴을 정의하거나, 제공되는
RepeatedTest.LONG_DISPLAY_NAME패턴을 사용할 수 있다.RepeatedTest.LONG_DISPLAY_NAME:"DisplayName:: repetition {currentRepetition} of {totalRepetitions}"
- 현재 반복에 대한 정보를 가져오고 싶다면,
@RepeatedTest,@BeforeEach,@AfterEach메서드에서RepetitionInfo타입의 인스턴스를 주입받을 수 있다.
import static org.junit.jupiter.api.Assertions.assertEquals;

import java.util.logging.Logger;

import org.junit.jupiter.api.BeforeEach;
import org.junit.jupiter.api.DisplayName;
import org.junit.jupiter.api.RepeatedTest;
import org.junit.jupiter.api.RepetitionInfo;
import org.junit.jupiter.api.TestInfo;

class RepeatedTestsDemo {

    @BeforeEach
    void beforeEach(TestInfo testInfo, RepetitionInfo repetitionInfo) {
        int currentRepetition = repetitionInfo.getCurrentRepetition();
        int totalRepetitions = repetitionInfo.getTotalRepetitions();
        String methodName = testInfo.getTestMethod().get().getName();
        logger.info(String.format("About to execute repetition %d of %d for %s", //
            currentRepetition, totalRepetitions, methodName));
    }

    @RepeatedTest(10)
    void repeatedTest() {
    }

    @RepeatedTest(5)
    void repeatedTestWithRepetitionInfo(RepetitionInfo repetitionInfo) {
        assertEquals(5, repetitionInfo.getTotalRepetitions());
    }

    @RepeatedTest(value = 1, name = "{displayName} {currentRepetition}/{totalRepetitions}")
    @DisplayName("Repeat!")
    void customDisplayName(TestInfo testInfo) {
        assertEquals("Repeat! 1/1", testInfo.getDisplayName());
    }

    @RepeatedTest(value = 1, name = RepeatedTest.LONG_DISPLAY_NAME)
    @DisplayName("Details...")
    void customDisplayNameWithLongPattern(TestInfo testInfo) {
        assertEquals("Details... :: repetition 1 of 1", testInfo.getDisplayName());
    }

    @RepeatedTest(value = 5, name = "Wiederholung {currentRepetition} von {totalRepetitions}")
    void repeatedTestInGerman() {
    }
}
├─ RepeatedTestsDemo ✔
│ ├─ repeatedTest() ✔
│ │ ├─ repetition 1 of 10 ✔
│ │ ├─ repetition 2 of 10 ✔
│ │ ├─ repetition 3 of 10 ✔
│ │ ├─ repetition 4 of 10 ✔
│ │ ├─ repetition 5 of 10 ✔
│ │ ├─ repetition 6 of 10 ✔
│ │ ├─ repetition 7 of 10 ✔
│ │ ├─ repetition 8 of 10 ✔
│ │ ├─ repetition 9 of 10 ✔
│ │ └─ repetition 10 of 10 ✔
│ ├─ repeatedTestWithRepetitionInfo(RepetitionInfo) ✔
│ │ ├─ repetition 1 of 5 ✔
│ │ ├─ repetition 2 of 5 ✔
│ │ ├─ repetition 3 of 5 ✔
│ │ ├─ repetition 4 of 5 ✔
│ │ └─ repetition 5 of 5 ✔
│ ├─ Repeat! ✔
│ │ └─ Repeat! 1/1 ✔
│ ├─ Details... ✔
│ │ └─ Details... :: repetition 1 of 1 ✔
│ └─ repeatedTestInGerman() ✔
│ ├─ Wiederholung 1 von 5 ✔
│ ├─ Wiederholung 2 von 5 ✔
│ ├─ Wiederholung 3 von 5 ✔
│ ├─ Wiederholung 4 von 5 ✔
│ └─ Wiederholung 5 von 5 ✔파라미터화 된 테스트(Parameterized Tests)
@ParameterizedTest애노테이션을 이용한 파라미터화된 테스트는 하나의 테스트를 각기 다른 인수로 여러 번 실행할 수 있게 해준다.- 파라미터화 된 테스트를 정의하려면 반드시 하나 이상의 소스(source)를 선언해야 한다.
- 소스는 각 호출에 대한 인자를 제공하며, 제공된 인자는 테스트 메서드에서 사용(consume)된다.
@ParameterizedTest
@ValueSource(strings = { "racecar", "radar", "able was I ere I saw elba" })
void palindromes(String candidate) {
    assertTrue(StringUtils.isPalindrome(candidate));
}
palindromes(String) ✔
├─ [1] candidate=racecar ✔
├─ [2] candidate=radar ✔
└─ [3] candidate=able was I ere I saw elba ✔인자 사용하기(Consuming Arguments)
- 파라미터화 된 테스트는 일반적으로 설정된 소스의 인자 인덱스와 메서드 파라미터 인덱스가 1대 1로 대응된다.
- 하지만 원한다면 인자들을 집계(aggregate)해서 메서드에 하나의 단일 객체로 전달하는 것도 가능하다.
TestInfo,TestReporter등의 추가적인 인자는ParameterResolver에 의해 제공받을 수 있다.- 파라미터화 된 테스트 메서드의 파라미터는 반드시 다음의 순서를 따라서 선언되어야 한다:
- 인덱스화된(Indexed) 인자
- 애그리게이터(Aggregator) 인자
ParameterResolver에 의해 제공되는 인자
인자의 소스(Sources of Arguments)
@ValueSource
@ValueSource로 리터럴 값의 단일 배열을 소스로 지정할 수 있다.- 각 리터럴 값은 각 테스트 메서드 호출 마다 하나씩 전달되므로, 하나의 인자만 받는 파라미터화 테스트에만 사용할 수 있다.
@ValueSource의 리터럴 값으로 사용할 수 있는 타입은short,byte,int,long,float,double,char,boolean,String,Class등이 있다.
@ParameterizedTest
@ValueSource(ints = { 1, 2, 3 })
void testWithValueSource(int argument) {
    assertTrue(argument > 0 && argument < 4);
}
@NullSource
- 하나의
null값을 인자로 제공한다. - 파라미터가 원시(primitive) 타입인 경우 사용할 수 없다.
@EmptySource
- 하나의 빈(empty) 값을 인자로 제공한다.
- 파라미터의 타입은
String,List,Set,Map, 원시 타입 배열(ex.int[],char[][]등), 객체 배열(ex.String[],Integer[][]등) 중 하나여야 한다.- 위 타입의 자식 타입(subtype)은 지원되지 않는다.
@NullAndEmptySource
@NullSource와@EmptySource의 기능을 결합한 조합(composed) 애노테이션
정리:
- 코너 케이스 또는 잘못된 입력 값에 대한 동작을 테스트할 때 유용하다.
- 여러 종류의 공백 문자열을 테스트하고 싶다면
@ValueSource(strings = {" ", " ", "\t", "\n"})와 같은 형태를 사용할 수 있다.
@ParameterizedTest
@NullSource
@EmptySource
@ValueSource(strings = { " ", "   ", "\t", "\n" })
void nullEmptyAndBlankStrings(String text) {
    assertTrue(text == null || text.trim().isEmpty());
}
@ParameterizedTest
@NullAndEmptySource
@ValueSource(strings = { " ", " ", "\t", "\n" })
void nullEmptyAndBlankStrings(String text) {
assertTrue(text == null || text.trim().isEmpty());
}- 위
nullEmptyAndBlankStrings메서드는 총 6번 호출된다.- 1회의
null문자열 호출 - 1회의 빈 문자열 호출
- 4회의 공백 문자열 호출 (
" "," ","\t","\n")
- 1회의
@EnumSource
- 애노테이션의
value로 테스트에 사용할enum클래스를 지정할 수 있다. - 선택(optional)이다. 만일
value가 제공되지 않은 경우, 첫 번째 메서드 파라미터의 타입이 사용된다. - 하지만 해당 타입이
enum타입이 아닐 경우 테스트는 실패한다. names속성으로 어떤 상수를 사용할 지 지정할 수 있다.names를 지정하지 않을 경우, 모든 상수가 사용된다.
mode속성으로names로 제공된 값을 어떻게 처리할 것인지 선언할 수 있다.- ex.
EXLUDE,MATCH_ALL등
- ex.
@ParameterizedTest
@EnumSource(ChronoUnit.class)
void testWithEnumSource(TemporalUnit unit) {
    assertNotNull(unit);
}

@ParameterizedTest
@EnumSource
void testWithEnumSourceWithAutoDetection(ChronoUnit unit) {
    assertNotNull(unit);
}

@ParameterizedTest
@EnumSource(names = { "DAYS", "HOURS" })
void testWithEnumSourceInclude(ChronoUnit unit) {
    assertTrue(EnumSet.of(ChronoUnit.DAYS, ChronoUnit.HOURS).contains(unit));
}

@ParameterizedTest
@EnumSource(mode = EXCLUDE, names = { "ERAS", "FOREVER" })
void testWithEnumSourceExclude(ChronoUnit unit) {
    assertFalse(EnumSet.of(ChronoUnit.ERAS, ChronoUnit.FOREVER).contains(unit));
}

@ParameterizedTest
@EnumSource(mode = MATCH_ALL, names = "^.*DAYS$")
void testWithEnumSourceRegex(ChronoUnit unit) {
    assertTrue(unit.name().endsWith("DAYS"));
}
@MethodSource
@MethodSource로 하나 이상의 팩토리 메서드를 지정할 수 있다.- 명시적으로 팩토리 메서드를 지정하지 않은 경우, 관례에 따라 현재
@ParameterizedMethod와 동일한 이름의 팩토리 메서드를 찾게 된다.
- 명시적으로 팩토리 메서드를 지정하지 않은 경우, 관례에 따라 현재
- 팩토리 메서드는 테스트 클래스에 위치할 수도 있고, 외부 클래스에 위치할 수도 있으며, 반드시
static이어야 한다.- 예외적으로
@TestInstance(Lifecycle.PER_CLASS)를 사용할 경우 테스트 클래스에 위치한 팩토리 메서드는static이 아닐 수도 있다. - 팩토리 메서드가 외부 클래스에 위치한 경우, 해당 팩토리 메서드의 FQMN(Fully Qualified Method Name)을 제공해야 한다.
- 예외적으로
- 팩토리 메서드는 반드시 인자를 받지 않아야 한다.
- 각 팩토리 메서드는 반드시 인자의 스트림(stream of arguments)를 생성해야 한다.
- 단, 실제 리턴 타입은
Stream으로 변환될 수 있다면 여러 타입이 가능하다. - ex.
Stream,IntStream,LongStream,DoubleStream,Collection,Iterator,Iterable, 객체 배열, 원시 값 배열 등
- 단, 실제 리턴 타입은
- 스트림 내의 인자 집합은 각 호출마다
Arguments의 인스턴스, 객체 배열, 또는 단일 값으로 제공된다. - 테스트 메서드가 하나의 파라미터만 필요로 하는 경우, 단순히 파라미터 타입의
Stream을 리턴해도 된다. - 테스트 메서드가 여러 개의 파라미터를 필요로 하는 경우,
Arguments인스턴스의 콜렉션, 스트림, 배열, 또는 객체 배열을 리턴해야 한다.
@ParameterizedTest
@MethodSource("stringProvider")
void testWithExplicitLocalMethodSource(String argument) {
    assertNotNull(argument);
}

static Stream stringProvider() {
    return Stream.of("apple", "banana");
}

@ParameterizedTest
@MethodSource
void testWithDefaultLocalMethodSource(String argument) {
    assertNotNull(argument);
}

static Stream testWithDefaultLocalMethodSource() {
    return Stream.of("apple", "banana");
}

@ParameterizedTest
@MethodSource("range")
void testWithRangeMethodSource(int argument) {
    assertNotEquals(9, argument);
}

static IntStream range() {
    return IntStream.range(0, 20).skip(10);
}

@ParameterizedTest
@MethodSource("stringIntAndListProvider")
void testWithMultiArgMethodSource(String str, int num, List list) {
    assertEquals(5, str.length());
    assertTrue(num >=1 && num <=2);
    assertEquals(2, list.size());
}

static Stream stringIntAndListProvider() {
    return Stream.of(
        arguments("apple", 1, Arrays.asList("a", "b")),
        arguments("lemon", 2, Arrays.asList("x", "y"))
    );
}
class ExternalMethodSourceDemo {
@ParameterizedTest
@MethodSource("example.StringsProviders#tinyStrings")
void testWithExternalMethodSource(String tinyString) {
// test with tiny string
}
}
class StringsProviders {
static Stream tinyStrings() {
return Stream.of(".", "oo", "OOO");
}
}@CsvSource
@CsvSource를 이용하면 인자의 리스트를 CSV(comma-seperated values)로 표현 할 수 있다.delimiter속성으로 구분자(delimiter)를 지정할 수 있으며, 기본 값은 콤마(,)다.- 단일 문자 구분자 대신 문자열 구분자를 사용하고 싶다면
delimiterString속성을 사용할 수 있다.delimiter와delimiterString은 동시에 사용될 수 없다.
@CsvSource는 인용 문자로 작은 따옴표(')를 사용한다.- 빈 인용구(
'')는 빈 문자열로, 완전히 빈 값은null로 해석된다.null로 해석된 값의 타입이 원시형인 경우ArgumentConversionException예외가 발생한다.
emptyValue속성으로 빈 문자열 특정 문자열로 해석하도록 할 수 있다.nullValue속성으로 특정 문자열들을null로 해석하도록 할 수 있다.- 인용구로 둘러싸이지 않은 빈 값은
nullValue속성과 관계 없이 항상null로 변환된다.
- 인용구로 둘러싸이지 않은 빈 값은
| Example Input | Resulting Argument List |
|---|---|
@CsvSource({ "apple, banana" }) | "apple", "banana" |
@CsvSource({ "apple, 'lemon, lime'" }) | "apple", "lemon, lime" |
@CsvSource({ "apple, ''" }) | "apple", "" |
@CsvSource({ "apple, " }) | "apple", null |
@CsvSource(value = { "apple, banana, NIL" }, nullValues = "NIL") | "apple", "banana", null |
@CsvFileSource
@CsvFileSource를 사용하면 로컬 파일 시스템 또는 클래스 경로(classpath)의 CSV 파일을 사용할 수 있다.- CSV 파일 각각의 라인 마다 파라미터화 된 테스트 메서드가 호출된다.
delimiter속성으로 구분자(delimiter)를 지정할 수 있으며, 기본 값은 콤마(,)다.- 단일 문자 구분자 대신 문자열 구분자를 사용하고 싶다면
delimiterString속성을 사용할 수 있다.delimiter와delimiterString은 동시에 사용될 수 없다.
- CSV 파일 라인 중
#문자로 시작하는 라인은 주석으로 해석되며, 무시된다. @CsvSource와 달리, 인용 문자로 큰 따옴표(")를 사용한다.- 빈 인용구(
"")는 빈 문자열로, 완전히 빈 값은null로 해석된다.null로 해석된 값의 타입이 원시형인 경우ArgumentConversionException예외가 발생한다.
emptyValue속성으로 빈 문자열 특정 문자열로 해석하도록 할 수 있다.nullValue속성으로 특정 문자열들을null로 해석하도록 할 수 있다.- 인용구로 둘러싸이지 않은 빈 값은
nullValue속성과 관계 없이 항상null로 변환된다.
- 인용구로 둘러싸이지 않은 빈 값은
@ParameterizedTest
@CsvFileSource(resources = "/two-column.csv", numLinesToSkip = 1)
void testWithCsvFileSourceFromClasspath(String country, int reference) {
    assertNotNull(country);
    assertNotEquals(0, reference);
}

@ParameterizedTest
@CsvFileSource(files = "src/test/resources/two-column.csv", numLinesToSkip = 1)
void testWithCsvFileSourceFromFile(String country, int reference) {
    assertNotNull(country);
    assertNotEquals(0, reference);
}
Country, reference
Sweden, 1
Poland, 2
"United States of America", 3@ArgumentsSource
@ArgumentsSource로 재사용 가능한 사용자 지정ArgumentsProvider를 지정할 수 있다.ArgumentsProvider는 반드시 최상위 클래스 또는 정적(static) 내부(nested) 클래스에 정의되어야 한다.
@ParameterizedTest
@ArgumentsSource(MyArgumentsProvider.class)
void testWithArgumentsSource(String argument) {
    assertNotNull(argument);
}
public class MyArgumentsProvider implements ArgumentsProvider {
@Override
public Stream provideArguments(ExtensionContext context) {
return Stream.of("apple", "banana").map(Arguments::of);
}
}인자 변환(Argument Conversion)
확장 변환(Widening Conversion)
- JUnit은
@ParameterizedTest에 제공된 인자에 대한 확장 변환을 지원한다. - 예를 들어,
@ValueSource(ints = { 1, 2, 3 })는int타입 뿐만 아니라,long,float,double타입으로 확장 변환 될 수 있다.
묵시적 변환(Implicit Conversion)
- JUnit은
@CsvSource와 같은 유스케이스를 지원하기 위해 몇 가지 빌트인 묵시적 타입 변환기를 제공한다. - 변환 프로세스는 메서드 파라미터 타입에 의존한다.
- 예를 들어,
@ParameterizedTest테스트 메서드의 파라미터 타입이TimeUnit이고, 제공된 소스가String타입이라면, 해당 문자열은 자동으로TimeUnitenum상수로 변환된다.- 8진법, 10진법, 16진법
String리터럴은byte,short,int,long또는 해당 원시형의 박스(boxed) 타입으로 변환 된다.
- 8진법, 10진법, 16진법
@ParameterizedTest
@ValueSource(strings = "SECONDS")
void testWithImplicitArgumentConversion(ChronoUnit argument) {
    assertNotNull(argument.name());
}| Target Type | Example |
|---|---|
boolean/Boolean | "true" → true |
byte/Byte | "15", "0xF", or "017" → (byte) 15 |
char/Character | "o" → 'o' |
short/Short | "15", "0xF", or "017" → (short) 15 |
int/Integer | "15", "0xF", or "017" → 15 |
long/Long | "15", "0xF", or "017" → 15L |
float/Float | "1.0" → 1.0f |
double/Double | "1.0" → 1.0d |
Enum subclass | "SECONDS" → TimeUnit.SECONDS |
java.io.File | "/path/to/file" → new File("/path/to/file") |
java.lang.Class | "java.lang.Integer" → java.lang.Integer.class (내부 클래스의 경우에는 $를 사용한다. ex. "java.lang.Thread$State") |
java.lang.Class | "byte" → byte.class (원시 타입 지원) |
java.lang.Class | "char[]" → char[].class (배열 타입 지원) |
java.math.BigDecimal | "123.456e789" → new BigDecimal("123.456e789") |
java.math.BigInteger | "1234567890123456789" → new BigInteger("1234567890123456789") |
java.net.URI | "https://junit.org/" → URI.create("https://junit.org/") |
java.net.URL | "https://junit.org/" → new URL("https://junit.org/") |
java.nio.charset.Charset | "UTF-8" → Charset.forName("UTF-8") |
java.nio.file.Path | "/path/to/file" → Paths.get("/path/to/file") |
java.time.Duration | "PT3S" → Duration.ofSeconds(3) |
java.time.Instant | "1970-01-01T00:00:00Z" → Instant.ofEpochMilli(0) |
java.time.LocalDateTime | "2017-03-14T12:34:56.789" → LocalDateTime.of(2017, 3, 14, 12, 34, 56, 789_000_000) |
java.time.LocalDate | "2017-03-14" → LocalDate.of(2017, 3, 14) |
java.time.LocalTime | "12:34:56.789" → LocalTime.of(12, 34, 56, 789_000_000) |
java.time.MonthDay | "--03-14" → MonthDay.of(3, 14) |
java.time.OffsetDateTime | "2017-03-14T12:34:56.789Z" → OffsetDateTime.of(2017, 3, 14, 12, 34, 56, 789_000_000, ZoneOffset.UTC) |
java.time.OffsetTime | "12:34:56.789Z" → OffsetTime.of(12, 34, 56, 789_000_000, ZoneOffset.UTC) |
java.time.Period | "P2M6D" → Period.of(0, 2, 6) |
java.time.YearMonth | "2017-03" → YearMonth.of(2017, 3) |
java.time.Year | "2017" → Year.of(2017) |
java.time.ZonedDateTime | "2017-03-14T12:34:56.789Z" → ZonedDateTime.of(2017, 3, 14, 12, 34, 56, 789_000_000, ZoneOffset.UTC) |
java.time.ZoneId | "Europe/Berlin" → ZoneId.of("Europe/Berlin") |
java.time.ZoneOffset | "+02:30" → ZoneOffset.ofHoursMinutes(2, 30) |
java.util.Currency | "JPY" → Currency.getInstance("JPY") |
java.util.Locale | "en" → new Locale("en") |
java.util.UUID | "d043e930-7b3b-48e3-bdbe-5a3ccfb833db" → UUID.fromString("d043e930-7b3b-48e3-bdbe-5a3ccfb833db") |
문자열에서 객체 변환 대체(Fallback String-to-Object Conversion)
- JUnit은
String에서 특정 타입으로 자동 변환하기 위한 대체 메커니즘(fallback mechanism)도 제공한다. - 이 경우, 변환을 위한 팩토리 메서드 또는 팩토리 생성자가 필요하다.
- 팩토리 메서드
- 정확히 하나의
String인자를 받아 대상 타입의 인스턴스를 리턴한다. private이 아닌static메서드여야 한다.- 메서드명은 임의로 정해도 된다.
- 정확히 하나의
- 팩토리 생성자
- 정확히 하나의
String인자를 받아 대상 타입의 인스턴스를 리턴하는 생성자 private이면 안되며, 대상 타입은 반드시 최상위 클래스 또는 정적 내부 클래스에 선언되어야 한다.
- 정확히 하나의
- 만일 여러 개의 팩토리 메서드가 발견되면 무시된다.
- 하나의 팩토리 메서드와 하나의 팩토리 생성자가 발견되면, 팩토리 메서드가 생성자 대신 사용된다.
@ParameterizedTest
@ValueSource(strings = "42 Cats")
void testWithImplicitFallbackArgumentConversion(Book book) {
    assertEquals("42 Cats", book.getTitle());
}
public class Book {
private final String title;
private Book(String title) {
this.title = title;
}
public static Book fromTitle(String title) {
return new Book(title);
}
public String getTitle() {
return this.title;
}
}명시적 변환(Explicit Conversion)
- 특정 파라미터에
@ConvertWith애노테이션으로ArgumentConverter를 지정할 수도 있다. ArgumentConverter는 반드시 최상위 클래스 또는 정적 내부 클래스에 선언되어야 한다.- 만약 변환기가 오직 한 타입을 다른 타입으로 변환하기만 하는 경우라면,
TypedArgumentConverter를 상속해서 타입 체크를 위한 보일러플레이트를 피할 수 있다. - 명시적 인자 변환기는 테스트와 익스텐션 작성자가 구현 해야 하는 것이다. 따라서 JUnit은 오직 한 가지의 명시적 인자 변환기만을 제공한다.
JavaTimeArgumentConverter:@JavaTimeConversionPattern조합 애노테이션을 통해 사용한다.- 해당 구현을 레퍼런스로 참고해서 명시적 인자 변환기를 구현하라.
@ParameterizedTest
@EnumSource(ChronoUnit.class)
void testWithExplicitArgumentConversion(
        @ConvertWith(ToStringArgumentConverter.class) String argument) {

    assertNotNull(ChronoUnit.valueOf(argument));
}
public class ToStringArgumentConverter extends SimpleArgumentConverter {
@Override
protected Object convert(Object source, Class<?> targetType) {
assertEquals(String.class, targetType, "Can only convert to String");
if (source instanceof Enum<?>) {
return ((Enum<?>) source).name();
}
return String.valueOf(source);
}
}public class ToLengthArgumentConverter extends TypedArgumentConverter<String, Integer> {
protected ToLengthArgumentConverter() {
super(String.class, Integer.class);
}
@Override
protected Integer convert(String source) {
return source.length();
}
}@ParameterizedTest
@ValueSource(strings = { "01.01.2017", "31.12.2017" })
void testWithExplicitJavaTimeConverter(
@JavaTimeConversionPattern("dd.MM.yyyy") LocalDate argument) {
assertEquals(2017, argument.getYear());
}인자 집계(Argument Aggregation)
- 기본적으로
@ParameterizedTest메서드에 제공된 각 인자는 메서드 파라미터 한 개에 대응한다.- 이에 따라 많은 수의 인자를 제공해야 하는 경우에는 메서드 시그니처가 비대해진다.
- 이러한 경우, 여러 개의 파라미터 대신에
ArgumentAccessor를 사용할 수 있다. ArgumnetAccessorAPI를 사용하면, 제공된 인자들을 하나의 인자를 통해 접근할 수 있다.ArgumentAccessor는 묵시적 타입 변환도 지원한다.
@ParameterizedTest
@CsvSource({
    "Jane, Doe, F, 1990-05-20",
    "John, Doe, M, 1990-10-22"
})
void testWithArgumentsAccessor(ArgumentsAccessor arguments) {
    Person person = new Person(arguments.getString(0),
                               arguments.getString(1),
                               arguments.get(2, Gender.class),
                               arguments.get(3, LocalDate.class));

    if (person.getFirstName().equals("Jane")) {
        assertEquals(Gender.F, person.getGender());
    }
    else {
        assertEquals(Gender.M, person.getGender());
    }
    assertEquals("Doe", person.getLastName());
    assertEquals(1990, person.getDateOfBirth().getYear());
}ArgumentsAccessor타입의 파라미터에ArgumentsAccessor의 인스턴스가 자동으로 주입된다.
사용자 지정 애그리게이터(Cusom Aggregator)
-
JUnit은
ArgumentsAccessor를 통한 인자 직접 접근과는 별개로 사용자 지정, 재사용 가능한 애그리게이터(aggregator) 또한 지원한다. -
사용자 지정 애그리게이터를 사용하기 위해서는
ArgumnetAggregator인터페이스를 구현하고, 해당 파라미터에@AggregateWith애노테이션으로 애그리게이터를 등록해 주어야 한다. -
파라미터화 테스트가 호출되면 애그리게이터의 결과가 해당 인자로 제공된다.
-
ArgumentsAggregator는 최상위 클래스 또는 정적 내부 클래스에 선언되어야 한다. -
코드 여러 곳에
@AggregateWith애노테이션이 중복해서 나타날 경우, 이를 조합 애노테이션으로 추출할 수도 있다.
@ParameterizedTest
@CsvSource({
    "Jane, Doe, F, 1990-05-20",
    "John, Doe, M, 1990-10-22"
})
void testWithArgumentsAggregator(@AggregateWith(PersonAggregator.class) Person person) {
    // perform assertions against person
}
public class PersonAggregator implements ArgumentsAggregator {
@Override
public Person aggregateArguments(ArgumentsAccessor arguments, ParameterContext context) {
return new Person(arguments.getString(0),
arguments.getString(1),
arguments.get(2, Gender.class),
arguments.get(3, LocalDate.class));
}
}@ParameterizedTest
@CsvSource({
"Jane, Doe, F, 1990-05-20",
"John, Doe, M, 1990-10-22"
})
void testWithCustomAggregatorAnnotation(@CsvToPerson Person person) {
}@Retention(RetentionPolicy.RUNTIME)
@Target(ElementType.PARAMETER)
@AggregateWith(PersonAggregator.class)
public @interface CsvToPerson {
}표시 이름 사용자화하기(Customizing Display Names)
- 기본적으로 파라미터화 테스트의 표시 이름은 호출 인덱스와 해당 호출에 대한 모든 인자의
String표현 값을 포함한다. @ParameterizedTest애노테이션의name속성으로 표시 이름을 사용자화할 수 있다.name속성은MessageFormat패턴이므로, 작은 따옴표(')를 표시하기 위해서는 작은 따옴표 두 개('')를 사용해야 한다.
@DisplayName("Display name of container")
@ParameterizedTest(name = "{index} ==> the rank of ''{0}'' is {1}")
@CsvSource({ "apple, 1", "banana, 2", "'lemon, lime', 3" })
void testWithCustomDisplayNames(String fruit, int rank) {
}
Display name of container ✔
├─ 1 ==> the rank of 'apple' is 1 ✔
├─ 2 ==> the rank of 'banana' is 2 ✔
└─ 3 ==> the rank of 'lemon, lime' is 3 ✔- 그 외에 다음과 같은 자리 표시자(placeholders)들이 지원된다:
| Placeholder | Description |
|---|---|
DisplayName | 메서드의 표시 이름 |
{index} | 현재 호출 인덱스 (1부터 시작) |
{arguments} | 콤마로 구분된 완전한 인자의 목록 |
{argumentsWithNames} | 콤마로 구분된 완전한 인자의 목록 (파라미터 이름 포함) |
{0}, {1}, … | 각 개별 인자 하나 |
- 인자를 표시 이름에 포함할 경우, 인자의
String표현 값이 설정된 최대 길이(기본값 = 512 문자)를 넘어가면 생략된다.- 최대 길이 제한은
junit.jupiter.params.displayname.argument.maxlength설정 파라미터를 통해 설정할 수 있다.
- 최대 길이 제한은
라이프사이클과 상호운용성(Lifecycle and Interoperability)
- 파라미터화 테스트의 각 호출은 일반적인
@Test메서드와 동일하다.- 예를 들어
@BeforeEach메서드는 각 호출 이전에 실행된다.
- 예를 들어
- 동적 테스트와 비슷하게 각각의 호출은 IDE의 테스트 트리에서 하나씩 보여진다.
@ParameterizedTest메서드에서ParameterResolver익스텐션도 함께 사용할 수 있지만, 인자 소스로부터 받을 파라미터가 파라미터 목록의 앞에 먼저 와야 한다.- 인자 소스의 실제 값들은 라이프사이클 메서드와 테스트 클래스 생성자에서는 결정(resolve)되지 않는다.
@BeforeEach
void beforeEach(TestInfo testInfo) {
}

@ParameterizedTest
@ValueSource(strings = "apple")
void testWithRegularParameterResolver(String argument, TestReporter testReporter) {
    testReporter.publishEntry("argument", argument);
}

@AfterEach
void afterEach(TestInfo testInfo) {
}
테스트 템플릿(Test Templates)
@TestTemplate메서드는 일반적인 테스트 케이스가 아니라 테스트 케이스를 위한 템플릿이다.- 테스트 템플릿은 등록된 프로바이더에 의해 리턴되는 호출 컨텍스트(invocation context)의 개수에 따라 여러 번 호출되도록 설계되었다.
- 따라서 테스트 템플릿은 등록된
TestTemplateInvocationContextProvider익스텐션과 함께 사용되어야 한다. - 각 테스트 템플릿 메서드의 호출은 일반적인
@Test메서드의 실행처럼 동일한 라이프사이클 콜백과 익스텐션을 지원한다. - 반복 테스트와 파라미터화 테스트는 기본적으로 제공되는 테스트 템플릿의 특수한 케이스이다.
동적 테스트(Dynamic Tests)
- JUnit의 표준
@Test애노테이션은 컴파일 시간에 완전히 결정된다는 관점에서 정적이다. - 따라서
@Test메서드의 동작(behavior)은 런타임에는 변경될 수 없다. - 가정(assumption)은 동적인 동작의 기본적인 형태를 제공하지만, 표현력이 제한적이다.
@TestFactory가 달린 팩토리 메서드는 런타임에 동적 테스트를 생성한다.@TestFactory메서드는@Test메서드와 대조적으로 테스트 케이스가 아니라 테스트 케이스를 위한 팩토리다.@TestFactory메서드는 하나의DynamicNode,Stream,Collection,Iterable,Iterator, 또는DynamicNode인스턴스의 배열을 리턴해야 한다.DynamicNode의 생성 가능한 자식 클래스로는DynamicContainer와DynamicTest가 있다.DynamicContainer인스턴스는 표시 이름과 동적 자식 노드로 이루어지며, 임의로 동적 노드의 중첩 계층을 만들 수 있다.DynamicTest인스턴스는 게으르게(lazily) 실행되며, 동적 또는 심지어 비결정적(non-deterministic)인 테스트 케이스의 생성을 할 수 있다.
@TestFactory메서드에 의해 리턴되는 모든Stream은stream.close()를 호출함으로서 적절히 종료되므로,Files.lines()와 같은 리소스를 안전하게 사용할 수 있다.@TestFactory메서드는@Test메서드와 마찬가지로private이거나static일 수 없으며, 원한다면ParameterResolver가 제공하는 파라미터를 선언할 수 있다.DynamicTest는 런타임에 생성되는 테스트 케이스로, 표시 이름과Executable로 이루어진다.Executable은@FunctionalInterface이므로, 동적 테스트의 구현은 람다 표현식(lambda expression) 또는 메서드 레퍼런스(method references)로 사용될 수 있다.- 동적 테스트는 반드시 팩토리 메서드에 의해 만들어져야 한다.
동적 테스트의 라이프사이클
- 동적 테스트의 실행 라이프사이클은 일반적인
@Test의 라이프사이클과 상당히 다르다. - 각 개별 동적 테스트는 라이프사이클 콜백을 가지지 않는다.
@BeforeEach와@AfterEach메서드와, 익스텐션 콜백들은@TestFactory메서드에 의해 실행되지, 동적 테스트에 의해 실행되지 않는다.- 즉, 동적 테스트를 위한 람다 표현식 내에서 필드에 접근하면 해당 필드는 각 개별 동적 테스트 사이에 콜백 메서드나 확장에 의해 초기화 되지 않는다.
동적 테스트 예시
class DynamicTestsDemo {

    private final Calculator calculator = new Calculator();

    // This will result in a JUnitException!
    @TestFactory
    List<String> dynamicTestsWithInvalidReturnType() {
        return Arrays.asList("Hello");
    }

    @TestFactory
    Collection<DynamicTest> dynamicTestsFromCollection() {
        return Arrays.asList(
            dynamicTest("1st dynamic test", () -> assertTrue(isPalindrome("madam"))),
            dynamicTest("2nd dynamic test", () -> assertEquals(4, calculator.multiply(2, 2)))
        );
    }

    @TestFactory
    Iterable<DynamicTest> dynamicTestsFromIterable() {
        return Arrays.asList(
            dynamicTest("3rd dynamic test", () -> assertTrue(isPalindrome("madam"))),
            dynamicTest("4th dynamic test", () -> assertEquals(4, calculator.multiply(2, 2)))
        );
    }

    @TestFactory
    Iterator<DynamicTest> dynamicTestsFromIterator() {
        return Arrays.asList(
            dynamicTest("5th dynamic test", () -> assertTrue(isPalindrome("madam"))),
            dynamicTest("6th dynamic test", () -> assertEquals(4, calculator.multiply(2, 2)))
        ).iterator();
    }

    @TestFactory
    DynamicTest[] dynamicTestsFromArray() {
        return new DynamicTest[] {
            dynamicTest("7th dynamic test", () -> assertTrue(isPalindrome("madam"))),
            dynamicTest("8th dynamic test", () -> assertEquals(4, calculator.multiply(2, 2)))
        };
    }

    @TestFactory
    Stream<DynamicTest> dynamicTestsFromStream() {
        return Stream.of("racecar", "radar", "mom", "dad")
            .map(text -> dynamicTest(text, () -> assertTrue(isPalindrome(text))));
    }

    @TestFactory
    Stream<DynamicTest> dynamicTestsFromIntStream() {
        // Generates tests for the first 10 even integers.
        return IntStream.iterate(0, n -> n + 2).limit(10)
            .mapToObj(n -> dynamicTest("test" + n, () -> assertTrue(n % 2 == 0)));
    }

    @TestFactory
    Stream<DynamicTest> generateRandomNumberOfTestsFromIterator() {

        // Generates random positive integers between 0 and 100 until
        // a number evenly divisible by 7 is encountered.
        Iterator<Integer> inputGenerator = new Iterator<Integer>() {

            Random random = new Random();
            int current;

            @Override
            public boolean hasNext() {
                current = random.nextInt(100);
                return current % 7 != 0;
            }

            @Override
            public Integer next() {
                return current;
            }
        };

        // Generates display names like: input:5, input:37, input:85, etc.
        Function<Integer, String> displayNameGenerator = (input) -> "input:" + input;

        // Executes tests based on the current input value.
        ThrowingConsumer<Integer> testExecutor = (input) -> assertTrue(input % 7 != 0);

        // Returns a stream of dynamic tests.
        return DynamicTest.stream(inputGenerator, displayNameGenerator, testExecutor);
    }

    @TestFactory
    Stream<DynamicTest> dynamicTestsFromStreamFactoryMethod() {
        // Stream of palindromes to check
        Stream<String> inputStream = Stream.of("racecar", "radar", "mom", "dad");

        // Generates display names like: racecar is a palindrome
        Function<String, String> displayNameGenerator = text -> text + " is a palindrome";

        // Executes tests based on the current input value.
        ThrowingConsumer<String> testExecutor = text -> assertTrue(isPalindrome(text));

        // Returns a stream of dynamic tests.
        return DynamicTest.stream(inputStream, displayNameGenerator, testExecutor);
    }

    @TestFactory
    Stream<DynamicNode> dynamicTestsWithContainers() {
        return Stream.of("A", "B", "C")
            .map(input -> dynamicContainer("Container " + input, Stream.of(
                dynamicTest("not null", () -> assertNotNull(input)),
                dynamicContainer("properties", Stream.of(
                    dynamicTest("length > 0", () -> assertTrue(input.length() > 0)),
                    dynamicTest("not empty", () -> assertFalse(input.isEmpty()))
                ))
            )));
    }

    @TestFactory
    DynamicNode dynamicNodeSingleTest() {
        return dynamicTest("'pop' is a palindrome", () -> assertTrue(isPalindrome("pop")));
    }

    @TestFactory
    DynamicNode dynamicNodeSingleContainer() {
        return dynamicContainer("palindromes",
            Stream.of("racecar", "radar", "mom", "dad")
                .map(text -> dynamicTest(text, () -> assertTrue(isPalindrome(text)))
        ));
    }
}dynamicTestsWithInvalidReturnType()와 같이 유효하지 않은 타입을 리턴하는 경우, 이를 컴파일 시간에 알 수 없기 때문에 런타임 예외인JUnitException이 발생한다.
동적 테스트를 위한 URI 테스트 소스(URI Test Sources for Dynamic Tests)
- JUnit 플랫폼은 IDE와 빌드 도구에서 테스트의 소스나 컨테이너의 위치를 표현하기 위한
TestSource를 제공한다. - 동적 테스트 또는 동적 컨테이너를 위한
TestSource는 각각DynamicTest.dynamicTest(String, URI, Executable)나DynamicContainer.dynamicContainer(String, URI, Stream)팩토리 메서드로 만들 수 있다. URI는 다음TestSource구현 중 하나로 변환된다:ClasspathResourceSource:URI가classpath스킴을 포함한 경우 (ex.classpath:/test/foo.xml?line=20,column=2)DirectorySource:URI가 파일 시스템에 존재하는 디렉토리를 나타내는 경우FileSource:URI가 파일 시스템에 존재하는 파일을 나타내는 경우MethodSource:URI가method스킴과 FQMN(Fully Qualified Method Name)을 포함하는 경우- ex.
method:org.junit.Foo#bar(java.lang.String, java.lang.String[])
- ex.
UriSource: 위 네 개의TestSource구현을 적용할 수 없는 경우
타임아웃(Timeouts)
@Timeout애노테이션은 선언된 테스트, 테스트 팩토리, 테스트 템플릿, 또는 라이프사이클 메서드의 실행 시간이 주어진 시간을 초과하면 실패하도록 한다.- 시간 단위의 기본값은 초(seconds)이지만, 원한다면 다른 단위로 설정할 수 있다.
class TimeoutDemo {

    @BeforeEach
    @Timeout(5)
    void setUp() {
        // fails if execution time exceeds 5 seconds
    }

    @Test
    @Timeout(value = 100, unit = TimeUnit.MILLISECONDS)
    void failsIfExecutionTimeExceeds100Milliseconds() {
        // fails if execution time exceeds 100 milliseconds
    }

}assertTimeoutPreemptively()단언과 달리,@Timeout메서드의 실행은 테스트의 메인 스레드에서 실행된다. 만일 타임아웃이 초과되면, 메인 스레드는 다른 스레드로부터 인터럽트된다. 따라서ThreadLocal트랜잭션 관리 등과 함께 상호 운용이 가능하다.- 테스트 클래스의 모든 테스트 메서드와 모든
@Nested클래스에 동일한 타임아웃을 설정하기 위해 클래스 레벨에@Timeout애노테이션을 선언할 수도 있다.- 클래스 레벨에
@Timeout이 선언되어 있더라도, 각 테스트 메서드 또는@Nested클래스에서 타임아웃을 오버라이드 할 수 있다. - 클래스 레벨에
@Timeout이 선언되어 있더라도, 라이프사이클 메서드에는 타임아웃이 적용되지 않는다.
- 클래스 레벨에
@Timeout을@TestFactory메서드에 선언하면 해당 팩토리 메서드가 주어진 시간 안에 리턴되는지만 검증하고, 리턴된 각 개별 동적 테스트의 실행시간은 검증하지 않는다.- 동적 테스트의 타임아웃을 검증해야 할 경우,
assertTimeout()또는assertTimeoutPreemptively()를 사용해야 한다.
- 동적 테스트의 타임아웃을 검증해야 할 경우,
@Timeout이@TestTemplate메서드(ex.@RepeatedTest,@ParameterizedTest)에 선언되어 있다면, 각 호출에 해당 타임아웃이 적용된다.- 설정 파라미터를 이용해 전역 타임아웃 기본값을 설정할 수 있다.
- 설정 파라미터는 구체적인 값이 덜 구체적인 값을 오버라이드 한다.
- 설정 파라미터의 값은 대소문자 구분 없는
<number> [ns|μs|ms|s|m|h|d]포맷을 가져야 한다. - 설정 파라미터 값에 단위가 없다면 기본 단위인 초가 적용된다.
| 설정 파라미터 | 대상 |
|---|---|
junit.jupiter.execution.timeout.default | 모든 테스트 가능한 요소들 (라이프사이클 메서드 포함) |
junit.jupiter.execution.timeout.testable.method.default | 모든 테스트 가능한 요소들 |
junit.jupiter.execution.timeout.test.method.default | 모든 @Test 메서드 |
junit.jupiter.execution.timeout.testtemplate.method.default | 모든 @TestTemplate 메서드 |
junit.jupiter.execution.timeout.testfactory.method.default | 모든 @TestFactory 메서드 |
junit.jupiter.execution.timeout.lifecycle.method.default | 모든 라이프사이클 메서드 |
junit.jupiter.execution.timeout.beforeall.method.default | 모든 @BeforeAll 메서드 |
junit.jupiter.execution.timeout.beforeeach.method.default | 모든 @BeforeEach 메서드 |
junit.jupiter.execution.timeout.aftereach.method.default | 모든 @AfterEach 메서드 |
junit.jupiter.execution.timeout.afterall.method.default | 모든 @AfterAll 메서드 |
| 설정 파라미터 값 | 동등한 애노테이션 |
|---|---|
42 | @Timeout(42) |
42 ns | @Timeout(value = 42, unit = NANOSECONDS) |
42 μs | @Timeout(value = 42, unit = MICROSECONDS) |
42 ms | @Timeout(value = 42, unit = MILLISECONDS) |
42 s | @Timeout(value = 42, unit = SECONDS) |
42 m | @Timeout(value = 42, unit = MINUTES) |
42 h | @Timeout(value = 42, unit = HOURS) |
42 d | @Timeout(value = 42, unit = DAYS) |
폴링 테스트를 위해 @Timeout 사용하기(Using @Timeout for Polling Tests)
- 비동기 코드를 다루는 경우, 단언을 수행하기 전에 어떤 일이 일어날 때까지 대기하는 테스트를 작성하는 경우가 흔하다.
- 어떤 경우에는
CountDownLatch혹은 다른 동기화 메커니즘을 사용할 수도 있지만, 불가능한 경우도 있다. - 이러한 경우에 비동기적으로 타임아웃을 설정함으로써 테스트가 무한히 실행되는 것을 방지 할 수 있다.
@Test
@Timeout(5) // Poll at most 5 seconds
void pollUntil() throws InterruptedException {
    while (asynchronousResultNotAvailable()) {
        Thread.sleep(250); // custom poll interval
    }
    // Obtain the asynchronous result and perform assertions
}
전역적으로 @Timeout 비활성화하기(Disable @Timeout Globally)
- 디버깅 모드에서 디버그를 할 때는 고정된 타임아웃 제한이 번거로울 수 있다.
junit.jupiter.execution.timeout.mode설정 파라미터를 변경하면 타임아웃 적용 여부를 설정할 수 있다.- 파라미터 설정 값으로는
enabled,disabled,disabled_on_debug가 존재한다.
- 파라미터 설정 값으로는
병렬 실행(Parellel Execution)
병렬 실행은 실험적(experimental)인 기능이다.
-
기본적으로 JUnit 테스트는 싱글 스레드에서 순차적으로 실행된다.
-
원한다면 테스트 실행 속도를 높이기 위해서 병렬 실행을 할 수도 있다.
-
병렬 실행을 활성화하기 위해서는
junit.jupiter.execution.parallel.enabled를true로 설정하면 된다. -
테스트 트리의 노드가 동시에 실행될 것인지 아닌지는 실행 모드에 의해 결정된다.
SAME_THREAD실행 모드- 부모 스레드와 동일한 스레드를 사용하도록 강제한다.
- 예를 들어, 테스트 클래스 내의 테스트 메서드는
@BeforeAll또는@AfterAll과 동일한 스레드에서 실행된다.
CONCURRENT실행 모드- 리소스 락(resource lock)이 동일 스레드 내 실행을 강제하지 않는다면, 동시에 실행한다.
-
기본적으로 테스트 트리의 노드는
SAME_THREAD실행 모드를 사용한다.junit.jupiter.execution.parallel.mode.default설정 프로퍼티를 이용해 기본 실행 모드를 설정할 수 있다.- 아니면,
@Execution애노테이션으로 선언한 요소와 그 하위 요소의 실행 모드를 지정할 수 있다.
-
기본 실행 모드는 몇 가지 예외적인 경우를 제외하면 테스트 트리의 모든 노드에 적용된다.
- 테스트 클래스가
Lifecycle.PER_CLASS모드를 사용하는 경우, 테스트 작성자는 해당 테스트 클래스가 스레드-안전(thread-safe)한 지 확인해야 한다. - 테스트 클래스가
MethodOrderer를 사용하는 경우, 동시 실행은 설정한 실행 순서와 충돌할 수 있다. - 따라서 위 두 가지 경우에 해당하는 테스트 클래스는
@Execution(CONCURRENT)애노테이션이 존재하는 경우에만 동시에 실행된다.
- 테스트 클래스가
-
CONCURRENT실행 모드로 설정된 테스트 트리의 모든 노드는 선언적 동기화 메커니즘(declarative synchronization mechanism)을 관찰하면서 제공된 구성에 따라 완전히 병렬로 실행된다. -
최상위 클래스의 실행 모드의 기본 값은
junit.jupiter.execution.parallel.mode.classes.default설정 프로퍼티로 설정할 수 있다.- 만일
junit.jupiter.execution.parallel.mode.classes.default설정 값이 명시적으로 설정되지 않은 경우,junit.jupiter.execution.parallel.mode.default설정 값이 대신 사용된다.
- 만일
설정 값 예시
- 최상위 클래스는 병렬로, 메서드는 같은 스레드에서 실행:
junit.jupiter.execution.parallel.enabled=true
junit.jupiter.execution.parallel.mode.default=same_thread
junit.jupiter.execution.parallel.mode.classes.default=concurrent- 최상위 클래스는 순차적으로 , 메서드는 병렬로 실행:
junit.jupiter.execution.parallel.enabled=true
junit.jupiter.execution.parallel.mode.default=concurrent
junit.jupiter.execution.parallel.mode.classes.default=same_thread- 두 개의 최상위 클래스
A와B가 각각 두 개의 메서드test1()과test2()를 가지고 있다고 가정하자. junit.jupiter.execution.parallel.mode.default설정 값과junit.jupiter.execution.parallel.mode.classes.default설정 값의 조합에 따라 4가지 경우가 가능하다.

구성(Configuration)
-
원하는 병렬성(parallelism)의 정도와 최대 풀 사이즈(maximum pool size)와 같은 프로퍼티는
ParallelExecutionConfigurationStrategy를 통해 설정할 수 있다. -
전략을 선택하려면
junit.jupiter.execution.parallel.config.strategy프로퍼티를 설정하면 된다. -
JUnit 플랫폼은
dynamic과fixed두 가지 전략을 기본적으로 제공하며, 원한다면custom전략을 구현할 수도 있다.dynamic사용할 수 있는 프로세서/코어 수 × ${junit.jupiter.execution.parallel.config.dynamic.factor}를 계산하여 병렬성의 정도를 결정한다.junit.jupiter.execution.parallel.config.dynamic.factor의 기본값은 1이다.
fixedjunit.jupiter.execution.parallel.config.fixed.parallelism로 설정된 값을 사용한다.junit.jupiter.execution.parallel.config.fixed.parallelism는 필수 값이다.
customParallelExecutionConfigurationStrategy를 구현하고,junit.jupiter.execution.parallel.config.custom.class로 구현된 클래스를 명시하여 원하는 구성을 사용한다.
-
junit.jupiter.execution.parallel.config.strategy의 기본 값은dynamic이다.- 따라서 프로세서/코어 수 만큼의 병렬성이 사용된다.
-
병렬성은 동시 스레드의 최대 개수를 의미하지 않는다.
- JUnit은 동시에 존재하는 스레드의 개수가 설정된 병렬성을 초과하지 않는다는 보장을 하지 않는다.
- 예를 들어,
ForkJoinPool동기화 메커니즘을 사용한다면, 충분한 병렬성을 제공하기 위해 추가적인 스레드가 생성될 수 있다.
동기화(Synchronization)
- JUnit은
@Execution애노테이션을 통한 실행 모드 지정 외에도 또 다른 애노테이션 기반 선언적 동기화 메커니즘을 제공한다. @ResourceLock애노테이션은 테스트 클래스 또는 메서드에 사용할 수 있다.@ResourceLock은 특정한 공유 리소스에 대한 동기화된 접근을 보장해야 할 때 사용한다.- 공유 리소스는
String타입의 고유한 이름으로 식별된다. - 리소스의 이름은
Resources에 정의되어 있는SYSTEM_PROPERTIES,SYSTEM_OUT,SYSTEM_ERR,LOCALE,TIME_ZONE일 수도 있고, 사용자가 직접 정의한 이름일 수도 있다. - 공유 리소스에 대한 접근이
@ResourceLock애노테이션으로 선언되어 있다면 JUnit은 이 정보를 사용하여 테스트 병렬 실행시 충돌이 일어나지 않도록 보증한다. - 특정 테스트 클래스가 격리(isolation)되어 실행되어야 한다면
@Isolated애노테이션을 사용할 수 있다.@Isolated로 선언된 테스트 클래스 내의 모든 테스트 메서드는 다른 메서드와 동시에 실행되지 않으며, 순차적으로 실행된다.
- 공유 리소스의 이름 이외에도 접근 모드를 지정할 수 있다.
- 같은 공유 리소스에 대해
READ접근을 하는 두 테스트는 동시에 실행될 수 있지만,READ_WRITE접근을 하는 테스트는 동시에 실행될 수 없다.
- 같은 공유 리소스에 대해
@Execution(CONCURRENT)
class SharedResourcesDemo {

    private Properties backup;

    @BeforeEach
    void backup() {
        backup = new Properties();
        backup.putAll(System.getProperties());
    }

    @AfterEach
    void restore() {
        System.setProperties(backup);
    }

    @Test
    @ResourceLock(value = SYSTEM_PROPERTIES, mode = READ)
    void customPropertyIsNotSetByDefault() {
        assertNull(System.getProperty("my.prop"));
    }

    @Test
    @ResourceLock(value = SYSTEM_PROPERTIES, mode = READ_WRITE)
    void canSetCustomPropertyToApple() {
        System.setProperty("my.prop", "apple");
        assertEquals("apple", System.getProperty("my.prop"));
    }

    @Test
    @ResourceLock(value = SYSTEM_PROPERTIES, mode = READ_WRITE)
    void canSetCustomPropertyToBanana() {
        System.setProperty("my.prop", "banana");
        assertEquals("banana", System.getProperty("my.prop"));
    }
}
빌트인 익스텐션(Built-in Extensions)
- JUnit은 일반적으로 사용되는 익스텐션에 대한 구현들을 내장하고 있다.
임시 디렉토리 익스텐션(The TempDirectoryExtension)
@TempDir은 실험적(experimental)인 기능이다.
-
빌트인
TempDirectory익스텐션은 개별 테스트 또는 테스트 클래스의 모든 테스트를 위한 임시 디렉토리를 생성하고 정리하는데 사용된다. -
TempDirectory익스텐션은 기본적으로 등록되어 있다. -
임시 디렉토리 익스텐션을 사용하려면 테스트 클래스의
private이 아닌 필드 또는 라이프사이클 메서드와 테스트 메서드 파라미터에@TempDir애노테이션을 선언한다. -
임시 디렉토리 익스텐션은
java.nio.file.Path와java.io.File타입을 지원한다.
@Test
void writeItemsToFile(@TempDir Path tempDir) throws IOException {
    Path file = tempDir.resolve("test.txt");

    new ListWriter(file).write("a", "b", "c");

    assertEquals(singletonList("a,b,c"), Files.readAllLines(file));
}@TempDir애노테이션은 생성자 파라미터를 지원하지 않으므로, 필드 주입을 사용해야 한다.- 다음 예시 코드는 공유 임시 디렉토리를
static필드에 저장한다. 따라서 해당 테스트 클래스의 모든 라이프사이클 메서드와 테스트 메서드에서 동일한 공유 디렉토리에 접근이 가능하다.
class SharedTempDirectoryDemo {

    @TempDir
    static Path sharedTempDir;

    @Test
    void writeItemsToFile() throws IOException {
        Path file = sharedTempDir.resolve("test.txt");

        new ListWriter(file).write("a", "b", "c");

        assertEquals(singletonList("a,b,c"), Files.readAllLines(file));
    }

    @Test
    void anotherTestThatUsesTheSameTempDir() {
        // use sharedTempDir
    }
}
테스트 실행하기(Running Tests)
설정 파라미터(Configuration Parameters)
- 설정 파라미터는 텍스트 기반의 키-값 쌍들로 이루어지며, 다음 우선순위로 결정된다.
LauncherAPI에 요청을 제공하기 위한LauncherDiscoveryRequestBuilder의configurationParameter()andconfigurationParameters()메서드- Console Launcher:
--config커맨드 라인 옵션을 사용한다. - Gradle:
systemProperty또는systemPropertiesDSL을 사용한다. - Maven Surefire provider:
configurationParameters프로퍼티를 사용한다.
- Console Launcher:
- JVM 시스템 프로퍼티
- JUnit 플랫폼 설정 파일
- 클래스 경로의
junit-platform.properties파일
- 클래스 경로의
패턴 매칭 구문(Pattern Matching Syntax) 예시
- 설정 파라미터 값에 패턴 매칭 구문을 사용할 수 있다.
*: 모든 클래스org.junit.*:org.junit기반 패키지 하위의 모든 클래스와 하위 패키지*.MyCustomImpl: 클래스 이름이 정확히MyCustomImpl인 클래스*System*: FQCN에System을 포함한 클래스*System*+, +*Unit*: FQCN에System또는Unit을 포함한 클래스org.example.MyCustomImpl: FQCN이 정확히org.example.MyCustomImpl인 클래스org.example.MyCustomImpl, org.example.TheirCustomImpl: FQCN이 정확히org.example.MyCustomImpl또는org.example.TheirCustomImpl인 클래스
태그 표현식(Tag Expressions)
- 태그 표현식은
!,&,|연산자와 연산자 우선순위를 조정하기 위한 괄호((,))로 이루어진 부울 표현식이다. any()와none()특수 표현도 조합 가능하다.
| 연산자 | 의미 | 결합 방향 |
|---|---|---|
! | not | 오른쪽 |
& | and | 왼쪽 |
| ` | ` | or |
태그 표현식 예시
- 다음과 같이 두 개의 차원으로 태그를 붙였다고 가정하자.
- 기능 차원:
product,catalog,shipping - 테스트 유형 차원:
micro,integration,end-to-end
- 기능 차원:
| 태그 표현식 | 선택되는 대상 |
|---|---|
product | product 테스트 |
| `catalog | shipping` |
catalog & shipping | catalog 테스트이면서 shippping 테스트 |
product & !end-to-end | product 테스트 중 end-to-end 테스트가 아닌 테스트 |
| `(micro | integration) & (product |
표준 출력/에러 캡쳐하기(Capturing Standard Output/Error)
- JUnit 플랫폼은
System.out과System.err로 출력된 결과를 캡쳐할 수 있는 기능을 지원한다. junit.platform.output.capture.stdout또는junit.platform.output.capture.stderr를true로 설정하면 된다.junit.platform.output.capture.maxBuffer를 설정하여 테스트 실행마다 사용할 최대 버퍼 사이즈를 설정할 수 있다.
익스텐션 모델(Extension Model)
- 과거의
Runner,TestRule,MethodRule를 대체하는 단 하나의 일관된 개념 Extension그 자체는 단순히 마커 인터페이스다.
익스텐션 등록하기(Registering Extensions)
@ExtendWith애노테이션을 통해 선언적(declaratively)으로 등록한다.@RegisterExtension애노테이션을 통해 프로그램적(programmatically)으로 등록한다.- Java의
ServiceLoader메커니즘을 통해 자동적(automatically)으로 등록한다.
선언적 익스텐션 등록(Declarative Extension Registration)
@ExtendWith애노테이션을 이용해서 하나 이상의 익스텐션을 선언적으로 등록할 수 있다.@ExtendWith애노테이션은 테스트 인터페이스, 테스트 클래스, 테스트 메서드 또는 조합 애노테이션에 선언 가능하다.@ExtendWith애노테이션에는 등록하고자 하는 클래스 참조를 제공해야 한다.- 여러 개의 클래스 참조를 지정할 수도 있다.
@ExtendWith애노테이션으로 등록한 익스텐션은 소스 코드에 명시된 순서대로 등록된다.
@ExtendWith(RandomParametersExtension.class)
@Test
void test(@Random int i) {
}@ExtendWith(RandomParametersExtension.class)
class MyTests {
}@ExtendWith({ DatabaseExtension.class, WebServerExtension.class })
class MyFirstTests {
}@ExtendWith(DatabaseExtension.class)
@ExtendWith(WebServerExtension.class)
class MySecondTests {
}@Target({ ElementType.TYPE, ElementType.METHOD })
@Retention(RetentionPolicy.RUNTIME)
@ExtendWith({ DatabaseExtension.class, WebServerExtension.class })
public @interface DatabaseAndWebServerExtension {
}프로그램적으로 익스텐션 등록하기(Programmatic Extension Registration)
-
테스트 틀래스의 필드를
@RegisterExtension애노테이션으로 선언하여 프로그램적으로 익스텐션을 등록할 수 있다. -
@ExtendWith으로 선언적으로 익스텐션을 등록하면 애노테이션을 통해서만 설정이 가능하지만,@RegisterExtension을 이용하면 프로그램적으로 익스텐션을 설정할 수 있다.- 예를 들어, 익스텐션 생성자, 정적 팩토리 메서드, 또는 빌더 API에 인자를 전달하는 것이 가능하다.
-
@RegisterExtension을 통해 프로그램적으로 등록된 익스텐션은 어떤 알고리즘을 통해 결정적으로, 하지만 자명하지 않은 순서로 등록된다.- 특정한 등록 순서를 지정하고 싶다면
@Order를 사용해야 한다. @Order가 지정되지 않은@RegisterExtension은 기본적으로Integer.MAX_VALUE / 2의 기본 순서값을 가진다.- 기본 순서 값보다 낮은 순서 값을 지정한 익스텐션은 먼저 등록되고, 높은 순서 값을 지정한 익스텐션은 이후에 등록된다.
- 특정한 등록 순서를 지정하고 싶다면
-
@RegisterExtension을 선언한 필드는private이거나 평가 시점에null이어서는 안된다.static여부는 상관 없다.
정적 필드(Static Fields)
@RegisterExtension필드가static이라면,@ExtendWith로 명시된 클래스 레벨 익스텐션들이 먼저 등록된 이후에 등록된다.- 정적 익스텐션은 어떤 익스텐션 API를 구현하는지에 제약이 없다.
- 따라서 클래스 레벨 익스텐션 API를 구현할 수도 있고,
BeforeAllCallback,AfterAllCallback,TestInstancePostProcessor, 또는TestInstancePreDestroyCallback과 같은 인스턴스 레벨 익스텐션 API를 구현할 수도 있고,BeforeEachCallback과 같은 메서드 레벨 익스텐션을 구현할 수도 있다.
class WebServerDemo {

    @RegisterExtension
    static WebServerExtension server = WebServerExtension.builder()
        .enableSecurity(false)
        .build();

    @Test
    void getProductList() {
        WebClient webClient = new WebClient();
        String serverUrl = server.getServerUrl();
        // Use WebClient to connect to web server using serverUrl and verify response
        assertEquals(200, webClient.get(serverUrl + "/products").getResponseStatus());
    }

}- 위 예시 코드에서
WebServerDemo클래스의server필드는WebServerExtension가 지원하는 빌더 패턴으로 초기화된다. - 설정된
WebServerExtension은 클래스 레벨 익스텐션으로 자동적으로 등록된다. - 필요할 경우
@BeforeAll,@AfterAll,@BeforeEach,@AfterEach,@Teset메서드 안에서server필드를 통해서 익스텐션의 인스턴스에 접근할 수 있다.
인스턴스 필드(Instance Fields)
@RegisterExtension필드가 정적이 아니라면(non-static), 익스텐션은 테스트 클래스가 초기화되고, 등록된 각TestInstancePostProcessor가 테스트 인스턴스를 후처리(post-process)한 이후에 등록된다.- 그러므로, 인스턴스 익스텐션이 클래스 레벨 또는
BeforeAllCallback,AfterAllCallback,TestInstancePostProcessor와 같은 인스턴스 레벨 API를 구현하고 있다면, 해당 API는 인정되지 않는다. - 기본적으로 인스턴스 익스텐션은 메서드 레벨
@ExtendWith등록 이후에 등록된다.- 하지만 테스트 클래스가
@TestInstance(Lifecycle.PER_CLASS)로 선언되어 있다면 인스턴스 익스텐션은 메서드 레벨@ExtendWith등록 이전에 등록된다.
- 하지만 테스트 클래스가
class DocumentationDemo {

    static Path lookUpDocsDir() {
        // return path to docs dir
    }

    @RegisterExtension
    DocumentationExtension docs = DocumentationExtension.forPath(lookUpDocsDir());

    @Test
    void generateDocumentation() {
        // use this.docs ...
    }
}- 위 예시 코드에서 테스트 클래스의
docs필드는lookUpDocsDir()메서드가 호출되고 결과가DocumentationExtension.forPath()정적 팩토리 메서드에 제공될 때 초기화된다. - 설정된
DocumentationExtension는 자동적으로 메서드 레벨 익스텐션으로 등록된다. - 필요한 경우
@BeforeEach,@AfterEach,@Teset메서드 안에서server필드를 통해서 익스텐션의 인스턴스에 접근할 수 있다.
자동 익스텐션 등록(Automatic Extension Registration)
- JUnit은
java.util.ServiceLoader메커니즘을 통한 전역 익스텐션 등록(global extension registration) 또한 지원한다. - 이를 통해 클래스 경로 내의 써드 파티 익스텐션이 자동으로 감지되고 등록된다.
/META-INF/services경로 내org.junit.jupiter.api.extension.Extension파일에 해당 익스텐션의 FQCN을 제공함으로써 사용자가 원하는 익스텐션을 등록할 수 있다.
자동 익스텐션 감지 활성화하기(Enabling Automatic Extension Detection)
- 자동 감지는 고급 기능이므로 기본적으로 비활성화되어 있다.
- 활성화하려면
junit.jupiter.extensions.autodetection.enabled설정 파라미터를true로 설정하면 된다.Launcher에 전달되는LauncherDiscoveryRequest의 설정 파라미터를 JVM 시스템 프로퍼티로 다음과 같이 제공할 수 있다.-Djunit.jupiter.extensions.autodetection.enabled=true
- JUnit 플랫폼 설정 파일을 이용해서 제공할 수도 있다.
- 자동 감지가 활성화되면
ServiceLoader메커니즘에 의해 발견된 익스텐션들은 JUnit 전역 익스텐션(ex.TestInfo,TestReporter)이 등록된 이후에 익스텐션 레지스트리에 등록된다.
익스텐션 상속(Extension Inheritance)
- 등록된 익스텐션들은 테스트 클래스 계층구조에서 탑-다운으로 상속된다.
- 클래스 레벨에서 등록된 익스텐션들은 메서드 레벨로 상속된다.
- 특정 익스텐션 구현은 주어진 한 익스텐션 컨텍스트와 그 부모 컨텍스트들에 대해 오직 한번만 등록될 수 있다.
- 이에 따라, 중복된 익스텐션 구현을 등록하려는 시도는 무시된다.
조건부 테스트 실행(Conditional Test Execution)
ExecutionCondition은 프로그램 가능한 조건부 테스트 실행을 위해ExtensionAPI를 정의한다.ExecutionCondition은 각 컨테이너(ex. 테스트 클래스)마다 , 각 테스트마다 평가(evaluated)된다.- 이는 주어진 테스트 컨테이너 또는 메서드가 제공된
ExtensionContext에 기반하여 실행되어야 하는지 결정하기 위해서이다.
- 이는 주어진 테스트 컨테이너 또는 메서드가 제공된
- 여러 개의
ExtensionContext익스텐션이 등록되어 있는 경우, 조건 중 하나라도 비활성화되는 즉시 컨테이너 또는 테스트가 비활성화된다.- 그러므로 다른 익스텐션이 이미 컨테이너나 테스트를 비활성화 했을 수 있으므로, 어떤 조건이 평가되었음을 보장할 수는 없다.
- 즉,
ExtensionContext의 평가(evaluation)는 부울 OR 연산자의 단락(short-circuiting)처럼 동작한다. (ex. 조건들 중 하나라도true로 평가되면 뒤의 조건은 평가하지 않듯이) DiabledCondition과@Disabled예시를 참고하라.
조건 비활성화하기(Deactivating Conditions)
- 때때로 특정 조건들을 비활성화한 채로 테스트를 실행하고 싶을 수 있다.
- 예를 들어,
@Disabled된 테스트 메서드가 여전히 깨지는지 확인하기 위해 실행해 보고 싶을 수 있다.
- 예를 들어,
junit.jupiter.conditions.deactivate설정 파라미터로 현재 테스트 실행에서 어떤 조건들을 비활성화 할 것인지(평가하지 않을 것인지) 패턴 값으로 명시할 수 있다.- 패턴 값은
Launcher에 전달되는LauncherDiscoveryRequest의 설정 파라미터를 JVM 시스템 프로퍼티로 제공할 수도 있고, JUnit 플랫폼 설정 파일로 제공할 수도 있다.
- 패턴 값은
- 예를 들어,
@Disabled조건을 비활성화하기 위해서 JVM을 다음의 시스템 프로퍼티와 함께 실행할 수 있다.-Djunit.jupiter.conditions.deactivate=org.junit.*DisabledCondition
테스트 인스턴스 팩토리(Test Instance Factories)
-
TestInstanceFactory는 테스트 클래스 인스턴스 생성을 위한 API를 정의한다. -
일반적인 유스케이스:
- 의존성 주입 프레임워크로부터 테스트 인스턴스를 얻는다.
- 테스트 인스턴스를 생성하기 위해 정적 팩토리 메서드를 호출한다.
-
TestInstanceFactory가 등록되어 있지 않다면, 프레임워크는 테스트 클래스를 인스턴스화하기 위해 유일한(sole) 생성자를 호출한다.- 생성자의 인자는 등록된
ParameterResolver익스텐션에 의해 결정될 수도 있다.
- 생성자의 인자는 등록된
-
TestInstanceFactory를 구현한 익스텐션은 테스트 인터페이스, 최상위 테스트 클래스, 또는@Nested테스트 클래스에서 등록될 수 있다. -
한 클래스에 대해
TestInstanceFactory를 구현한 익스텐션을 여러 개 등록하면 예외가 발생한다.- 부모 클래스 또는 바깥(enclosing) 클래스에서 등록한
TestInstanceFactory는 상속된다. - 따라서 모든 테스트 클래스에 대해 단 하나의
TestInstanceFactory가 등록되도록 해야 한다.
- 부모 클래스 또는 바깥(enclosing) 클래스에서 등록한
테스트 인스턴스 후처리(Test Instance Post-processing)
TestInstancePostProcessor는 테스트 인스턴스 후처리를 위한 API를 정의한다.- 일반적인 유스케이스:
- 테스트 인스턴스에 의존성을 주입한다.
- 테스트 인스턴스의 사용자 지정 초기화 메서드를 호출한다.
- 구체적인 예시는
MockitoExtension과SpringExtension의 소스 코드를 참고하라.
테스트 인스턴스 소멸전 콜백(Test Instance Pre-destroy Callback)
TestInstancePreDestroyCallback는 테스트 인스턴스가 테스트에 사용된 후 소멸되기 전에 특정 처리를 하기 위한 API를 정의한다.- 일반적인 유스케이스
- 테스트 인스턴스에 주입되었던 의존성을 정리(cleaning)한다.
- 테스트 인스턴스의 사용자 지정 역초기화(de-initialization) 메서드를 호출한다.
파라미터 결정(Parameter Resolution)
ParameterResolver는 동적으로 런타임에 파라미터를 결정(resolve)하기 위한 API를 정의한다.- 테스트 클래스 생성자, 테스트 메서드, 라이프사이클 메서드가 파라미터를 선언할 경우, 파라미터는
ParameterResolver에 의해 런타임에 반드시 결정되어야 한다. ParameterResolver는 기본 제공되는 빌트인ParameterResolver일 수도 있고 사용자에 의해 등록된ParameterResolver일 수도 있다.- 일반적으로 파라미터는 이름, 타입, 애노테이션 또는 그 조합에 의해서 결정(resolved)된다.
- 파라미터가 타입에 의해서만 결정되는 경우
TypeBasedParameterResolver를 구현하여 사용하면 편리하다.
- 파라미터가 타입에 의해서만 결정되는 경우
- 구체적인 예시는
CustomTypeParameterResolver,CustomAnnotationParameterResolver,MapOfListsTypeBasedParameterResolver의 소스 코드를 참고하라. - JDK 9 이전 버전에는
javac가 생성하는 바이트 코드의 버그로 인해java.lang.reflect.ParameterAPI로 직접 내부 클래스 생성자(ex.@Nested테스트 클래스의 생성자) 파라미터의 애노테이션을 찾으면 실패한다.- 이에 따라,
ParameterResolver구현에 제공되는ParameterContextAPI는 파라미터 애노테이션을 올바르게 찾기 위한 편리한 메서드를 제공한다.boolean isAnnotated(Class<? extends Annotation> annotationType)Optional<A> findAnnotation(Class<A> annotationType)List<A> findRepeatableAnnotations(Class<A> annotationType)
- 익스텐션 작성자는 버그가 존재하는
java.lang.reflect.ParameterAPI 대신 위 메서드를 사용해야 한다.
- 이에 따라,
테스트 결과 처리(Test Result Processing)
TestWatcher는 테스트 메서드 실행의 결과를 처리하기 위한 API를 정의한다.TestWatcher는 다음과 같은 이벤트에 대한 컨텍스트 정보와 함께 호출된다.testDisabled: 비활성화된 테스트 메서드가 스킵된 뒤 호출된다.testSuccessful: 테스트 메서드가 성공적으로 완료된 뒤 호출된다.testAborted: 테스트 메서드가 취소(aborted)된 뒤 호출된다.testFailed: 테스트 메서드가 실패한 뒤 호출된다.- 위에서 말한 테스트 메서드는
@Test메서드뿐만 아니라@TestTemplate메서드(ex.@RepeatedTest,@ParameterizedTest)도 해당된다.
- 이 인터페이스를 구현한 익스텐션은 클래스 레벨 또는 메서드 레벨에 등록될 수 있다.
- 클래스 레벨에 등록된 경우,
@Nested클래스들을 포함해서 해당 클래스가 포함한 모든 테스트 메서드에 대해 호출된다.
- 클래스 레벨에 등록된 경우,
- 제공된
ExtensionContext의Store에 저장되어 있는 모든ExtensionContext.Store.CloseableResource인스턴스는 이 메서드가 호출되기 전에 종료(closed)된다.- 이와 같은 리소스로 무언가 해야 한다면, 부모 컨텍스트의
Store를 사용할 수 있다.
- 이와 같은 리소스로 무언가 해야 한다면, 부모 컨텍스트의
테스트 라이프사이클 콜백(Test Lifecycle Callbacks)
- 다음과 같은 인터페이스들은 테스트 실행 라이프사이클의 다양한 지점에서 테스트를 확장하기 위한 API를 정의한다.
BeforeAllCallbackBeforeEachCallbackBeforeTestExecutionCallbackAfterTestExecutionCallback
AfterEachCallback
AfterAllCallback
- 자세한 디테일은
org.junit.jupiter.api.extension패키지의 JavaDoc을 참조하라. - 개발자는 한 익스텐션 안에서 위와 같은 인터페이스들을 여러 개 구현할 수 있다.
- 구체적인 예시는
SpringExtension의 소스 코드를 참고하라.
- 구체적인 예시는
테스트 실행 전후 콜백(Before and After Test Execution Callbacks)
BeforeTestExecutionCallback과AfterTestExecutionCallback는 각각 테스트 메서드 실행 직전과 직후에 동작(behavior)을 추가하기 위한 API를 정의한다.- 이러한 기능은 타이밍, 트레이싱 등과 같은 유스케이스에 잘 맞는다.
@BeforeEach또는@AfterEach메서드 전후에 콜백을 구현해야 한다면BeforeEachCallback과AfterEachCallback을 사용하면 된다.- 다음 예시는 테스트 메서드의 실행 시간을 계산하고, 로그를 출력하는 콜백이다.
public class TimingExtension implements BeforeTestExecutionCallback, AfterTestExecutionCallback {

    private static final Logger logger = Logger.getLogger(TimingExtension.class.getName());

    private static final String START_TIME = "start time";

    @Override
    public void beforeTestExecution(ExtensionContext context) throws Exception {
        getStore(context).put(START_TIME, System.currentTimeMillis());
    }

    @Override
    public void afterTestExecution(ExtensionContext context) throws Exception {
        Method testMethod = context.getRequiredTestMethod();
        long startTime = getStore(context).remove(START_TIME, long.class);
        long duration = System.currentTimeMillis() - startTime;

        logger.info(() ->
            String.format("Method [%s] took %s ms.", testMethod.getName(), duration));
    }

    private Store getStore(ExtensionContext context) {
        return context.getStore(Namespace.create(getClass(), context.getRequiredTestMethod()));
    }
}- 아래와 같이
@ExtendWith(TimingExtension.class)로 등록하면 실행 시간이 출력된다.
@ExtendWith(TimingExtension.class)
class TimingExtensionTests {

    @Test
    void sleep20ms() throws Exception {
        Thread.sleep(20);
    }

    @Test
    void sleep50ms() throws Exception {
        Thread.sleep(50);
    }

}
INFO: Method [sleep20ms] took 24 ms.
INFO: Method [sleep50ms] took 53 ms.예외 처리(Exception Handling)
- 테스트 실행 도중 발생한 예외는 더 전파되기 전에 가로채져서(intercepted) 처리(handled)될 수 있다.
- 에러 로깅 또는 리소스 해제와 같은 특정 행동이 전문화된 익스텐션 안에 정의될 수 있다.
- JUnit은 테스트 실행 도중 발생한 예외를 처리하기 위한 API를 정의한다.
@Test메서드 안에서 발생한 예외는TestExecutionExceptionHandler를 통해 처리된다.- 라이프사이클 메서드(ex.
@BeforeAll,@BeforeEach,@AfterEach,@AfterAll) 안에서 발생한 예외는LifecycleMethodExecutionExceptionHandler를 통해 처리된다.
- 다음 예시는 테스트 중 발생한 모든
IOException인스턴스를 다시 던지지 않고 삼켜버린다(swallow).
public class IgnoreIOExceptionExtension implements TestExecutionExceptionHandler {

    @Override
    public void handleTestExecutionException(ExtensionContext context, Throwable throwable)
            throws Throwable {

        if (throwable instanceof IOException) {
            return;
        }
        throw throwable;
    }
}- 다음 예외 처리 익스텐션은 테스트 사전 설정(setup)과 사후 정리(cleanup)시에 예기치 못한 예외가 발생한 경우, 애플리케이션의 상태를 기록한다.
- 라이프사이클 콜백은 테스트 상태에따라 실행이 될 수도, 안 될 수도 있는 반면, 이 방법은 `
@BeforeAll,@BeforeEach,@AfterEach,@AfterAll등이 실패한 직후에 실행될 것을 보장한다.
- 라이프사이클 콜백은 테스트 상태에따라 실행이 될 수도, 안 될 수도 있는 반면, 이 방법은 `
class RecordStateOnErrorExtension implements LifecycleMethodExecutionExceptionHandler {

    @Override
    public void handleBeforeAllMethodExecutionException(ExtensionContext context, Throwable ex)
            throws Throwable {
        memoryDumpForFurtherInvestigation("Failure recorded during class setup");
        throw ex;
    }

    @Override
    public void handleBeforeEachMethodExecutionException(ExtensionContext context, Throwable ex)
            throws Throwable {
        memoryDumpForFurtherInvestigation("Failure recorded during test setup");
        throw ex;
    }

    @Override
    public void handleAfterEachMethodExecutionException(ExtensionContext context, Throwable ex)
            throws Throwable {
        memoryDumpForFurtherInvestigation("Failure recorded during test cleanup");
        throw ex;
    }

    @Override
    public void handleAfterAllMethodExecutionException(ExtensionContext context, Throwable ex)
            throws Throwable {
        memoryDumpForFurtherInvestigation("Failure recorded during class cleanup");
        throw ex;
    }
}- 선언한 순서에 따라 동일한 라이프사이클 메서드에 대해 여러 개의 예외 처리기가 호출될 수 있다.
- 만일 한 처리기가 예외를 삼켜(swallow)버리면 마치 예외가 발생하지 않은 것처럼 처리되어, 뒤따르는 처리기 또는 JUnit 엔진으로 실패가 전파되지 않는다.
- 처리기는 예외를 다시 던질 수도 있고, 원래 예외를 다른 예외로 감싸서 던질 수도 있다.
@BeforeAll와@AfterAll실행 중 발생한 예외를 처리하고자LifecycleMethodExecutionExceptionHandler를 구현한 익스텐션은 클래스 레벨에 등록되어야 한다.- 반면
@BeforeEach와@AfterEach를 위한 처리기는 개별 테스트 메서드에 등록될 수도 있다.
- 반면
// Register handlers for @Test, @BeforeEach, @AfterEach as well as @BeforeAll and @AfterAll
@ExtendWith(ThirdExecutedHandler.class)
class MultipleHandlersTestCase {

    // Register handlers for @Test, @BeforeEach, @AfterEach only
    @ExtendWith(SecondExecutedHandler.class)
    @ExtendWith(FirstExecutedHandler.class)
    @Test
    void testMethod() {
    }

}
호출 가로채기(Intercepting Invocations)
InvocationInterceptor는 테스트 코드에 대한 호출을 가로채기 위한 API를 정의한다.- 다음 예시는 Swing의 이벤트 디스패치 스레드에서 모든 테스트 메서드를 실행하는 익스텐션이다.
public class SwingEdtInterceptor implements InvocationInterceptor {

    @Override
    public void interceptTestMethod(Invocation<Void> invocation,
            ReflectiveInvocationContext<Method> invocationContext,
            ExtensionContext extensionContext) throws Throwable {

        AtomicReference<Throwable> throwable = new AtomicReference<>();

        SwingUtilities.invokeAndWait(() -> {
            try {
                invocation.proceed();
            }
            catch (Throwable t) {
                throwable.set(t);
            }
        });
        Throwable t = throwable.get();
        if (t != null) {
            throw t;
        }
    }
}
테스트 템플릿을 위한 호출 컨텍스트 제공하기(Providing Invocation Contexts for Test Templates)
@TestTemplate메서드는 최소한 하나의TestTemplateInvocationContextProvider가 등록된 경우에만 실행될 수 있다.- 프로바이더는
TestTemplateInvocationContext인스턴스의Stream을 제공할 책임이 있다.
- 프로바이더는
- 각 컨텍스트는 사용자 지정 이름과
@TestTemplate메서드의 다음 호출에서 사용될 추가적인 익스텐션의 목록을 명시할 수 있다. - 다음 예시는
TestTemplateInvocationContextProvider를 구현하고 등록해서 테스트 템플릿에 사용하는 방법을 보여준다.
final List<String> fruits = Arrays.asList("apple", "banana", "lemon");

@TestTemplate
@ExtendWith(MyTestTemplateInvocationContextProvider.class)
void testTemplate(String fruit) {
    assertTrue(fruits.contains(fruit));
}

public class MyTestTemplateInvocationContextProvider
        implements TestTemplateInvocationContextProvider {

    @Override
    public boolean supportsTestTemplate(ExtensionContext context) {
        return true;
    }

    @Override
    public Stream<TestTemplateInvocationContext> provideTestTemplateInvocationContexts(
            ExtensionContext context) {

        return Stream.of(invocationContext("apple"), invocationContext("banana"));
    }

    private TestTemplateInvocationContext invocationContext(String parameter) {
        return new TestTemplateInvocationContext() {
            @Override
            public String getDisplayName(int invocationIndex) {
                return parameter;
            }

            @Override
            public List<Extension> getAdditionalExtensions() {
                return Collections.singletonList(new ParameterResolver() {
                    @Override
                    public boolean supportsParameter(ParameterContext parameterContext,
                            ExtensionContext extensionContext) {
                        return parameterContext.getParameter().getType().equals(String.class);
                    }

                    @Override
                    public Object resolveParameter(ParameterContext parameterContext,
                            ExtensionContext extensionContext) {
                        return parameter;
                    }
                });
            }
        };
    }
}
└─ testTemplate(String) ✔
├─ apple ✔
└─ banana ✔-
위 예시에서 테스트 템플릿은 두 번 호출되며, 호출의 표시 이름은 호출 컨텍스트에 명시된 대로
apple과banana이다. -
각 호출은 메서드 파라미터를 결정하는데 사용할 사용자 지정
ParameterResolver를 등록한다. -
TestTemplateInvocationContextProvider익스텐션 API는 다른 컨텍스트에서 테스트와 유사한(test-like) 메서드의 반복적인 호출에 의존하는 다양한 종류의 테스트를 구현하기 위한 것이다.- 예를 들면, 컨텍스트를 변경하지 않으면서 다른 파라미터로 또는 다른 테스트 클래스 인스턴스로 테스트하는데 사용한다.
익스텐션 내부 상태 유지하기(Keeping State in Extensions)
- 보통 익스텐션은 단 한번만 인스턴스화된다.
- 그렇다면 어떻게 호출된 익스텐션의 상태를 다음 호출까지 어떻게 유지할 수 있을까?
ExtensionContextAPI는 익스텐션의 상태를 유지하기 위해서Store를 제공한다.- 익스텐션은 값을 스토어에 저장했다가 나중에 다시 기져와서 사용할 수 있다.
- 위에서 살펴본
TimingExtension은 메서드 레벨 스코프로Store를 사용하는 예시다. - 테스트 실행 동안
ExtensionContext에 저장된 값들은 해당ExtensionContext를 감싸고 있는 다른ExtensionContext에서는 사용될 수 없다. ExtensionContext는 중첩될 수 있으므로, 안쪽 컨텍스트의 스코프는 제한된다.Store에 값을 저장하고 가져오는 메서드는 Javadoc을 참조하라.- 익스텐션 컨텍스트 스토어는 자신의 익스텐션 컨텍스트 라이프사이클로 제한된다.
- 익스텐션 컨텍스트 라이프사이클이 끝나면 해당 익스텐션은 자신의 스토어를 종료(close)한다.
- 스토어에 저장된 모든
CloseableResource는 스토어에 추가된 순서의 역순으로close()메서드가 호출된다.
익스텐션에서 지원되는 유틸리티들(Supported Utilities in Extensions)
junit-platform-commons아티팩트는org.junit.platform.commons.support패키지를 노출한다.org.junit.platform.commons.support패키지는 애노테이션, 클래스, 리플렉션, 클래스 경로 스캔 등을 위한 유틸리티 메서드를 제공한다.TestEngine또는Extension을 개발할 때 이러한 메서드를 사용하는 것이 권장된다.
애노테이션 지원(Annotation Support)
AnnotationSupport는 애노테이션을 가진 요소(ex. 패키지, 애노테이션, 클래스, 인터페이스, 생성자, 메서드, 필드 등)에 사용할 수 있는 정적 유틸리티 메서드들을 제공한다.- 유스케이스:
- 요소의 애노테이션 보유 여부를 확인한다.
- 요소가 특정 애노테이션으로 메타 애노테이션되어 있는지 확인한다.
- 특정 애노테이션을 찾는다.
- 클래스 또는 인터페이스에서 애노테이션을 가진 메서드를 찾는다.
- 몇몇 메서드는 구현된 인터페이스와 클래스 계층을 따라 애노테이션을 찾기도 한다.
- 자세한 내용은
AnnotationSupport의 Javadoc을 참조하라.
클래스 지원(Class Support)
ClassSupport는 클래스(java.lang.Class의 인스턴스)에 사용할 수 있는 정적 유틸리티 메서드를 제공한다.- 자세한 내용은
ClassSupport의 Javadoc을 참조하라.
리플렉션 지원(Reflection Support)
ReflectionSupport는 JDK 표준 리플렉션과 클래스 로딩 메커니즘과 관련된 정적 유틸리티 메서드를 제공한다.- 유스케이스:
- 클래스 경로에서 특정 조건을 만족하는 클래스를 찾는다.
- 클래스를 로드하고 새로운 인스턴스를 만든다.
- 클래스를 찾고 메서드를 호출한다.
- 몇몇 메서드는 조건에 맞는 메서드를 찾기위해서 클래스 계층 구조를 탐색하기도 한다.
- 자세한 내용은
ReflectionSupport의 Javadoc을 참조하라.
접근제어자 지원(Modifier Support)
ModifierSupport는 클래스 또는 멤버의 접근제어자와 관련된 정적 유틸리티 메서드를 제공한다.- ex. 멤버가
public,private,abstract,static로 선언되어 있는지 확인한다.
- ex. 멤버가
- 자세한 내용은
ModifierSupport의 Javadoc을 참조하라.
사용자 코드와 익스텐션의 상대적 실행 순서(Relative Execution Order of User Code and Extensions)
- 하나 이상의 테스트 메서드를 포함하는 테스트 클래스를 실행할 때, 사용자가 제공한 테스트와 라이프사이클 메서드 외에도 추가로 여러 개의 익스텐션 콜백들이 호출된다.
사용자 코드와 익스텐션 코드(User and Extension Code)
- 다음 도표는 사용자가 제공한 코드와 익스텐션 코드의 상대적인 실행 순서를 나타낸다.
- 사용자가 제공한 테스트와 라이프사이클 메서드는 주황색으로, 익스텐션이 구현한 콜백 코드는 파란색으로 표시되어 있다.
- 회색 상자는 한 테스트 메서드의 실행을 나타내며, 모든 테스트 메서드에 대해 반복된다.
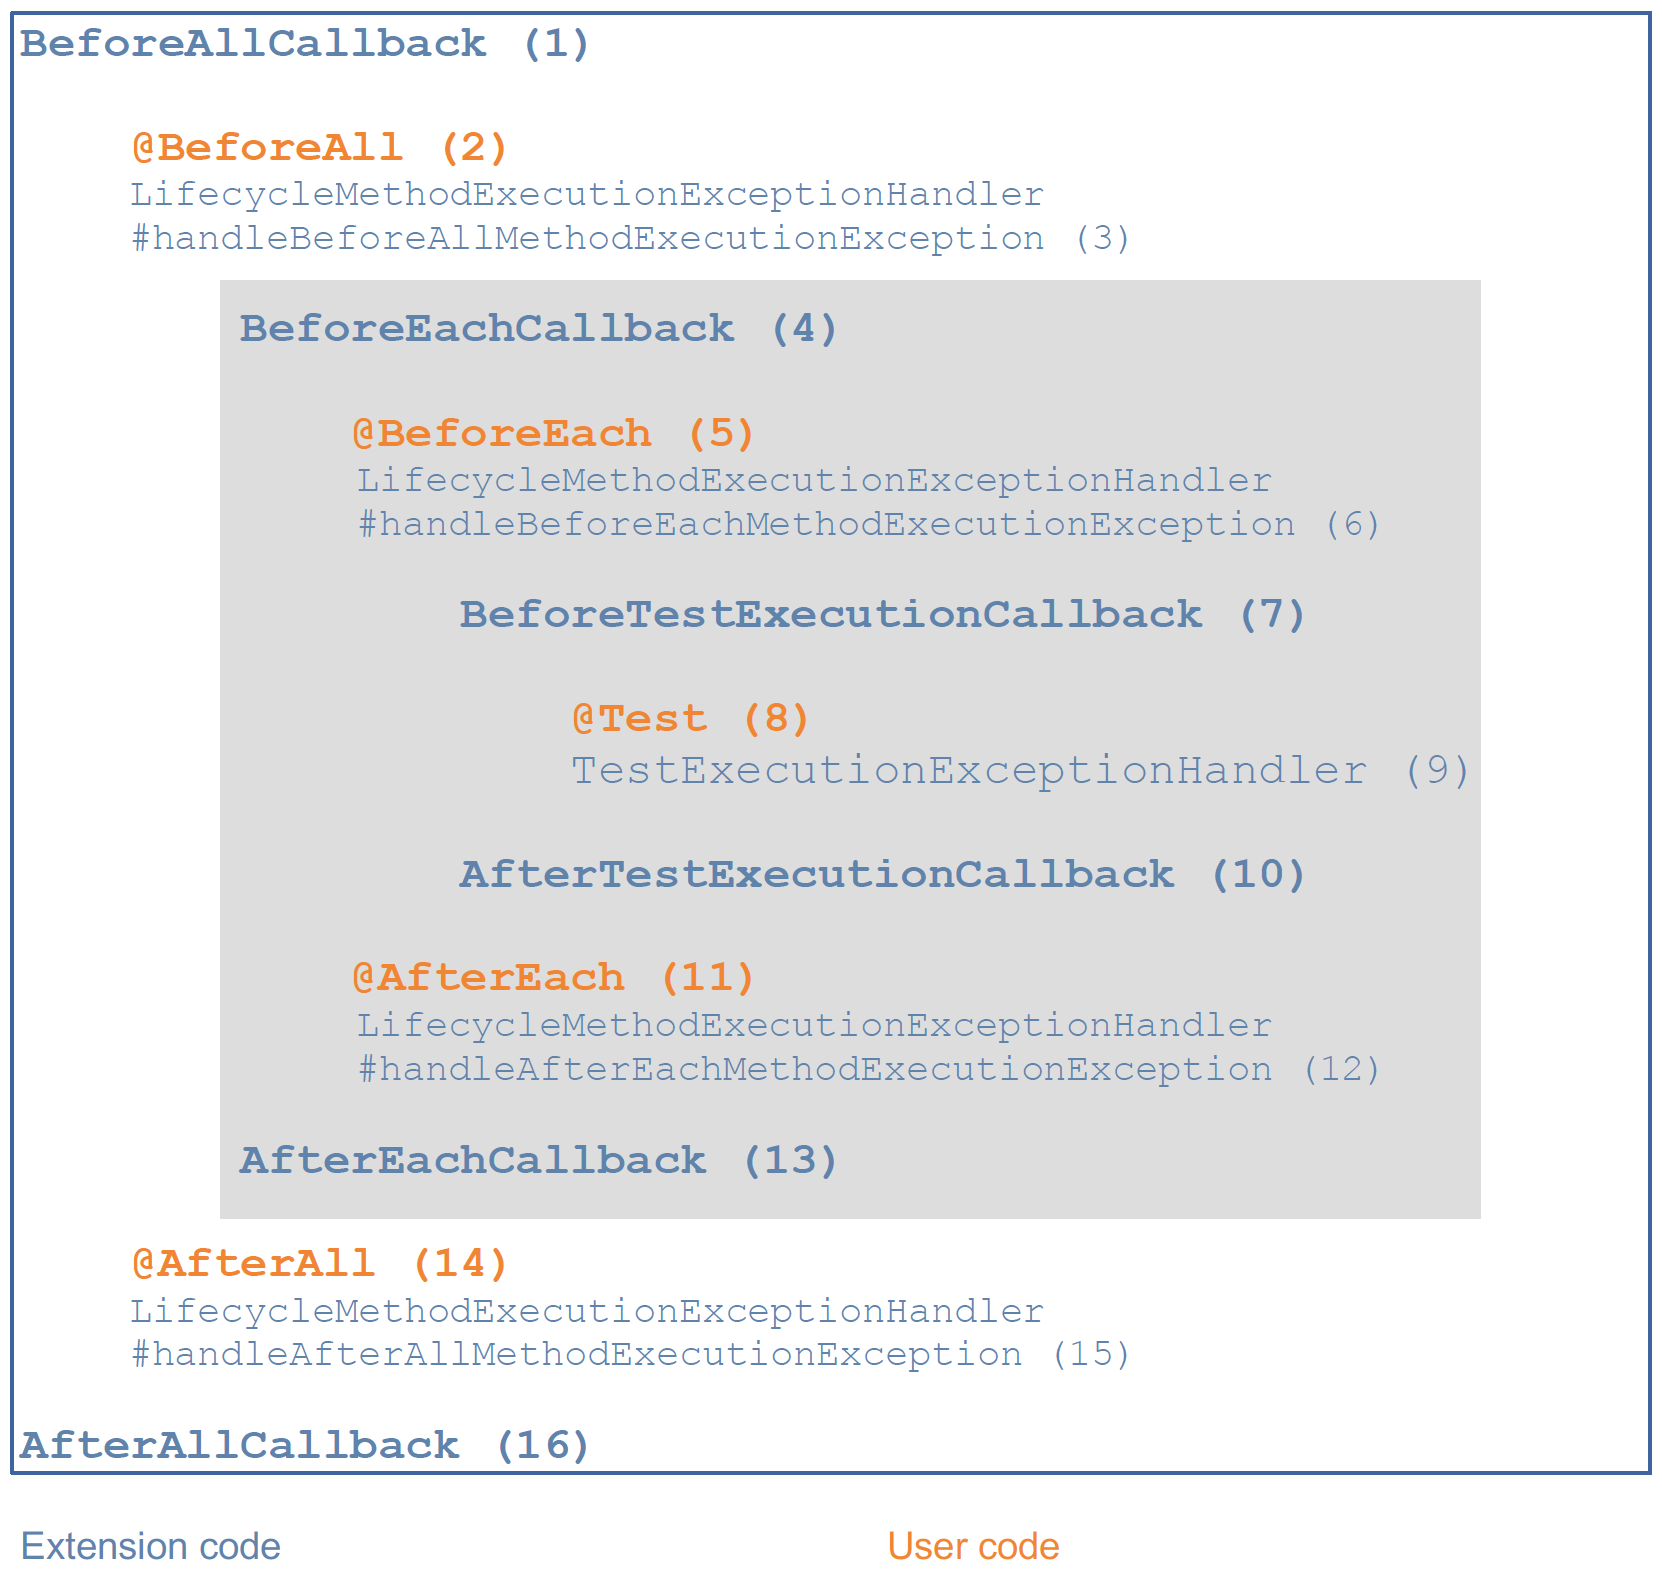
- 다음 표는 위 16개의 단계에 대한 설명이다.
| 단계 | 타입 | 구분 | FQCN 및 설명 |
|---|---|---|---|
| 1 | 인터페이스 | 익스텐션 | org.junit.jupiter.api.extension.BeforeAllCallback컨테이너의 모든 테스트가 실행되기 전에 실행되는 코드 |
| 2 | 애노테이션 | 사용자 | org.junit.jupiter.api.BeforeAll컨테이너의 모든 테스트가 실행되기 전에 실행되는 코드 |
| 3 | 인터페이스 | 익스텐션 | org.junit.jupiter.api.extension.LifecycleMethodExecutionExceptionHandler #handleBeforeAllMethodExecutionException@BeforeAll 메서드에서 발생한 예외를 처리하기 위한 코드 |
| 4 | 인터페이스 | 익스텐션 | org.junit.jupiter.api.extension.BeforeEachCallback각 테스트가 실행되기 전에 실행되는 코드 |
| 5 | 애노테이션 | 사용자 | org.junit.jupiter.api.BeforeEach각 테스트가 실행되기 전에 실행되는 코드 |
| 6 | 인터페이스 | 익스텐션 | org.junit.jupiter.api.extension.LifecycleMethodExecutionExceptionHandler #handleBeforeEachMethodExecutionException@BeforeEach 메서드에서 발생한 예외를 처리하기 위한 코드 |
| 7 | 인터페이스 | 익스텐션 | org.junit.jupiter.api.extension.BeforeTestExecutionCallback테스트 실행 직전에 실행되는 코드 |
| 8 | 애노테이션 | 사용자 | org.junit.jupiter.api.Test실제 테스트 메서드의 코드 |
| 9 | 인터페이스 | 익스텐션 | org.junit.jupiter.api.extension.TestExecutionExceptionHandler테스트 중에 발생한 예외를 처리하기 위한 코드 |
| 10 | 인터페이스 | 익스텐션 | org.junit.jupiter.api.extension.AfterTestExecutionCallback테스트 실행과 대응하는 예외 처리기 직후에 실행되는 코드 |
| 11 | 애노테이션 | 사용자 | org.junit.jupiter.api.AfterEach각 테스트가 실행된 이후에 실행되는 코드 |
| 12 | 인터페이스 | 익스텐션 | org.junit.jupiter.api.extension.LifecycleMethodExecutionExceptionHandler #handleAfterEachMethodExecutionException@AfterEach 메서드에서 발생한 예외를 처리하기 위한 코드 |
| 13 | 인터페이스 | 익스텐션 | org.junit.jupiter.api.extension.AfterEachCallback각 테스트가 실행된 이후 실행되는 코드 |
| 14 | 애노테이션 | 사용자 | org.junit.jupiter.api.AfterAll컨테이너의 모든 테스트가 실행된 후 실행되는 코드 |
| 15 | 인터페이스 | 익스텐션 | org.junit.jupiter.api.extension.LifecycleMethodExecutionExceptionHandler #handleAfterAllMethodExecutionException@AfterAll 메서드에서 발생한 예외를 처리하는 코드 |
| 16 | 인터페이스 | 익스텐션 | org.junit.jupiter.api.extension.AfterAllCallback컨테이너의 모든 테스트가 실행된 후 실행되는 코드 |
- 가장 단순한 경우에는 실제 테스트 메서드만 실행된다. (단계 8)
- 다른 모든 단계는 라이프사이클 콜백에 대응하는 사용자 또는 익스텐션 코드가 존재하는지에 따라 선택적(optional)이다.
- 다양한 라이프사이클 콜백에 대한 더 자세한 디테일은 각 애노테이션과 익스텐션의 Javadoc을 참조하라.
InvocationInterceptor를 구현하면 추가적으로 사용자 코드 메서드의 모든 호출을 가로챌 수도 있다.
콜백의 래핑 동작(Wrapping Behavior of Callbacks)
- JUnit은 라이프사이클 콜백(ex.
BeforeAllCallback,AfterAllCallback,BeforeEachCallback,AfterEachCallback,BeforeTestExecutionCallback,AfterTestExecutionCallback)을 구현한 익스텐션이 여러개 등록된 경우, 항상 래핑 동작(wrapping behavior)을 보장한다.Extension1이 등록된 후Extension2가 등록되었다고 가정하자.Extension1의 모든 사전(before) 콜백은Extension2의 모든 사전 콜백 이전에 실행된다.Extension1의 모든 사후(after) 콜백은Extension2의 모든 사후 콜백 이후에 실행된다.- 따라서,
Extenstion1이Extension2를 래핑한다.
- JUnit은 사용자 제공 라이프사이클 메서드에 대해, 클래스와 인터페이스 계층 구조에 안에서의 래핑 또한 보장한다.
@BeforeAll,@BeforeEach,@AfterEach,@AfterAll메서드는 부모 클래스 또는 인터페이스로부터 상속된다.- 단, 숨겨지거나(hidden) 오버라이드(overriden)되지 않았을 때에 한한다.
- 부모클래스(인터페이스)의
@BeforeAll메서드는 자식(구현) 클래스의@BeforeAll메서드 이전에 실행된다. - 부모클래스(인터페이스)의
@BeforeEach메서드는 자식(구현) 클래스의@BeforeEach메서드 이전에 실행된다. - 부모클래스(인터페이스)의
@AfterEach메서드는 자식(구현) 클래스의@AfterEach메서드 이후에 실행된다. - 부모클래스(인터페이스)의
@AfterAll메서드는 자식(구현) 클래스의@AfterAll메서드 이후에 실행된다.
- 다음 예시가 이와 같은 동작을 보여준다.
public class Extension1 implements BeforeEachCallback, AfterEachCallback {

    @Override
    public void beforeEach(ExtensionContext context) {
        beforeEachCallback(this);
    }

    @Override
    public void afterEach(ExtensionContext context) {
        afterEachCallback(this);
    }
}
public class Extension2 implements BeforeEachCallback, AfterEachCallback {
@Override
public void beforeEach(ExtensionContext context) {
beforeEachCallback(this);
}
@Override
public void afterEach(ExtensionContext context) {
afterEachCallback(this);
}
}abstract class AbstractDatabaseTests {
@BeforeAll
static void createDatabase() {
beforeAllMethod(AbstractDatabaseTests.class.getSimpleName() + ".createDatabase()");
}
@BeforeEach
void connectToDatabase() {
beforeEachMethod(AbstractDatabaseTests.class.getSimpleName() + ".connectToDatabase()");
}
@AfterEach
void disconnectFromDatabase() {
afterEachMethod(AbstractDatabaseTests.class.getSimpleName() + ".disconnectFromDatabase()");
}
@AfterAll
static void destroyDatabase() {
afterAllMethod(AbstractDatabaseTests.class.getSimpleName() + ".destroyDatabase()");
}
}@ExtendWith({ Extension1.class, Extension2.class })
class DatabaseTestsDemo extends AbstractDatabaseTests {
@BeforeAll
static void beforeAll() {
beforeAllMethod(DatabaseTestsDemo.class.getSimpleName() + ".beforeAll()");
}
@BeforeEach
void insertTestDataIntoDatabase() {
beforeEachMethod(getClass().getSimpleName() + ".insertTestDataIntoDatabase()");
}
@Test
void testDatabaseFunctionality() {
testMethod(getClass().getSimpleName() + ".testDatabaseFunctionality()");
}
@AfterEach
void deleteTestDataFromDatabase() {
afterEachMethod(getClass().getSimpleName() + ".deleteTestDataFromDatabase()");
}
@AfterAll
static void afterAll() {
beforeAllMethod(DatabaseTestsDemo.class.getSimpleName() + ".afterAll()");
}
}DatabaseTestsDemo테스트 클래스의 실행결과는 다음과 같다:
@BeforeAll AbstractDatabaseTests.createDatabase()
@BeforeAll DatabaseTestsDemo.beforeAll()
  Extension1.beforeEach()
  Extension2.beforeEach()
    @BeforeEach AbstractDatabaseTests.connectToDatabase()
    @BeforeEach DatabaseTestsDemo.insertTestDataIntoDatabase()
      @Test DatabaseTestsDemo.testDatabaseFunctionality()
    @AfterEach DatabaseTestsDemo.deleteTestDataFromDatabase()
    @AfterEach AbstractDatabaseTests.disconnectFromDatabase()
  Extension2.afterEach()
  Extension1.afterEach()
@BeforeAll DatabaseTestsDemo.afterAll()
@AfterAll AbstractDatabaseTests.destroyDatabase()- 이를 시퀀스 다이어그램으로 표현하면 다음과 같다:
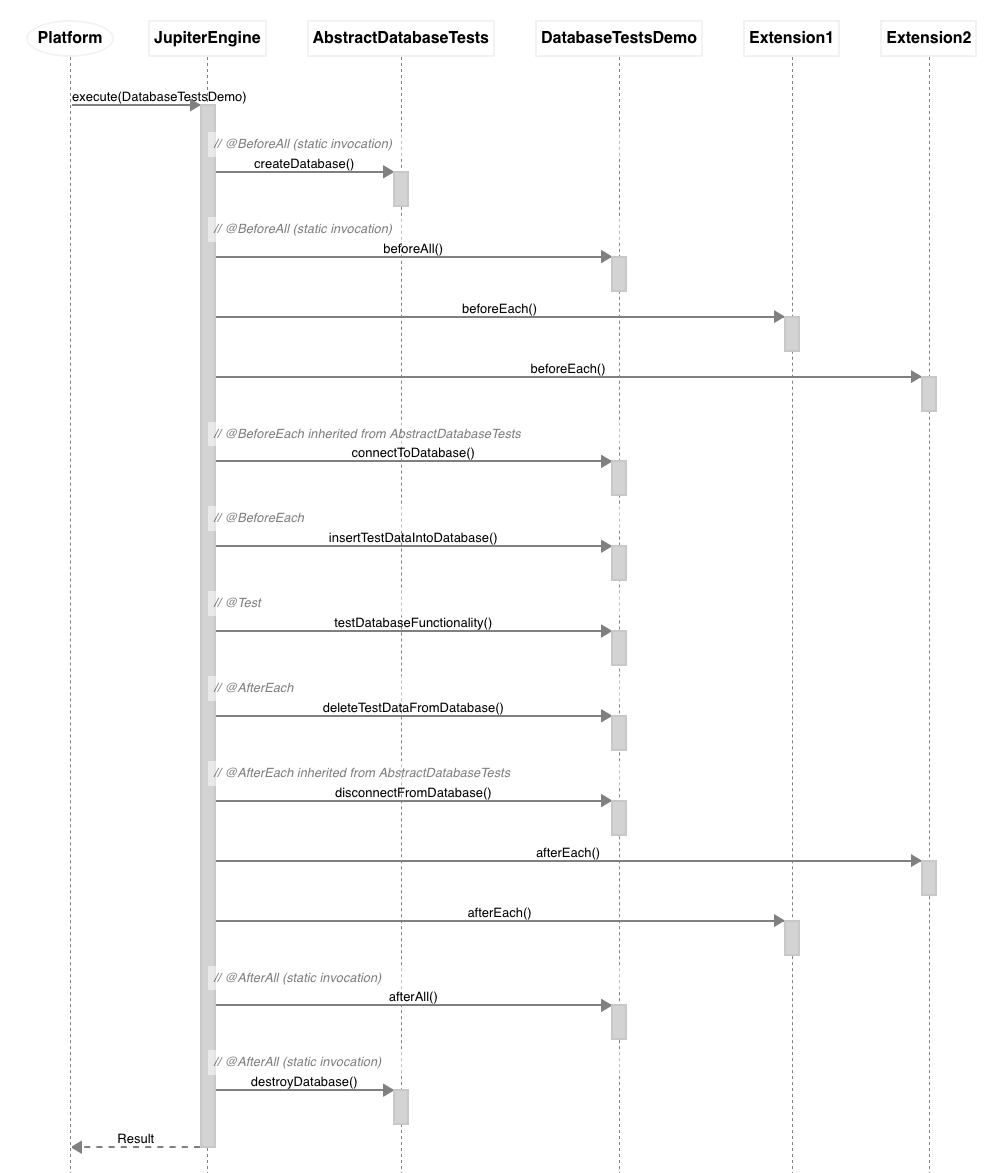
-
JUnit은 하나의 테스트 클래스 또는 인터페이스에 선언되어있는 라이프사이클 메서드가 여러개일 경우 실행 순서를 보장하지 않는다.
@Test메서드의 실행 순서가 결정되는 것과 유사하다.- 실행 순서는 어떤 알고리즘에 의해 결정적(deterministic)이지만 자명하지 않게(non-obvious) 결정된다.
-
JUnit은 하나의 테스트 클래스 또는 인터페이스에 선언되어있는 라이프사이클 메서드가 여러개일 경우 래핑을 지원하지 않는다.
-
따라서 라이프사이클 메서드간에 의존성이 없다면, 하나의 테스트 클래스 또는 인터페이스에 대해 최대 한 개의 라이프사이클 메서드만 선언하는 것을 추천한다.
-
다음 예시는 지역적으로 선언된 라이프사이클 메서드의 실행 순서로 인해 라이프사이클 메서드 구성이 깨진(broken) 경우의 동작을 보여준다.
@ExtendWith({ Extension1.class, Extension2.class })
class BrokenLifecycleMethodConfigDemo {

    @BeforeEach
    void connectToDatabase() {
        beforeEachMethod(getClass().getSimpleName() + ".connectToDatabase()");
    }

    @BeforeEach
    void insertTestDataIntoDatabase() {
        beforeEachMethod(getClass().getSimpleName() + ".insertTestDataIntoDatabase()");
    }

    @Test
    void testDatabaseFunctionality() {
        testMethod(getClass().getSimpleName() + ".testDatabaseFunctionality()");
    }

    @AfterEach
    void deleteTestDataFromDatabase() {
        afterEachMethod(getClass().getSimpleName() + ".deleteTestDataFromDatabase()");
    }

    @AfterEach
    void disconnectFromDatabase() {
        afterEachMethod(getClass().getSimpleName() + ".disconnectFromDatabase()");
    }
}BrokenLifecycleMethodConfigDemo테스트 클래스의 실행결과는 다음과 같다:
Extension1.beforeEach()
Extension2.beforeEach()
  @BeforeEach BrokenLifecycleMethodConfigDemo.insertTestDataIntoDatabase()
  @BeforeEach BrokenLifecycleMethodConfigDemo.connectToDatabase()
    @Test BrokenLifecycleMethodConfigDemo.testDatabaseFunctionality()
  @AfterEach BrokenLifecycleMethodConfigDemo.disconnectFromDatabase()
  @AfterEach BrokenLifecycleMethodConfigDemo.deleteTestDataFromDatabase()
Extension2.afterEach()
Extension1.afterEach()- 이를 시퀀스 다이어그램으로 표현하면 다음과 같다:
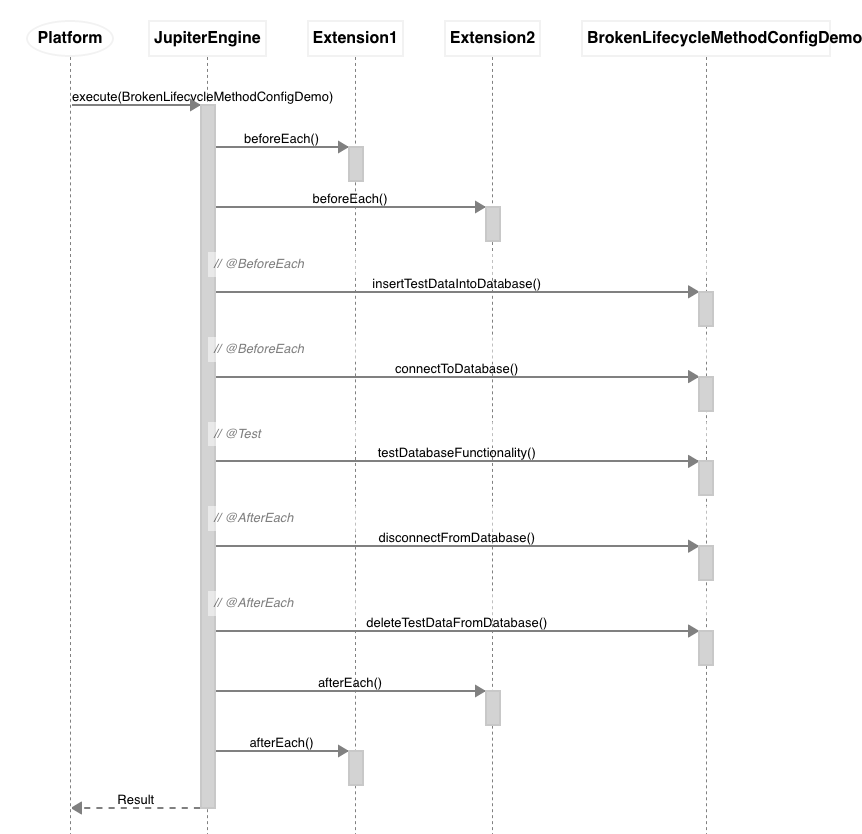

wow... 잘 읽고갑니다