3에서 사용한 네이버 api로 검색 목록을 구현하자!
홈 화면 -> 검색 목록

홈 화면에서 검색바에 내용을 입력하면 그 내용에 해당하는 책 목록을 보여주도록 한다.
먼저 홈 화면 html에서 이 부분을 살펴보자
<p th:if="${errorMessage}" th:text="${errorMessage}" style="color: red;"></p>
<form action="/list/Booklist" method="GET" class="input-group mb-3 align-items-center" style="height: 3rem; ">
<input type="text" name="query" class="form-control" placeholder="책 검색..." aria-label="책 검색" aria-describedby="button-addon">
<button class="btn btn-primary btn-bd-primary" type="submit" id="button-addon">검색</button>
</form>
버튼을 클릭하면 "/list/Booklist"라는 GetMapping 메서득 실행되고,
에러가 존재하면 {errorMessage}에 에러 내용을 담아서 전달하는 것을 알 수 있다.
해당 "/list/Booklist"
   @GetMapping("list/Booklist")
    public String list(@RequestParam(required = false, value = "query") String text, @RequestParam(value = "page", defaultValue = "1") int page, Model model) {
        try {
            log.info("BookListController - list 메서드 실행");

            if (text == null || text.trim().isEmpty()) {
                // 검색어가 비어 있는 경우
                model.addAttribute("errorMessage", "다시 입력해주세요.");
                return "home/home"; // 홈으로 리다이렉트
            }

            //api 응답 본문 string 형식으로 가져옴
            String responseBody = naverApiService.BookListPaging(text, page);

            // JSON 파싱 객체 생성 (Json 문자열을 객체로 만듦, 문서화)
            ObjectMapper om = new ObjectMapper();
            try {
                //readValue 메서드 -> JSON 문자열을 'Search_ResultVO' 객체로 변환
                Search_ResultVO resultVO = om.readValue(responseBody, Search_ResultVO.class);

                log.info("resultVO 객체 total = {}", resultVO.getTotal());

                List<BookItem> books = resultVO.getItems();
                model.addAttribute("books", books);

                // 총 책 수를 모델에 추가
                model.addAttribute("totalBooks", resultVO.getTotal());

                // 현재 페이지 번호를 모델에 추가하여 뷰로 전달
                model.addAttribute("currentPage", page);

                model.addAttribute("query", text);

                // 총 페이지 수를 모델에 추가하여 뷰로 전달
                int display = 10;
                int totalPages = (resultVO.getTotal() + display - 1) / display;
                log.info("totalPages = {}", totalPages);
                model.addAttribute("totalPages", totalPages);

            } catch (JsonMappingException e) {
                log.error("JSON 매핑 중 오류 발생 : {}", e.getMessage());
                e.printStackTrace();
            } catch (JsonProcessingException e) {
                log.error("JSON 처리 중 오류 발생 : {}", e.getMessage());
                e.printStackTrace();
            }
            log.info("책 목록입니다.");
            return "list/Booklist";

        } catch (Exception e) {
            // 예외 처리
            model.addAttribute("errorMessage", "다시 입력해주세요.");
            return "/home/home"; // 홈 페이지로 이동하는 뷰 이름을 반환합니다.
        }
    }
빈 값을 입력했을 경우 "다시 입력해주세요"라는 메세지를 빨간 글씨로 보여준다.
제대로 입력이 되었을 경우에는 naverApiService.BookListPaging(text, page)를 통해 응답 본문을 받아온 후 그 문자열을 Search_ResultVO 객체로 변환 후 값을 보여준다.
naverApiService.BookListPaging - 페이징 처리 메서드
    @Transactional
    public String BookListPaging(String text, int page) {

        //한 페이지에 표시할 결과 수
        int display = 10;

        //검색 시작 위치 계산
        int start = (page - 1) * display + 1;

        //String apiURL = "https://openapi.naver.com/v1/search/blog?query=" + text;    // JSON 결과
        URI uri = UriComponentsBuilder
                .fromUriString("https://openapi.naver.com")
                .path("/v1/search/book.json")
                .queryParam("query", text)
                .queryParam("display", display)
                .queryParam("start", start)
                .queryParam("sort", "sim")
                .encode()
                .build()
                .toUri();

        // Spring 요청 제공 클래스, HTTP 요청 생성
        RequestEntity<Void> req = RequestEntity
                .get(uri)
                .header("X-Naver-Client-Id", clientId)
                .header("X-Naver-Client-Secret", clientSecret)
                .build();

        // Spring 제공 restTemplate, 요청한 HTTP를 통해 응답을 받음
        RestTemplate restTemplate = new RestTemplate();

        //exchange를 통해 요청을 실행하고 응답으로 ResponseEntity<String>을 받음 (String - 응답의 본문)
        ResponseEntity<String> resp = restTemplate.exchange(req, String.class);

        //받은 응답 본문을 문자열로 받아옴
        String responseBody = resp.getBody();

        return responseBody;
    }
Search_ResultBookVO - 네이버 검색 API로 넘어오는
JSON 값을 담기 위해 사용되는 DTO 객체
package Book_Toy_Project.BOOK.api;

import Book_Toy_Project.BOOK.Entity.BookItem;
import lombok.*;

import java.util.List;

/**
 * Search_ResultVO -> 네이버 검색 API로 넘어오는 JSON 값을 담기 위해 사용되는 DTO 객체
 * API 응답 데이터 매핑, 응답 데이터 관리, 간편한 데이터 접근
 */
@ToString
@NoArgsConstructor
@AllArgsConstructor
@Getter @Setter
public class Search_ResultVO {
    private String lastBuildDate;
    private int total;
    private int start;
    private int display;
    private List<BookItem> items;
}
검색 목록 화면
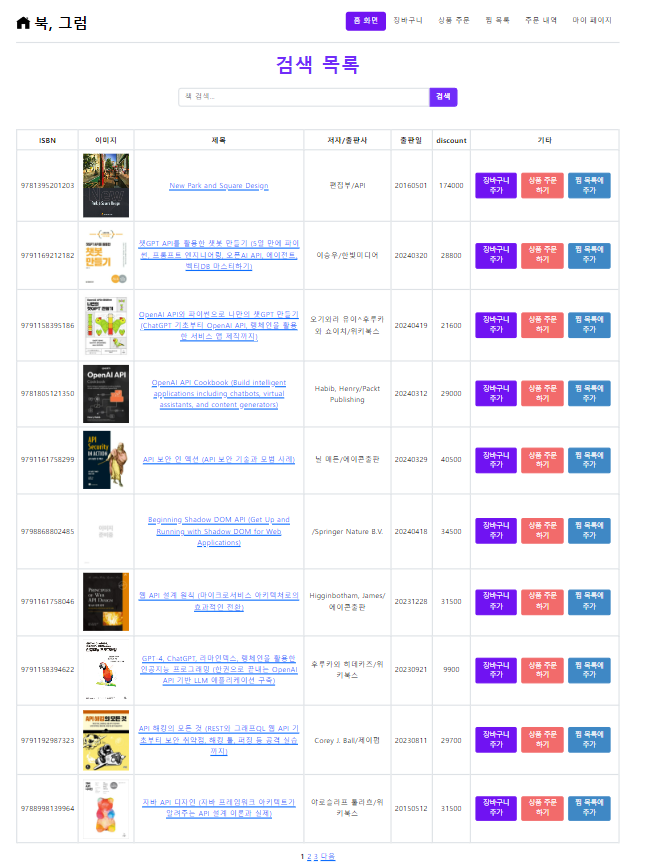
이런식으로 만약 내가 api를 검색하였을 때 해당하는 책을 isbn, 이미지, 제목, 저자/출판사, 출판일, discount,기타(장바구니 추가, 상품 주문하기, 찜 목록에 추가) 순으로
차례대로 뽑도록 하였다.
책 목록
      <!-- 수정 후 코드 -->
      <tr th:each="book:${books}">
        <td>[[${book.isbn}]]</td>
        <td><img th:src="${book.image}" th:alt="${book.title}" width="100"></td>
        <td><a th:href="${book.link}">[[${book.title}]]</a></td>
        <td>[[${book.author}]]/[[${book.publisher}]]</td>
        <td>[[${book.pubdate}]]</td>
        <td>[[${book.discount}]]</td>
        <td style="text-align: center">
          <div class="d-flex justify-content-center text-center align-items-center">
            <!-- 장바구니에 추가 버튼 -->
            <form id = "BookListForm1" action="/home/basket" method="GET">
            <button id="BookListButton1" class="btn btn-primary btn-sm btn-fixed-width" style="margin-right: 10px; background-color: #7013F2; border-color: #7013F2; color: white;">장바구니 추가</button>
              <input type="hidden" id="BookListId1" name="isbn" th:value="${book.isbn}">
            </form>

            <!-- 상품 주문 버튼-->
            <form id = "BookListForm2" action="/BooklistToOrderBook" method="GET">
              <button id="BookListButton2" class="btn btn-primary btn-sm btn-fixed-width" style="margin-right: 10px; background-color: #F26B6B; border-color: #F26B6B; color: white;">상품 주문 하기</button>
              <input type="hidden" id="BookListId2" name="isbn" th:value="${book.isbn}">
            </form>


            <!-- 찜 목록 추가 버튼 -->
            <form id = "BookListForm3" action="/savedBookinWishlist" method="GET">
              <button id="BookListButton3" class="btn btn-primary btn-sm btn-fixed-width" style="margin-right: 10px; background-color: #3F88C5; border-color: #3F88C5; color: white;">찜 목록에 추가</button>
              <input type="hidden" id="BookListId3" name="isbn" th:value="${book.isbn}">
            </form>
          </div>
        </td>
      </tr>
넘어온 book 객체의 내용들을 추출하기 위해 반복문을 통해 하나씩 뽑아준다.
페이징
<!-- 페이지네이션 -->

<!-- 페이지 번호 링크 -->
<div style="text-align: center;">

  <!-- 이전 버튼 -->
  <a th:if="${currentPage > 1}" th:href="@{/list/Booklist(query=${query},page=${currentPage - 1})}">이전</a>

  <!-- 현재 페이지 주변의 페이지 번호 -->
  <span th:each="pageNumber : ${#numbers.sequence((currentPage - 2 > 0 ? currentPage - 2 : 1), (currentPage + 2 <= totalPages ? currentPage + 2 : totalPages))}">
        <a th:if="${pageNumber != currentPage}" th:href="@{/list/Booklist(query=${query},page=${pageNumber})}" th:text="${pageNumber}"></a>
        <span th:if="${pageNumber == currentPage}" th:text="${pageNumber}" style="font-weight: bold;"></span>
    </span>

  <!-- 다음 버튼 -->
  <a th:if="${currentPage < totalPages}" th:href="@{/list/Booklist(query=${query},page=${currentPage+1})}">다음</a>
</div>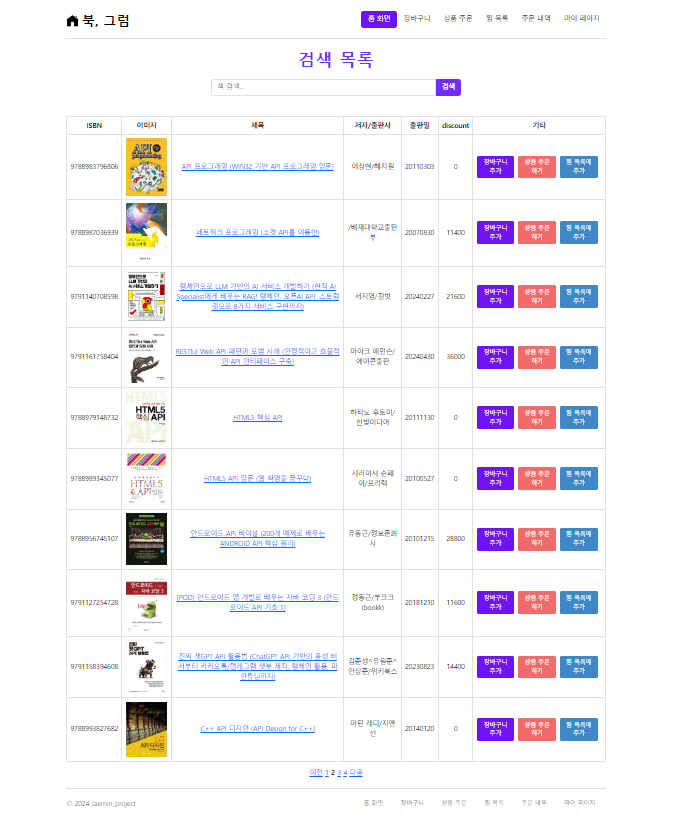
2페이지를 눌렀을 때 잘 넘어가고 밑에 번호가 잘 이동되었으면 성공!

복학생의 개발 일기